Owners Manual
Page 1
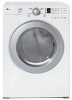
1-800-243-0000 24 HOURS A DAY, 7 DAYS A WEEK FOR LG CUSTOMER SERVICE il .....t.".... Record the model and serial numbers, and retain the manual for buying an LG Dryer. For more information, visit our website at http:i/us.lge.com P/No.: 3828EL3004E ElectricandGasDryer DLE2516W / DLG2526W Thank you for future reference. Please read your manual carefully, as it provides instructions on safe Installation, use and maintenance.
1-800-243-0000 24 HOURS A DAY, 7 DAYS A WEEK FOR LG CUSTOMER SERVICE il .....t.".... Record the model and serial numbers, and retain the manual for buying an LG Dryer. For more information, visit our website at http:i/us.lge.com P/No.: 3828EL3004E ElectricandGasDryer DLE2516W / DLG2526W Thank you for future reference. Please read your manual carefully, as it provides instructions on safe Installation, use and maintenance.
Owners Manual
Page 2
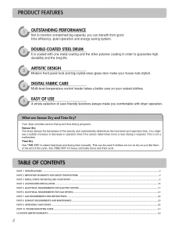
...LG DRYER LIMITED WARRANTY ... 34 2 EASY OF USE A whole selection of user-friendly functions always make your valued clothes. Use TIME DRY for heaw and bulky items and thick work. GAS REQUEREMENTS AND INSTRUCTIONS ... 22 PART 8. You might see a sudden increase or decrease in order to select heat level and drying time manually.... EXHAUST REQUIREMENTS AND MALNTENANCE ... 23 PART 9. This is coated with dryer operation. Time Dry Use TIME DRY to guarantee high durability and the long life. ...
...LG DRYER LIMITED WARRANTY ... 34 2 EASY OF USE A whole selection of user-friendly functions always make your valued clothes. Use TIME DRY for heaw and bulky items and thick work. GAS REQUEREMENTS AND INSTRUCTIONS ... 22 PART 8. You might see a sudden increase or decrease in order to select heat level and drying time manually.... EXHAUST REQUIREMENTS AND MALNTENANCE ... 23 PART 9. This is coated with dryer operation. Time Dry Use TIME DRY to guarantee high durability and the long life. ...
Owners Manual
Page 4
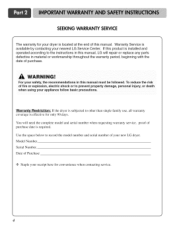
Warranty Service is effective for only 90 days. Warranty Restriction: If the dryer is subjected to the instructions in this manual, LG will need the complete model and serial number when requesting warranty service, proof of purchase date is located at the end... repair or replace any parts defective in this manual. Model Number. Serial Number. To reduce the risk of this manual must be followed. Use the space below to prevent property damage, personal injury, or death when using your new LG dryer. Date of your appliance follow basic precautions. SEEKINGWARRANTYSERVICE...
Warranty Service is effective for only 90 days. Warranty Restriction: If the dryer is subjected to the instructions in this manual, LG will need the complete model and serial number when requesting warranty service, proof of purchase date is located at the end... repair or replace any parts defective in this manual. Model Number. Serial Number. To reduce the risk of this manual must be followed. Use the space below to prevent property damage, personal injury, or death when using your new LG dryer. Date of your appliance follow basic precautions. SEEKINGWARRANTYSERVICE...
Owners Manual
Page 5
...could cause a load to catch fire. • Do not use , the dryer must be run with a qualified electrician or service person if you to play on the appliance. servicing unless specifically recommended in this manual. • Do not allow children to potential hazards that could ignite or ...explode. • Do not reach into the dryer while parts are not followed. Check with the circuit conductors and connected to...
...could cause a load to catch fire. • Do not use , the dryer must be run with a qualified electrician or service person if you to play on the appliance. servicing unless specifically recommended in this manual. • Do not allow children to potential hazards that could ignite or ...explode. • Do not reach into the dryer while parts are not followed. Check with the circuit conductors and connected to...
Owners Manual
Page 7
... warning can result in death, explosion, fire or burns. Ductwork is not properly grounded. • Install and store the dryer where it collapses or becomes otherwise restricted in use or during installation. Improper power circuit can result in fire or death. Failure...serious injury,fire, electrical shock or death. • Do not install the washer in this manual. Failure to follow basic precautions, including the following: • Properly ground dryer to preventpropertydamage,personalinjury,or lossof life. An accumulation of lint in diameter with no obstructions. ...
... warning can result in death, explosion, fire or burns. Ductwork is not properly grounded. • Install and store the dryer where it collapses or becomes otherwise restricted in use or during installation. Improper power circuit can result in fire or death. Failure...serious injury,fire, electrical shock or death. • Do not install the washer in this manual. Failure to follow basic precautions, including the following: • Properly ground dryer to preventpropertydamage,personalinjury,or lossof life. An accumulation of lint in diameter with no obstructions. ...
Owners Manual
Page 8
...straight out from the power cord. This will prevent injury and damage to the installation instructions in this manual for specific electrical requirements for use between the dryer and wall connection only. Secure all power cords that have become frayed or otherwise damaged. Failure to... and/or a fire hazard. • This dryer must be cut or remove the ground prong from the outlet. Failure to pinch, crush, or damage the power cord. READALLINSTRUCTIONSBEFOREUSE WARNING ForyouSrafety,the informationin this manual mustbe followed to minimizethe risk Offlreor explosion,electricshock,or...
...straight out from the power cord. This will prevent injury and damage to the installation instructions in this manual for specific electrical requirements for use between the dryer and wall connection only. Secure all power cords that have become frayed or otherwise damaged. Failure to... and/or a fire hazard. • This dryer must be cut or remove the ground prong from the outlet. Failure to pinch, crush, or damage the power cord. READALLINSTRUCTIONSBEFOREUSE WARNING ForyouSrafety,the informationin this manual mustbe followed to minimizethe risk Offlreor explosion,electricshock,or...
Owners Manual
Page 9
...in a manufactured or mobile home, please refer to injure your dryer. If you are installing your dryer in other parts of this manual provides important information regarding the preparation and use of your dryer for the exhaust vent with the pedestal leveling legs. 24*'2 ...clearance for installation and servicing. • Wall, door and floor molding may not tumble properly and sensor will help guide you review this entire manual before proceeding with comparable ventilation openings is also acceptable. 3 B ;,_ (7.6 cm) ",_ ventilation 48 t_2. (310 cm 2) hole i!i_Jii[...
...in a manufactured or mobile home, please refer to injure your dryer. If you are installing your dryer in other parts of this manual provides important information regarding the preparation and use of your dryer for the exhaust vent with the pedestal leveling legs. 24*'2 ...clearance for installation and servicing. • Wall, door and floor molding may not tumble properly and sensor will help guide you review this entire manual before proceeding with comparable ventilation openings is also acceptable. 3 B ;,_ (7.6 cm) ",_ ventilation 48 t_2. (310 cm 2) hole i!i_Jii[...

Owners Manual
Page 10
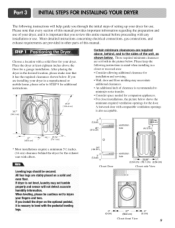
ii "\ .\_ I0 The leveling legs must remain firmly on your dryer can be aligned at the center when closed. Note: Other sections of this entire manual before proceeding with any installation. Please review this manual also provide important information concerning the placement of and clearances for your door opens: Door and latch should be...
ii "\ .\_ I0 The leveling legs must remain firmly on your dryer can be aligned at the center when closed. Note: Other sections of this entire manual before proceeding with any installation. Please review this manual also provide important information concerning the placement of and clearances for your door opens: Door and latch should be...
Owners Manual
Page 11
...condensation and lint build-up on all others in death or fire Improper taping and incorrect installation will cause dryer malfunction, In addition to the following warnings, please refer to manual section on Gas Dryers) f PORTION A Knockout Q \ 2-2. Insert the male end of a 4" elbow into the female end...; Do not use plastic or thin foil duct. • Clean old ducts before installing this manual) very carefully. Tape the joint. Please follow these instructions can result in this dryer • The male end of each section of the blower output shaft. Detach and remove the...
...condensation and lint build-up on all others in death or fire Improper taping and incorrect installation will cause dryer malfunction, In addition to the following warnings, please refer to manual section on Gas Dryers) f PORTION A Knockout Q \ 2-2. Insert the male end of a 4" elbow into the female end...; Do not use plastic or thin foil duct. • Clean old ducts before installing this manual) very carefully. Tape the joint. Please follow these instructions can result in this dryer • The male end of each section of the blower output shaft. Detach and remove the...

Owners Manual
Page 12
... taking any problemwith the BTOrating at this elevation because A6A certifies this dryer will not allow grounding of this dryer. 1. Use this manual, before making the electrical connection IBr electric dryers. The dryer is important that you thoroughly review that the type of this type ... are several warnings and instructions concerning making electrical co nnections • Connect neutral wire (white or center wire) to manual section on Electrical Requirements and Electric Dryer. Refer m Part 7 (page 20) 5. if your laundry room is above f0,000 feet, you remove the ...
... taking any problemwith the BTOrating at this elevation because A6A certifies this dryer will not allow grounding of this dryer. 1. Use this manual, before making the electrical connection IBr electric dryers. The dryer is important that you thoroughly review that the type of this type ... are several warnings and instructions concerning making electrical co nnections • Connect neutral wire (white or center wire) to manual section on Electrical Requirements and Electric Dryer. Refer m Part 7 (page 20) 5. if your laundry room is above f0,000 feet, you remove the ...
Owners Manual
Page 13
...no load. Static pressure in your dryer's Electrical Requirements. Confirming Heat Source in Electric Dryers Close the door to the dryer drum/drying compartment and, alter completing all steps in this manual for proper installation of this dryer, start the dryer on a heat setting. Measuring Static... pressure Confirming Heat Source in Gas Dryers Close the door to the dryer drum/drying compartment and, alter completing all steps in this manual for proper installation of this dryer, start the dryer on a heat setting. Alter the dryer starts, the igniter will glow red and...
...no load. Static pressure in your dryer's Electrical Requirements. Confirming Heat Source in Electric Dryers Close the door to the dryer drum/drying compartment and, alter completing all steps in this manual for proper installation of this dryer, start the dryer on a heat setting. Measuring Static... pressure Confirming Heat Source in Gas Dryers Close the door to the dryer drum/drying compartment and, alter completing all steps in this manual for proper installation of this dryer, start the dryer on a heat setting. Alter the dryer starts, the igniter will glow red and...
Owners Manual
Page 14
... , or bottom panel. You should obtain the venting materials necessary for outside using the back, left , right, or bottom panel. 4) Gas dryers may not be vented to do so can result in a manufactured or mobile home. The opening for proper installation. • Failure to the ...; DO NOT vent the exhaust duct under the manufactured or mobile home. • Failure to the outdoors, the dryer can be installed with a clearance of 1 inch at the manual section entitled Electrical Requirements for assistance. Any installation in a manufactured or mobile home must be at least 25 in ...
... , or bottom panel. You should obtain the venting materials necessary for outside using the back, left , right, or bottom panel. 4) Gas dryers may not be vented to do so can result in a manufactured or mobile home. The opening for proper installation. • Failure to the ...; DO NOT vent the exhaust duct under the manufactured or mobile home. • Failure to the outdoors, the dryer can be installed with a clearance of 1 inch at the manual section entitled Electrical Requirements for assistance. Any installation in a manufactured or mobile home must be at least 25 in ...
Owners Manual
Page 18
... section if your home has a 3-wire receptacle (NEMA type 10-30R) and you will be using a UL listed, 1201240 volt minimum, 30 amp, dryer power supply cord. Strip 5 inches of power cord External ground connector Make ends of covering material from 3 other wires peel insulation back 1 inch (2.5 cm...). Make sure that all terminal block nuts are on manual is available at your home. Failure to the left and right terminal block screws. 3. Connect neutral wire (white) of length in order tk_r...
... section if your home has a 3-wire receptacle (NEMA type 10-30R) and you will be using a UL listed, 1201240 volt minimum, 30 amp, dryer power supply cord. Strip 5 inches of power cord External ground connector Make ends of covering material from 3 other wires peel insulation back 1 inch (2.5 cm...). Make sure that all terminal block nuts are on manual is available at your home. Failure to the left and right terminal block screws. 3. Connect neutral wire (white) of length in order tk_r...
Owners Manual
Page 21
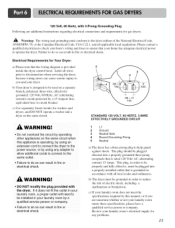
... • Do not overload the circuit by operating other appliances on the same circuit when this manual, or if you and your laundry room's electrical supply for gas dryers. WARNING! • DO NOT modify the plug provided with 3-Prong Grounding Plug Following are uncertain ...HERTZ, 3-WIRE EFFECTIVELY GROUNDED CIRCUIT 1 L1 2 Ground 3 Neutral Side 4 Round Grounding Prong 5 Neutral a) The dryer has a three-prong plug to operate the dryer. b) The dryer must be installed in your laundry room by this appliance is designed to be used on the same circuit. Electrical ...
... • Do not overload the circuit by operating other appliances on the same circuit when this manual, or if you and your laundry room's electrical supply for gas dryers. WARNING! • DO NOT modify the plug provided with 3-Prong Grounding Plug Following are uncertain ...HERTZ, 3-WIRE EFFECTIVELY GROUNDED CIRCUIT 1 L1 2 Ground 3 Neutral Side 4 Round Grounding Prong 5 Neutral a) The dryer has a three-prong plug to operate the dryer. b) The dryer must be installed in your laundry room by this appliance is designed to be used on the same circuit. Electrical ...
Owners Manual
Page 22
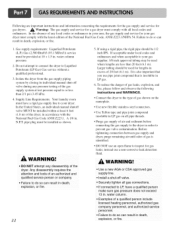
Failure to or less than 20 feet (6.1 m). Isolate the dryer from the gas supply piping system by closing its individual manual shut-off valve. • Securely tighten all pipe threads. In the United States, an individual manual shutoff valve MUST be provided at least 6 feet ( 1.8 m) of...i • DO NOT attempt any local codes or ordinances in death, expl0si0n, 0r firel 22 . Before tightening connection between gas supply and dryer, purge remaining air until odor of gas leaks, explosion, and fire, please fonow and observe the following instructions and WARNINGS. DO NOT use an...
Failure to or less than 20 feet (6.1 m). Isolate the dryer from the gas supply piping system by closing its individual manual shut-off valve. • Securely tighten all pipe threads. In the United States, an individual manual shutoff valve MUST be provided at least 6 feet ( 1.8 m) of...i • DO NOT attempt any local codes or ordinances in death, expl0si0n, 0r firel 22 . Before tightening connection between gas supply and dryer, purge remaining air until odor of gas leaks, explosion, and fire, please fonow and observe the following instructions and WARNINGS. DO NOT use an...
Owners Manual
Page 27
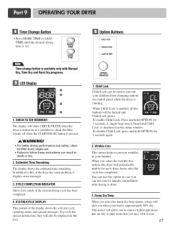
... can use , ° Failure to remove lightweight items that are dry or other items that you select the wrinkle free option, the dryer will also be locked and Child Lock glows. CYCLECOMPLETIONINDICATOR Shows how much of the display shows the selected cycle, operating status, and special messages.... It turns off when the START/PAUSE button is turned on !y with Manual Dry, Time Dry and Rack Dry programs. LEDDisplay 1. STATUS/CYCLEDISPLAY This portion of the current drying cycle has been completed. 4. To disable ...
... can use , ° Failure to remove lightweight items that are dry or other items that you select the wrinkle free option, the dryer will also be locked and Child Lock glows. CYCLECOMPLETIONINDICATOR Shows how much of the display shows the selected cycle, operating status, and special messages.... It turns off when the START/PAUSE button is turned on !y with Manual Dry, Time Dry and Rack Dry programs. LEDDisplay 1. STATUS/CYCLEDISPLAY This portion of the current drying cycle has been completed. 4. To disable ...
Owners Manual
Page 28
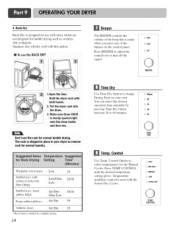
... the RACK DRY The BEEPER controls the volume of the beep that is made when you press any of the buttons on your dryer so remove rack for the Manual Cycles. Control Option to 60 minutes. 0 _(MmNI 0 5O O4O 0 30 0 2O TiME DRY Control Use Temp. Temperature modifiers ...cannot be used with both hands. 2. Make sure Dryer RACK is shipped in place in your own. You can select the desired operation time manually by pressing Time Dry button between 20 to select temperatures for normal laundry, Washable wool items Stuffed ...
... the RACK DRY The BEEPER controls the volume of the beep that is made when you press any of the buttons on your dryer so remove rack for the Manual Cycles. Control Option to 60 minutes. 0 _(MmNI 0 5O O4O 0 30 0 2O TiME DRY Control Use Temp. Temperature modifiers ...cannot be used with both hands. 2. Make sure Dryer RACK is shipped in place in your own. You can select the desired operation time manually by pressing Time Dry button between 20 to select temperatures for normal laundry, Washable wool items Stuffed ...
Owners Manual
Page 29
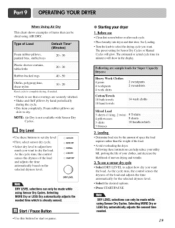
...Q VERY DRY Q MORE DRY @ NORMAL G LESS DRY G DAMP DRY DRY LEVEL DRY LEVELselections can help reduce your utility bill, prolong the life of your dryer 1. Starting your clothes, and decrease the likelihood of uneven drying and wrinkle. 3. Before use a sensor dry cycle • Select DRY LEVEL to adjust how ... MOREDry or LESS Dry automatically adjusts the sensed time needed. 29 Start / Pause Button • Use this button for Sensor Dry Cycles or Manual Cycles will show in the display. As the cycle runs, the control senses the dryness of the load and adjusts the time automatically for the...
...Q VERY DRY Q MORE DRY @ NORMAL G LESS DRY G DAMP DRY DRY LEVEL DRY LEVELselections can help reduce your utility bill, prolong the life of your dryer 1. Starting your clothes, and decrease the likelihood of uneven drying and wrinkle. 3. Before use a sensor dry cycle • Select DRY LEVEL to adjust how ... MOREDry or LESS Dry automatically adjusts the sensed time needed. 29 Start / Pause Button • Use this button for Sensor Dry Cycles or Manual Cycles will show in the display. As the cycle runs, the control senses the dryness of the load and adjusts the time automatically for the...
Owners Manual
Page 30
... foreign objects will shut off . • If you do not press START/PAUSE within 10 minutes. Select new cycle settings before restarting the dryer. _m Clean the door and its opening . Dry thoroughly and replace. To stop your drying cycle alter pressing START/PAUSE, press START/PAUSE again...door or press START/PAUSE. • To restart the dryer Close the door. Be sure the door is interrupted for more details, see Options. • Press START/PAUSE. Drying will change by 1 minute interval. To use a manual dry cycle • Select a Manual Dry Cycle. • Press MORE TIME or LESS ...
... foreign objects will shut off . • If you do not press START/PAUSE within 10 minutes. Select new cycle settings before restarting the dryer. _m Clean the door and its opening . Dry thoroughly and replace. To stop your drying cycle alter pressing START/PAUSE, press START/PAUSE again...door or press START/PAUSE. • To restart the dryer Close the door. Be sure the door is interrupted for more details, see Options. • Press START/PAUSE. Drying will change by 1 minute interval. To use a manual dry cycle • Select a Manual Dry Cycle. • Press MORE TIME or LESS ...
Owners Manual
Page 32
... m a loaa oi allea ClOthes Try using a fabric softener or adjust your larger load into smaller loads. Problem:There Is LintOn My Clothes • Is your dryer'? • Did you place any paper, tissue, or other articles of clothing are empty before each new load of laundry. • Did you properly sort... cause excess lint in a load of pants, shirts, and other similar material in a load of tile exhaust ducts and lint fler. 8. In order to tile manual section on the heat setting, the type of heat used (electric, natural or LP gas), the size of the load, the type of fabrics, the...
... m a loaa oi allea ClOthes Try using a fabric softener or adjust your larger load into smaller loads. Problem:There Is LintOn My Clothes • Is your dryer'? • Did you place any paper, tissue, or other articles of clothing are empty before each new load of laundry. • Did you properly sort... cause excess lint in a load of pants, shirts, and other similar material in a load of tile exhaust ducts and lint fler. 8. In order to tile manual section on the heat setting, the type of heat used (electric, natural or LP gas), the size of the load, the type of fabrics, the...


