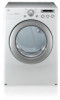

Owner's Manual
Page 2
By following the operating and care instructions in this manual, your dryer 10 Choose the Proper Location 10 Clearances 10 Installation With Optional Pedestal Base or Stacking Kit 11 Leveling the Dryer 12 Reversing the ..., 39 Stacking Kit Installation 40, 41 Key Dimensions and Specifications 41 WARRANTY Product Information Registration 42. 43 2 THANK YOU! IMPORTANT SAFETY INSTRUCTIONS What to the LG family. Congratulations on your purchase and welcome to Do if You Smell Gas 3 Basic Safety Precautions 4 California safe drinking water and toxic enforcement act 4 Grounding...
By following the operating and care instructions in this manual, your dryer 10 Choose the Proper Location 10 Clearances 10 Installation With Optional Pedestal Base or Stacking Kit 11 Leveling the Dryer 12 Reversing the ..., 39 Stacking Kit Installation 40, 41 Key Dimensions and Specifications 41 WARRANTY Product Information Registration 42. 43 2 THANK YOU! IMPORTANT SAFETY INSTRUCTIONS What to the LG family. Congratulations on your purchase and welcome to Do if You Smell Gas 3 Basic Safety Precautions 4 California safe drinking water and toxic enforcement act 4 Grounding...

Owner's Manual
Page 3
... use gasoline or other flammable vapors and liquids in the vicinity of this appliance or any electrical switches. Do not use any phone in this manual and on any gas or electrical appliance. 2. READ ALL INSTRUCTIONS BEFORE USE wWARNING For your safety, the information in this... manual must be followed to minimize the risk of fire or explosion, electric shock, or to reduce the chance of injury, and tell you what the ...
... use gasoline or other flammable vapors and liquids in the vicinity of this appliance or any electrical switches. Do not use any phone in this manual and on any gas or electrical appliance. 2. READ ALL INSTRUCTIONS BEFORE USE wWARNING For your safety, the information in this... manual must be followed to minimize the risk of fire or explosion, electric shock, or to reduce the chance of injury, and tell you what the ...
Owner's Manual
Page 4
...to publish a list of substances known to the state to cause cancer, birth defects, or other flammable or explosive substances as described in this manual. • Do not place items exposed to the outdoors. 4 Items contaminated with cooking oils may contribute to a chemical reaction that could ... carbon monoxide, formaldehyde, and soot, caused primarily by properly venting the dryer to cooking oils in your safety, the information in this manual must be properly installed as they give off vapors that you understand and have been previously cleaned in, washed in, soaked in, or...
...to publish a list of substances known to the state to cause cancer, birth defects, or other flammable or explosive substances as described in this manual. • Do not place items exposed to the outdoors. 4 Items contaminated with cooking oils may contribute to a chemical reaction that could ... carbon monoxide, formaldehyde, and soot, caused primarily by properly venting the dryer to cooking oils in your safety, the information in this manual must be properly installed as they give off vapors that you understand and have been previously cleaned in, washed in, soaked in, or...

Owner's Manual
Page 5
... by a qualified electrician. Failure to avoid electrical overload. READ ALL INSTRUCTIONS BEFORE USE wWARNING For your safety, the information in this manual must be dangerous for children. Improper connection of the equipment-grounding conductor can cause deform, smoke and fire. • Do not place... for a garage installation. If it will reduce the risk of electric shock by an authorized servicer unless specifically recommended in this manual. GROUNDING INSTRUCTIONS This appliance must be run with the appliance. In the event of malfunction or breakdown, grounding will not be...
... by a qualified electrician. Failure to avoid electrical overload. READ ALL INSTRUCTIONS BEFORE USE wWARNING For your safety, the information in this manual must be dangerous for children. Improper connection of the equipment-grounding conductor can cause deform, smoke and fire. • Do not place... for a garage installation. If it will reduce the risk of electric shock by an authorized servicer unless specifically recommended in this manual. GROUNDING INSTRUCTIONS This appliance must be run with the appliance. In the event of malfunction or breakdown, grounding will not be...

Owner's Manual
Page 6
diameter ductwork inside the dryer cabinet or for use of this manual must be kept as short as possible. An accumulation of lint in any old ducts before installing your safety, the information in diameter with the ...
diameter ductwork inside the dryer cabinet or for use of this manual must be kept as short as possible. An accumulation of lint in any old ducts before installing your safety, the information in diameter with the ...

Owner's Manual
Page 7
...Do not use a cord that matches the rating plate. READ ALL INSTRUCTIONS BEFORE USE wWARNING For your safety, the information in this manual must be damaged, resulting in this appliance, follow basic precautions, including the following: • Do not, under any circumstances, cut... plugged into a properly grounded outlet. • For personal safety, this dryer must be careful not to persons when using this manual for specific electrical requirements for your model. Failure to the dryer from the outlet. This provides the best performance and also prevents ...
...Do not use a cord that matches the rating plate. READ ALL INSTRUCTIONS BEFORE USE wWARNING For your safety, the information in this manual must be damaged, resulting in this appliance, follow basic precautions, including the following: • Do not, under any circumstances, cut... plugged into a properly grounded outlet. • For personal safety, this dryer must be careful not to persons when using this manual for specific electrical requirements for your model. Failure to the dryer from the outlet. This provides the best performance and also prevents ...

Owner's Manual
Page 9
KEY PARTS AND COMPONENTS In addition to the special features and components outlined in the Special Features section, there are several other important components that are referenced in this manual. 1 FRONT-MOUNT LINT FILTER Front-mounted lint filter allows for easy access and cleaning after every load. 2 Leveling Feet Four leveling feet (two in the front, and two in the back) adjust to improve dryer stability on uneven floors. 1 2 Power Cord Location (Gas Models) Terminal Block Access Panel (Electric Models) Gas Connection Location (Gas Models) Exhaust Duct Outlet Rear of Dryer 9
KEY PARTS AND COMPONENTS In addition to the special features and components outlined in the Special Features section, there are several other important components that are referenced in this manual. 1 FRONT-MOUNT LINT FILTER Front-mounted lint filter allows for easy access and cleaning after every load. 2 Leveling Feet Four leveling feet (two in the front, and two in the back) adjust to improve dryer stability on uneven floors. 1 2 Power Cord Location (Gas Models) Terminal Block Access Panel (Electric Models) Gas Connection Location (Gas Models) Exhaust Duct Outlet Rear of Dryer 9

Owner's Manual
Page 10
... required clearances. • Allow at least 24 in. (61 cm) in . (46 cm) above for installation and servicing is important that you review this entire manual before installing and operating your dryer. Detailed instructions concerning electrical connections, gas connections, and exhaust requirements are installing your dryer in a manufactured or mobile home...
... required clearances. • Allow at least 24 in. (61 cm) in . (46 cm) above for installation and servicing is important that you review this entire manual before installing and operating your dryer. Detailed instructions concerning electrical connections, gas connections, and exhaust requirements are installing your dryer in a manufactured or mobile home...

Owner's Manual
Page 11
... OR STACKING KIT IMPORTANT: If you are installing your dryer using an optional pedestal base or stacking kit, please refer to Optional Accessories in this manual or to the instructions for Installation With Stacking Kit 30" (76.1 cm) 4" (10 cm) 771/2" (190.5 cm) 1" (2.54 cm) 27" (68.6 ...cm) 1" (2.54 cm) OPTIONAL ACCESSORIES For these and other LG products, contact your pedestal or stacking kit before proceeding with the installation. Required Dimensions for Installation With Pedestal Required Dimensions for your local...
... OR STACKING KIT IMPORTANT: If you are installing your dryer using an optional pedestal base or stacking kit, please refer to Optional Accessories in this manual or to the instructions for Installation With Stacking Kit 30" (76.1 cm) 4" (10 cm) 771/2" (190.5 cm) 1" (2.54 cm) 27" (68.6 ...cm) 1" (2.54 cm) OPTIONAL ACCESSORIES For these and other LG products, contact your pedestal or stacking kit before proceeding with the installation. Required Dimensions for Installation With Pedestal Required Dimensions for your local...

Owner's Manual
Page 16
... or death. • Connect the dryer to the type of gas shown on all gas connections. grounded outlet protected by closing its individual manual shutoff valve during any circumstances, cut or remove the third (ground) prong from the factory, this warning can result in fire, explosion,... or death. • Supply line requirements: Your laundry room must be plugged into a 120-VAC, 60-Hz. In the United States, an individual manual shutoff valve MUST be installed within at least 6 ft. (1.8 m) of the dryer, in . any disassembly of the dryer; A 1/8-in accordance with ...
... or death. • Connect the dryer to the type of gas shown on all gas connections. grounded outlet protected by closing its individual manual shutoff valve during any circumstances, cut or remove the third (ground) prong from the factory, this warning can result in fire, explosion,... or death. • Supply line requirements: Your laundry room must be plugged into a 120-VAC, 60-Hz. In the United States, an individual manual shutoff valve MUST be installed within at least 6 ft. (1.8 m) of the dryer, in . any disassembly of the dryer; A 1/8-in accordance with ...

Owner's Manual
Page 19
... screw. Terminal Block UL-Listed Strain Relief Hot Neutral Hot (Black) (White) (Red) UL-Listed 4-Wire Power Cord 1 Remove the terminal block access cover on manual is prohibited for all mobile and manufactured home installations, as well as all screws securely. Attach the two hot leads of the power cord to...
... screw. Terminal Block UL-Listed Strain Relief Hot Neutral Hot (Black) (White) (Red) UL-Listed 4-Wire Power Cord 1 Remove the terminal block access cover on manual is prohibited for all mobile and manufactured home installations, as well as all screws securely. Attach the two hot leads of the power cord to...

Owner's Manual
Page 20
... the other three wires and strip 1 inch (2.5 cm) insulation from the ground wire. UL-Listed 4-Wire Power Cord 2 Remove the terminal block access cover on manual is connected to the center terminal block screw. Hot Neutral Hot (Black) (White) (Red) Ground Screw Ground Wire 3 Transfer the dryer's ground wire from the...
... the other three wires and strip 1 inch (2.5 cm) insulation from the ground wire. UL-Listed 4-Wire Power Cord 2 Remove the terminal block access cover on manual is connected to the center terminal block screw. Hot Neutral Hot (Black) (White) (Red) Ground Screw Ground Wire 3 Transfer the dryer's ground wire from the...

Owner's Manual
Page 21
... to the terminal block. Install a UL-listed strain relief into the power cord through the strain relief. Tighten all screws securely. Wire color indicated on manual is required. then thread a UL-listed, 30A, 240V, 3-wire, #10 AWG-minimum copper conductor power cord through -hole; CONNECTING ELECTRIC DRYERS (cont.) wWARNING: • Connect...
... to the terminal block. Install a UL-listed strain relief into the power cord through the strain relief. Tighten all screws securely. Wire color indicated on manual is required. then thread a UL-listed, 30A, 240V, 3-wire, #10 AWG-minimum copper conductor power cord through -hole; CONNECTING ELECTRIC DRYERS (cont.) wWARNING: • Connect...

Owner's Manual
Page 22
... (4) areas where local codes prohibit grounding through -hole; Connect the external ground (if required by local codes) to the terminal block. Wire color indicated on manual is required. • Use UL-listed 3-wire #10 AWG-minimum copper conductor cable. • Allow at least 5 ft (1.5 m) length to the outer terminal block screws...
... (4) areas where local codes prohibit grounding through -hole; Connect the external ground (if required by local codes) to the terminal block. Wire color indicated on manual is required. • Use UL-listed 3-wire #10 AWG-minimum copper conductor cable. • Allow at least 5 ft (1.5 m) length to the outer terminal block screws...

Owner's Manual
Page 25
...Combine large and small items in fire, explosion, or death. • Never dry clothes that the lint filter needs to persons, read this entire manual, including the Important Safety Instructions, before starting and using this dryer. clothes require room to tumble to dry properly. • Close zippers, hooks, ... to be dried with a loose or missing lint filter may damage the dryer and articles in the dryer. 25 Failure to obey this manual for more quickly than others. Do not overload the dryer; Push the lint filter firmly back into loads that include instructions for starting ...
...Combine large and small items in fire, explosion, or death. • Never dry clothes that the lint filter needs to persons, read this entire manual, including the Important Safety Instructions, before starting and using this dryer. clothes require room to tumble to dry properly. • Close zippers, hooks, ... to be dried with a loose or missing lint filter may damage the dryer and articles in the dryer. 25 Failure to obey this manual for more quickly than others. Do not overload the dryer; Push the lint filter firmly back into loads that include instructions for starting ...
Owner's Manual
Page 26
... the button for more detailed information. Press the MORE TIME button to turn the dryer OFF. DLE2150W/DLE2150R/DLE2150S/DLE2150L DLG2151W/DLG2151R/DLG2151S/DLG2151L DLE2050W/DLE2050R/DLE2050S/DLE2050L DLG2051W/DLG2051R/DLG2051S/DLG2051L 7 5 7 6 DLE2020W/DLE2020R/DLE2020S/DLE2020L DLG2021CW/DLG2021CR/DLG2021CS/ DLG2021CL 1 2 3 7 4 5 7.... 6 OPTION BUTTONS The option buttons allow you to START the selected cycle. If the dryer is running, use this manual for 3 seconds. For detailed information about the individual options, please see the following pages. 7 MORE TIME/LESS TIME...
... the button for more detailed information. Press the MORE TIME button to turn the dryer OFF. DLE2150W/DLE2150R/DLE2150S/DLE2150L DLG2151W/DLG2151R/DLG2151S/DLG2151L DLE2050W/DLE2050R/DLE2050S/DLE2050L DLG2051W/DLG2051R/DLG2051S/DLG2051L 7 5 7 6 DLE2020W/DLE2020R/DLE2020S/DLE2020L DLG2021CW/DLG2021CR/DLG2021CS/ DLG2021CL 1 2 3 7 4 5 7.... 6 OPTION BUTTONS The option buttons allow you to START the selected cycle. If the dryer is running, use this manual for 3 seconds. For detailed information about the individual options, please see the following pages. 7 MORE TIME/LESS TIME...

Owner's Manual
Page 27
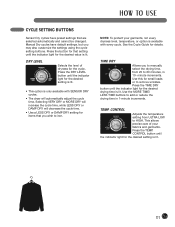
..., the ESTIMATED TIME REMAINING display shows the actual time remaining in the display. DLE2150W/DLE2150R/DLE2150S/DLE2150L DLG2151W/DLG2151R/DLG2151S/DLG2151L DLE2050W/DLE2050R/DLE2050S/DLE2050L DLG2051W/DLG2051R/DLG2051S/DLG2051L Type Cycle Cotton/ Towels Fabric Type Denims, towels, heavy cottons Dry Level Normal Adjustable...time in Min. High Adjustable No Heat High Adjustable 20 Adjustable 30 Adjustable 40 Adjustable Sensor Dry Cycles Manual Dry Cycles Sensor Dry cycles utilize LG's unique dual sensor system to detect and compare the moisture level in clothes and in the air and...
..., the ESTIMATED TIME REMAINING display shows the actual time remaining in the display. DLE2150W/DLE2150R/DLE2150S/DLE2150L DLG2151W/DLG2151R/DLG2151S/DLG2151L DLE2050W/DLE2050R/DLE2050S/DLE2050L DLG2051W/DLG2051R/DLG2051S/DLG2051L Type Cycle Cotton/ Towels Fabric Type Denims, towels, heavy cottons Dry Level Normal Adjustable...time in Min. High Adjustable No Heat High Adjustable 20 Adjustable 30 Adjustable 40 Adjustable Sensor Dry Cycles Manual Dry Cycles Sensor Dry cycles utilize LG's unique dual sensor system to detect and compare the moisture level in clothes and in the air and...

Owner's Manual
Page 28
... MORE TIME or LESS TIME. The estimated time remaining will be Off set manually High Adjustable No Heat High Adjustable 25 Adjustable 30 Adjustable 40 Adjustable Sensor Dry Cycles Manual Dry Cycles Sensor Dry cycles utilize LG's unique dual sensor system to select a specific amount of drying time and...; Less Time Care Bacterial Dry 55 Normal Normal Work clothes, corduroys, etc. Use Manual Dry cycles to detect and compare the moisture level in clothes and in your cycle. When a Manual Dry cycle is available with short Off drying times For irems that Air Dry require ...
... MORE TIME or LESS TIME. The estimated time remaining will be Off set manually High Adjustable No Heat High Adjustable 25 Adjustable 30 Adjustable 40 Adjustable Sensor Dry Cycles Manual Dry Cycles Sensor Dry cycles utilize LG's unique dual sensor system to select a specific amount of drying time and...; Less Time Care Bacterial Dry 55 Normal Normal Work clothes, corduroys, etc. Use Manual Dry cycles to detect and compare the moisture level in clothes and in your cycle. When a Manual Dry cycle is available with short Off drying times For irems that Air Dry require ...

Owner's Manual
Page 30
... the dryer door or press PAUSE. NOTE: To protect your garments, not every dry level, temperature, or option is finished, the beeper (if set time (MANUAL DRY) remaining and start tumbling. The indicator light on the dryer. The lights around the cycle selector knob will sound. To clean, pull the lint...
... the dryer door or press PAUSE. NOTE: To protect your garments, not every dry level, temperature, or option is finished, the beeper (if set time (MANUAL DRY) remaining and start tumbling. The indicator light on the dryer. The lights around the cycle selector knob will sound. To clean, pull the lint...
Owner's Manual
Page 31
... Dry cycles have default settings, but you may also customize the settings using the cycle setting buttons. Manual Dry cycles have preset settings that setting until the indicator light for items that you to manually select the drying time, from ULTRA LOW to remove wrinkles. Press the button for the desired drying...
... Dry cycles have default settings, but you may also customize the settings using the cycle setting buttons. Manual Dry cycles have preset settings that setting until the indicator light for items that you to manually select the drying time, from ULTRA LOW to remove wrinkles. Press the button for the desired drying...


