
Owners Manual
Page 1
All Rights Reserved. OWNER'S MANUAL LG Digital Signage (MONITOR SIGNAGE) Please read this manual carefully before operating your set and retain it for future reference. 98UH5E 98UM3E www.lg.com Copyright © 2019 LG Electronics Inc.
All Rights Reserved. OWNER'S MANUAL LG Digital Signage (MONITOR SIGNAGE) Please read this manual carefully before operating your set and retain it for future reference. 98UH5E 98UM3E www.lg.com Copyright © 2019 LG Electronics Inc.

Owners Manual
Page 2
... the Product 5 --Precautions for Moving the Product 6 --Precautions for Using/Cleaning the Product......7 --Product Disposal (Only, Hg lamp used LCD Monitor 7 LICENSES 8 ASSEMBLY AND PREPARATION...9 --Optional Accessories 10 --Parts and Buttons 11 --Connecting IR and Light Sensor 12 --Portrait Layout 13 --Connecting... the Eye-Bolt Bracket 14 --Attaching the LG Logo Bracket 15 --Installing on a Wall 16 REMOTE CONTROL 18 MAKING CONNECTIONS 20 --Connecting to a PC 20 --External Device Connection 20...
... the Product 5 --Precautions for Moving the Product 6 --Precautions for Using/Cleaning the Product......7 --Product Disposal (Only, Hg lamp used LCD Monitor 7 LICENSES 8 ASSEMBLY AND PREPARATION...9 --Optional Accessories 10 --Parts and Buttons 11 --Connecting IR and Light Sensor 12 --Portrait Layout 13 --Connecting... the Eye-Bolt Bracket 14 --Attaching the LG Logo Bracket 15 --Installing on a Wall 16 REMOTE CONTROL 18 MAKING CONNECTIONS 20 --Connecting to a PC 20 --External Device Connection 20...

Owners Manual
Page 7
...not used in this product contains a small amount of mercury. •• Do not dispose of this product with a soft cloth to -time. -- Monitor may occur. (Do not use chemicals such as its electrical shock. •• Spray water onto a soft cloth 2 to 4 times, and use ...•• Keep small accessories out of the reach of children. •• Displaying a still image for long time on the monitor may cause staining. Contact LG Customer Service for repair. •• When cleaning the product, unplug the power cord and scrub gently with general household waste. &#...
...not used in this product contains a small amount of mercury. •• Do not dispose of this product with a soft cloth to -time. -- Monitor may occur. (Do not use chemicals such as its electrical shock. •• Spray water onto a soft cloth 2 to 4 times, and use ...•• Keep small accessories out of the reach of children. •• Displaying a still image for long time on the monitor may cause staining. Contact LG Customer Service for repair. •• When cleaning the product, unplug the power cord and scrub gently with general household waste. &#...

Owners Manual
Page 13
13 Portrait Layout When installing in a portrait layout, rotate the monitor counterclockwise 90 degrees (when facing the screen). ENGLISH
13 Portrait Layout When installing in a portrait layout, rotate the monitor counterclockwise 90 degrees (when facing the screen). ENGLISH

Owners Manual
Page 15
When the monitor is in the horizontal position When the monitor is in the vertical position You can position the logo according to the monitor. 15 ENGLISH Attaching the LG Logo Bracket Use one screw, inserted from behind, to attach the LG Logo Bracket to the monitor's direction.
When the monitor is in the horizontal position When the monitor is in the vertical position You can position the logo according to the monitor. 15 ENGLISH Attaching the LG Logo Bracket Use one screw, inserted from behind, to attach the LG Logo Bracket to the monitor's direction.

Owners Manual
Page 16
...100 mm 100 mm 100 mm To install your dealer, see the optional Tilt Wall Mounting Bracket Installation and Setup Guide. LG Electronics is securely fixed to the monitor and to the wall. 1 Use only screws and wall mounting brackets that the wall mounting bracket is not liable for ... 14 mm (0.5 inches) 785 mm (30.9 inches) Detailed installation instructions are longer than standard length may damage the inside of the monitor. 3 A non-VESA standard screw may damage the product and cause the monitor to fall. Make sure that conform to VESA standards. 2 Screws which are available from your...
...100 mm 100 mm 100 mm To install your dealer, see the optional Tilt Wall Mounting Bracket Installation and Setup Guide. LG Electronics is securely fixed to the monitor and to the wall. 1 Use only screws and wall mounting brackets that the wall mounting bracket is not liable for ... 14 mm (0.5 inches) 785 mm (30.9 inches) Detailed installation instructions are longer than standard length may damage the inside of the monitor. 3 A non-VESA standard screw may damage the product and cause the monitor to fall. Make sure that conform to VESA standards. 2 Screws which are available from your...

Owners Manual
Page 17
...8226; For more information, please refer to avoid risk of screws required may differ depending on a ceiling or slanted wall, it may damage the monitor and void your warranty. •• Use only screws and wall mounting brackets that meet the VESA standard. ENGLISH 17 CAUTION •• Disconnect...tighten the screws as this may fall and result in injury. Use an authorized LG wall mount and contact your local dealer. •• The length of electric shock. •• If you install the monitor on the wall mount. Any damage or injuries caused by the warranty. You ...
...8226; For more information, please refer to avoid risk of screws required may differ depending on a ceiling or slanted wall, it may damage the monitor and void your warranty. •• Use only screws and wall mounting brackets that meet the VESA standard. ENGLISH 17 CAUTION •• Disconnect...tighten the screws as this may fall and result in injury. Use an authorized LG wall mount and contact your local dealer. •• The length of electric shock. •• If you install the monitor on the wall mount. Any damage or injuries caused by the warranty. You ...
Owners Manual
Page 18
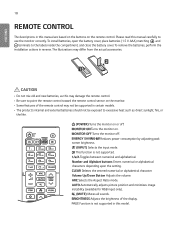
...place batteries (1.5 V AAA) matching and terminals to excessive heat such as direct sunlight, fire, or the like. (POWER) Turns the monitor on the remote control. Reduces power consumption by adjusting peak screen brightness. (INPUT) Selects the input mode. Number and Alphabet buttons Enters ...may not be supported in reverse. Deletes the entered numerical or alphabetical character. Volume Up/Down Button Adjusts the volume. Turns the monitor on. To remove the batteries, perform the installation actions in certain models. •• The product's internal and external batteries ...
...place batteries (1.5 V AAA) matching and terminals to excessive heat such as direct sunlight, fire, or the like. (POWER) Turns the monitor on the remote control. Reduces power consumption by adjusting peak screen brightness. (INPUT) Selects the input mode. Number and Alphabet buttons Enters ...may not be supported in reverse. Deletes the entered numerical or alphabetical character. Volume Up/Down Button Adjusts the volume. Turns the monitor on. To remove the batteries, perform the installation actions in certain models. •• The product's internal and external batteries ...

Owners Manual
Page 19
When the Picture ID number matches the Set ID number, you can control whichever monitor you want in the user interaction function. Navigation Buttons Scrolls through the SimpLink menu. Selects menus or options and confirms your input and exit menus. ...
When the Picture ID number matches the Set ID number, you can control whichever monitor you want in the user interaction function. Navigation Buttons Scrolls through the SimpLink menu. Selects menus or options and confirms your input and exit menus. ...

Owners Manual
Page 20
...the external device you want to your monitor. Connecting to your monitor using HDMI cables is recommended. External Device Connection Some of the cables are not provided. For the best picture and sound quality, connecting external devices to connect. This monitor supports the * feature. * : ...a feature that enables a PC to the monitor and select an appropriate input mode. Connect a HD receiver, DVD, or VCR player to ...
...the external device you want to your monitor. Connecting to your monitor using HDMI cables is recommended. External Device Connection Some of the cables are not provided. For the best picture and sound quality, connecting external devices to connect. This monitor supports the * feature. * : ...a feature that enables a PC to the monitor and select an appropriate input mode. Connect a HD receiver, DVD, or VCR player to ...

Owners Manual
Page 21
... the default audio output to HDMI. •• If you want to use HDMI-PC mode, you must set your PC/DTV to the monitor, use the cable provided with Ethernet •• If you cannot hear any sound in temporary distortion on the screen. •• Avoid ... (shorter than 3 meters (9.8 feet)). •• Use a certified cable with ferrite core, such as this may result in HDMI mode please check your monitor can affect the image. If you turn the monitor on the screen. Use a screensaver if possible. •• A wireless communication device near your PC settings.
... the default audio output to HDMI. •• If you want to use HDMI-PC mode, you must set your PC/DTV to the monitor, use the cable provided with Ethernet •• If you cannot hear any sound in temporary distortion on the screen. •• Avoid ... (shorter than 3 meters (9.8 feet)). •• Use a certified cable with ferrite core, such as this may result in HDMI mode please check your monitor can affect the image. If you turn the monitor on the screen. Use a screensaver if possible. •• A wireless communication device near your PC settings.

Owners Manual
Page 22
... (at the recommended resolution) if the signal is stable and there is certified to the connection of the other models. To connect more than 100 monitors, it is recommended to use a distributor. •• If the signal cable connecting the product to your PC is too long, make sure to use... a booster or optical cable. •• You may experience compatibility issues if you use multiple monitors connected to each other, connect the end of the signal input cable (DP cable) to the connection in one...
... (at the recommended resolution) if the signal is stable and there is certified to the connection of the other models. To connect more than 100 monitors, it is recommended to use a distributor. •• If the signal cable connecting the product to your PC is too long, make sure to use... a booster or optical cable. •• You may experience compatibility issues if you use multiple monitors connected to each other, connect the end of the signal input cable (DP cable) to the connection in one...
Owners Manual
Page 33
USER MANUAL LG Digital Signage (MONITOR SIGNAGE) Please read this manual carefully before operation and retain it for future reference. webOS 4.0 www.lg.com
USER MANUAL LG Digital Signage (MONITOR SIGNAGE) Please read this manual carefully before operation and retain it for future reference. webOS 4.0 www.lg.com
Owners Manual
Page 36
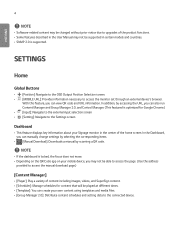
...input selection screen •• [Setting]: Navigate to the Settings screen Dashboard •• This feature displays key information about your Signage monitor in certain models and countries. •• SNMP 2.0 is locked, the focus does not move. •• Depending on the QR... on your own content using templates and media files. •• [Group Manager 2.0]: Distribute content schedules and setting data to access the monitor set through an external device's browser. With this feature, you may not be played at different times. •• [Template]: You...
...input selection screen •• [Setting]: Navigate to the Settings screen Dashboard •• This feature displays key information about your Signage monitor in certain models and countries. •• SNMP 2.0 is locked, the focus does not move. •• Depending on the QR... on your own content using templates and media files. •• [Group Manager 2.0]: Distribute content schedules and setting data to access the monitor set through an external device's browser. With this feature, you may not be played at different times. •• [Template]: You...

Owners Manual
Page 37
.../Off Time Setting]: Set on/off . •• [Tile Mode Settings]: Display a single integrated screen on multiple Signage monitors. •• [Natural Mode]: Display the image excluding the area that overlaps with the monitor's bezel so that the image displayed has a more natural feel to it. •• [Frame Control]: Adjust the...
.../Off Time Setting]: Set on/off . •• [Tile Mode Settings]: Display a single integrated screen on multiple Signage monitors. •• [Natural Mode]: Display the image excluding the area that overlaps with the monitor's bezel so that the image displayed has a more natural feel to it. •• [Frame Control]: Adjust the...

Owners Manual
Page 40
... using illumination sensors between devices connected by accessing the specified URL. •• [Save]: Save the specified URL. •• [Reboot to Apply]: Restarts the monitor set to the same network.
... using illumination sensors between devices connected by accessing the specified URL. •• [Save]: Save the specified URL. •• [Reboot to Apply]: Restarts the monitor set to the same network.

Owners Manual
Page 45
... via RS- 232C. You can select the menu language to be displayed on the screen. •• [Menu Language]: Sets the language of your Signage monitor. •• [Keyboard Language]: Sets the language of the product to 1. [Time Setting] [General] [Time Setting] This feature enables you to view and change the...
... via RS- 232C. You can select the menu language to be displayed on the screen. •• [Menu Language]: Sets the language of your Signage monitor. •• [Keyboard Language]: Sets the language of the product to 1. [Time Setting] [General] [Time Setting] This feature enables you to view and change the...

Owners Manual
Page 46
... the power of the product off. [DPM] Set the Display Power Management (DPM) mode. •• If this feature is not set to [Off], the monitor will enter DPM mode when there is no input signal. •• If you set this feature to [Off], [DPM] is disabled. [DPM Wake Up...
... the power of the product off. [DPM] Set the Display Power Management (DPM) mode. •• If this feature is not set to [Off], the monitor will enter DPM mode when there is no input signal. •• If you set this feature to [Off], [DPM] is disabled. [DPM Wake Up...

Owners Manual
Page 47
...;• You can set the delay interval in the range of 0 to 250 seconds. [Power On Status] •• Select the operating status of the monitor when the main power has turned on. •• You can choose from among [PWR (Power On)], [STD (Standby)], [and LST (Last Status)]. &#..., letting you turn the product on the backlight to [On], the [Wake On LAN] feature is input from the remote control's Power button or the monitor's Off button. •• [Screen Off & Backlight On]: Partially turns on remotely through a wired network. •• [Wireless]: When set to keep the ...
...;• You can set the delay interval in the range of 0 to 250 seconds. [Power On Status] •• Select the operating status of the monitor when the main power has turned on. •• You can choose from among [PWR (Power On)], [STD (Standby)], [and LST (Last Status)]. &#..., letting you turn the product on the backlight to [On], the [Wake On LAN] feature is input from the remote control's Power button or the monitor's Off button. •• [Screen Off & Backlight On]: Partially turns on remotely through a wired network. •• [Wireless]: When set to keep the ...

Owners Manual
Page 48
For detailed information, contact your Internet provider or consult your router manual. [Wi-Fi Connection] If you have set your monitor up a physical connection, the display will automatically connect without any adjustments on /off [Power Indicator]. •• ... Setting to [On] will turn off history. [Network] [General] [Network] [Wired Connection (Ethernet)] •• Wired Connection: Connects the monitor to a local area network (LAN) via the LAN port and configures wired network settings. But, IPv6 connection only supports automatic connection. Only wired network...
For detailed information, contact your Internet provider or consult your router manual. [Wi-Fi Connection] If you have set your monitor up a physical connection, the display will automatically connect without any adjustments on /off [Power Indicator]. •• ... Setting to [On] will turn off history. [Network] [General] [Network] [Wired Connection (Ethernet)] •• Wired Connection: Connects the monitor to a local area network (LAN) via the LAN port and configures wired network settings. But, IPv6 connection only supports automatic connection. Only wired network...