
Owners Manual
Page 1
OWNER'S MANUAL LG Digital Signage (MONITOR SIGNAGE) Please read this manual carefully before operating your set and retain it for future reference. 43UL3J-E 50UL3J-E 55UL3J-E 65UL3J-E 75UL3J-E 43UL3J-M 50UL3J-M 55UL3J-M www.lg.com Copyright © 2021 LG Electronics Inc. All Rights Reserved.
OWNER'S MANUAL LG Digital Signage (MONITOR SIGNAGE) Please read this manual carefully before operating your set and retain it for future reference. 43UL3J-E 50UL3J-E 55UL3J-E 65UL3J-E 75UL3J-E 43UL3J-M 50UL3J-M 55UL3J-M www.lg.com Copyright © 2021 LG Electronics Inc. All Rights Reserved.

Owners Manual
Page 2
ENGLISH 2 TABLE OF CONTENTS WARNING! SAFETY INSTRUCTIONS 3 ASSEMBLY AND PREPARATION...6 --Parts and Buttons 7 --Portrait Layout 8 --Using Kensington Lock 8 --Installing on a Wall 9 REMOTE CONTROL 11 MAKING CONNECTIONS 13 --Connecting to a PC 13 --External Device Connection 13 --Using the Input List 14 --Connecting Multiple Monitors 15 TROUBLESHOOTING 16 PRODUCT SPECIFICATIONS....... 20 LICENSES 27
ENGLISH 2 TABLE OF CONTENTS WARNING! SAFETY INSTRUCTIONS 3 ASSEMBLY AND PREPARATION...6 --Parts and Buttons 7 --Portrait Layout 8 --Using Kensington Lock 8 --Installing on a Wall 9 REMOTE CONTROL 11 MAKING CONNECTIONS 13 --Connecting to a PC 13 --External Device Connection 13 --Using the Input List 14 --Connecting Multiple Monitors 15 TROUBLESHOOTING 16 PRODUCT SPECIFICATIONS....... 20 LICENSES 27

Owners Manual
Page 3
... FIRE, KEEP CANDLES OR OTHER ITEMS WITH OPEN FLAMES AWAY FROM THIS PRODUCT AT ALL TIMES. •• Do not place the monitor and/or remote control in the following environments: -- An area exposed to the presence of CISPR 32. SAFETY INSTRUCTIONS CAUTION RISK OF ...risk of electric shock to dripping or splashing and do not place objects filled with cloth or other devices that may become hot. Install your monitor where there is plugged in fire, electric shock, combustion/explosion, malfunction or product deformation. •• Ventilation -- REFER TO QUALIFIED SERVICE ...
... FIRE, KEEP CANDLES OR OTHER ITEMS WITH OPEN FLAMES AWAY FROM THIS PRODUCT AT ALL TIMES. •• Do not place the monitor and/or remote control in the following environments: -- An area exposed to the presence of CISPR 32. SAFETY INSTRUCTIONS CAUTION RISK OF ...risk of electric shock to dripping or splashing and do not place objects filled with cloth or other devices that may become hot. Install your monitor where there is plugged in fire, electric shock, combustion/explosion, malfunction or product deformation. •• Ventilation -- REFER TO QUALIFIED SERVICE ...
Owners Manual
Page 4
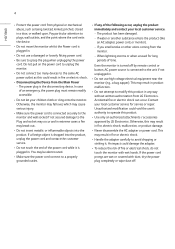
... upon. If you smell smoke or other odors coming from LG Electronics. The power plug is connected to grasp the plug when unplugging the power cord. If water or another substance enters the product (like an AC adapter, power cord, or monitor). -- When lightning storms or when unused for service or...could damage the adapter. •• To reduce the risk of fire or electrical shock, do not touch the monitor with dust, dry the power plug completely or wipe dust off by LG Electronics. If the power cord prongs are wet or covered with wet hands. In case of time. Contact your...
... upon. If you smell smoke or other odors coming from LG Electronics. The power plug is connected to grasp the plug when unplugging the power cord. If water or another substance enters the product (like an AC adapter, power cord, or monitor). -- When lightning storms or when unused for service or...could damage the adapter. •• To reduce the risk of fire or electrical shock, do not touch the monitor with dust, dry the power plug completely or wipe dust off by LG Electronics. If the power cord prongs are wet or covered with wet hands. In case of time. Contact your...

Owners Manual
Page 5
... Only. Do not spray water or other liquids directly on the front panel of children. •• Do not allow the batteries to carry larger monitors. WARNING If you ignore the warning message, you may result in a fire. When moving, make a scratch on it. Do not press or put ...stress on the monitor. Store the accessories (battery, etc.) in product damage, fire hazard or injury. •• Keep the packing anti-moisture material or vinyl packing out ...
... Only. Do not spray water or other liquids directly on the front panel of children. •• Do not allow the batteries to carry larger monitors. WARNING If you ignore the warning message, you may result in a fire. When moving, make a scratch on it. Do not press or put ...stress on the monitor. Store the accessories (battery, etc.) in product damage, fire hazard or injury. •• Keep the packing anti-moisture material or vinyl packing out ...

Owners Manual
Page 7
Power On (Press the button When the monitor is turned off.) Power Off (Press the button When the monitor is turned on.) ENGLISH 7 Parts and Buttons The image may be different according to the model.
Power On (Press the button When the monitor is turned off.) Power Off (Press the button When the monitor is turned on.) ENGLISH 7 Parts and Buttons The image may be different according to the model.
Owners Manual
Page 8
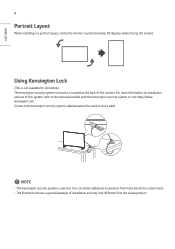
...is not available for all models.) The Kensington security system connector is optional. Connect the Kensington security system cable between the monitor and a table. NOTE •• The Kensington security system is located at the back of installation and may look ...accessories from most electronics retail stores. •• The illustration shows a general example of the monitor. ENGLISH 8 Portrait Layout When installing in a portrait layout, rotate the monitor counterclockwise 90 degrees (when facing the screen). kensington.com. For more information on installation and ...
...is not available for all models.) The Kensington security system connector is optional. Connect the Kensington security system cable between the monitor and a table. NOTE •• The Kensington security system is located at the back of installation and may look ...accessories from most electronics retail stores. •• The illustration shows a general example of the monitor. ENGLISH 8 Portrait Layout When installing in a portrait layout, rotate the monitor counterclockwise 90 degrees (when facing the screen). kensington.com. For more information on installation and ...
Owners Manual
Page 9
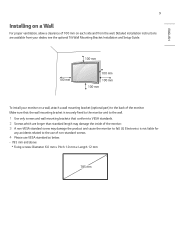
LG Electronics is securely fixed to the monitor and to the wall. 1 Use only screws and wall mounting brackets that the wall mounting bracket is not liable for any accidents related to the use of the monitor. 3 A non-VESA standard screw may damage the product and cause the monitor to fall... 100 mm on a wall, attach a wall mounting bracket (optional part) to the back of the monitor. Make sure that conform to VESA standards. 2 Screws which are available from your monitor on each side and from the wall. Detailed installation instructions are longer than standard length may damage the ...
LG Electronics is securely fixed to the monitor and to the wall. 1 Use only screws and wall mounting brackets that the wall mounting bracket is not liable for any accidents related to the use of the monitor. 3 A non-VESA standard screw may damage the product and cause the monitor to fall... 100 mm on a wall, attach a wall mounting bracket (optional part) to the back of the monitor. Make sure that conform to VESA standards. 2 Screws which are available from your monitor on each side and from the wall. Detailed installation instructions are longer than standard length may damage the ...
Owners Manual
Page 10
... information, please refer to the guide provided with the installation. •• Do not over tighten the screws as this may damage the monitor and void your warranty. •• Use only screws and wall mounting brackets that meet the VESA standard. Any damage or injuries caused by... mount kit includes the installation guide and all necessary parts. •• The wall mounting bracket is supported. (in injury. Use an authorized LG wall mount and contact your local dealer. •• The length of screws required may differ depending on a ceiling or slanted wall, it may...
... information, please refer to the guide provided with the installation. •• Do not over tighten the screws as this may damage the monitor and void your warranty. •• Use only screws and wall mounting brackets that meet the VESA standard. Any damage or injuries caused by... mount kit includes the installation guide and all necessary parts. •• The wall mounting bracket is supported. (in injury. Use an authorized LG wall mount and contact your local dealer. •• The length of screws required may differ depending on a ceiling or slanted wall, it may...
Owners Manual
Page 11
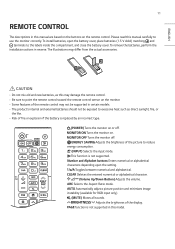
... buttons Enters numerical or alphabetical characters depending upon the setting. This function is not supported in this manual carefully to use the monitor correctly. Selects the Aspect Ratio mode. The illustrations may not be supported in certain models. •• The product's internal... the like. •• Risk of fire or explosion if the battery is replaced by an incorrect type. (POWER) Turns the monitor on or off . Toggles between numerical and alphabetical. Automatically adjusts picture position and minimizes image instability (available for RGB input only). (MUTE...
... buttons Enters numerical or alphabetical characters depending upon the setting. This function is not supported in this manual carefully to use the monitor correctly. Selects the Aspect Ratio mode. The illustrations may not be supported in certain models. •• The product's internal... the like. •• Risk of fire or explosion if the battery is replaced by an incorrect type. (POWER) Turns the monitor on or off . Toggles between numerical and alphabetical. Automatically adjusts picture position and minimizes image instability (available for RGB input only). (MUTE...

Owners Manual
Page 12
Quit all OSD tasks and applications. When the Picture ID number matches the Set ID number, you can control whichever monitor you to enjoy multimedia simply by using the remote control through menus or options. Allows you to control various multimedia devices to move back one ...
Quit all OSD tasks and applications. When the Picture ID number matches the Set ID number, you can control whichever monitor you to enjoy multimedia simply by using the remote control through menus or options. Allows you to control various multimedia devices to move back one ...
Owners Manual
Page 13
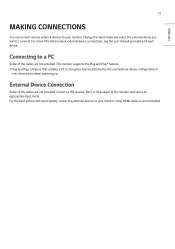
... the * feature. * : a feature that enables a PC to the monitor and select an appropriate input mode. Connecting to a PC Some of the cables are not provided. Connect a HD receiver, DVD, or VCR player to recognize ... attached by the user without device configuration or user intervention when powering up. For the best picture and sound quality, connecting external devices to your monitor. Change the input mode and select the external device you want to connect. External Device Connection Some of the cables are not provided. For more...
... the * feature. * : a feature that enables a PC to the monitor and select an appropriate input mode. Connecting to a PC Some of the cables are not provided. Connect a HD receiver, DVD, or VCR player to recognize ... attached by the user without device configuration or user intervention when powering up. For the best picture and sound quality, connecting external devices to your monitor. Change the input mode and select the external device you want to connect. External Device Connection Some of the cables are not provided. For more...
Owners Manual
Page 14
... for a long period of the product, use a shielded interface cable with ferrite core, such as this may result in HDMI mode please check your monitor can affect the image. Using the Input List (HOME) • • ENGLISH 14 NOTE •• For the best image quality, using the...on the screen. •• Avoid displaying static images on the screen for a prolonged period as a DVI-D/ HDMI cable. •• If you turn the monitor on the screen. This is disconnected. •• If you use HDMI-PC mode, you must set is normal. •• Sometimes red, green, or...
... for a long period of the product, use a shielded interface cable with ferrite core, such as this may result in HDMI mode please check your monitor can affect the image. Using the Input List (HOME) • • ENGLISH 14 NOTE •• For the best image quality, using the...on the screen. •• Avoid displaying static images on the screen for a prolonged period as a DVI-D/ HDMI cable. •• If you turn the monitor on the screen. This is disconnected. •• If you use HDMI-PC mode, you must set is normal. •• Sometimes red, green, or...

Owners Manual
Page 15
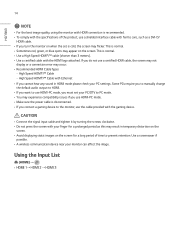
DVI IN DP OUT DP IN DP OUT Connecting Multiple Monitors DP IN DP OUT To use multiple monitors connected to each other, connect the end of the signal input cable to the one monitor and connect the other end to the connection of the other monitor. 15 connection in ENGLISH
DVI IN DP OUT DP IN DP OUT Connecting Multiple Monitors DP IN DP OUT To use multiple monitors connected to each other, connect the end of the signal input cable to the one monitor and connect the other end to the connection of the other monitor. 15 connection in ENGLISH
Owners Manual
Page 17
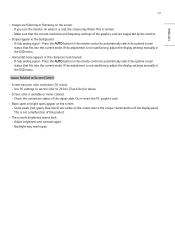
... the screen. -- Make sure that the current resolution and frequency settings of the graphics card are supported by the monitor. •• Stripes appear in the remote control to automatically select the optimal screen status that fits into the current mode. Press the button in ...
... the screen. -- Make sure that the current resolution and frequency settings of the graphics card are supported by the monitor. •• Stripes appear in the remote control to automatically select the optimal screen status that fits into the current mode. Press the button in ...