
User Guide
Page 1
USER GUIDE LG Digital Signage (MONITOR SIGNAGE) Please read this manual carefully before operation and retain it for future reference. L18 www.lg.com
USER GUIDE LG Digital Signage (MONITOR SIGNAGE) Please read this manual carefully before operation and retain it for future reference. L18 www.lg.com

User Guide
Page 4
... to the external input selection screen. •• [Settings]: Navigate to the Settings screen. Dashboard •• This feature displays key information about your Signage monitor in certain models and countries. •• SNMP 2.0 is supported. ENGLISH 4 NOTE •• Software-related content may be changed without prior notice due to...
... to the external input selection screen. •• [Settings]: Navigate to the Settings screen. Dashboard •• This feature displays key information about your Signage monitor in certain models and countries. •• SNMP 2.0 is supported. ENGLISH 4 NOTE •• Software-related content may be changed without prior notice due to...
User Guide
Page 5
...;• [Natural Mode]: Display the image excluding the area that overlaps with the monitor's bezel so that the image displayed has a more natural feel to it. •• [Scan Inversion]: This function reduces the differences in image sync between ...
...;• [Natural Mode]: Display the image excluding the area that overlaps with the monitor's bezel so that the image displayed has a more natural feel to it. •• [Scan Inversion]: This function reduces the differences in image sync between ...
User Guide
Page 7
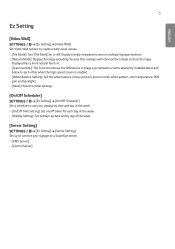
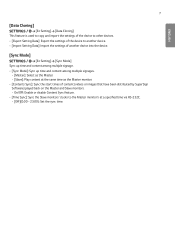
...of the device to other devices. •• [Export Setting Data]: Export the settings of the device to the Master monitor's at the same time as the Master monitor. •• [Contents Sync]: Sync the start times of content (videos or images that have been distributed by SuperSign... Software) played back on the Master and Slave monitors. -- On/Off: Enable or disable Content Sync feature. •• [Time Sync]: Sync the Slave monitors' clocks to another device. •• [Import Setting Data]: Import the settings of another...
...of the device to other devices. •• [Export Setting Data]: Export the settings of the device to the Master monitor's at the same time as the Master monitor. •• [Contents Sync]: Sync the start times of content (videos or images that have been distributed by SuperSign... Software) played back on the Master and Slave monitors. -- On/Off: Enable or disable Content Sync feature. •• [Time Sync]: Sync the Slave monitors' clocks to another device. •• [Import Setting Data]: Import the settings of another...

User Guide
Page 8
You can select the menu language to be displayed on the screen. •• [Menu Language]: Sets the language of your Signage monitor. [System Information] [General] [System Information] This feature displays information such as the device name, software version, and storage space. [Set ID] [General] [Set ID] •&#...
You can select the menu language to be displayed on the screen. •• [Menu Language]: Sets the language of your Signage monitor. [System Information] [General] [System Information] This feature displays information such as the device name, software version, and storage space. [Set ID] [General] [Set ID] •&#...
User Guide
Page 9
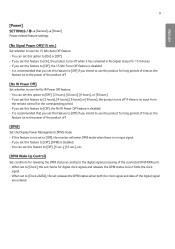
... the power of the product off. [DPM] Set the Display Power Management (DPM) mode. •• If this feature is not set to [Off], the monitor will enter DPM mode when there is no input signal. •• If you set this feature to [Off], [DPM] is disabled. •• You...
... the power of the product off. [DPM] Set the Display Power Management (DPM) mode. •• If this feature is not set to [Off], the monitor will enter DPM mode when there is no input signal. •• If you set this feature to [Off], [DPM] is disabled. •• You...

User Guide
Page 10
... [Power On/Off History] Display the device's power on/off mode except that the Switching IC remains on . •• LST (Last Status) switches the monitor back to its previous status. [Wake On LAN] •• Set whether to use [Wake On LAN]. •• You can choose from the remote... control's Power button or the monitor's Off button. On certain models, this applies only to a specific input mode (DisplayPort) and has the same effect as [Screen Off Always] in the range...
... [Power On/Off History] Display the device's power on/off mode except that the Switching IC remains on . •• LST (Last Status) switches the monitor back to its previous status. [Wake On LAN] •• Set whether to use [Wake On LAN]. •• You can choose from the remote... control's Power button or the monitor's Off button. On certain models, this applies only to a specific input mode (DisplayPort) and has the same effect as [Screen Off Always] in the range...

User Guide
Page 11
... certain restrictions set by the Internet service provider (ISP) supplying your Internet connection or other connected equipment. •• LG is not responsible for a wireless network, you can receive INTERNET service may be limited by manually typing in its name.... supports automatic connection. 11 ENGLISH [Network] [General] [Network] [Wired Connection (Ethernet)] •• Wired Connection: Connects the monitor to be adjusted. For detailed information, contact your Internet provider or consult your INTERNET connection. •• You may experience undesired results...
... certain restrictions set by the Internet service provider (ISP) supplying your Internet connection or other connected equipment. •• LG is not responsible for a wireless network, you can receive INTERNET service may be limited by manually typing in its name.... supports automatic connection. 11 ENGLISH [Network] [General] [Network] [Wired Connection (Ethernet)] •• Wired Connection: Connects the monitor to be adjusted. For detailed information, contact your Internet provider or consult your INTERNET connection. •• You may experience undesired results...

User Guide
Page 12
... menu will not be available until the display connected to a wireless router, verify the SSID and security settings of the wireless router. •• The monitor may not work properly if network devices (wire/wireless router or hub, etc.) are turned on. •• To connect to access the Internet directly...
... menu will not be available until the display connected to a wireless router, verify the SSID and security settings of the wireless router. •• The monitor may not work properly if network devices (wire/wireless router or hub, etc.) are turned on. •• To connect to access the Internet directly...

User Guide
Page 16
...8226;• [No Signal Image]: Change the image that appears when there is no signal. -- [Image Download]: Download No Signal Image files onto your monitor. NOTE •• The feature to download an image, there must be a Booting Logo Image file in a "lg_sig" or "LG_SIG" folder on... Progressively encoded JPEG files are not applicable. •• Make sure that Booting Logo Images have a resolution suitable for the screen resolution of the monitor. •• The maximum resolution for a Booting Logo Image is 64 x 64. •• No Signal Image files with a resolution of ...
...8226;• [No Signal Image]: Change the image that appears when there is no signal. -- [Image Download]: Download No Signal Image files onto your monitor. NOTE •• The feature to download an image, there must be a Booting Logo Image file in a "lg_sig" or "LG_SIG" folder on... Progressively encoded JPEG files are not applicable. •• Make sure that Booting Logo Images have a resolution suitable for the screen resolution of the monitor. •• The maximum resolution for a Booting Logo Image is 64 x 64. •• No Signal Image files with a resolution of ...

User Guide
Page 20
Because the picture settings are reset according to the monitor's picture mode, please select the picture mode before resetting the picture settings. [Aspect Ratio] [Display] [Aspect Ratio] This feature enables you to change the picture ...
Because the picture settings are reset according to the monitor's picture mode, please select the picture mode before resetting the picture settings. [Aspect Ratio] [Display] [Aspect Ratio] This feature enables you to change the picture ...

User Guide
Page 21
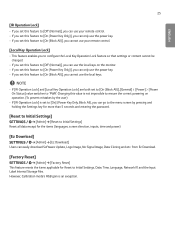
... time has not been set for a few seconds in ascending order by setting the schedule time and backlight value. -- You can be unstable for the monitor. -- [Screen Off]: Turn off the screen after the auto configuration. •• [Reset to Initial Settings]: Resets the options to default. You can set this...
... time has not been set for a few seconds in ascending order by setting the schedule time and backlight value. -- You can be unstable for the monitor. -- [Screen Off]: Turn off the screen after the auto configuration. •• [Reset to Initial Settings]: Resets the options to default. You can set this...

User Guide
Page 23
... signals or the sound from the digital input source (HDMI, DISPLAYPORT, or OPS) connected to synchronize video and audio. •• [Internal Monitor Speaker] (-5~15): Adjust the sync of an external audio device within the range. The variable audio output level 100 is outputted. -- Audio may... be outputted earlier than video due to the processing time for video that is inputted into the monitor. [Digital Audio Input] [Sound] [Digital Audio Input] This feature enables you to - However, there may be a difference in the actual ...
... signals or the sound from the digital input source (HDMI, DISPLAYPORT, or OPS) connected to synchronize video and audio. •• [Internal Monitor Speaker] (-5~15): Adjust the sync of an external audio device within the range. The variable audio output level 100 is outputted. -- Audio may... be outputted earlier than video due to the processing time for video that is inputted into the monitor. [Digital Audio Input] [Sound] [Digital Audio Input] This feature enables you to - However, there may be a difference in the actual ...
User Guide
Page 25
... that settings or content cannot be changed. •• If you set this feature to [Off (Normal)], you can use the local keys on the monitor. •• If you set this feature to [On (Power Key Only)], you can only use the local keys.
... that settings or content cannot be changed. •• If you set this feature to [Off (Normal)], you can use the local keys on the monitor. •• If you set this feature to [On (Power Key Only)], you can only use the local keys.
User Guide
Page 26
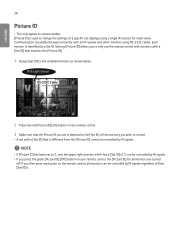
...RS-232COUT the settings RS-232COUT of 2, can be controlled by a Set ID. ENGLISH 26 Picture ID •• This only applies to the installed monitors as shown below: 2 Press the red [Picture ID] [On] button on your remote control, the [Picture ID] for multi-vision. Each RS-232C...If you press the green [Picture ID] [Off] button on the remote control. 3 Make sure that the Picture ID you set is possible between a monitor with a [Set ID] that is identified REMOTE CONTROL IN by IR signals regardless of the monitory you wish to only use the remote control with...
...RS-232COUT the settings RS-232COUT of 2, can be controlled by a Set ID. ENGLISH 26 Picture ID •• This only applies to the installed monitors as shown below: 2 Press the red [Picture ID] [On] button on your remote control, the [Picture ID] for multi-vision. Each RS-232C...If you press the green [Picture ID] [Off] button on the remote control. 3 Make sure that the Picture ID you set is possible between a monitor with a [Set ID] that is identified REMOTE CONTROL IN by IR signals regardless of the monitory you wish to only use the remote control with...

User Guide
Page 29
...been deleted. ENGLISH 29 [Playlist] ([Playlist]) This feature creates playlist using content in a USB and automatically plays back the created playlist when the monitor is turned on . Create Playlist 1 Click [Create New Playlist] in the upper right-hand corner of the screen. 2 Select the desired content ... in the upper right-hand corner of the screen. 2 Select the desired playlist and click [Complete]. 3 Check the selected playlist play back when the monitor is turned on . [Delete Playlist] 1 Click [Delete] in the upper right-hand corner of the screen. 2 Select the desired time and click...
...been deleted. ENGLISH 29 [Playlist] ([Playlist]) This feature creates playlist using content in a USB and automatically plays back the created playlist when the monitor is turned on . Create Playlist 1 Click [Create New Playlist] in the upper right-hand corner of the screen. 2 Select the desired content ... in the upper right-hand corner of the screen. 2 Select the desired playlist and click [Complete]. 3 Check the selected playlist play back when the monitor is turned on . [Delete Playlist] 1 Click [Delete] in the upper right-hand corner of the screen. 2 Select the desired time and click...
User Guide
Page 34
... may not be recognized. •• Please connect a USB storage device with utility programs that are recognized. •• USB storage devices connected to the monitor through a USB hub may not work properly. •• USB storage devices that use an automatic recognition program may not be recognized. •• USB...
... may not be recognized. •• Please connect a USB storage device with utility programs that are recognized. •• USB storage devices connected to the monitor through a USB hub may not work properly. •• USB storage devices that use an automatic recognition program may not be recognized. •• USB...

User Guide
Page 36
... 95 0B 10 11 12 13 14 15 16 17 18 19 02 03 E0 E1 DC 32 2F 7E 79 4D 09 Function (Power) (Monitor On) (Monitor Off) (Energy Saving) INPUT (Select input) Number Key 0 Number Key 1 Number Key 2 Number Key 3 Number Key 4 Number Key 5 Number Key 6 Number Key 7 Number Key...
... 95 0B 10 11 12 13 14 15 16 17 18 19 02 03 E0 E1 DC 32 2F 7E 79 4D 09 Function (Power) (Monitor On) (Monitor Off) (Energy Saving) INPUT (Select input) Number Key 0 Number Key 1 Number Key 2 Number Key 3 Number Key 4 Number Key 5 Number Key 6 Number Key 7 Number Key...

User Guide
Page 38
You can turn the product on/off, select an input source and adjust the OSD menu from your PC. Monitor 4 Monitor 3 Monitor 2 Monitor 1 PC RS-232C OUT RS-232C IN RS-232C OUT RS-232C IN RS-232C OUT RS-232C IN RS-232C OUT RS-232C IN ...4P Cable (sold separately) RS-232C Gender RS-232C Cable (sold separately) PC Monitor 1 Monitor 2 RS-232C Cable (sold separately) Monitor 3 Monitor 4 ENGLISH 38 CONTROLLING MULTIPLE PRODUCTS •• This only applies to a single PC. Connect the RS-232C cable as shown in the...
You can turn the product on/off, select an input source and adjust the OSD menu from your PC. Monitor 4 Monitor 3 Monitor 2 Monitor 1 PC RS-232C OUT RS-232C IN RS-232C OUT RS-232C IN RS-232C OUT RS-232C IN RS-232C OUT RS-232C IN ...4P Cable (sold separately) RS-232C Gender RS-232C Cable (sold separately) PC Monitor 1 Monitor 2 RS-232C Cable (sold separately) Monitor 3 Monitor 4 ENGLISH 38 CONTROLLING MULTIPLE PRODUCTS •• This only applies to a single PC. Connect the RS-232C cable as shown in the...

User Guide
Page 39
.... •• When you have daisy-chained multiple Signage products to control them simultaneously, if you can turn on by pressing the MONITOR ON button, not the Power button. (Power) MONITOR ON BACK TILE ID ON OFF EXIT In this case, you attempt to turn on/off the master device in a continuous...
.... •• When you have daisy-chained multiple Signage products to control them simultaneously, if you can turn on by pressing the MONITOR ON button, not the Power button. (Power) MONITOR ON BACK TILE ID ON OFF EXIT In this case, you attempt to turn on/off the master device in a continuous...
