
Owners Manual
Page 3
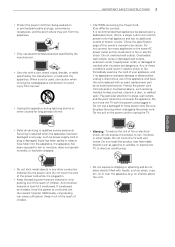
.... Be sure do not expose this apparatus during lightning storms or when unused for long periods of children. on or over . yyUse only with a cart, stand, tripod, bracket, or table specified by an authorized service. that appliance and has no additional outlets or branch circuits. Overloaded wall outlets, loose or damaged...
.... Be sure do not expose this apparatus during lightning storms or when unused for long periods of children. on or over . yyUse only with a cart, stand, tripod, bracket, or table specified by an authorized service. that appliance and has no additional outlets or branch circuits. Overloaded wall outlets, loose or damaged...
Owners Manual
Page 8
Attaching the stand 15 - Tidying cables 18 MAKING CONNECTIONS 18 Connecting to an antenna or cable 19 Connecting to a PC 24 - Component Connection 23 - yyYour TV's OSD (On ... Extras 12 Parts and Buttons 13 Lifting and moving the TV 14 Setting up the TV 14 - Mounting on a table 17 - Screen, frame, cabinet and stand 38 - yyNew features may differ slightly from the input source or product model that shown in the future. DVI to an Audio System 26 - HDMI...
Attaching the stand 15 - Tidying cables 18 MAKING CONNECTIONS 18 Connecting to an antenna or cable 19 Connecting to a PC 24 - Component Connection 23 - yyYour TV's OSD (On ... Extras 12 Parts and Buttons 13 Lifting and moving the TV 14 Setting up the TV 14 - Mounting on a table 17 - Screen, frame, cabinet and stand 38 - yyNew features may differ slightly from the input source or product model that shown in the future. DVI to an Audio System 26 - HDMI...
Owners Manual
Page 9
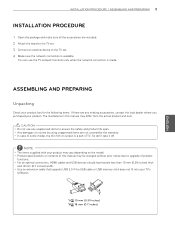
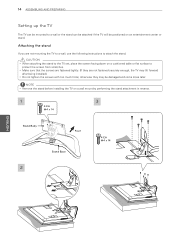
... and 18 mm (0.7 inches) width. INSTALLATION PROCEDURE / ASSEMBLING AND PREPARING 9 INSTALLATION PROCEDURE 1 Open the package and make sure all the accessories are included. 2 Attach the stand to the TV set . 4 Make sure the network connection is available. yyIn case of product functions. yyProduct specifications or contents of this manual may be...
... and 18 mm (0.7 inches) width. INSTALLATION PROCEDURE / ASSEMBLING AND PREPARING 9 INSTALLATION PROCEDURE 1 Open the package and make sure all the accessories are included. 2 Attach the stand to the TV set . 4 Make sure the network connection is available. yyIn case of product functions. yyProduct specifications or contents of this manual may be...
Owners Manual
Page 10
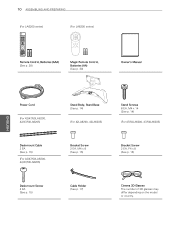
..., 42/47/50LA6205) Desk-mount Cable 2 EA (See p. 15) (For 42/47/50LA6200, 42/47/50LA6205) Desk-mount Screw 2 EA (See p. 15) Stand Body, Stand Base (See p. 14) (For 42LA6200, 42LA6205) Stand Screws 8 EA, M4 x 14 (See p. 14) (For 47/50LA6200, 47/50LA6205) Bracket Screw 2 EA, M4 x 8 (See p. 15) Bracket Screw 2 EA, P4...
..., 42/47/50LA6205) Desk-mount Cable 2 EA (See p. 15) (For 42/47/50LA6200, 42/47/50LA6205) Desk-mount Screw 2 EA (See p. 15) Stand Body, Stand Base (See p. 14) (For 42LA6200, 42LA6205) Stand Screws 8 EA, M4 x 14 (See p. 14) (For 47/50LA6200, 47/50LA6205) Bracket Screw 2 EA, M4 x 8 (See p. 15) Bracket Screw 2 EA, P4...
Owners Manual
Page 14
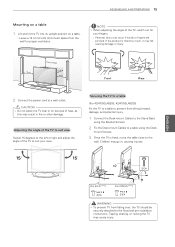
..., the TV may be positioned on a wall mount by performing the stand attachment in reverse. 1 3 4 EA M4 x 14 ENGLISH Stand Body Front Stand Base 2 4 EA M4 x 14 NOTE yyRemove the stand before installing the TV on an entertainment center or stand. otherwise they are not mounting the TV to a wall, use the...instructions to protect the screen from scratches. 14 ASSEMBLING AND PREPARING Setting up the TV The TV can be mounted to a wall or the stand can be attached if the TV will be damaged and come loose later. yyMake sure that the screws are fastened tightly. (If they may...
..., the TV may be positioned on a wall mount by performing the stand attachment in reverse. 1 3 4 EA M4 x 14 ENGLISH Stand Body Front Stand Base 2 4 EA M4 x 14 NOTE yyRemove the stand before installing the TV on an entertainment center or stand. otherwise they are not mounting the TV to a wall, use the...instructions to protect the screen from scratches. 14 ASSEMBLING AND PREPARING Setting up the TV The TV can be mounted to a wall or the stand can be attached if the TV will be damaged and come loose later. yyMake sure that the screws are fastened tightly. (If they may...
Owners Manual
Page 15
... table close to the wall. Leave a 10 cm (4 inch) (minimum) space from tilting forward, damage, and potential injury. 1 Connect the Desk-mount Cables to the Stand Base using the Bracket Screws. 2 Fix the Desk-mount Cables to a table using the Desk- ENGLISH 10 cm 10 cm (4 inches) 10 cm 10 cm...
... table close to the wall. Leave a 10 cm (4 inch) (minimum) space from tilting forward, damage, and potential injury. 1 Connect the Desk-mount Cables to the Stand Base using the Bracket Screws. 2 Fix the Desk-mount Cables to a table using the Desk- ENGLISH 10 cm 10 cm (4 inches) 10 cm 10 cm...
Owners Manual
Page 34
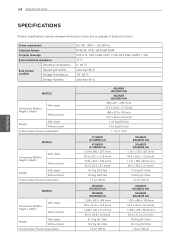
... MODELS Dimensions (Width x Height x Depth) With stand Without stand Weight With stand Without stand Current Value / Power consumption 42LA6200 (42LA6200-UA) 42LA6205 (42LA6205-UA) 964 x 631 x 294 (mm) 37.9 x 24.8 x 11.5 (inch) 964 x 573 x 78 (mm) 37.9 x 22.5 x 3.0 (inch) 11.8 Kg (26.0 lbs) 10.0 Kg (22.0 lbs) 1.1 A / 110 W 47LA6200 (47LA6200-UA) 47LA6205 (47LA6205-UA) 1,076 x 695...
... MODELS Dimensions (Width x Height x Depth) With stand Without stand Weight With stand Without stand Current Value / Power consumption 42LA6200 (42LA6200-UA) 42LA6205 (42LA6205-UA) 964 x 631 x 294 (mm) 37.9 x 24.8 x 11.5 (inch) 964 x 573 x 78 (mm) 37.9 x 22.5 x 3.0 (inch) 11.8 Kg (26.0 lbs) 10.0 Kg (22.0 lbs) 1.1 A / 110 W 47LA6200 (47LA6200-UA) 47LA6205 (47LA6205-UA) 1,076 x 695...
Owners Manual
Page 38
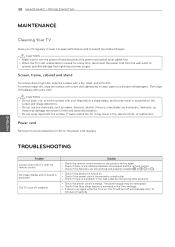
... and properly installed ( to , to extend the product lifespan. yyCheck if there is activated in clean water or a diluted mild detergent. Screen, frame, cabinet and stand To remove dust or light dirt, wipe the surface with a dry cloth. To remove major dirt, wipe the surface with the remote control. Then wipe...
... and properly installed ( to , to extend the product lifespan. yyCheck if there is activated in clean water or a diluted mild detergent. Screen, frame, cabinet and stand To remove dust or light dirt, wipe the surface with a dry cloth. To remove major dirt, wipe the surface with the remote control. Then wipe...

Owners Manual
Page 39
... a "larger than life" flat panel display. Follow the manufacturer's recommendations for proper use of drawers. • Remember that are not always supported on the proper stands or installed according to climb on or play with steel studs or old cinder block construction. CHILD SAFETY: It Makes A Difference How and Where You...
... a "larger than life" flat panel display. Follow the manufacturer's recommendations for proper use of drawers. • Remember that are not always supported on the proper stands or installed according to climb on or play with steel studs or old cinder block construction. CHILD SAFETY: It Makes A Difference How and Where You...