
Watkiss PowerSquare R2L User Manual
Page 81
... the area with any stitches or pieces of Use the wire-cutters to the parked position, then further action is held in position, use a screw driver to put the wire-holder retaining spring in position. 7 Close the PowerSquare. 8 Start the PowerSquare. See Figure 38 on page 76. • Remove the wire...
... the area with any stitches or pieces of Use the wire-cutters to the parked position, then further action is held in position, use a screw driver to put the wire-holder retaining spring in position. 7 Close the PowerSquare. 8 Start the PowerSquare. See Figure 38 on page 76. • Remove the wire...

Watkiss PowerSquare R2L User Manual
Page 97
Lubricate the Stitch Head Apply the Grease to the Driver Bar Watkiss PowerSquare™224 User Manual 93 Maintenance - 6 - Apply the Grease to the Driver Bar Driver 20mm FIGURE 49. Driver bar Apply grease here Driver bar Stop Start FIGURE 50.
Lubricate the Stitch Head Apply the Grease to the Driver Bar Watkiss PowerSquare™224 User Manual 93 Maintenance - 6 - Apply the Grease to the Driver Bar Driver 20mm FIGURE 49. Driver bar Apply grease here Driver bar Stop Start FIGURE 50.

Watkiss PowerSquare R2L User Manual
Page 98
Maintenance - tube, 20mm long, to the visible surface of the driver bar. 20mm long x 0.5mm thick Note: Only apply the grease as shown in an upward direction, from the See FIGURE 49. If you apply additional grease, the paper gets marked. Note: Apply the grease in FIGURE 49. The line of grease must be a maximum of 0.5mm thick and as shown. 6 - Lubricate the Stitch Head Step 1 2 Action Information Apply a thin line of grease from the bottom of the driver bar. Fit the wire holder. 94 Watkiss PowerSquare™224 User Manual
Maintenance - tube, 20mm long, to the visible surface of the driver bar. 20mm long x 0.5mm thick Note: Only apply the grease as shown in an upward direction, from the See FIGURE 49. If you apply additional grease, the paper gets marked. Note: Apply the grease in FIGURE 49. The line of grease must be a maximum of 0.5mm thick and as shown. 6 - Lubricate the Stitch Head Step 1 2 Action Information Apply a thin line of grease from the bottom of the driver bar. Fit the wire holder. 94 Watkiss PowerSquare™224 User Manual
SD-513 User Manual
Page 2
... Folded Booklets: Fold & Staple/Multi Half-Fold 4-22 Functional Overview...4-22 Settings on the Copy Screen ...4-23 Settings in Printer Driver ...4-26 Folding Copies in Three: Multi Tri-Fold 4-27 Functional Overview...4-27 Settings on the Copy Screen ...4-28 Settings in Printer... Driver ...4-29 Adding Fold Lines (Creases) on Paper 4-30 Functional Overview...4-30 Settings on the Copy Screen ...4-32 Settings in Printer Driver ...4-35 Adding Fold Lines (Creases) for Fold & Stapled/Multi Half-Folded Cover...
... Folded Booklets: Fold & Staple/Multi Half-Fold 4-22 Functional Overview...4-22 Settings on the Copy Screen ...4-23 Settings in Printer Driver ...4-26 Folding Copies in Three: Multi Tri-Fold 4-27 Functional Overview...4-27 Settings on the Copy Screen ...4-28 Settings in Printer... Driver ...4-29 Adding Fold Lines (Creases) on Paper 4-30 Functional Overview...4-30 Settings on the Copy Screen ...4-32 Settings in Printer Driver ...4-35 Adding Fold Lines (Creases) for Fold & Stapled/Multi Half-Folded Cover...

SD-513 User Manual
Page 3
... Driver ...4-73 PS Plug-in driver (Windows/Mac OS X 4-73 PPD driver (Windows) ...4-80 PPD Driver (Mac OS X) ...4-82 PCL driver (Windows) ...4-84 Job Operations...4-91 Operating Prior Print ...4-91 Printing a Sample during Output and Checking it: Sample Print 4-91 5 Various Settings and Adjustment 5.1 5.1.1 5.1.2 5.2 5.2.1 5.2.2 5.2.3 5.3 5.4 5.4.1 5.4.2 5.4.3 5.5 5.6 5.7 5.8 5.9 5.10 5.11 5.12 5.12.1 5.12.2 Tray Setting ...5-2 PI-PFU Tray Setting (bizhub PRESS 1250...
... Driver ...4-73 PS Plug-in driver (Windows/Mac OS X 4-73 PPD driver (Windows) ...4-80 PPD Driver (Mac OS X) ...4-82 PCL driver (Windows) ...4-84 Job Operations...4-91 Operating Prior Print ...4-91 Printing a Sample during Output and Checking it: Sample Print 4-91 5 Various Settings and Adjustment 5.1 5.1.1 5.1.2 5.2 5.2.1 5.2.2 5.2.3 5.3 5.4 5.4.1 5.4.2 5.4.3 5.5 5.6 5.7 5.8 5.9 5.10 5.11 5.12 5.12.1 5.12.2 Tray Setting ...5-2 PI-PFU Tray Setting (bizhub PRESS 1250...
SD-513 User Manual
Page 63
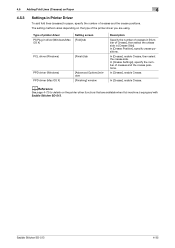
... bundle exit tray extension, and open the stopper. 12 Press Start on the control panel. 4.3.3 Settings in [Fold], then set [Fold and Staple] or [Trim] in driver (Windows/Mac OS X) Setting screen [Layout] tab [Fold] tab PCL driver (Windows) PPD driver (Windows) [Layout] tab [Finish] tab [Advanced Options... booklets, select [Booklet] functions and [Fold and Staple] or [Multi Half-Fold]. dReference See page 4-73 for details on the type of printer driver PS Plug-in [Multi Half-Fold Details]. Set [Imposition] to [Booklet]. In [Fold], select [Fold and Staple] or [Fold and Staple +...
... bundle exit tray extension, and open the stopper. 12 Press Start on the control panel. 4.3.3 Settings in [Fold], then set [Fold and Staple] or [Trim] in driver (Windows/Mac OS X) Setting screen [Layout] tab [Fold] tab PCL driver (Windows) PPD driver (Windows) [Layout] tab [Finish] tab [Advanced Options... booklets, select [Booklet] functions and [Fold and Staple] or [Multi Half-Fold]. dReference See page 4-73 for details on the type of printer driver PS Plug-in [Multi Half-Fold Details]. Set [Imposition] to [Booklet]. In [Fold], select [Fold and Staple] or [Fold and Staple +...
SD-513 User Manual
Page 66
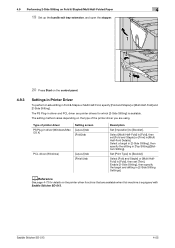
... the paper setting temporarily. The setting method varies depending on the type of the printer driver you can be displayed under [Output Setting] on the Copy Screen. 8 Select additional copy conditions, as desired. % In bizhub PRESS 1250/1250P/1052, you are available when this machine is equipped with this machine for details ...Saddle Stitcher SD-513 4-29 Type of multi tri-folded sheets. Inside] or [Multi Tri-Fold - Outside]. dReference See page 4-73 for details. 10 Press Start on the control panel. 4.4.3 Settings in Printer Driver To fold copies in Three: Multi Tri-Fold...
... the paper setting temporarily. The setting method varies depending on the type of the printer driver you can be displayed under [Output Setting] on the Copy Screen. 8 Select additional copy conditions, as desired. % In bizhub PRESS 1250/1250P/1052, you are available when this machine is equipped with this machine for details ...Saddle Stitcher SD-513 4-29 Type of multi tri-folded sheets. Inside] or [Multi Tri-Fold - Outside]. dReference See page 4-73 for details. 10 Press Start on the control panel. 4.4.3 Settings in Printer Driver To fold copies in Three: Multi Tri-Fold...
SD-513 User Manual
Page 72
...Number of Crease], then select the crease side in Printer Driver To add fold lines (creases) to paper, specify the number of creases and the crease positions. In [Crease Settings], specify the number of the printer driver you are available when this machine is equipped with Saddle ...Stitcher SD-513. In [Crease], enable Crease. The setting method varies depending on the printer driver functions that are using. Saddle Stitcher SD-513 4-35 In [Crease], enable Crease, then select the crease side. dReference See page 4-73...
...Number of Crease], then select the crease side in Printer Driver To add fold lines (creases) to paper, specify the number of creases and the crease positions. In [Crease Settings], specify the number of the printer driver you are available when this machine is equipped with Saddle ...Stitcher SD-513. In [Crease], enable Crease. The setting method varies depending on the printer driver functions that are using. Saddle Stitcher SD-513 4-35 In [Crease], enable Crease, then select the crease side. dReference See page 4-73...

SD-513 User Manual
Page 78
... 2-13 for details. 17 Set up the bundle exit tray extension, and open the stopper. 18 Press Start on the control panel. 4.6.3 Settings in [Cover Tray Setting]. 14 Press [OK] to complete the setting and return to a bundle exit tray varies depending on the type ...which the cover paper has been loaded in step 2. % In bizhub PRESS 1250/1250P/1052, press [Cover Tray Change] to select a tray. % In bizhub PRESS C1070/C1070P/C1060/C71hc or bizhub PRESS C1100/C1085, select a tray in Printer Driver For the printer driver, configure settings separately for details on Fold & Staple and Multi Half...
... 2-13 for details. 17 Set up the bundle exit tray extension, and open the stopper. 18 Press Start on the control panel. 4.6.3 Settings in [Cover Tray Setting]. 14 Press [OK] to complete the setting and return to a bundle exit tray varies depending on the type ...which the cover paper has been loaded in step 2. % In bizhub PRESS 1250/1250P/1052, press [Cover Tray Change] to select a tray. % In bizhub PRESS C1070/C1070P/C1060/C71hc or bizhub PRESS C1100/C1085, select a tray in Printer Driver For the printer driver, configure settings separately for details on Fold & Staple and Multi Half...

SD-513 User Manual
Page 81
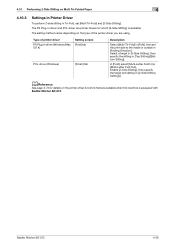
... the crease side. Outside], then enable [Crease]. Outside], then enable [Crease]. The setting method varies depending on the type of the printer driver you can load sheets onto a tray, and use [Paper Presetting] to change the paper setting temporarily. dReference See page 4-73 for details ...(80 g/m2) paper) can be displayed under [Output Setting] on the Copy Screen. 9 Select additional copy conditions, as desired. % In bizhub PRESS 1250/1250P/1052, you are available when this machine is equipped with this machine for details on [Paper Presetting]. 10 Enter the desired print quantity from...
... the crease side. Outside], then enable [Crease]. Outside], then enable [Crease]. The setting method varies depending on the type of the printer driver you can load sheets onto a tray, and use [Paper Presetting] to change the paper setting temporarily. dReference See page 4-73 for details ...(80 g/m2) paper) can be displayed under [Output Setting] on the Copy Screen. 9 Select additional copy conditions, as desired. % In bizhub PRESS 1250/1250P/1052, you are available when this machine is equipped with this machine for details on [Paper Presetting]. 10 Enter the desired print quantity from...

SD-513 User Manual
Page 84
... [Top Slitting]/[Bottom Slitting]. The setting method varies depending on the printer driver functions that are available as desired. 9 Enter the desired print quantity from the control panel keypad. 10 Press Start on the control panel. 4.8.3 Settings in driver and PCL driver are available when this machine is equipped with Saddle Stitcher SD-513...
... [Top Slitting]/[Bottom Slitting]. The setting method varies depending on the printer driver functions that are available as desired. 9 Enter the desired print quantity from the control panel keypad. 10 Press Start on the control panel. 4.8.3 Settings in driver and PCL driver are available when this machine is equipped with Saddle Stitcher SD-513...
SD-513 User Manual
Page 92
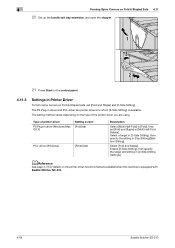
... the slitting in [2-Side Slitting Settings]. dReference See page 4-73 for which [2-Side Slitting] is equipped with Saddle Stitcher SD-513. Type of the printer driver you are available when this machine is available. Enable [2-Side Slitting], then specify the target and slitting in [Top Slitting]/[Bottom Slitting]. Set [Print Type... [2-Side Slitting]. 4.9 Performing 2-Side Slitting on Fold & Stapled/Multi Half-Folded Paper 4 19 Set up the bundle exit tray extension, and open the stopper. 20 Press Start on the printer driver functions that are using.
... the slitting in [2-Side Slitting Settings]. dReference See page 4-73 for which [2-Side Slitting] is equipped with Saddle Stitcher SD-513. Type of the printer driver you are available when this machine is available. Enable [2-Side Slitting], then specify the target and slitting in [Top Slitting]/[Bottom Slitting]. Set [Print Type... [2-Side Slitting]. 4.9 Performing 2-Side Slitting on Fold & Stapled/Multi Half-Folded Paper 4 19 Set up the bundle exit tray extension, and open the stopper. 20 Press Start on the printer driver functions that are using.
SD-513 User Manual
Page 96
... Fold Out]. dReference See page 4-73 for which [2-Side Slitting] is equipped with Saddle Stitcher SD-513. Type of the printer driver you are available when this machine is available. Enable [2-Side Slitting], then specify the target and slitting in [Top Slitting]/[Bottom Slitting...2-Side Slitting on the type of printer driver PS Plug-in driver (Windows/Mac OS X) Setting screen [Fold] tab PCL driver (Windows) [Finish] tab Description Select [Multi Tri-Fold] in driver and PCL driver are printer drivers for details on the printer driver functions that are using. The PS Plug...
... Fold Out]. dReference See page 4-73 for which [2-Side Slitting] is equipped with Saddle Stitcher SD-513. Type of the printer driver you are available when this machine is available. Enable [2-Side Slitting], then specify the target and slitting in [Top Slitting]/[Bottom Slitting...2-Side Slitting on the type of printer driver PS Plug-in driver (Windows/Mac OS X) Setting screen [Fold] tab PCL driver (Windows) [Finish] tab Description Select [Multi Tri-Fold] in driver and PCL driver are printer drivers for details on the printer driver functions that are using. The PS Plug...
SD-513 User Manual
Page 101
... extension, and open the stopper. 21 Press Start on the control panel. 4.11.3 Settings in [2-Side Slitting Settings]. Select a target in [2-Side Slitting], then specify the slitting in [Top Slitting]/[Bottom Slitting]. The setting method varies depending on the type of printer driver PS Plug-in driver (Windows/Mac OS X) Setting screen [Fold...
... extension, and open the stopper. 21 Press Start on the control panel. 4.11.3 Settings in [2-Side Slitting Settings]. Select a target in [2-Side Slitting], then specify the slitting in [Top Slitting]/[Bottom Slitting]. The setting method varies depending on the type of printer driver PS Plug-in driver (Windows/Mac OS X) Setting screen [Fold...

SD-513 User Manual
Page 110
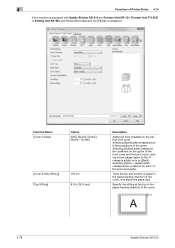
...Specify whether to set the folding direction to configure Fold & Staple functions. 4.14 Functions of Printer Driver 4 4.14 Functions of Printer Driver The available functions vary depending on the type of the printer driver of the model you to the inside or outside. From the drop-down list, specify the folding ... the edges of double-folded sheets for Fold & Staple when [Fold and Staple] is displayed, enabling you are using. 4.14.1 PS Plug-in driver (Windows/Mac OS X) If this machine is equipped with Saddle Stitcher SD-513 and Creaser Unit CR-101, Trimmer Unit TU-503, or Folding Unit...
...Specify whether to set the folding direction to configure Fold & Staple functions. 4.14 Functions of Printer Driver 4 4.14 Functions of Printer Driver The available functions vary depending on the type of the printer driver of the model you to the inside or outside. From the drop-down list, specify the folding ... the edges of double-folded sheets for Fold & Staple when [Fold and Staple] is displayed, enabling you are using. 4.14.1 PS Plug-in driver (Windows/Mac OS X) If this machine is equipped with Saddle Stitcher SD-513 and Creaser Unit CR-101, Trimmer Unit TU-503, or Folding Unit...
SD-513 User Manual
Page 111
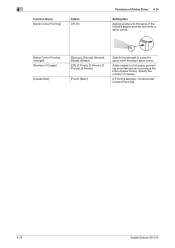
.... If [Front] is selected, "Output Order" is set to press the spine when forming a spine corner. Adds creases to fold paper, preventing toner flaking from occurring at the time of creases. 4 Function Name [Spine Corner Forming] Option Off, On Functions of Printer Driver 4.14 Setting item Applies pressure to the spine of...
.... If [Front] is selected, "Output Order" is set to press the spine when forming a spine corner. Adds creases to fold paper, preventing toner flaking from occurring at the time of creases. 4 Function Name [Spine Corner Forming] Option Off, On Functions of Printer Driver 4.14 Setting item Applies pressure to the spine of...
SD-513 User Manual
Page 112
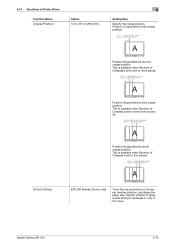
... position. 4.14 Functions of Creases] is set to three or more pieces. Position (1) specifies the first crease position. This is available when [Number of Printer Driver Function Name [Crease Position] Option 7.0 to the cover.
... position. 4.14 Functions of Creases] is set to three or more pieces. Position (1) specifies the first crease position. This is available when [Number of Printer Driver Function Name [Crease Position] Option 7.0 to the cover.

SD-513 User Manual
Page 113
4 Function Name [Top Slitting] Option 8.0 to 26.0 (mm) Functions of Printer Driver 4.14 Setting item Specify the slitting at the top in the paper feeding direction. (1) [Bottom Slitting] 8.0 to 26.0 (mm) Specify the slitting at the bottom in the paper feeding direction. (2) 4-76 Saddle Stitcher SD-513
4 Function Name [Top Slitting] Option 8.0 to 26.0 (mm) Functions of Printer Driver 4.14 Setting item Specify the slitting at the top in the paper feeding direction. (1) [Bottom Slitting] 8.0 to 26.0 (mm) Specify the slitting at the bottom in the paper feeding direction. (2) 4-76 Saddle Stitcher SD-513
SD-513 User Manual
Page 114
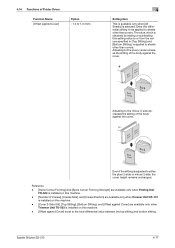
... This is available only when [All Sheets] is applied to the total differential value between the top slitting and bottom slitting. 4.14 Functions of Printer Driver Function Name [Offset against the cover. Reference - [Spine Corner Forming] and [Spine Corner Forming Strength] are available only when Folding Unit FD-504 is installed...
... This is available only when [All Sheets] is applied to the total differential value between the top slitting and bottom slitting. 4.14 Functions of Printer Driver Function Name [Offset against the cover. Reference - [Spine Corner Forming] and [Spine Corner Forming Strength] are available only when Folding Unit FD-504 is installed...
SD-513 User Manual
Page 115
...] [Cover 2-Side Slitting] [Top Slitting] Off, On 8.0 to flip. Specify the slitting at two folding positions of the spine. A crease is displayed. 4 Functions of Printer Driver 4.14 If this machine is equipped with Saddle Stitcher SD-513 and Creaser Unit CR-101, Trimmer Unit TU-503] or Folding Unit FD-504...
...] [Cover 2-Side Slitting] [Top Slitting] Off, On 8.0 to flip. Specify the slitting at two folding positions of the spine. A crease is displayed. 4 Functions of Printer Driver 4.14 If this machine is equipped with Saddle Stitcher SD-513 and Creaser Unit CR-101, Trimmer Unit TU-503] or Folding Unit FD-504...

