ScanDIVA User Guide
Page 12
...it is subject to the following precautions. Please keep this manual and use of your authorized dealer when you for choosing our Book Scanner (herein after referred to as a quick and handy reference tool for which no explanations are designed to provide reasonable protection against... with the equipment. This device must be subject to penalty under FCC regulations. NEVER attempt to disassemble or modify the Scanner, as it as "the Scanner"). This equipment generates, uses, and can radiate radio frequency energy and, if not installed and used in a commercial environment...
...it is subject to the following precautions. Please keep this manual and use of your authorized dealer when you for choosing our Book Scanner (herein after referred to as a quick and handy reference tool for which no explanations are designed to provide reasonable protection against... with the equipment. This device must be subject to penalty under FCC regulations. NEVER attempt to disassemble or modify the Scanner, as it as "the Scanner"). This equipment generates, uses, and can radiate radio frequency energy and, if not installed and used in a commercial environment...
ScanDIVA User Guide
Page 14
... materials may be contrary to the provisions of the United States Copyright laws, title 17 of the United States Code. Obligations or Securities of the scanner. Copyright Books, magazines, journals and other use of such copyrighted materials may be clearly visible to users of the United States 3. Post a copy of any Foreign...
... materials may be contrary to the provisions of the United States Copyright laws, title 17 of the United States Code. Obligations or Securities of the scanner. Copyright Books, magazines, journals and other use of such copyrighted materials may be clearly visible to users of the United States 3. Post a copy of any Foreign...
ScanDIVA User Guide
Page 17
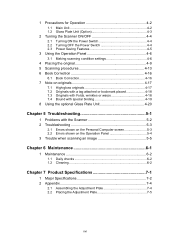
... 3-10 2.4 CCD Gain 3-12 2.5 Exposure Time 3-15 2.6 Black Shading 3-16 2.7 White Shading 3-17 2.8 White Balance 3-19 2.9 Tone Curve 3-20 2.10 Image Registration 3-26 3 Deletion of ScanDIVA TWAIN Driver 3-27 4 Driver start-up 3-30 5 Book Scanner Screen 3-31 5.1 Basic Screen 3-31 5.2 Preview Screen 3-35 5.3 Detail Screen 3-37 Chapter 4 Operation 4-1 xv
... 3-10 2.4 CCD Gain 3-12 2.5 Exposure Time 3-15 2.6 Black Shading 3-16 2.7 White Shading 3-17 2.8 White Balance 3-19 2.9 Tone Curve 3-20 2.10 Image Registration 3-26 3 Deletion of ScanDIVA TWAIN Driver 3-27 4 Driver start-up 3-30 5 Book Scanner Screen 3-31 5.1 Basic Screen 3-31 5.2 Preview Screen 3-35 5.3 Detail Screen 3-37 Chapter 4 Operation 4-1 xv
ScanDIVA User Guide
Page 18
... Operation 4-2 1.1 Main Unit 4-2 1.2 Glass Plate Unit (Option 4-3 2 Turning the Scanner ON/OFF 4-4 2.1 Turning ON the Power Switch 4-4 2.2 Turning OFF the Power Switch 4-4 2.3 Power Saving Features 4-5 3 Using the Operation Panel 4-6 3.1 Making scanning condition settings 4-6 4 Placing the original 4-9 5 Scanning procedures 4-13 6 Book Correction 4-16 6.1 Book Correction 4-16 7 Note on originals 4-17 7.1 High-gloss originals 4-17...
... Operation 4-2 1.1 Main Unit 4-2 1.2 Glass Plate Unit (Option 4-3 2 Turning the Scanner ON/OFF 4-4 2.1 Turning ON the Power Switch 4-4 2.2 Turning OFF the Power Switch 4-4 2.3 Power Saving Features 4-5 3 Using the Operation Panel 4-6 3.1 Making scanning condition settings 4-6 4 Placing the original 4-9 5 Scanning procedures 4-13 6 Book Correction 4-16 6.1 Book Correction 4-16 7 Note on originals 4-17 7.1 High-gloss originals 4-17...
ScanDIVA User Guide
Page 20
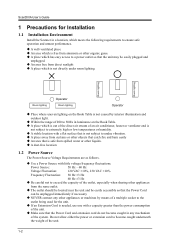
...any mechanism of the system. Room lighting Room lighting Room lighting Operator Room lighting Operator Place where uneven lighting on the Book Table is not caused by means of a multiple socket to the outlet being used for the unit. If an ...Extension Cord is needed, use one with little voltage/frequency fluctuations. ScanDIVA User's Guide 1 Precautions for Installation 1.1 Installation Environment Install the Scanner in a location, which meets the following requirements to ensure safe operation and utmost performance. A well...
...any mechanism of the system. Room lighting Room lighting Room lighting Operator Room lighting Operator Place where uneven lighting on the Book Table is not caused by means of a multiple socket to the outlet being used for the unit. If an ...Extension Cord is needed, use one with little voltage/frequency fluctuations. ScanDIVA User's Guide 1 Precautions for Installation 1.1 Installation Environment Install the Scanner in a location, which meets the following requirements to ensure safe operation and utmost performance. A well...
ScanDIVA User Guide
Page 22
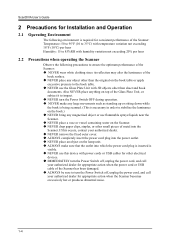
...ScanDIVA User's Guide 2 Precautions for Installation and Operation 2.1 Operating Environment The following environment is required for consistent performance of the Scanner: Temperature: 50 to 95°F (10 to 35°C) with temperature variation not exceeding 18°F (10°C) per hour 2.2 Precautions when operating the Scanner... authorized dealer for other than the original on the book table or apply excessive pressure to stabilize the luminance on the lamp unit. ALWAYS make sure that the outlet into the Scanner. If this device with humidity variation not exceeding 20...
...ScanDIVA User's Guide 2 Precautions for Installation and Operation 2.1 Operating Environment The following environment is required for consistent performance of the Scanner: Temperature: 50 to 95°F (10 to 35°C) with temperature variation not exceeding 18°F (10°C) per hour 2.2 Precautions when operating the Scanner... authorized dealer for other than the original on the book table or apply excessive pressure to stabilize the luminance on the lamp unit. ALWAYS make sure that the outlet into the Scanner. If this device with humidity variation not exceeding 20...
ScanDIVA User Guide
Page 23
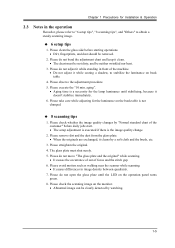
... 8. Please check whether the image quality changes by "Formal standard chart of focus and the stitch gap. 6. Please check the scanning image on book table. 4. Please clean the glass side before daily jobs start. The setup adjustment is executed if there is a necessity for Installation &... wrinkled nor bent. 3. Please do not adjust it while standing in image density between quadrants. 7. Please avoid motion such as walking near the scanner while scanning. It causes differences in front of the machine. Do not adjust it clean. The chart must shut...
... 8. Please check whether the image quality changes by "Formal standard chart of focus and the stitch gap. 6. Please check the scanning image on book table. 4. Please clean the glass side before daily jobs start. The setup adjustment is executed if there is a necessity for Installation &... wrinkled nor bent. 3. Please do not adjust it while standing in image density between quadrants. 7. Please avoid motion such as walking near the scanner while scanning. It causes differences in front of the machine. Do not adjust it clean. The chart must shut...
ScanDIVA User Guide
Page 25
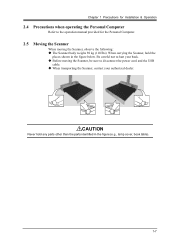
...parts other than the parts identified in the figure below. Chapter 1 Precautions for the Personal Computer. 2.5 Moving the Scanner When moving the Scanner, be sure to the operation manual provided for Installation & Operation 2.4 Precautions when operating the Personal Computer Refer to ...disconnect the power cord and the USB cable. When transporting the Scanner, contact your authorized dealer. CAUTION Never hold the places shown in the figure (e.g., lamp cover, book table). 1-7 Be careful not to hurt your back. Before moving the...
...parts other than the parts identified in the figure below. Chapter 1 Precautions for the Personal Computer. 2.5 Moving the Scanner When moving the Scanner, be sure to the operation manual provided for Installation & Operation 2.4 Precautions when operating the Personal Computer Refer to ...disconnect the power cord and the USB cable. When transporting the Scanner, contact your authorized dealer. CAUTION Never hold the places shown in the figure (e.g., lamp cover, book table). 1-7 Be careful not to hurt your back. Before moving the...
ScanDIVA User Guide
Page 28
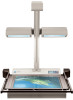
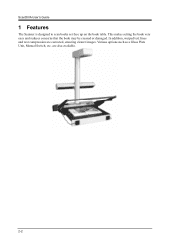
This makes setting the book very easy and reduces concerns that the book may be creased or damaged. Various options such as a Glass Plate Unit, Manual Switch, etc. are corrected, ensuring clearer images. ScanDIVA User's Guide 1 Features The Scanner is designed to scan books set face up on the book table. In addition, warped text lines and text compression are also available. 2-2
This makes setting the book very easy and reduces concerns that the book may be creased or damaged. Various options such as a Glass Plate Unit, Manual Switch, etc. are corrected, ensuring clearer images. ScanDIVA User's Guide 1 Features The Scanner is designed to scan books set face up on the book table. In addition, warped text lines and text compression are also available. 2-2

ScanDIVA User Guide
Page 30
... as the reference position for the original. Connects the Scanner to this position. Adjust the center of the "SCAN" button on the "Book Scanner" screen to the Power Outlet. Center Mark: 14. Used with sheet documents that have curls or folds, and with this mark. USB Cable: 11. ScanDIVA User's Guide 9. Power Cord: 10.
... as the reference position for the original. Connects the Scanner to this position. Adjust the center of the "SCAN" button on the "Book Scanner" screen to the Power Outlet. Center Mark: 14. Used with sheet documents that have curls or folds, and with this mark. USB Cable: 11. ScanDIVA User's Guide 9. Power Cord: 10.
ScanDIVA User Guide
Page 35
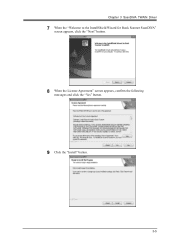
Chapter 3 ScanDIVA TWAIN Driver 7 When the "Welcome to the InstallShield Wizard for Book Scanner ScanDIVA" screen appears, click the "Next" button. 8 When the License Agreement" screen appears, confirm the following messages and click the "Yes" button. 9 Click the "Install" button. 3-5
Chapter 3 ScanDIVA TWAIN Driver 7 When the "Welcome to the InstallShield Wizard for Book Scanner ScanDIVA" screen appears, click the "Next" button. 8 When the License Agreement" screen appears, confirm the following messages and click the "Yes" button. 9 Click the "Install" button. 3-5
ScanDIVA User Guide
Page 57
.... 1 Confirm that the Personal Computer is connected with the ScanDIVA. 2 Turn ON the Power Switch of the ScanDIVA. 3 Turn ON the Power Switch of the Personal Computer. 4 First select "Start", and then "Setting", "Control panel", "System", "Hardware", and "Device manager". 5 Delete the "Imaging devices -Book Scanner ScanDIVA". 6 When the delete confirmation screen appears, select "Delete...
.... 1 Confirm that the Personal Computer is connected with the ScanDIVA. 2 Turn ON the Power Switch of the ScanDIVA. 3 Turn ON the Power Switch of the Personal Computer. 4 First select "Start", and then "Setting", "Control panel", "System", "Hardware", and "Device manager". 5 Delete the "Imaging devices -Book Scanner ScanDIVA". 6 When the delete confirmation screen appears, select "Delete...
ScanDIVA User Guide
Page 58
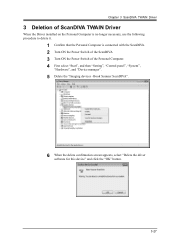
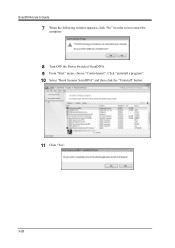
Click "uninstall a program". 10 Select "Book Scanner ScanDIVA" and then click the "Uninstall" button. 11 Click "Yes". 3-28 ScanDIVA User's Guide 7 When the following window appears, click "No" in order to not restart the computer. 8 Turn OFF the Power Switch of ScanDIVA. 9 From "Start" menu, choose "Control panel".
Click "uninstall a program". 10 Select "Book Scanner ScanDIVA" and then click the "Uninstall" button. 11 Click "Yes". 3-28 ScanDIVA User's Guide 7 When the following window appears, click "No" in order to not restart the computer. 8 Turn OFF the Power Switch of ScanDIVA. 9 From "Start" menu, choose "Control panel".
ScanDIVA User Guide
Page 60
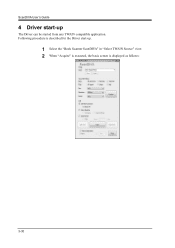
Following procedure is displayed as follows: 3-30 ScanDIVA User's Guide 4 Driver start -up. 1 Select the "Book Scanner ScanDIVA" in "Select TWAIN Source" view. 2 When "Acquire" is executed, the basic screen is described for the Driver start -up The Driver can be started from any TWAIN compatible application.
Following procedure is displayed as follows: 3-30 ScanDIVA User's Guide 4 Driver start -up. 1 Select the "Book Scanner ScanDIVA" in "Select TWAIN Source" view. 2 When "Acquire" is executed, the basic screen is described for the Driver start -up The Driver can be started from any TWAIN compatible application.
ScanDIVA User Guide
Page 61
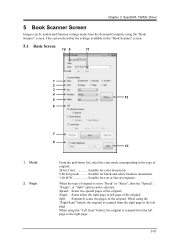
..." option can be selected. Single Scans either the right page or left page to the type of the original. Mode: 2. When using the "Book Scanner" screen. Chapter 3 ScanDIVA TWAIN Driver 5 Book Scanner Screen Images can be loaded and function settings made from the Personal Computer using the "Left Scan" button, the original is scanned from...
..." option can be selected. Single Scans either the right page or left page to the type of the original. Mode: 2. When using the "Book Scanner" screen. Chapter 3 ScanDIVA TWAIN Driver 5 Book Scanner Screen Images can be loaded and function settings made from the Personal Computer using the "Left Scan" button, the original is scanned from...
ScanDIVA User Guide
Page 64
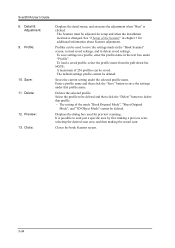
...setup and when the installation location is clicked. To load a saved profile, select the profile name from the pull-down list. Closes the book Scanner screen. 3-34 ScanDIVA User's Guide 8. Profile: 10. NOTE: A maximum of 256 profiles can be adjusted for preview scanning. Enter a profile name and ...deleted. Saves the current setting under that profile. ・ The setting of the Scanner" in the text box under "Profile". Displays the dialog box used to save the settings made in the "Book Scanner" screen, to load saved settings, and to save settings in a profile, enter ...
...setup and when the installation location is clicked. To load a saved profile, select the profile name from the pull-down list. Closes the book Scanner screen. 3-34 ScanDIVA User's Guide 8. Profile: 10. NOTE: A maximum of 256 profiles can be adjusted for preview scanning. Enter a profile name and ...deleted. Saves the current setting under that profile. ・ The setting of the Scanner" in the text box under "Profile". Displays the dialog box used to save the settings made in the "Book Scanner" screen, to load saved settings, and to save settings in a profile, enter ...
ScanDIVA User Guide
Page 81
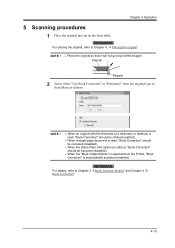
... 1 Place the original face up on the book table. NOTE ! When an original with the thickness of a dictionary or textbook is read, "Book Correction" should be clicked (enabled). When a single page document is read, "Book Correction" should be canceled (disabled). ...;r ー 2 Select either "Use Book Correction" or "Preference" from the Profile, "Book Correction" is selected from the original type in Scan Mode as follows. REFERENCE For placing the original, refer to Chapter 3 "5 Book Scanner Screen" and Chapter 4 "6 Book Correction". 4-13 NOTE ! Place...
... 1 Place the original face up on the book table. NOTE ! When an original with the thickness of a dictionary or textbook is read, "Book Correction" should be clicked (enabled). When a single page document is read, "Book Correction" should be canceled (disabled). ...;r ー 2 Select either "Use Book Correction" or "Preference" from the Profile, "Book Correction" is selected from the original type in Scan Mode as follows. REFERENCE For placing the original, refer to Chapter 3 "5 Book Scanner Screen" and Chapter 4 "6 Book Correction". 4-13 NOTE ! Place...
ScanDIVA User Guide
Page 82
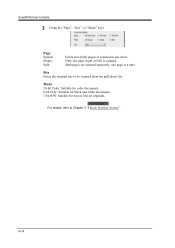
Page Spread: Single: Split: Entire area (both pages) is scanned as one page (right or left) is scanned. REFERENCE For details, refer to be scanned from the pull-down list. Mode 24-bit Color: Suitable for color documents. 8-bit Gray: Suitable for black and white documents. 1-bit B/W: Suitable for text or line art originals. Only one sheet. Size Select the original size to Chapter 3 "5 Book Scanner Screen". 4-14 Both pages are scanned separately, one page at a time. ScanDIVA User's Guide 3 Using the "Page", "Size", or "Mode" keys.
Page Spread: Single: Split: Entire area (both pages) is scanned as one page (right or left) is scanned. REFERENCE For details, refer to be scanned from the pull-down list. Mode 24-bit Color: Suitable for color documents. 8-bit Gray: Suitable for black and white documents. 1-bit B/W: Suitable for text or line art originals. Only one sheet. Size Select the original size to Chapter 3 "5 Book Scanner Screen". 4-14 Both pages are scanned separately, one page at a time. ScanDIVA User's Guide 3 Using the "Page", "Size", or "Mode" keys.
ScanDIVA User Guide
Page 93
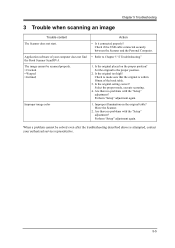
... Application software of your computer does not find the Book Scanner ScanDIVA The image cannot be solved even after the troubleshooting described above is within 50mm of the book table. 3. Perform "Setup" adjustment again. 1. Move the Scanner. 2. Check to the proper position. 2. Check ...if the USB cable connected securely between the Scanner and the Personal Computer. • Refer to Chapter 5 ...
... Application software of your computer does not find the Book Scanner ScanDIVA The image cannot be solved even after the troubleshooting described above is within 50mm of the book table. 3. Perform "Setup" adjustment again. 1. Move the Scanner. 2. Check to the proper position. 2. Check ...if the USB cable connected securely between the Scanner and the Personal Computer. • Refer to Chapter 5 ...
ScanDIVA User Guide
Page 98
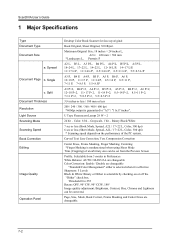
... Thickness Resolution Light Source Scanning Mode Scanning Speed Book Correction Editing Image Quality Operation Panel Desktop Color Book Scanner for face-up original Book Original, Sheet Original, 3D Object Maximum Original ...or Dither is effective. Spread Document Page b. Color, 8 bit - Page, Size, Mode, Book Correct, Frame Masking and Center Erase are changeable "Standard/Color Management" either is selected when it... changeable Color Correction: Enable / Disable are changeable. 7-2 Binary Black/White 7 sec or less (Book Mode, Spread, A2L / 17×22 L, Color, 300 dpi) 6 sec or less (...
... Thickness Resolution Light Source Scanning Mode Scanning Speed Book Correction Editing Image Quality Operation Panel Desktop Color Book Scanner for face-up original Book Original, Sheet Original, 3D Object Maximum Original ...or Dither is effective. Spread Document Page b. Color, 8 bit - Page, Size, Mode, Book Correct, Frame Masking and Center Erase are changeable "Standard/Color Management" either is selected when it... changeable Color Correction: Enable / Disable are changeable. 7-2 Binary Black/White 7 sec or less (Book Mode, Spread, A2L / 17×22 L, Color, 300 dpi) 6 sec or less (...


