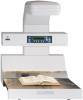
Twain Driver and Overlay Manager Software Installation and User Guide
Page 14
...match the background instead of pixels captured will remain constant with Fine Mode 1. The number of removed. The MS 7000 supports an automatic lamp shut-off . Initialize scan settings from the previous TWAIN session. Auto card feeder - Automatically feed cards (AFC) during a scanning session... of cards that border pixels are converted to match the image's background. Fine Mode 2 Fine Mode 1 None Masking/Cropping - Auto Lamp OFF - This setting will crop borders and thus return smaller images. Retrieve the current scan settings from scanner at the beginning of a...
Twain Driver and Overlay Manager Software Installation and User Guide
Page 27
...crops borders and thus return smaller images. Note that border pixels are converted to match the image's background. The MS 7000 supports an automatic lamp shut-off . This drop down box allows you to configure the scanner to try to auto detect black (or darkly shaded) areas around the... image. Ideal this feature is visually less than as scanned. An 8-bit grayscale image, A strong sharpen algorithm for the next scan only. Auto Lamp OFF - lighting is that is either set the scan area to think of this setting is unavailable when scanning in better representation of loading the...
PS7000 Operator Manual (PC Version)
Page 14
... version (connected to a printer 2-2 Part identification and functions 2-3 Control panel keys 2-5 Functions of control panel keys 2-6 Chapter 3 PS7000 Twain Driver Installation 3-1 System environment 3-1 Installation procedure 3-2 Uninstall 3-5 Uninstall procedure 3-5 Start-up 3-7 Image acquisition screen 3-9 Chapter 4 PS7000 ISIS Driver Installation 4-1 System environment 4-1 Installation procedure 4-2 Start-up 4-5 Image acquisition screen 4-7 Chapter 5 Operation Precautions for operation...
PS7000 Operator Manual (PC Version)
Page 19
.... N Make sure that power cord can be located near the Scanner and easily accessible so that no possibility of 2.6 m, and 12 or less 40 W fluorescent lamps). Grounding Connect the Scanner's ground wire to any other equipment or machines to undue vibration.
PS7000 Operator Manual (PC Version)
Page 21
... computer Refer to page 7-1). N NEVER place a vase or vessel containing water on the power cord or interface cables of other than the original on the lamp unit. If any object other electrical equipment. N ALWAYS be blocked, causing the failure to the product. Precautions for Installation & Operation Chapter 1 1-3 Operation Operating environment The...
PS7000 Operator Manual (PC Version)
Page 22
... any parts other than the parts identified with arrows in the below figure. Do not carry the Scanner alone but with arrows in the figure (e.g.,lamp cover, book table), or the Scanner may have trouble. N The Scanner body weighs 64 kg. N When moving the Scanner, observe the following. Be careful not...
PS7000 Operator Manual (PC Version)
Page 27
...) and the height of the original is 65 mm or more, this connector. When a special binder or the like is used for scanning. Book table: 7. Lamp unit: 3. Steel mirror: 6. Place the original (book) face up on and off. Control panel: 4. Scanner unit: 2. Connect the printer cable to this center of the...
PS7000 Operator Manual (PC Version)
Page 32
The lamp of the selected mode lights. Single: Only the right or left pages are scanned as one sheet. Contrast User Mode Job Recall Mode Check Spread ... scanned. Contrast User Mode Job Recall Mode Check Spread Single Book Split Text Photo Panel Reset Book Split: Right and left page is selected. The lamp of the selected mode lights. Photo: Suitable for scanning text. 2-8 Control panel keys 7. Spread: Both pages are scanned separately.
PS7000 Operator Manual (PC Version)
Page 57
Do not look directly at the lamp light visible through the front slits or from the original to the steel mirror or book table. When only one side of the book table ...
PS7000 Operator Manual (PC Version)
Page 58
... gone out. * The auto-off one , three, or five minutes in the Scanner is reading the original. The lamp returns to rest your eyes. NOTE The halogen lamp used in the Utility mode. However, never look directly at full intensity when the Scanner is safe and not hazardous to ... the preset time*. Full intensity The Scanner's lamp lights at the lamp when lit. When the Scanner is pressed for the lamp can be set to one minute after scanning is pressed to health. 5-2 Lamp status Half intensity The Scanner's lamp lights at the lamp when lit may result in eye damage. Looking...
PS7000 Operator Manual (PC Version)
Page 63
The lamp of the selected mode lights. 5 Hold the edges of the right and left ) is scanned. Spread: Entire area (both pages in the middle with your ...
PS7000 Operator Manual (PC Version)
Page 75
Auto clr Lamp off Save mode Previous 1 min. 3 min. 10 min. No OK 10 min. 20 min. 30 min. Variety Buzzer Previous Down Up Previous OK OK Alarm ...
PS7000 Operator Manual (PC Version)
Page 103
5-47 Operations in Utility Mode: • Initial settings upon power supply • Timers (automatic clear, lamp off, and printer power save) • Warning (detection items and buzzer preferences) • Changing the SCSI port and ID No. Simultaneously press the User Mode key and the Job Recall key on the control Contrast panel. Select Function Init Time Caut SCSI Main ial set ion set in Utility mode The following items can be set Menu Operation Chapter 5 User Mode Job Recall Mode Check The main Utility screen appears.
PS7000 Operator Manual (PC Version)
Page 106
Select Function Init Time Caut SCSI Main ial set ion set ] on the main Utility screen. Enable Timer Settings Auto Lamp Save clr off time, and printer power save time) are reset to "0" and deactivates the auto clear function. min. OK Selecting [No] sets the auto ...clear time to the default factory settings (auto clear time). Select [1 min], [3 min], or [10 min] for the timer (automatic clear time, lamp off mode Prev ious Operation Chapter 5 3 Select [Auto clr] to determine the -1 time until all settings are set. 1 Select [Time set Manu 2 Select the desired...
PS7000 Operator Manual (PC Version)
Page 107
... time. Select [1 min.], [3 min.], or [5 min.] to define the setting. 5-51 Operations in Utility mode 3 Select [Lamp off] to set the time -3 until -2 the lamp is turned off (lamp off time) after scanning has been completed, or after printing has been completed (printer power save time). min. Select [OK] to define the setting...
PS7000 Operator Manual (PC Version)
Page 115
... original during scanning. • Never move your hands and arms after the start switch is pressed. • An obstacle is blocking the lamp. • Remove the obstacle blocking the lamp. • Current [Output] setting is Not Detected Reset Book or Change Sheet Exp. level is Not Detected Clean Top of the book...
PS7000 Operator Manual (PC Version)
Page 119
... or 23" (effective range: within 420 mm in longitudinal direction) 200/240/300/400/600 dpi Reducing-type line CCD (7500 pixels) Long cylindrical halogen lamp (DC150V, 620 W) Automatic (9 steps) or Manual (9 steps) Automatic or Manual (0-50 mm or 0-2") Automatic function erases the shadow generated between pages Curved text line correction...
PS7000 Operator Manual (Printer Version)
Page 18
... to a printer 2-2 PC version (connected to a personal computer 2-2 Part identification and functions 2-3 Control panel keys 2-5 Functions of control panel keys 2-6 Chapter 3 Operation Precautions for operation 3-1 Lamp status 3-2 Half intensity 3-2 Full intensity 3-2 Turning the Scanner ON and OFF 3-3 Turning on 3-3 Turning off 3-4 Placing the original 3-5 Scanning procedures 3-6 Book/Sheet modes 3-10 Book...
PS7000 Operator Manual (Printer Version)
Page 23
... with little voltage/frequency fluctuations. A dry place. ! Make sure that no possibility of being splashed with ceiling height of 2.6 m, and 12 or less 40 W fluorescent lamps). ! Ground contact that catch fire and burn easily. ! A place not in a location which meets the following to prevent electrical shocks due to undue vibration. ! Voltage...
PS7000 Operator Manual (Printer Version)
Page 25
... & Operation Chapter 1 1-3 Operation Operating environment The following precautions to ensure the optimum performance of the Scanner. ! NEVER place the Scanner or the cabinet on the lamp unit. ! NEVER drop paper clips, staples, or other object in front of the exhaust outlet of the cooling fan located on either side of the...