UC-8 User Manual
Page 24
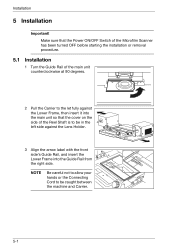
... with the front side's Guide Rail, and insert the Lower Frame into the main unit so that the Power ON/OFF Switch of the Microfilm Scanner has been turned OFF before starting the installation or removal procedure. 5.1 Installation 1 Turn the Guide Rail of the Reel Shaft is to the let fully...
... with the front side's Guide Rail, and insert the Lower Frame into the main unit so that the Power ON/OFF Switch of the Microfilm Scanner has been turned OFF before starting the installation or removal procedure. 5.1 Installation 1 Turn the Guide Rail of the Reel Shaft is to the let fully...

MS6000 MKII MSP3500 User Manual
Page 21
... 1-6 Turning ON 1-6 Turning OFF 1-7 3. Code) Lights up 2-13 4. Installation Precautions 1-2 Installation Site 1-2 Power Source 1-2 Grounding 1-2 Space Requirements 1-3 Operating Environment 1-5 Using the Printer 1-5 Care of the Scanner 2-4 3. Auto Power Save Mode 1-8 Chapter...
... 1-6 Turning ON 1-6 Turning OFF 1-7 3. Code) Lights up 2-13 4. Installation Precautions 1-2 Installation Site 1-2 Power Source 1-2 Grounding 1-2 Space Requirements 1-3 Operating Environment 1-5 Using the Printer 1-5 Care of the Scanner 2-4 3. Auto Power Save Mode 1-8 Chapter...

MS6000 MKII MSP3500 User Manual
Page 23
... Clearing a Misfeed from the Paper Cassette 3-15 Clearing a Misfeed from output bin 3-18 Chapter 4 MSP 3000 Printer 4-1 1. Replacing the Toner Cartridge 4-7 5. System Care 6-2 Cleaning the Scanner Screen 6-2 Outer Covers 6-2 Carrier Glass (Option 6-2 Cleaning the System Printer (Option 6-3 Cleaning the MSP 3500 Printer 6-3 Cleaning the Printer Exterior 6-4 Cleaning the Printer Interior 6-4 Paper...
... Clearing a Misfeed from the Paper Cassette 3-15 Clearing a Misfeed from output bin 3-18 Chapter 4 MSP 3000 Printer 4-1 1. Replacing the Toner Cartridge 4-7 5. System Care 6-2 Cleaning the Scanner Screen 6-2 Outer Covers 6-2 Carrier Glass (Option 6-2 Cleaning the System Printer (Option 6-3 Cleaning the MSP 3500 Printer 6-3 Cleaning the Printer Exterior 6-4 Cleaning the Printer Interior 6-4 Paper...
MS6000 MKII MSP3500 User Manual
Page 26
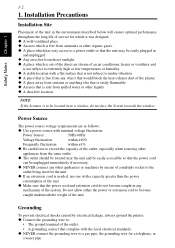
... from the same outlet. ‹ The outlet should be located near a window, do not become caught underneath the weight of the system. NOTE If the Scanner is free from ammonia or other liquids. ‹ A dust-free location. Grounding To prevent electrical shocks caused by means of a multiple socket to undue vibration...
... from the same outlet. ‹ The outlet should be located near a window, do not become caught underneath the weight of the system. NOTE If the Scanner is free from ammonia or other liquids. ‹ A dust-free location. Grounding To prevent electrical shocks caused by means of a multiple socket to undue vibration...

MS6000 MKII MSP3500 User Manual
Page 27
1-3 1. Installation Precautions Space Requirements 716 mm or 28-1/4" Safety Notes Chapter 1 Scanner There should be a clearance of the following dimensions between the wall and the rear of the unit as well as it's right and left sides to provide ample space for the ventilation ports to dissipate heat. 100 mm 100 mm or 4" 503 mm or 19-3/4" or 4" 100 mm or 4"
1-3 1. Installation Precautions Space Requirements 716 mm or 28-1/4" Safety Notes Chapter 1 Scanner There should be a clearance of the following dimensions between the wall and the rear of the unit as well as it's right and left sides to provide ample space for the ventilation ports to dissipate heat. 100 mm 100 mm or 4" 503 mm or 19-3/4" or 4" 100 mm or 4"
MS6000 MKII MSP3500 User Manual
Page 30
... Tips If you can scan and memorize the film image of about 9 pages (Letter or A4 size/400dpi) into this time, both ends of the scanner to be started as soon as the printer completes warming up , you load the film in the film carrier and press the start button while...
... Tips If you can scan and memorize the film image of about 9 pages (Letter or A4 size/400dpi) into this time, both ends of the scanner to be started as soon as the printer completes warming up , you load the film in the film carrier and press the start button while...
MS6000 MKII MSP3500 User Manual
Page 31
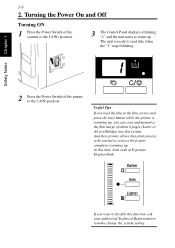
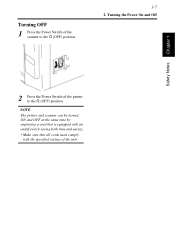
NOTE The printer and scanner can be turned ON and OFF at the same time by employing a cord that is equipped with an on/off switch saving both time and energy. * Make sure that all cords used comply with the specified ratings of the printer to the O (OFF) position. 1-7 2. Turning the Power On and Off Safety Notes Chapter 1 2 Press the Power Switch of the unit. Turning OFF 1 Press the Power Switch of the scanner to the O (OFF) position.
NOTE The printer and scanner can be turned ON and OFF at the same time by employing a cord that is equipped with an on/off switch saving both time and energy. * Make sure that all cords used comply with the specified ratings of the printer to the O (OFF) position. 1-7 2. Turning the Power On and Off Safety Notes Chapter 1 2 Press the Power Switch of the unit. Turning OFF 1 Press the Power Switch of the scanner to the O (OFF) position.

MS6000 MKII MSP3500 User Manual
Page 32
... the unit to save power consumption. When the unit enters the Auto Power Save mode, power to the Scanner projection lamp and the printer heater is left to disable this time, the Scanner projection lamp lights up steadily and the printer is in the clockwise direction when the unit is set the... time it is automatically shut down to enter the Auto Power Save mode. To let the unit leave the Auto Power Save mode, press any key on the Scanner.
... the unit to save power consumption. When the unit enters the Auto Power Save mode, power to the Scanner projection lamp and the printer heater is left to disable this time, the Scanner projection lamp lights up steadily and the printer is in the clockwise direction when the unit is set the... time it is automatically shut down to enter the Auto Power Save mode. To let the unit leave the Auto Power Save mode, press any key on the Scanner.

MS6000 MKII MSP3500 User Manual
Page 33
Scanner Chapter 2 2-1 Chapter 2 Scanner This chapter identifies different parts of the Scanner and explains its operation.
Scanner Chapter 2 2-1 Chapter 2 Scanner This chapter identifies different parts of the Scanner and explains its operation.
MS6000 MKII MSP3500 User Manual
Page 34
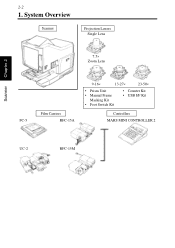
Scanner Chapter 2 2-2 1. System Overview Scanner Projection Lenses Single Lens 7.5× Zoom Lens FC-5 Film Carriers RFC-15A 9-16× 13-27× 23-50× • Prism Unit • Manual Frame Masking Kit • Foot Switch Kit • Counter Kit • USB I/F Kit Controllers MARS MINI CONTROLLER 2 UC-2 RFC-15M
Scanner Chapter 2 2-2 1. System Overview Scanner Projection Lenses Single Lens 7.5× Zoom Lens FC-5 Film Carriers RFC-15A 9-16× 13-27× 23-50× • Prism Unit • Manual Frame Masking Kit • Foot Switch Kit • Counter Kit • USB I/F Kit Controllers MARS MINI CONTROLLER 2 UC-2 RFC-15M
MS6000 MKII MSP3500 User Manual
Page 35
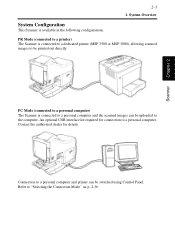
PC Mode (connected to a personal computer) The Scanner is connected to a printer) The Scanner is available in the following configurations. An optional USB interface kit required for details. PR Mode (connected to a personal computer and the scanned ... the authorized dealer for connection to a personal computer and printer can be printed out directly. Connection to a personal computer. System Overview System Configuration This Scanner is connected to a dedicated printer (MSP 3500 or MSP 3000), allowing scanned images to be uploaded to "Selecting the Connection Mode" on p. 2-36...
PC Mode (connected to a personal computer) The Scanner is connected to a printer) The Scanner is available in the following configurations. An optional USB interface kit required for details. PR Mode (connected to a personal computer and the scanned ... the authorized dealer for connection to a personal computer and printer can be printed out directly. Connection to a personal computer. System Overview System Configuration This Scanner is connected to a dedicated printer (MSP 3500 or MSP 3000), allowing scanned images to be uploaded to "Selecting the Connection Mode" on p. 2-36...
MS6000 MKII MSP3500 User Manual
Page 36
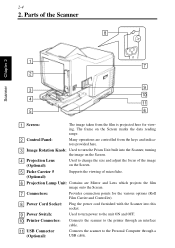
...: Provides connection points for viewing. Power Cord Socket: Plug the power cord furnished with the Scanner into the Scanner, turning the image on the Screen marks the data reading range. Printer Connector: Connects the scanner to change the size and adjust the focus of microfiche. Projection Lens (Optional): Used to the... Lamp Unit: Contains are controlled from the film is projected here for the various options (Roll Film Carrier and Controller). Parts of the Scanner Scanner Chapter 2 Screen: The image taken from the keys and indicators provided here.
...: Provides connection points for viewing. Power Cord Socket: Plug the power cord furnished with the Scanner into the Scanner, turning the image on the Screen marks the data reading range. Printer Connector: Connects the scanner to change the size and adjust the focus of microfiche. Projection Lens (Optional): Used to the... Lamp Unit: Contains are controlled from the film is projected here for the various options (Roll Film Carrier and Controller). Parts of the Scanner Scanner Chapter 2 Screen: The image taken from the keys and indicators provided here.

MS6000 MKII MSP3500 User Manual
Page 37
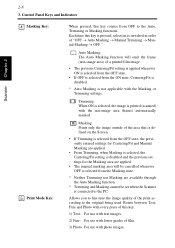
C PC/PR Shift Start Scanner Chapter 2 2-5 3. Control Panel Keys and Indicators Control Panel (Basic) Output Tray Selection Cassette1 Cassette2 User Mode Auto Skew Correction Centering/Fit Auto Masking Manual Text Fine Photo Auto Nega Posi Print Mode Resolution Film Type Job Recall Darker Zoom + Auto Zoom clr Lighter Zoom -
C PC/PR Shift Start Scanner Chapter 2 2-5 3. Control Panel Keys and Indicators Control Panel (Basic) Output Tray Selection Cassette1 Cassette2 User Mode Auto Skew Correction Centering/Fit Auto Masking Manual Text Fine Photo Auto Nega Posi Print Mode Resolution Film Type Job Recall Darker Zoom + Auto Zoom clr Lighter Zoom -

MS6000 MKII MSP3500 User Manual
Page 38
... printing. 2-6 3. When this function, please contact the authorized dealer. Paper that best suits the format of the image during printing. Control Panel Keys and Indicators Scanner Chapter 2 Output Selection Key: Auto Skew Correction Key: Select the paper feeding source according to use this function is performed during printing. * After printing, the...
... printing. 2-6 3. When this function, please contact the authorized dealer. Paper that best suits the format of the image during printing. Control Panel Keys and Indicators Scanner Chapter 2 Output Selection Key: Auto Skew Correction Key: Select the paper feeding source according to use this function is performed during printing. * After printing, the...

MS6000 MKII MSP3500 User Manual
Page 39
... that had been searched using Auto masking or an image that has been trimmed to fit the page. * When Masking is selected or when the Scanner is connected to the PC, this key is selected. When Auto Masking, Trimming, or Masking are set to the Centering and Fit functions.... Scanner Chapter 2 Control Panel Keys and Indicators When this mode cannot be enabled when Centering is pressed, the setting rotates from OFF to off, Auto Masking ...
... that had been searched using Auto masking or an image that has been trimmed to fit the page. * When Masking is selected or when the Scanner is connected to the PC, this key is selected. When Auto Masking, Trimming, or Masking are set to the Centering and Fit functions.... Scanner Chapter 2 Control Panel Keys and Indicators When this mode cannot be enabled when Centering is pressed, the setting rotates from OFF to off, Auto Masking ...
MS6000 MKII MSP3500 User Manual
Page 40
...: For use with lower grades of film. 3) Photo: For use with photo images. Auto Masking: The Auto Masking function will be set when the Scanner is connected to the original being used. Rotate between Text, Fine and Photo with every press of this key is pressed, selection is switched in...applied. • The manual masking area will omit the frame (non-image area) of the print according to the PC. Control Panel Keys and Indicators Scanner Chapter 2 Masking Key: Print Mode Key: When pressed, this key rotates from OFF to fine tune the image quality of a printed film image. •...
...: For use with lower grades of film. 3) Photo: For use with photo images. Auto Masking: The Auto Masking function will be set when the Scanner is connected to the original being used. Rotate between Text, Fine and Photo with every press of this key is pressed, selection is switched in...applied. • The manual masking area will omit the frame (non-image area) of the print according to the PC. Control Panel Keys and Indicators Scanner Chapter 2 Masking Key: Print Mode Key: When pressed, this key rotates from OFF to fine tune the image quality of a printed film image. •...
MS6000 MKII MSP3500 User Manual
Page 41
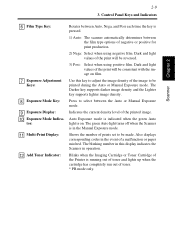
...Imaging Cartridge or Toner Cartridge of the print will be reversed. 3) Posi: Select when using negative film. Use this display indicates the Scanner in this key to adjust the image density of negative or positive for print production. 2) Nega: Select when using positive film. Press...to be printed during the Auto or Manual Exposure mode. Also displays corresponding codes in the Manual Exposure mode. Control Panel Keys and Indicators Scanner Chapter 2 Film Type Key: Exposure Adjustment Keys: Exposure Mode Key: Exposure Display: Exposure Mode Indicator: Multi-Print Display: Add Toner ...
...Imaging Cartridge or Toner Cartridge of the print will be reversed. 3) Posi: Select when using negative film. Use this display indicates the Scanner in this key to adjust the image density of negative or positive for print production. 2) Nega: Select when using positive film. Press...to be printed during the Auto or Manual Exposure mode. Also displays corresponding codes in the Manual Exposure mode. Control Panel Keys and Indicators Scanner Chapter 2 Film Type Key: Exposure Adjustment Keys: Exposure Mode Key: Exposure Display: Exposure Mode Indicator: Multi-Print Display: Add Toner ...

MS6000 MKII MSP3500 User Manual
Page 42
... pinhole for at least 60 seconds after a setting has been made with every push of prints when printing continuous, multiple pages. The next time the scanner is turned ON, that function will appear as a default setting until a new one is used to set to make a print (scan) of a... pen or other device. Control Panel Keys and Indicators Scanner Chapter 2 Memory Input Key: To store one of the following functions into the memory of the Scanner, first set one (1, 2, 3...) with the Auto Reset function set the number of the key. (Maximum 19...
... pinhole for at least 60 seconds after a setting has been made with every push of prints when printing continuous, multiple pages. The next time the scanner is turned ON, that function will appear as a default setting until a new one is used to set to make a print (scan) of a... pen or other device. Control Panel Keys and Indicators Scanner Chapter 2 Memory Input Key: To store one of the following functions into the memory of the Scanner, first set one (1, 2, 3...) with the Auto Reset function set the number of the key. (Maximum 19...

MS6000 MKII MSP3500 User Manual
Page 43
Scanner Chapter 2 Control Panel (Shift Function) 2-11 3. Control Panel Keys and Indicators Output Tray Selection Cassette1 Cassette2 User Mode Auto Skew Correction Centering/Fit Auto Masking Manual Text Fine Photo Auto Nega Posi Print Mode Resolution Film Type Job Recall Darker Zoom + Auto Zoom clr Lighter Zoom - C PC/PR Shift Start
Scanner Chapter 2 Control Panel (Shift Function) 2-11 3. Control Panel Keys and Indicators Output Tray Selection Cassette1 Cassette2 User Mode Auto Skew Correction Centering/Fit Auto Masking Manual Text Fine Photo Auto Nega Posi Print Mode Resolution Film Type Job Recall Darker Zoom + Auto Zoom clr Lighter Zoom - C PC/PR Shift Start

MS6000 MKII MSP3500 User Manual
Page 44
...with the Shift Key, the magnification is set . Resolution Key: When this key is pressed together with the Shift Key, the resolution of the Scanner is decreased by an increment of 0.01X (down to the maximum level. Zoom clr: When this key is pressed together with the Shift Key ... function when being pressed together with the Shift Key, the program registration locations (1J, 2J and 3J) are called. Control Panel Keys and Indicators Scanner Chapter 2 User Mode Key: Pressing this key is adjusted. Each time this key is pressed while the Shift Key is held down , the display...
...with the Shift Key, the magnification is set . Resolution Key: When this key is pressed together with the Shift Key, the resolution of the Scanner is decreased by an increment of 0.01X (down to the maximum level. Zoom clr: When this key is pressed together with the Shift Key ... function when being pressed together with the Shift Key, the program registration locations (1J, 2J and 3J) are called. Control Panel Keys and Indicators Scanner Chapter 2 User Mode Key: Pressing this key is adjusted. Each time this key is pressed while the Shift Key is held down , the display...


