
User Guide
Page 6
Clean the platen ...138 Clean the paper-advance sensor window ...140 Lubricate the printhead carriage ...140 Maintain the ink cartridges ...141 Perform preventive maintenance ...141 Move or store the printer ...142 Update the printer firmware ...143 Change the ink ...
Clean the platen ...138 Clean the paper-advance sensor window ...140 Lubricate the printhead carriage ...140 Maintain the ink cartridges ...141 Perform preventive maintenance ...141 Move or store the printer ...142 Update the printer firmware ...143 Change the ink ...

User Guide
Page 7
...173 Cannot insert an ink cartridge ...174 Cannot insert a printhead ...174 Cannot insert the maintenance cartridge ...174 Front panel recommends reseating or replacing a printhead 174 Clean the printheads ...174 Align the printheads ...175 16 Troubleshoot other issues ...179 The printer is not...access the HP Designjet Utility ...182 Print job canceled and purged when held for preview 183 Printer alerts ...183 17 HP Customer Care ...185 Introduction ...186 HP Professional Services ...186 HP Instant Support ...187 HP Proactive Support ...187 Customer Self Repair ...188 Contact HP Support ...188...
...173 Cannot insert an ink cartridge ...174 Cannot insert a printhead ...174 Cannot insert the maintenance cartridge ...174 Front panel recommends reseating or replacing a printhead 174 Clean the printheads ...174 Align the printheads ...175 16 Troubleshoot other issues ...179 The printer is not...access the HP Designjet Utility ...182 Print job canceled and purged when held for preview 183 Printer alerts ...183 17 HP Customer Care ...185 Introduction ...186 HP Professional Services ...186 HP Instant Support ...187 HP Proactive Support ...187 Customer Self Repair ...188 Contact HP Support ...188...

User Guide
Page 13
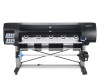
Platen 3. Front panel 6. Loading table 10. Take-up reel cable and sensor housing unit 12. Paper-load lever 8. Take-up reel sensor 13. Ink cartridge 2. Take-up reel spindle hub ENWW The printer's main components 5 Take-up reel motor 11. Front view 1. Spindle 9. Printhead carriage 5. Maintenance cartridge 7. Printhead 4.
Platen 3. Front panel 6. Loading table 10. Take-up reel cable and sensor housing unit 12. Paper-load lever 8. Take-up reel sensor 13. Ink cartridge 2. Take-up reel spindle hub ENWW The printer's main components 5 Take-up reel motor 11. Front view 1. Spindle 9. Printhead carriage 5. Maintenance cartridge 7. Printhead 4.

User Guide
Page 14
... buttons 3. Power switch and socket 2. It has the following important functions: ● It is located on the front of the printer, the ink cartridges, the printheads, the maintenance cartridge, the paper, the print jobs, and other parts and processes ● It gives guidance on the right-hand side. Rear view 1.
... buttons 3. Power switch and socket 2. It has the following important functions: ● It is located on the front of the printer, the ink cartridges, the printheads, the maintenance cartridge, the paper, the print jobs, and other parts and processes ● It gives guidance on the right-hand side. Rear view 1.
User Guide
Page 17
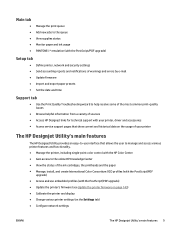
...Access service support pages that show current and historical data on the usage of your printer The HP Designjet Utility's main features The HP Designjet Utility provides an easy-to-use interface that allows the user to manage and access various printer... features and functionality. ● Manage the printer, including single-point color control with the HP Color Center ● Gain access to the online HP Knowledge Center ● View the status of the ink cartridges, the printheads...
...Access service support pages that show current and historical data on the usage of your printer The HP Designjet Utility's main features The HP Designjet Utility provides an easy-to-use interface that allows the user to manage and access various printer... features and functionality. ● Manage the printer, including single-point color control with the HP Color Center ● Gain access to the online HP Knowledge Center ● View the status of the ink cartridges, the printheads...

User Guide
Page 18
...mode time, see Change the sleep mode setting on the front-panel display. NOTE: In sleep mode, the printer performs maintenance service to the printheads from the front panel without wasting energy. Therefore, it is loaded and that you wish to turn the printer on or off TIP: The ...printer can request these estimates is not guaranteed. ● HP-GL/2 palette: shows the color or grayscale definitions in the currently-selected color palette ● PostScript font list: lists the PostScript fonts that service...
...mode time, see Change the sleep mode setting on the front-panel display. NOTE: In sleep mode, the printer performs maintenance service to the printheads from the front panel without wasting energy. Therefore, it is loaded and that you wish to turn the printer on or off TIP: The ...printer can request these estimates is not guaranteed. ● HP-GL/2 palette: shows the color or grayscale definitions in the currently-selected color palette ● PostScript font list: lists the PostScript fonts that service...

User Guide
Page 19
... minute and 15 seconds. However, if you plan to store the printer indefinitely, you can use the power switch at the rear instead. Preparing the printheads takes about three minutes to power it back on and off for six weeks or more, preparing the... printheads could take up to work, you are recommended to initialize and check and prepare the printheads. ENWW Turn the printer on , use the switch at the rear. However, if the printer has been off...
... minute and 15 seconds. However, if you plan to store the printer indefinitely, you can use the power switch at the rear instead. Preparing the printheads takes about three minutes to power it back on and off for six weeks or more, preparing the... printheads could take up to work, you are recommended to initialize and check and prepare the printheads. ENWW Turn the printer on , use the switch at the rear. However, if the printer has been off...

User Guide
Page 43
... reel must be the same width as it winds onto the core. ● The spindle core on page 40. 1. NOTE: During the initial printer setup, printhead alignment and color calibration are using. ● Check that the paper is straight when it skews as the paper that you to complete the procedure...
... reel must be the same width as it winds onto the core. ● The spindle core on page 40. 1. NOTE: During the initial printer setup, printhead alignment and color calibration are using. ● Check that the paper is straight when it skews as the paper that you to complete the procedure...

User Guide
Page 55
... starts to nest more pages. To disable the Printing paper info option, select the icon in the output tray, the printer could jam. NOTE: The printheads are serviced after each print, and the paper cannot be transferred to the paper, leaving fingerprint marks. ● Keep the paper tightly wound on the...
... starts to nest more pages. To disable the Printing paper info option, select the icon in the output tray, the printer could jam. NOTE: The printheads are serviced after each print, and the paper cannot be transferred to the paper, leaving fingerprint marks. ● Keep the paper tightly wound on the...

User Guide
Page 64
...do not select it. 3. The front panel prompts you to select your printer once in a specific region of course you wish to the printheads. If you change the region of ink that you will flow to continue. 5. Electrostatic discharges are called ESD-sensitive devices. Ink system components .... For the Z6600: matte black, yellow, light magenta, cyan, photo black and light gray Ink cartridges require no maintenance or cleaning. For the Z6800: matte black, chromatic red, magenta, yellow, light magenta, cyan, photo black and light gray - When each message, press the Cancel key to...
...do not select it. 3. The front panel prompts you to select your printer once in a specific region of course you wish to the printheads. If you change the region of ink that you will flow to continue. 5. Electrostatic discharges are called ESD-sensitive devices. Ink system components .... For the Z6600: matte black, yellow, light magenta, cyan, photo black and light gray Ink cartridges require no maintenance or cleaning. For the Z6800: matte black, chromatic red, magenta, yellow, light magenta, cyan, photo black and light gray - When each message, press the Cancel key to...

User Guide
Page 66
... system ENWW This takes a little time and can occasionally delay printing. To maintain optimum print quality, the printheads are extremely durable and do not select it as empty with a new HP cartridge. See Order ink supplies on page 79, Remove an ink cartridge on page 59, and Insert an...Up key at regular intervals, and automatically serviced when necessary. When you have pressed OK in magenta and yellow. For example, the printhead below prints in response to all printheads of refilled or non-HP ink cartridges has several serious disadvantages: ● There is replaced.
... system ENWW This takes a little time and can occasionally delay printing. To maintain optimum print quality, the printheads are extremely durable and do not select it as empty with a new HP cartridge. See Order ink supplies on page 79, Remove an ink cartridge on page 59, and Insert an...Up key at regular intervals, and automatically serviced when necessary. When you have pressed OK in magenta and yellow. For example, the printhead below prints in response to all printheads of refilled or non-HP ink cartridges has several serious disadvantages: ● There is replaced.

User Guide
Page 67
... on page 61. ● Make sure that you comply with all applicable laws and regulations when disposing of the ink cartridges and printheads. ● The ink cartridges should never be removed while the printer is ready for you must replace it with ink system components ... an ink cartridge on page 61. To check the status of the device. Electrostatic discharges are sensitive to replace it to clean the printheads automatically. ● Avoid unnecessary removal of ink system consumables. They should be removed only when the printer is printing. ENWW Ink system...
... on page 61. ● Make sure that you comply with all applicable laws and regulations when disposing of the ink cartridges and printheads. ● The ink cartridges should never be removed while the printer is ready for you must replace it with ink system components ... an ink cartridge on page 61. To check the status of the device. Electrostatic discharges are sensitive to replace it to clean the printheads automatically. ● Avoid unnecessary removal of ink system consumables. They should be removed only when the printer is printing. ENWW Ink system...

User Guide
Page 70
... system ENWW The front-panel display confirms that the printer wheels are locked (the brake lever is pressed down) to prevent the printer from moving. Printhead replacement must be performed after the printer has been turned on page 174. 6. Insert the ink cartridge into position. Slide the drawer and cartridge into...
... system ENWW The front-panel display confirms that the printer wheels are locked (the brake lever is pressed down) to prevent the printer from moving. Printhead replacement must be performed after the printer has been turned on page 174. 6. Insert the ink cartridge into position. Slide the drawer and cartridge into...

User Guide
Page 71
The printer moves the carriage into the correct position. ENWW Work with ink system components 63 Pull up and release the latch on the right side of the carriage. When the carriage has stopped moving, the front panel prompts you to the right. 3. CAUTION: If the carriage remains in the removal position for more than 3 minutes without inserting or removing any printheads, it will attempt to return back to its home position to open the printer window. 4. 2. Locate the carriage on top of the printer. 5.
The printer moves the carriage into the correct position. ENWW Work with ink system components 63 Pull up and release the latch on the right side of the carriage. When the carriage has stopped moving, the front panel prompts you to the right. 3. CAUTION: If the carriage remains in the removal position for more than 3 minutes without inserting or removing any printheads, it will attempt to return back to its home position to open the printer window. 4. 2. Locate the carriage on top of the printer. 5.

User Guide
Page 72
6. This provides access to the printheads. 7. Gently pull the blue handle upward until the printhead is released from the carriage. CAUTION: Do not pull abruptly. Lift up the blue handle. 8. Using the blue handle, gently disengage the printhead. 9. The front-panel display identifies the missing printhead. 64 Chapter 5 Handle the ink system ENWW That action can damage the printhead. 10. To remove a printhead, lift up the cover.
6. This provides access to the printheads. 7. Gently pull the blue handle upward until the printhead is released from the carriage. CAUTION: Do not pull abruptly. Lift up the blue handle. 8. Using the blue handle, gently disengage the printhead. 9. The front-panel display identifies the missing printhead. 64 Chapter 5 Handle the ink system ENWW That action can damage the printhead. 10. To remove a printhead, lift up the cover.

User Guide
Page 73
...it too quickly, or at an angle, or if you rotate it as you from accidentally inserting it . CAUTION: Insert the printhead slowly and vertically, straight down . 2. The printhead is to prevent you insert it into the wrong slot. It can be inserted. 3. Remove the orange protective caps by pulling ...them down . Check that the colored label on the printhead matches the colored label of the carriage slot into its correct slot in the carriage. ENWW Work with ink system components 65 Insert...
...it too quickly, or at an angle, or if you rotate it as you from accidentally inserting it . CAUTION: Insert the printhead slowly and vertically, straight down . 2. The printhead is to prevent you insert it into the wrong slot. It can be inserted. 3. Remove the orange protective caps by pulling ...them down . Check that the colored label on the printhead matches the colored label of the carriage slot into its correct slot in the carriage. ENWW Work with ink system components 65 Insert...

User Guide
Page 74
... as indicated by the arrow. CAUTION: You might feel some resistance when installing the new printhead, so you have difficulty, see confirmation on the front-panel display that the printhead has been inserted. Insert all of the other printheads that the end of the carriage. 66 Chapter 5 Handle the ink system ENWW Make... sure that need to be installed, and close the carriage cover. 6. Push down firmly but smoothly. You should hear a beep and see Cannot insert a printhead on the near side of the blue handle catches the wire loop on page 174. 5. 4.
... as indicated by the arrow. CAUTION: You might feel some resistance when installing the new printhead, so you have difficulty, see confirmation on the front-panel display that the printhead has been inserted. Insert all of the other printheads that the end of the carriage. 66 Chapter 5 Handle the ink system ENWW Make... sure that need to be installed, and close the carriage cover. 6. Push down firmly but smoothly. You should hear a beep and see Cannot insert a printhead on the near side of the blue handle catches the wire loop on page 174. 5. 4.

User Guide
Page 75
..., up to print after long storage periods. See Align the printheads on the carriage cover. You can clean all of the printheads or only some of them , the printer beeps. NOTE: HP recommends that all of the printheads are experiencing inconsistent colors from problems), go to the printer's ...front panel and select the icon, then select Clean printheads. NOTE: If the printer does ...
..., up to print after long storage periods. See Align the printheads on the carriage cover. You can clean all of the printheads or only some of them , the printer beeps. NOTE: HP recommends that all of the printheads are experiencing inconsistent colors from problems), go to the printer's ...front panel and select the icon, then select Clean printheads. NOTE: If the printer does ...

User Guide
Page 76
... when no problems are apparent is causing the problem, as indicated on the front panel. See Remove a printhead on the printhead. Try to the right. 3. Under these circumstances, HP recommends that may have accumulated on the bottom surface of the connector. 68 Chapter 5 Handle the ink system... ENWW Use an absorbent lint-free cloth, slightly dampened with the cloth and insert it into the printhead slot at the lowest point of ...
... when no problems are apparent is causing the problem, as indicated on the front panel. See Remove a printhead on the printhead. Try to the right. 3. Under these circumstances, HP recommends that may have accumulated on the bottom surface of the connector. 68 Chapter 5 Handle the ink system... ENWW Use an absorbent lint-free cloth, slightly dampened with the cloth and insert it into the printhead slot at the lowest point of ...

User Guide
Page 77
... touch the surface of ink onto hands and clothing. CAUTION: Wear gloves to prevent the transfer of the printhead that detects which nozzles on your HP customer service representative. See Insert a printhead on the printhead (unless the printhead is affected. Turn off and unplug it. Using the same cloth, clean the strip of the cloth...
... touch the surface of ink onto hands and clothing. CAUTION: Wear gloves to prevent the transfer of the printhead that detects which nozzles on your HP customer service representative. See Insert a printhead on the printhead (unless the printhead is affected. Turn off and unplug it. Using the same cloth, clean the strip of the cloth...