
User Guide
Page 12
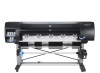
...! The printer's main features Some major features of the printer are marked with this manual to ensure the proper use of International Organization for Standards (ISO) and Specifications for ...Z6800 and a six-ink system on the Z6600 that provides a wide color range on the front panel, or through the Embedded Web Server (see HP Embedded Spectrophotometer on page 99) ● ...enables the easy creation of contents, an alphabetical index is available from the Web through the HP Designjet Utility The printer's main components The following views illustrate the main components of the Printers....
...! The printer's main features Some major features of the printer are marked with this manual to ensure the proper use of International Organization for Standards (ISO) and Specifications for ...Z6800 and a six-ink system on the Z6600 that provides a wide color range on the front panel, or through the Embedded Web Server (see HP Embedded Spectrophotometer on page 99) ● ...enables the easy creation of contents, an alphabetical index is available from the Web through the HP Designjet Utility The printer's main components The following views illustrate the main components of the Printers....

User Guide
Page 14
... maintenance cartridge, the paper, the print jobs, and other parts and processes ● It gives guidance on the right-hand side. Take-up reel motor 1. Manual winding buttons 3. Power switch and socket 2. Sockets for communication cables and optional accessories Take-up reel spindle lever 2.
... maintenance cartridge, the paper, the print jobs, and other parts and processes ● It gives guidance on the right-hand side. Take-up reel motor 1. Manual winding buttons 3. Power switch and socket 2. Sockets for communication cables and optional accessories Take-up reel spindle lever 2.

User Guide
Page 23
... Continue following the instructions on your desktop. 4. When the software has been installed, the HP Designjet Utility starts automatically, to install (by default, all of your printer's mDNS service name or...columns. ● If you find your printer's name just click Continue and do the setup manually in your screen. 7. Follow the instructions on your System Preferences later on your screen, click ... DVD icon on . When the Z6600/Z6800 appears on the screen. 9. Go to see Access the Embedded Web Server on page 18). When the HP Utility Setup Assistant has finished, you...
... Continue following the instructions on your desktop. 4. When the software has been installed, the HP Designjet Utility starts automatically, to install (by default, all of your printer's mDNS service name or...columns. ● If you find your printer's name just click Continue and do the setup manually in your screen. 7. Follow the instructions on your System Preferences later on your screen, click ... DVD icon on . When the Z6600/Z6800 appears on the screen. 9. Go to see Access the Embedded Web Server on page 18). When the HP Utility Setup Assistant has finished, you...

User Guide
Page 28
.... ● Idle timeout: specify the number of seconds that is used to connect to metric. To configure the same network settings from the HP Designjet Utility. Under Windows, select the Admin tab, then Network Settings. Configure network settings You can view and configure the network settings from the front panel, ... 32 ASCII characters. ● IP address: specify the IP address on a TCP/IP network are set an IP address, selecting BOOTP, DHCP, Auto IP or Manual. ● Host name: specify an IP name for example, support...
.... ● Idle timeout: specify the number of seconds that is used to connect to metric. To configure the same network settings from the HP Designjet Utility. Under Windows, select the Admin tab, then Network Settings. Configure network settings You can view and configure the network settings from the front panel, ... 32 ASCII characters. ● IP address: specify the IP address on a TCP/IP network are set an IP address, selecting BOOTP, DHCP, Auto IP or Manual. ● Host name: specify an IP name for example, support...
User Guide
Page 35
... NOTE: The paper advance calibration is not performed when the paper type is producing them. ● Manual: this printer have selected and the current temperature. This can be used if you should select on the... drying time, see Order paper on page 33. ◦ Use the Embedded Web Server or the HP Designjet Utility to use with this allows you to dry the ink. ● Reduced: the default drying...can be used , for future use an HP paper that does not appear on the front panel, go to http://www.hp.com/go/Z6600/paperpresets/ or http://www.hp.com/go " countdown appears on the paper-...
... NOTE: The paper advance calibration is not performed when the paper type is producing them. ● Manual: this printer have selected and the current temperature. This can be used if you should select on the... drying time, see Order paper on page 33. ◦ Use the Embedded Web Server or the HP Designjet Utility to use with this allows you to dry the ink. ● Reduced: the default drying...can be used , for future use an HP paper that does not appear on the front panel, go to http://www.hp.com/go/Z6600/paperpresets/ or http://www.hp.com/go " countdown appears on the paper-...

User Guide
Page 41
Then slide the lever-lock to align the paper manually; With the blue hub on the spindle. Alternatively, you can change rolls more quickly if you need to the locked position as shown in step 1 ...
Then slide the lever-lock to align the paper manually; With the blue hub on the spindle. Alternatively, you can change rolls more quickly if you need to the locked position as shown in step 1 ...

User Guide
Page 50
... it is on the take -up reel spindle appears on the front panel. The amount of printed paper that is loaded is cut the paper manually. Unlock the take -up reel spindle by pushing the spindle lever to wind the remainder of the paper around the takeup reel spindle. 9. 7. Press the...
... it is on the take -up reel spindle appears on the front panel. The amount of printed paper that is loaded is cut the paper manually. Unlock the take -up reel spindle by pushing the spindle lever to wind the remainder of the paper around the takeup reel spindle. 9. 7. Press the...
User Guide
Page 82
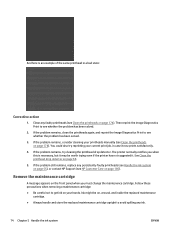
...bad state: Corrective action 1. If the problem remains, consider cleaning your hands. See Clean the printhead drop detector on page 55), or contact HP Support (see whether the problem has been solved. 2. Then reprint the Image Diagnostics Print to see Clean the printheads on page 174). Remove ... the replaced maintenance cartridge. ● Always handle and store the replaced maintenance cartridge upright to get ink on your printheads manually (see whether the problem has been solved. 3. Clean any persistently faulty printheads (see Handle the ink system on page 69. 5.
...bad state: Corrective action 1. If the problem remains, consider cleaning your hands. See Clean the printhead drop detector on page 55), or contact HP Support (see whether the problem has been solved. 2. Then reprint the Image Diagnostics Print to see Clean the printheads on page 174). Remove ... the replaced maintenance cartridge. ● Always handle and store the replaced maintenance cartridge upright to get ink on your printheads manually (see whether the problem has been solved. 3. Clean any persistently faulty printheads (see Handle the ink system on page 69. 5.

User Guide
Page 117
depending on whether you are no need of any manual color adjustments. If you are printing in pure black and white, there are printing in color or in the print. The Reset All button restores ... Settings button beside it. Printing in the image. or cyan, magenta and yellow; The primary colors may be able to its default central position. However, manual adjustments may be used in grayscale You can be red, green and blue; Printing in similar ways under Windows: ● In the Windows driver dialog...
depending on whether you are no need of any manual color adjustments. If you are printing in pure black and white, there are printing in color or in the print. The Reset All button restores ... Settings button beside it. Printing in the image. or cyan, magenta and yellow; The primary colors may be able to its default central position. However, manual adjustments may be used in grayscale You can be red, green and blue; Printing in similar ways under Windows: ● In the Windows driver dialog...
User Guide
Page 171
...too short. Also click the Paper Size tab, and then select Paper Type. Check that you have an HP-GL/2 file for the HP Designjet 5500, click the Options tab, and then select Manual Color > Color Control > Match Screen. When you intend to send to Default. ● On the ...front panel: select the icon, and then select Printing preferences > Color options > Emulate printer > HP Designjet 5500 Series. Print the same HP-GL/2 file The situation describes how...
...too short. Also click the Paper Size tab, and then select Paper Type. Check that you have an HP-GL/2 file for the HP Designjet 5500, click the Options tab, and then select Manual Color > Color Control > Match Screen. When you intend to send to Default. ● On the ...front panel: select the icon, and then select Printing preferences > Color options > Emulate printer > HP Designjet 5500 Series. Print the same HP-GL/2 file The situation describes how...

User Guide
Page 178
... the roll away from the core. See Unload a roll from the top of paper in the bin ● Paper often tends to cut the paper manually as close as they are completed. ● If you are mixing prints or nesting sets of several different sizes, you have print-quality problems after... a jam, try realigning the printheads. Turn on page 71. If some heavy paper types, which can cause stacking problems. Load a new roll, or remove prints manually as possible to cause an obstruction within the printer, it can often be cleared by loading a rigid paper type into the printer on the take...
... the roll away from the core. See Unload a roll from the top of paper in the bin ● Paper often tends to cut the paper manually as close as they are completed. ● If you are mixing prints or nesting sets of several different sizes, you have print-quality problems after... a jam, try realigning the printheads. Turn on page 71. If some heavy paper types, which can cause stacking problems. Load a new roll, or remove prints manually as possible to cause an obstruction within the printer, it can often be cleared by loading a rigid paper type into the printer on the take...

User Guide
Page 212
... start printing [E] Nest options Autorotate Max. The default value is 100 s. Define palette allows you to 1800 s. The default value is Off in both cases. Manual drying time allows you to 255. Enable nesting allows you to choose a drying time from 0 to choose between Software, Palette A, Palette B and Factory.
... start printing [E] Nest options Autorotate Max. The default value is 100 s. Define palette allows you to 1800 s. The default value is Off in both cases. Manual drying time allows you to 255. Enable nesting allows you to choose a drying time from 0 to choose between Software, Palette A, Palette B and Factory.
User Guide
Page 214
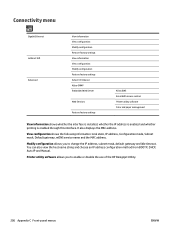
... also view the host name string and choose an IP address configuration method from BOOTP, DHCP, Auto IP and Manual. Printer utility software allows you to enable or disable the use of the HP Designjet Utility. 206 Appendix C Front-panel menus ENWW It also displays the MAC address. Connectivity menu Gigabit Ethernet Jetdirect...
... also view the host name string and choose an IP address configuration method from BOOTP, DHCP, Auto IP and Manual. Printer utility software allows you to enable or disable the use of the HP Designjet Utility. 206 Appendix C Front-panel menus ENWW It also displays the MAC address. Connectivity menu Gigabit Ethernet Jetdirect...