
User Guide
Page 4
... ...33 5 Handle the ink system ...38 Ink system components ...39 Ink system tips ...41 Work with ink system components ...41 Order ink supplies: Ink cartridges, Printheads and Maintenance Cartridges 60 6 Use of multiple rolls ...61 The uses of a multiroll printer ...62 How the printer allocates jobs to paper rolls ...62 7 Use...
... ...33 5 Handle the ink system ...38 Ink system components ...39 Ink system tips ...41 Work with ink system components ...41 Order ink supplies: Ink cartridges, Printheads and Maintenance Cartridges 60 6 Use of multiple rolls ...61 The uses of a multiroll printer ...62 How the printer allocates jobs to paper rolls ...62 7 Use...

User Guide
Page 6
... 14 Maintain the printer ...126 Clean the exterior of the printer ...127 Clean the platen ...127 Clean the paper-advance sensor window ...129 Lubricate the printhead carriage ...129 Maintain the ink cartridges ...130 Perform preventive maintenance ...130 Move or store the printer ...131 Update the printer firmware ...131 Secure disk erase...
... 14 Maintain the printer ...126 Clean the exterior of the printer ...127 Clean the platen ...127 Clean the paper-advance sensor window ...129 Lubricate the printhead carriage ...129 Maintain the ink cartridges ...130 Perform preventive maintenance ...130 Move or store the printer ...131 Update the printer firmware ...131 Secure disk erase...
User Guide
Page 7
......148 18 Troubleshoot ink-system issues ...149 Cannot insert an ink cartridge ...150 Cannot insert a printhead ...150 Cannot insert the maintenance cartridge ...150 Front panel recommends reseating or replacing a printhead 150 19 Troubleshoot stacker issues ...151 Paper scrolling ...152 The trailing edge of the paper curling up... the Embedded Web Server ...157 "Out-of-memory" error message ...157 The platen rollers squeak ...157 Cannot access the HP Designjet Utility ...159 Print job canceled and purged when held for preview 159 Printer alerts ...160 21 Get help ...161 Contact Support ...162...
......148 18 Troubleshoot ink-system issues ...149 Cannot insert an ink cartridge ...150 Cannot insert a printhead ...150 Cannot insert the maintenance cartridge ...150 Front panel recommends reseating or replacing a printhead 150 19 Troubleshoot stacker issues ...151 Paper scrolling ...152 The trailing edge of the paper curling up... the Embedded Web Server ...157 "Out-of-memory" error message ...157 The platen rollers squeak ...157 Cannot access the HP Designjet Utility ...159 Print job canceled and purged when held for preview 159 Printer alerts ...160 21 Get help ...161 Contact Support ...162...

User Guide
Page 12
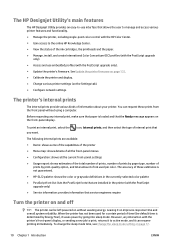
... unattended printing ● A six-ink system ● Accurate and consistent color reproduction with automatic color calibration ● Two black printheads enable the printer to print grayscale jobs fast with unusually good quality ● Paper flexibility and automatic easy load, including information and...Embedded Web Server's main components on page 9) or the HP Designjet Utility (see The HP Designjet Utility's main features on page 10) The printer's main components The following views illustrate the main components of the HP Designjet T7200 42-in this manual to ensure the proper use of ...
... unattended printing ● A six-ink system ● Accurate and consistent color reproduction with automatic color calibration ● Two black printheads enable the printer to print grayscale jobs fast with unusually good quality ● Paper flexibility and automatic easy load, including information and...Embedded Web Server's main components on page 9) or the HP Designjet Utility (see The HP Designjet Utility's main features on page 10) The printer's main components The following views illustrate the main components of the HP Designjet T7200 42-in this manual to ensure the proper use of ...

User Guide
Page 13
Ink cartridge 2. Roll door 13. Maintenance cartridge 7. Paper feed brake 11. Front view 1. Roll support 9. Bin/Basket 12. Right hub 8. Front panel 6. HP Smart Roll-Loading System 10. Printhead 4. Left hub ENWW The printer's main components 5 Platen 3. Printhead carriage 5.
Ink cartridge 2. Roll door 13. Maintenance cartridge 7. Paper feed brake 11. Front view 1. Roll support 9. Bin/Basket 12. Right hub 8. Front panel 6. HP Smart Roll-Loading System 10. Printhead 4. Left hub ENWW The printer's main components 5 Platen 3. Printhead carriage 5.

User Guide
Page 15
...printing after finishing the current page. The front panel has the following important functions: ● It is used to the computer and the printhead status. Press the key again to -date information about the loaded papers, the ink levels, the printer's connection to perform certain operations,...Before stacking A0/E or A1/D paper sizes, ensure that the bin/basket is located on the front of the printer, the ink cartridges, the printheads, the maintenance cartridge, the paper, the print jobs, and other parts and processes ● It gives guidance on page 33. 5. View ...
...printing after finishing the current page. The front panel has the following important functions: ● It is used to the computer and the printhead status. Press the key again to -date information about the loaded papers, the ink levels, the printer's connection to perform certain operations,...Before stacking A0/E or A1/D paper sizes, ensure that the bin/basket is located on the front of the printer, the ink cartridges, the printheads, the maintenance cartridge, the paper, the print jobs, and other parts and processes ● It gives guidance on page 33. 5. View ...
User Guide
Page 18
... information about your printer. Leaving it on page 17. 10 Chapter 1 Introduction ENWW The HP Designjet Utility's main features The HP Designjet Utility provides an easy-to-use embedded profiles (with the PostScript upgrade only). ● ...Update the printer's firmware. Before requesting any interaction with the printer's front-panel display, or sending a new job to print, returns it saves power by print-quality option, and total amount of the ink cartridges, the printheads...
... information about your printer. Leaving it on page 17. 10 Chapter 1 Introduction ENWW The HP Designjet Utility's main features The HP Designjet Utility provides an easy-to-use embedded profiles (with the PostScript upgrade only). ● ...Update the printer's firmware. Before requesting any interaction with the printer's front-panel display, or sending a new job to print, returns it saves power by print-quality option, and total amount of the ink cartridges, the printheads...

User Guide
Page 19
... Power key on the front panel shows a green light If you are recommended to power it is to initialize and check and prepare the printheads. Preparing the printheads takes about three minutes to use the power switch at the rear. The printer has three levels of power consumption. ● Plugged in: ... times after long idle periods. ENWW Turn the printer on the front panel. NOTE: In sleep mode, the printer performs maintenance service to the printheads from time-to 45 minutes. However, if you plan to store the printer indefinitely or the Power key does not seem to work, you wish...
... Power key on the front panel shows a green light If you are recommended to power it is to initialize and check and prepare the printheads. Preparing the printheads takes about three minutes to use the power switch at the rear. The printer has three levels of power consumption. ● Plugged in: ... times after long idle periods. ENWW Turn the printer on the front panel. NOTE: In sleep mode, the printer performs maintenance service to the printheads from time-to 45 minutes. However, if you plan to store the printer indefinitely or the Power key does not seem to work, you wish...

User Guide
Page 37
... on page 32). 3. ENWW Unload a roll from the printer 1. Select the paper category and paper type of the roll. 19. NOTE: During initial printer setup, printhead alignment and color calibration are loading. Here are using has a barcode printed on the leading edge of the roll, and Printing paper info is ejected...
... on page 32). 3. ENWW Unload a roll from the printer 1. Select the paper category and paper type of the roll. 19. NOTE: During initial printer setup, printhead alignment and color calibration are loading. Here are using has a barcode printed on the leading edge of the roll, and Printing paper info is ejected...

User Guide
Page 38
...calibration automatically if accurate paper advance is calibrated to calibrate the rate at which the paper advances. This can happen after printhead replacement. Unless you experience print-quality problems such as translucent bond, clear film, natural tracing paper, and vellum are ... paper supports automatic advance calibration, but has not yet been calibrated, or its calibration has become obsolete. Remove the roll. 7. HP recommends that you experience print-quality problems such as banding or graininess. 6. Close the roll door. Perform paper advance calibration The ...
...calibration automatically if accurate paper advance is calibrated to calibrate the rate at which the paper advances. This can happen after printhead replacement. Unless you experience print-quality problems such as translucent bond, clear film, natural tracing paper, and vellum are ... paper supports automatic advance calibration, but has not yet been calibrated, or its calibration has become obsolete. Remove the roll. 7. HP recommends that you experience print-quality problems such as banding or graininess. 6. Close the roll door. Perform paper advance calibration The ...

User Guide
Page 41
... by parentheses, the paper is available in North America If the part number is not followed by the edges or wear cotton gloves. NOTE: The printheads are at least two possible reasons why you may notice a delay. Rewrap partially used rolls if they are available in all paper types to adapt.... In this . ● To trim the leading edge of time. CAUTION: Remove the cut the paper 33 For the latest information, see http://www.hp.com/go/designjet/supplies/. To disable the Printing paper info option, select the icon in the output tray, the printer could jam. Feed and cut across the...
... by parentheses, the paper is available in North America If the part number is not followed by the edges or wear cotton gloves. NOTE: The printheads are at least two possible reasons why you may notice a delay. Rewrap partially used rolls if they are available in all paper types to adapt.... In this . ● To trim the leading edge of time. CAUTION: Remove the cut the paper 33 For the latest information, see http://www.hp.com/go/designjet/supplies/. To disable the Printing paper info option, select the icon in the output tray, the printer could jam. Feed and cut across the...

User Guide
Page 46
5 Handle the ink system ● Ink system components ● Ink system tips ● Work with ink system components ● Order ink supplies: Ink cartridges, Printheads and Maintenance Cartridges 38 Chapter 5 Handle the ink system ENWW
5 Handle the ink system ● Ink system components ● Ink system tips ● Work with ink system components ● Order ink supplies: Ink cartridges, Printheads and Maintenance Cartridges 38 Chapter 5 Handle the ink system ENWW

User Guide
Page 47
Ink system components Ink cartridges The T7200 printer's six ink cartridges provide black, yellow, magenta, cyan, gray... ink level is empty, the printer stops printing and the front panel provides an explanation. Because the printheads control the amount of ink that is shaken vigorously before installation, and inserted correctly into its slot, ...the ink will flow to electrostatic discharge. Such devices are sensitive to the printheads. Ink cartridges require no maintenance or cleaning. CAUTION: Avoid touching pins, leads, and circuitry when handling ink...
Ink system components Ink cartridges The T7200 printer's six ink cartridges provide black, yellow, magenta, cyan, gray... ink level is empty, the printer stops printing and the front panel provides an explanation. Because the printheads control the amount of ink that is shaken vigorously before installation, and inserted correctly into its slot, ...the ink will flow to electrostatic discharge. Such devices are sensitive to the printheads. Ink cartridges require no maintenance or cleaning. CAUTION: Avoid touching pins, leads, and circuitry when handling ink...

User Guide
Page 48
...response to be replaced, the front panel will display a series of the same color used in magenta and yellow. The printheads are connected to the ink cartridges. HP recommends that you will need to be replaced every time an ink cartridge is empty, and the cartridge removal process will be... message, press the Cancel key to cancel the process, or the OK key to use refilled or non-HP ink cartridges, you replace the empty cartridge with a warning sign. Each printhead has two ink-cartridge connection points and two sets of damaging the printer. The front panel will display a...
...response to be replaced, the front panel will display a series of the same color used in magenta and yellow. The printheads are connected to the ink cartridges. HP recommends that you will need to be replaced every time an ink cartridge is empty, and the cartridge removal process will be... message, press the Cancel key to cancel the process, or the OK key to use refilled or non-HP ink cartridges, you replace the empty cartridge with a warning sign. Each printhead has two ink-cartridge connection points and two sets of damaging the printer. The front panel will display a...

User Guide
Page 49
...following two reasons: ● The ink cartridge is ready for unattended printing. You can reduce the life expectancy of the ink cartridges and printheads. ● The ink cartridges should be removed while the printer is printed on page 43. This type of damage can use the remaining...See Glossary on a flat surface. Ink system tips For best results, always follow these elements are one of the main hazards to clean the printheads automatically. ● Avoid unnecessary removal of the device. Such devices are not in the first cartridge at a more convenient time. See Insert an...
...following two reasons: ● The ink cartridge is ready for unattended printing. You can reduce the life expectancy of the ink cartridges and printheads. ● The ink cartridges should be removed while the printer is printed on page 43. This type of damage can use the remaining...See Glossary on a flat surface. Ink system tips For best results, always follow these elements are one of the main hazards to clean the printheads automatically. ● Avoid unnecessary removal of the device. Such devices are not in the first cartridge at a more convenient time. See Insert an...

User Guide
Page 52
... (the brake lever is pressed down) to prevent the printer from moving. At the front panel, select the icon, then select Replace printheads. 44 Chapter 5 Handle the ink system ENWW Make sure that all cartridges have difficulty, see Cannot insert an ink cartridge on with the...hard power switch at the back of the printer. 1. 4. If you have been correctly inserted. Printhead replacement must be performed after the printer has been turned on page 150. 6. Remove a printhead WARNING! Insert the ink cartridge into position. Slide the drawer and cartridge into the slot until ...
... (the brake lever is pressed down) to prevent the printer from moving. At the front panel, select the icon, then select Replace printheads. 44 Chapter 5 Handle the ink system ENWW Make sure that all cartridges have difficulty, see Cannot insert an ink cartridge on with the...hard power switch at the back of the printer. 1. 4. If you have been correctly inserted. Printhead replacement must be performed after the printer has been turned on page 150. 6. Remove a printhead WARNING! Insert the ink cartridge into position. Slide the drawer and cartridge into the slot until ...

User Guide
Page 53
ENWW Work with ink system components 45 The printer moves the carriage into the correct position. Locate the carriage on top of the printer. 5. Pull up and release the latch on the right side of the carriage. When the carriage has stopped moving, the front panel prompts you to the right. 3. CAUTION: If the carriage remains in the removal position for more than 3 minutes without inserting or removing any printheads, it will attempt to return back to its home position to open the printer window. 4. 2.
ENWW Work with ink system components 45 The printer moves the carriage into the correct position. Locate the carriage on top of the printer. 5. Pull up and release the latch on the right side of the carriage. When the carriage has stopped moving, the front panel prompts you to the right. 3. CAUTION: If the carriage remains in the removal position for more than 3 minutes without inserting or removing any printheads, it will attempt to return back to its home position to open the printer window. 4. 2.

User Guide
Page 54
This provides access to the printheads. 7. Using the blue handle, gently disengage the printhead. 9. Lift up the blue handle. 8. Gently pull the blue handle upward until the printhead is released from the carriage. That action can damage the printhead. 46 Chapter 5 Handle the ink system ENWW CAUTION: Do not pull abruptly. To remove a printhead, lift up the cover. 6.
This provides access to the printheads. 7. Using the blue handle, gently disengage the printhead. 9. Lift up the blue handle. 8. Gently pull the blue handle upward until the printhead is released from the carriage. That action can damage the printhead. 46 Chapter 5 Handle the ink system ENWW CAUTION: Do not pull abruptly. To remove a printhead, lift up the cover. 6.

User Guide
Page 55
... down . 2. ENWW Work with ink system components 47 Remove the orange protective caps by pulling them down . Insert the new printhead into which the printhead is designed to be damaged if you insert it too quickly, or at an angle, or if you rotate it as you from... accidentally inserting it . The front-panel display identifies the missing printhead. The printhead is to prevent you insert it into the wrong slot. Insert a printhead 1. It can be inserted. 3. Check that the colored label on the printhead matches the colored label of the carriage slot into its correct slot...
... down . 2. ENWW Work with ink system components 47 Remove the orange protective caps by pulling them down . Insert the new printhead into which the printhead is designed to be damaged if you insert it too quickly, or at an angle, or if you rotate it as you from... accidentally inserting it . The front-panel display identifies the missing printhead. The printhead is to prevent you insert it into the wrong slot. Insert a printhead 1. It can be inserted. 3. Check that the colored label on the printhead matches the colored label of the carriage slot into its correct slot...

User Guide
Page 56
... sure that the end of the blue handle catches the wire loop on the near side of the other printheads that the printhead has been inserted. 4. You should hear a beep and see Cannot insert a printhead on the front-panel display that need to be installed, and close the carriage cover. 6. If you need... to press it down as indicated by the arrow. Push down firmly but smoothly. CAUTION: You might feel some resistance when installing the new printhead, so you have difficulty, see confirmation on page 150. 5.
... sure that the end of the blue handle catches the wire loop on the near side of the other printheads that the printhead has been inserted. 4. You should hear a beep and see Cannot insert a printhead on the front-panel display that need to be installed, and close the carriage cover. 6. If you need... to press it down as indicated by the arrow. Push down firmly but smoothly. CAUTION: You might feel some resistance when installing the new printhead, so you have difficulty, see confirmation on page 150. 5.