
User's Guide
Page 4
Product features Back/top/side view 1 6 5 43 2 1 Power connector (DC-in) 2 USB connector (to computer) 3 Cooling vents 4 Slot for paper path 5 Color cartridge (installed as shown) 6 Cartridge door ii www.kodak.com/go/support
Product features Back/top/side view 1 6 5 43 2 1 Power connector (DC-in) 2 USB connector (to computer) 3 Cooling vents 4 Slot for paper path 5 Color cartridge (installed as shown) 6 Cartridge door ii www.kodak.com/go/support

User's Guide
Page 5
... Getting started 1 Finding a location for your photo printer 1 Connecting and turning on the power 2 Handling and storing the color cartridge 3 Installing and removing the color cartridge 3 Handling and storing the paper 4 Loading the paper 5 Installing and removing the paper tray 6 Setting the ...Installing software 10 Minimum system requirements 10 Installing the software 10 4 Printing from a computer 13 Connecting to a computer 13 Canceling printing 16 5 Care and maintenance 17 General care 17 Cleaning the paper feed roller 18 Traveling with your photo printer 19 www.kodak...
... Getting started 1 Finding a location for your photo printer 1 Connecting and turning on the power 2 Handling and storing the color cartridge 3 Installing and removing the color cartridge 3 Handling and storing the paper 4 Loading the paper 5 Installing and removing the paper tray 6 Setting the ...Installing software 10 Minimum system requirements 10 Installing the software 10 4 Printing from a computer 13 Connecting to a computer 13 Canceling printing 16 5 Care and maintenance 17 General care 17 Cleaning the paper feed roller 18 Traveling with your photo printer 19 www.kodak...

User's Guide
Page 9
...careful not to remove the cartridge without first clearing the paper error. www.kodak.com/go/support 3 Getting started Handling and storing the color cartridge ■...vehicle parked in the color cartridge ribbon. Make sure the Paper light is no slack in the sun). Installing and removing the color cartridge 1 Open the cartridge door on the cartridge spool, then rotate the spool ... to make . 3 Slide the color cartridge in, label side up, with the arrow pointing toward the photo printer. To remove slack, push in place if there is a paper error. Do not attempt to rotate the...
...careful not to remove the cartridge without first clearing the paper error. www.kodak.com/go/support 3 Getting started Handling and storing the color cartridge ■...vehicle parked in the color cartridge ribbon. Make sure the Paper light is no slack in the sun). Installing and removing the color cartridge 1 Open the cartridge door on the cartridge spool, then rotate the spool ... to make . 3 Slide the color cartridge in, label side up, with the arrow pointing toward the photo printer. To remove slack, push in place if there is a paper error. Do not attempt to rotate the...

User's Guide
Page 10
... 5 or fewer prints remain, the Color cartridge light blinks slowly for several seconds. ■ When the color cartridge is in the sun). 4 www.kodak.com/go/support Do not touch the glossy side of high-temperature environments (such as a vehicle parked in the paper tray. Instead, remove the paper...error and resume printing. Handling and storing the paper ■ To avoid fingerprints, handle the paper by the edges or by the perforated tabs. After installing a new color cartridge, press the On/Off button to keep out dust and debris. ■ Store paper flat. ■ Keep the paper ...
... 5 or fewer prints remain, the Color cartridge light blinks slowly for several seconds. ■ When the color cartridge is in the sun). 4 www.kodak.com/go/support Do not touch the glossy side of high-temperature environments (such as a vehicle parked in the paper tray. Instead, remove the paper...error and resume printing. Handling and storing the paper ■ To avoid fingerprints, handle the paper by the edges or by the perforated tabs. After installing a new color cartridge, press the On/Off button to keep out dust and debris. ■ Store paper flat. ■ Keep the paper ...

User's Guide
Page 11
Do not load paper that is missing perforated tabs. Getting started Loading the paper 1 Remove the paper tray from the photo printer if installed (see page 6). 2 Slide the paper tray cover back until it "clicks" into place, about 1.25 in. (3 cm), then lift up on the end of the ... touch the glossy side of the paper tray cover. 3 Carefully "fan" the paper to prevent overloading. www.kodak.com/go /accessories. IMPORTANT: Do not load more than 25 sheets of Kodak products, or visit www.kodak.com/go /support 5 Use the upper limit line inside the paper tray as a guide to keep the...
Do not load paper that is missing perforated tabs. Getting started Loading the paper 1 Remove the paper tray from the photo printer if installed (see page 6). 2 Slide the paper tray cover back until it "clicks" into place, about 1.25 in. (3 cm), then lift up on the end of the ... touch the glossy side of the paper tray cover. 3 Carefully "fan" the paper to prevent overloading. www.kodak.com/go /accessories. IMPORTANT: Do not load more than 25 sheets of Kodak products, or visit www.kodak.com/go /support 5 Use the upper limit line inside the paper tray as a guide to keep the...

User's Guide
Page 12
...tray fits squarely on the photo printer, make sure to remove it "clicks" into place, about 1.25 in. (3 cm). 3 Slide the paper tray in the printer tray slot until it . Getting started Installing and removing the paper tray... 1 Open the paper tray door. 2 Slide the paper tray cover back until the tray locks into place. After refilling and installing the ...On/Off button to keep the paper tray cover all the way open while installing. Pull the paper tray out to keep out dust and debris. ■...
...tray fits squarely on the photo printer, make sure to remove it "clicks" into place, about 1.25 in. (3 cm). 3 Slide the paper tray in the printer tray slot until it . Getting started Installing and removing the paper tray... 1 Open the paper tray door. 2 Slide the paper tray cover back until the tray locks into place. After refilling and installing the ...On/Off button to keep the paper tray cover all the way open while installing. Pull the paper tray out to keep out dust and debris. ■...

User's Guide
Page 16
... ■ Color monitor, 1024 x 768 pixels (thousands ■ Color monitor, 800 x 600 pixels (16-bit or millions of colors recommended) or 24-bit recommended) Installing the software IMPORTANT: Install Kodak EasyShare software before connecting the photo printer to the computer. 1 Close all software applications that are open on your computer (including anti-virus software). 2 Place the...
... ■ Color monitor, 1024 x 768 pixels (thousands ■ Color monitor, 800 x 600 pixels (16-bit or millions of colors recommended) or 24-bit recommended) Installing the software IMPORTANT: Install Kodak EasyShare software before connecting the photo printer to the computer. 1 Close all software applications that are open on your computer (including anti-virus software). 2 Place the...

User's Guide
Page 17
... the photo printer with the photo printer. The printer driver is selected. If you don't see the ReadMe file on the Kodak EasyShare software CD. c In the Printer List window, click Add Printer. IMPORTANT: When prompted, take a few minutes to register electronically. www.kodak.com/go /register. 5 Restart the computer if prompted. d Select the photo printer, then click Add. You must install the printer...
... the photo printer with the photo printer. The printer driver is selected. If you don't see the ReadMe file on the Kodak EasyShare software CD. c In the Printer List window, click Add Printer. IMPORTANT: When prompted, take a few minutes to register electronically. www.kodak.com/go /register. 5 Restart the computer if prompted. d Select the photo printer, then click Add. You must install the printer...
User's Guide
Page 18
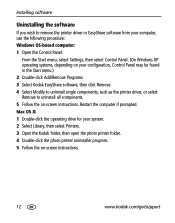
...-screen instructions. 12 www.kodak.com/go/support Restart the computer if prompted. Installing software Uninstalling the software If you wish to remove the printer driver or EasyShare software from your computer, use... the following procedure: Windows OS-based computer: 1 Open the Control Panel: From the Start menu, select Settings, then select Control Panel. (On Windows XP operating systems, depending on your system. 2 Select Library, then select Printers. 3 Open the Kodak folder, then open the photo printer folder. 4 Double-click the photo printer...
...-screen instructions. 12 www.kodak.com/go/support Restart the computer if prompted. Installing software Uninstalling the software If you wish to remove the printer driver or EasyShare software from your computer, use... the following procedure: Windows OS-based computer: 1 Open the Control Panel: From the Start menu, select Settings, then select Control Panel. (On Windows XP operating systems, depending on your system. 2 Select Library, then select Printers. 3 Open the Kodak folder, then open the photo printer folder. 4 Double-click the photo printer...
User's Guide
Page 19
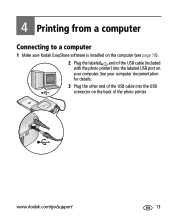
See your computer documentation for details. 3 Plug the other end of the USB cable into the labeled USB port on the back of the USB cable (included with the photo printer) into the USB connector on your computer. 4 Printing from a computer Connecting to a computer 1 Make sure Kodak EasyShare software is installed on the computer (see page 10). 2 Plug the labeled end of the photo printer. www.kodak.com/go/support 13
See your computer documentation for details. 3 Plug the other end of the USB cable into the labeled USB port on the back of the USB cable (included with the photo printer) into the USB connector on your computer. 4 Printing from a computer Connecting to a computer 1 Make sure Kodak EasyShare software is installed on the computer (see page 10). 2 Plug the labeled end of the photo printer. www.kodak.com/go/support 13
User's Guide
Page 20
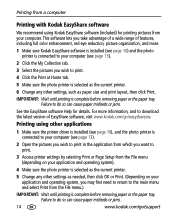
...: Wait until printing is complete before removing paper or the paper tray. For more . 1 Make sure Kodak EasyShare software is installed (see page 10) and the photo printer is connected to your computer (see page 13). 2 Open the pictures you wish to print in the ..., and to download the latest version of EasyShare software, visit www.kodak.com/go /support Printing from a computer Printing with Kodak EasyShare software We recommend using other applications 1 Make sure the printer driver is installed (see page 10), and the photo printer is connected to your computer (see page 13...
...: Wait until printing is complete before removing paper or the paper tray. For more . 1 Make sure Kodak EasyShare software is installed (see page 10) and the photo printer is connected to your computer (see page 13). 2 Open the pictures you wish to print in the ..., and to download the latest version of EasyShare software, visit www.kodak.com/go /support Printing from a computer Printing with Kodak EasyShare software We recommend using other applications 1 Make sure the printer driver is installed (see page 10), and the photo printer is connected to your computer (see page 13...

User's Guide
Page 26
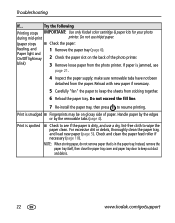
...sure paper is available in any way, or removable tabs have questions about your photo feed printer. Do not exceed the fill line. 5 Re-install the paper tray, then press to Troubleshooting information, visit www.kodak.com/go /support Carefully "fan" the paper to keep the sheets from sticking... file located on the Kodak EasyShare software CD. Do not exceed the fill line. 4 Re-install the paper tray then press to keep the sheets from sticking together. 4 Reload the paper tray. Printing problems If... Multiple sheets of paper are pulled through printer ■ Clean the ...
...sure paper is available in any way, or removable tabs have questions about your photo feed printer. Do not exceed the fill line. 5 Re-install the paper tray, then press to Troubleshooting information, visit www.kodak.com/go /support Carefully "fan" the paper to keep the sheets from sticking... file located on the Kodak EasyShare software CD. Do not exceed the fill line. 4 Re-install the paper tray then press to keep the sheets from sticking together. 4 Reload the paper tray. Printing problems If... Multiple sheets of paper are pulled through printer ■ Clean the ...

User's Guide
Page 27
... cartridge & paper kits for jammed paper: 3 Remove the paper supply from the ribbon, then re-install the cartridge (page 3). IMPORTANT: Check the paper slot on . www.kodak.com/go/support 21 Troubleshooting If... Do not attempt to keep the sheets from sticking together. 4 Reload the paper tray....remove any slack from the paper tray. Do not exceed the fill line. 5 Re-install the paper tray, then press to remove the cartridge (see Paper light under Photo printer status lights, page 26). Printer is jammed (Paper light, cartridge light, and/or On/Off light may lock in ...
... cartridge & paper kits for jammed paper: 3 Remove the paper supply from the ribbon, then re-install the cartridge (page 3). IMPORTANT: Check the paper slot on . www.kodak.com/go/support 21 Troubleshooting If... Do not attempt to keep the sheets from sticking together. 4 Reload the paper tray....remove any slack from the paper tray. Do not exceed the fill line. 5 Re-install the paper tray, then press to remove the cartridge (see Paper light under Photo printer status lights, page 26). Printer is jammed (Paper light, cartridge light, and/or On/Off light may lock in ...
User's Guide
Page 28
...from sticking together. 6 Reload the paper tray. Do not exceed the fill line. 7 Re-install the paper tray, then press to keep out dust and debris. 22 www.kodak.com/go/support Check and clean the paper feed roller if necessary (page 18). Handle paper ...4 Inspect the paper supply: make sure removable tabs have not been detached from the photo printer. Troubleshooting If... Try the following Printing stops IMPORTANT: Use only Kodak color cartridge & paper kits for your photo during mid-print printer. blink) 3 Remove loose paper from the paper. Reload with new paper if necessary...
...from sticking together. 6 Reload the paper tray. Do not exceed the fill line. 7 Re-install the paper tray, then press to keep out dust and debris. 22 www.kodak.com/go/support Check and clean the paper feed roller if necessary (page 18). Handle paper ...4 Inspect the paper supply: make sure removable tabs have not been detached from the photo printer. Troubleshooting If... Try the following Printing stops IMPORTANT: Use only Kodak color cartridge & paper kits for your photo during mid-print printer. blink) 3 Remove loose paper from the paper. Reload with new paper if necessary...
User's Guide
Page 30
...; Make sure the color cartridge is properly installed (page 3). Nothing ■ Check the USB connections from the photo printer to the computer happens when (page 13). Troubleshooting If... Install if necessary. Disconnect then reconnect the USB cable from the photo printer to the computer (page 13). ■ Make sure Kodak EasyShare software is at least one picture in...
...; Make sure the color cartridge is properly installed (page 3). Nothing ■ Check the USB connections from the photo printer to the computer happens when (page 13). Troubleshooting If... Install if necessary. Disconnect then reconnect the USB cable from the photo printer to the computer (page 13). ■ Make sure Kodak EasyShare software is at least one picture in...

User's Guide
Page 33
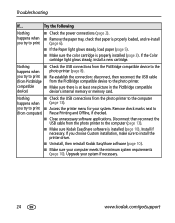
...IMPORTANT: The color cartridge may lock in place if there is nearly depleted. Slow blink (for several seconds): the color cartridge is a paper error. Install a new color cartridge (page 3), then press . and is a color cartridge jam Clear the jam (page 21), then press . Do not ...to remove the cartridge (see Paper light). www.kodak.com/go/support 27 cartridge (page 3), then press . Fast blink: there is working normally. The color cartridge is not installed or is depleted. Make sure the Paper light is properly installed None required. The color cartridge is Remove and ...
...IMPORTANT: The color cartridge may lock in place if there is nearly depleted. Slow blink (for several seconds): the color cartridge is a paper error. Install a new color cartridge (page 3), then press . and is a color cartridge jam Clear the jam (page 21), then press . Do not ...to remove the cartridge (see Paper light). www.kodak.com/go/support 27 cartridge (page 3), then press . Fast blink: there is working normally. The color cartridge is not installed or is depleted. Make sure the Paper light is properly installed None required. The color cartridge is Remove and ...

User's Guide
Page 34
Light is off before attempting to remove the cartridge. paper if necessary, then press . The paper tray is not installed or is properly installed and None required. Paper did not feed; Clean the paper feed roller (page 18). Clear the jam (page 21), then press . ...www.kodak.com/go/support the Remove loose paper. Reload with new paper if necessary, then together (page 20). Troubleshooting Paper light Light status Cause Action/solution IMPORTANT: The color cartridge may lock in place if there is missing paper supply. There is properly loaded, and re-install (...
Light is off before attempting to remove the cartridge. paper if necessary, then press . The paper tray is not installed or is properly installed and None required. Paper did not feed; Clean the paper feed roller (page 18). Clear the jam (page 21), then press . ...www.kodak.com/go/support the Remove loose paper. Reload with new paper if necessary, then together (page 20). Troubleshooting Paper light Light status Cause Action/solution IMPORTANT: The color cartridge may lock in place if there is missing paper supply. There is properly loaded, and re-install (...
User's Guide
Page 41
... other than the United States and Canada, the terms and conditions of this warranty may be by a Kodak company, no guarantee that interference will not occur in a particular installation. Regulatory information FCC compliance and advisory Kodak EasyShare photo printer 300 This equipment has been tested and found to comply with the instructions, may cause harmful interference to...
... other than the United States and Canada, the terms and conditions of this warranty may be by a Kodak company, no guarantee that interference will not occur in a particular installation. Regulatory information FCC compliance and advisory Kodak EasyShare photo printer 300 This equipment has been tested and found to comply with the instructions, may cause harmful interference to...

User's Guide
Page 42
...Class B-Cet appareil numérique de la classe B est conforme à la norme NMB-003 du Canada. 36 www.kodak.com/go/support Any changes or modifications not expressly approved by one or more of the product, they must be determined by turning... suggestions. Where shielded interface cables have been provided with the product or specified additional components or accessories elsewhere defined to be used with the installation of the following measures: 1) reorient or relocate the receiving antenna; 2) increase the separation between the equipment and the receiver; 3) connect ...
...Class B-Cet appareil numérique de la classe B est conforme à la norme NMB-003 du Canada. 36 www.kodak.com/go/support Any changes or modifications not expressly approved by one or more of the product, they must be determined by turning... suggestions. Where shielded interface cables have been provided with the product or specified additional components or accessories elsewhere defined to be used with the installation of the following measures: 1) reorient or relocate the receiving antenna; 2) increase the separation between the equipment and the receiver; 3) connect ...

User's Guide
Page 43
... of, 15 computer connecting photo printer to, 13 installing software, 10 printing from, 13 system requirements, 10 uninstalling software, 12 connecting photo printer to computer), ii, 13 cooling vents, ii customer support, 30 D DC-in, power connector, ii, 2 disposal and recycling, 33 door cartridge, ii, 3 paper tray, i, 6 E EasyShare software. See Kodak EasyShare software www.kodak.com/go/support 37
... of, 15 computer connecting photo printer to, 13 installing software, 10 printing from, 13 system requirements, 10 uninstalling software, 12 connecting photo printer to computer), ii, 13 cooling vents, ii customer support, 30 D DC-in, power connector, ii, 2 disposal and recycling, 33 door cartridge, ii, 3 paper tray, i, 6 E EasyShare software. See Kodak EasyShare software www.kodak.com/go/support 37