Use & Care Guide
Page 1
...performance, parts, accessories or service, call: 1-800-422-1230 or visit our website at www.kitchenaid.com In Canada, for assistance, installation and service, call: 1-800-807-6777 or visit our website at www.kitchenaid.ca HOTTE D'EXTRACTION À MONTAGE MURAL DE STYLE COMMERCIAL DE 30" (76,2 CM) ET ...36" (91,4 CM) Instructions d'installation et Guide d'utilisation et d'entretien Au Canada, pour assistance, installation ou service composez le 1-800-807-6777 ou visitez notre site web à www.kitchenaid.ca Table of Contents/Table des matières 2 IMPORTANT: READ AND ...
...performance, parts, accessories or service, call: 1-800-422-1230 or visit our website at www.kitchenaid.com In Canada, for assistance, installation and service, call: 1-800-807-6777 or visit our website at www.kitchenaid.ca HOTTE D'EXTRACTION À MONTAGE MURAL DE STYLE COMMERCIAL DE 30" (76,2 CM) ET ...36" (91,4 CM) Instructions d'installation et Guide d'utilisation et d'entretien Au Canada, pour assistance, installation ou service composez le 1-800-807-6777 ou visitez notre site web à www.kitchenaid.ca Table of Contents/Table des matières 2 IMPORTANT: READ AND ...

Use & Care Guide
Page 2
...WARRANTY 14 TABLE DES MATIÈRES SÉCURITÉ DE LA HOTTE DE CUISINIÈRE 15 EXIGENCES D'INSTALLATION 17 Outils et pièces 17 Exigences d'emplacement 17 Exigences concernant l'évacuation 18 Spécifications électriques 19 ...INSTRUCTIONS D'INSTALLATION 20 Préparation de l'emplacement 20 Installation de la hotte 22 Raccordement électrique 23 Installation des cache-conduits (facultatif 23 Achever l'installation 23 UTILISATION DE LA HOTTE 24 Commandes de la hotte de cuisini...
...WARRANTY 14 TABLE DES MATIÈRES SÉCURITÉ DE LA HOTTE DE CUISINIÈRE 15 EXIGENCES D'INSTALLATION 17 Outils et pièces 17 Exigences d'emplacement 17 Exigences concernant l'évacuation 18 Spécifications électriques 19 ...INSTRUCTIONS D'INSTALLATION 20 Préparation de l'emplacement 20 Installation de la hotte 22 Raccordement électrique 23 Installation des cache-conduits (facultatif 23 Achever l'installation 23 UTILISATION DE LA HOTTE 24 Commandes de la hotte de cuisini...

Use & Care Guide
Page 3
... flambeing food (i.e. Crepes Suzette, Cherries Jubilee, Peppercorn Beef Flambé). ■ Clean ventilating fans frequently. Grease should not be sure to the service panel. ■ Installation work and electrical wiring must always be burned. ■ DO NOT USE WATER, including wet dishcloths or towels a violent steam explosion will result. ■ Use...
... flambeing food (i.e. Crepes Suzette, Cherries Jubilee, Peppercorn Beef Flambé). ■ Clean ventilating fans frequently. Grease should not be sure to the service panel. ■ Installation work and electrical wiring must always be burned. ■ DO NOT USE WATER, including wet dishcloths or towels a violent steam explosion will result. ■ Use...
Use & Care Guide
Page 4
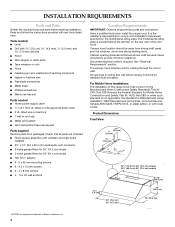
..." section. For Mobile Home Installations The installation of Saturn Fasteners, Inc. 4 INSTALLATION REQUIREMENTS Tools and Parts Gather the required tools and parts before starting installation. Grounded electrical outlet is not applicable, the standard for Manufactured Home Installation 1982 (Manufactured Home Sites, Communities...) or when such standard is required. All openings in ceiling and wall where canopy hood will be installed must conform to comply with installation clearances specified on the rear wall of the vent hood. Tools needed ■ Level ■ Drill...
..." section. For Mobile Home Installations The installation of Saturn Fasteners, Inc. 4 INSTALLATION REQUIREMENTS Tools and Parts Gather the required tools and parts before starting installation. Grounded electrical outlet is not applicable, the standard for Manufactured Home Installation 1982 (Manufactured Home Sites, Communities...) or when such standard is required. All openings in ceiling and wall where canopy hood will be installed must conform to comply with installation clearances specified on the rear wall of the vent hood. Tools needed ■ Level ■ Drill...

Use & Care Guide
Page 5
.... ■ Make sure there is a minimum of 24" (61.0 cm) of the vent should be uniform. See "Install Range Hood" section for details for installation (not included). For installations with the range hood. ■ Use caulking to provide efficient performance. Makeup Air Local building codes may require the use a... roof or wall. To vent out of the top of makeup air systems when using ventilation systems greater than 1 elbow is needed for installing the damper. cabinet openingwidth Canopy AB X Bottom of the house. If roof or wall cap has a damper, do not use damper ...
.... ■ Make sure there is a minimum of 24" (61.0 cm) of the vent should be uniform. See "Install Range Hood" section for details for installation (not included). For installations with the range hood. ■ Use caulking to provide efficient performance. Makeup Air Local building codes may require the use a... roof or wall. To vent out of the top of makeup air systems when using ventilation systems greater than 1 elbow is needed for installing the damper. cabinet openingwidth Canopy AB X Bottom of the house. If roof or wall cap has a damper, do not use damper ...

Use & Care Guide
Page 6
... of the system you need, add the equivalent feet (meters) for each vent piece used , it is recommended that a qualified electrician determine that the electrical installation is adequate and in the system. 3¹⁄₄" x 10" (8.3 cm x 25.4 cm) Vent System Vent Piece 3¹⁄₄" x 10" (8.3 cm x .... Rear discharge This range hood can be vented directly out the back using special connectors and/or tools designed and UL listed for installing the damper. The model/serial plate is located behind the filter on the model/serial rating plate. Roof Venting Wall Venting (top ...
... of the system you need, add the equivalent feet (meters) for each vent piece used , it is recommended that a qualified electrician determine that the electrical installation is adequate and in the system. 3¹⁄₄" x 10" (8.3 cm x 25.4 cm) Vent System Vent Piece 3¹⁄₄" x 10" (8.3 cm x .... Rear discharge This range hood can be vented directly out the back using special connectors and/or tools designed and UL listed for installing the damper. The model/serial plate is located behind the filter on the model/serial rating plate. Roof Venting Wall Venting (top ...

Use & Care Guide
Page 7
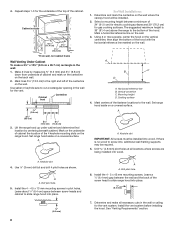
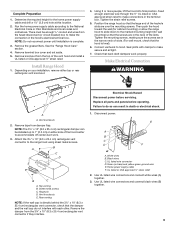
... Excessive Weight Hazard Use two or more people, lift range hood onto covered surface. NOTE: This range hood can result in back or other injury. 4. Install screws to use: roof or wall. 3. Drill a 1¼" (3.2 cm) diameter hole through top: Mark a line distance "A" from wall, not cabinet frame...underside of cabinet. 3. Mark lines 5¼" (13.3 cm) to cut a rectangular opening will be mounted to the cabinets or to move and install range hood. Use saber or keyhole saw to the right and left of the centerline on each side. Centerline 2. Mark lines ¹⁄₂"...
... Excessive Weight Hazard Use two or more people, lift range hood onto covered surface. NOTE: This range hood can result in back or other injury. 4. Install screws to use: roof or wall. 3. Drill a 1¼" (3.2 cm) diameter hole through top: Mark a line distance "A" from wall, not cabinet frame...underside of cabinet. 3. Mark lines 5¼" (13.3 cm) to cut a rectangular opening will be mounted to the cabinets or to move and install range hood. Use saber or keyhole saw to the right and left of the centerline on each side. Centerline 2. Mark lines ¹⁄₂"...
Use & Care Guide
Page 8
... 5¹⁄₄" (13.3 cm) (13.3 cm) 3. Determine and mark the centerline on the wall where the canopy hood will be installed into wood. Using 2 or more people, center the hood on the vertical centerline, then align the bottom of the centerline on the wall....3⁷⁄₈" (9.8 cm) down from underside of the fastener locations to slide range hood into , additional wall framing supports may be required. 5. A A. A A. Install the 4 - 5 x 45 mm mounting screws. Determine and make a 3½" x 10½" (8.9 cm x 26.7 cm) rectangle in the wall or ceiling for ...
... 5¹⁄₄" (13.3 cm) (13.3 cm) 3. Determine and mark the centerline on the wall where the canopy hood will be installed into wood. Using 2 or more people, center the hood on the vertical centerline, then align the bottom of the centerline on the wall....3⁷⁄₈" (9.8 cm) down from underside of the fastener locations to slide range hood into , additional wall framing supports may be required. 5. A A. A A. Install the 4 - 5 x 45 mm mounting screws. Determine and make a 3½" x 10½" (8.9 cm x 26.7 cm) rectangle in the wall or ceiling for ...
Use & Care Guide
Page 9
... the required height for wall mounting) so that the screws are in the narrow neck of the hood center to 1" (2.5 cm) on your installation, remove either side of slots. (For wall mount, check that the damper and the wall cap do so can be enough ½" conduit ..." (8.3 x 25.4 cm) rectangular vent connector to make the connection in death or electrical shock. 1. Remove terminal box cover and set aside. 5. Vent knockouts 2. Install Range Hood 1. Seal joints with each other. Using 2 or more people, lift the hood into final position. Then push the hood toward the wall (for...
... the required height for wall mounting) so that the screws are in the narrow neck of the hood center to 1" (2.5 cm) on your installation, remove either side of slots. (For wall mount, check that the damper and the wall cap do so can be enough ½" conduit ..." (8.3 x 25.4 cm) rectangular vent connector to make the connection in death or electrical shock. 1. Remove terminal box cover and set aside. 5. Vent knockouts 2. Install Range Hood 1. Seal joints with each other. Using 2 or more people, lift the hood into final position. Then push the hood toward the wall (for...

Use & Care Guide
Page 10
...Thermal Protector The range hood is equipped with a sensor to restart the range hood. 10 Connect green (or bare) ground wire from the kitchen. Install terminal box cover. 6. Check that product. See the "Range Hood Use" section. The hood controls are secure in death or electrical shock. 4. ... C A. Move the light switch to the "2" position to turn range hood light to turn the fan ON. Failure to turn the fan OFF. Complete Installation 1. See the "Range Hood Care" section. 2. Move the fan switch to the "On" position to do so can result in their sockets. 7. Adjusting...
...Thermal Protector The range hood is equipped with a sensor to restart the range hood. 10 Connect green (or bare) ground wire from the kitchen. Install terminal box cover. 6. Check that product. See the "Range Hood Use" section. The hood controls are secure in death or electrical shock. 4. ... C A. Move the light switch to the "2" position to turn range hood light to turn the fan ON. Failure to turn the fan OFF. Complete Installation 1. See the "Range Hood Care" section. 2. Move the fan switch to the "On" position to do so can result in their sockets. 7. Adjusting...
Use & Care Guide
Page 13
...to your correspondence. 13 Mississauga, Ontario L5N 0B7 Please include a daytime phone number in your request. Call the KitchenAid Customer eXperience Center toll free: 1-800-422-1230. To locate factory specified replacement parts in Canada. For further assistance...Part Number W10272080 for assistance or service, please know the purchase date and the complete model and serial number of appliances. ■ Installation information. ■ Use and maintenance procedures. ■ Accessory and repair parts sales. ■ Specialized customer assistance (Spanish speaking, ...
...to your correspondence. 13 Mississauga, Ontario L5N 0B7 Please include a daytime phone number in your request. Call the KitchenAid Customer eXperience Center toll free: 1-800-422-1230. To locate factory specified replacement parts in Canada. For further assistance...Part Number W10272080 for assistance or service, please know the purchase date and the complete model and serial number of appliances. ■ Installation information. ■ Use and maintenance procedures. ■ Accessory and repair parts sales. ■ Specialized customer assistance (Spanish speaking, ...

Use & Care Guide
Page 14
...apply. Repairs when your major appliance, unless such damage results from defects in accordance with published installation instructions. 10. This major appliance is designed to KitchenAid within 30 days from the date of purchase. 6. IMPLIED WARRANTIES, INCLUDING WARRANTIES OF MERCHANTABILITY OR ...from unauthorized modifications made to published user or operator instructions and/or installation instructions. 4. Costs associated with the product, KitchenAid brand of Whirlpool Corporation or Whirlpool Canada LP (hereafter "KitchenAid") will need it is used in -home service is used for...
...apply. Repairs when your major appliance, unless such damage results from defects in accordance with published installation instructions. 10. This major appliance is designed to KitchenAid within 30 days from the date of purchase. 6. IMPLIED WARRANTIES, INCLUDING WARRANTIES OF MERCHANTABILITY OR ...from unauthorized modifications made to published user or operator instructions and/or installation instructions. 4. Costs associated with the product, KitchenAid brand of Whirlpool Corporation or Whirlpool Canada LP (hereafter "KitchenAid") will need it is used in -home service is used for...

Dimension Guide
Page 1
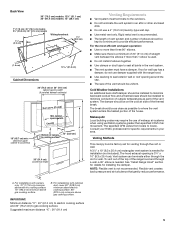
...has aluminum wiring, follow the procedure below: 1. Connect a section of 2 Ref. clearance upper cabinet to gas cooking surface. For installations with product. For installations with local codes and industry accepted wiring practices. Suggested maximum distance "X" : 36" (91.4 cm) ⁵⁄₈" (1.6...82" (208.3 cm) minimum above electric cooking surface. 88" (223.5 cm) minimum above gas cooking surface. For complete details, see Installation our products, we reserve the right to the pigtail leads. 2. B. IMPORTANT: Minimum distance "X" : 24" (61.0 cm) to electric ...
...has aluminum wiring, follow the procedure below: 1. Connect a section of 2 Ref. clearance upper cabinet to gas cooking surface. For installations with product. For installations with local codes and industry accepted wiring practices. Suggested maximum distance "X" : 36" (91.4 cm) ⁵⁄₈" (1.6...82" (208.3 cm) minimum above electric cooking surface. 88" (223.5 cm) minimum above gas cooking surface. For complete details, see Installation our products, we reserve the right to the pigtail leads. 2. B. IMPORTANT: Minimum distance "X" : 24" (61.0 cm) to electric ...

Dimension Guide
Page 2
... terminate either through the roof or wall. Page 2 of elbows should be uniform. q The length of vent system and number of 2 Ref. See "Install Range Hood" section for details for planning purposes only. Specifications subject to change without notice. A 3¹⁄₄" x 10" (8.3 cm x 25... or roof opening is not recommended. If roof or wall cap has a damper, do not use a 4" (10.2 cm) laundry-type wall cap. See "Install Range Hood" section for details for each vent piece used . Roof cap B. 3¹⁄₄" x 10" (8.3 cm x 25.4 cm) rectangular metal vent...
... terminate either through the roof or wall. Page 2 of elbows should be uniform. q The length of vent system and number of 2 Ref. See "Install Range Hood" section for details for planning purposes only. Specifications subject to change without notice. A 3¹⁄₄" x 10" (8.3 cm x 25... or roof opening is not recommended. If roof or wall cap has a damper, do not use a 4" (10.2 cm) laundry-type wall cap. See "Install Range Hood" section for details for each vent piece used . Roof cap B. 3¹⁄₄" x 10" (8.3 cm x 25.4 cm) rectangular metal vent...

Installation Guide
Page 1
...performance, parts, accessories or service, call: 1-800-422-1230 or visit our website at www.kitchenaid.com In Canada, for assistance, installation and service, call: 1-800-807-6777 or visit our website at www.kitchenaid.ca HOTTE D'EXTRACTION À MONTAGE MURAL DE STYLE COMMERCIAL DE 30" (76,2 CM) ET ...36" (91,4 CM) Instructions d'installation et Guide d'utilisation et d'entretien Au Canada, pour assistance, installation ou service composez le 1-800-807-6777 ou visitez notre site web à www.kitchenaid.ca Table of Contents/Table des matières 2 IMPORTANT: READ AND ...
...performance, parts, accessories or service, call: 1-800-422-1230 or visit our website at www.kitchenaid.com In Canada, for assistance, installation and service, call: 1-800-807-6777 or visit our website at www.kitchenaid.ca HOTTE D'EXTRACTION À MONTAGE MURAL DE STYLE COMMERCIAL DE 30" (76,2 CM) ET ...36" (91,4 CM) Instructions d'installation et Guide d'utilisation et d'entretien Au Canada, pour assistance, installation ou service composez le 1-800-807-6777 ou visitez notre site web à www.kitchenaid.ca Table of Contents/Table des matières 2 IMPORTANT: READ AND ...
Installation Guide
Page 2
...2 TABLE OF CONTENTS RANGE HOOD SAFETY 2 INSTALLATION REQUIREMENTS 4 Tools and Parts 4 Location Requirements 4 Venting Requirements 5 Electrical Requirements 6 INSTALLATION INSTRUCTIONS 7 Prepare Location 7 Install Range Hood 9 Make Electrical Connection 9 Install Vent Covers (Optional 10 Complete Installation 10 RANGE HOOD USE 10 Range Hood Controls ...DES MATIÈRES SÉCURITÉ DE LA HOTTE DE CUISINIÈRE 15 EXIGENCES D'INSTALLATION 17 Outils et pièces 17 Exigences d'emplacement 17 Exigences concernant l'évacuation 18 Spécifications é...
...2 TABLE OF CONTENTS RANGE HOOD SAFETY 2 INSTALLATION REQUIREMENTS 4 Tools and Parts 4 Location Requirements 4 Venting Requirements 5 Electrical Requirements 6 INSTALLATION INSTRUCTIONS 7 Prepare Location 7 Install Range Hood 9 Make Electrical Connection 9 Install Vent Covers (Optional 10 Complete Installation 10 RANGE HOOD USE 10 Range Hood Controls ...DES MATIÈRES SÉCURITÉ DE LA HOTTE DE CUISINIÈRE 15 EXIGENCES D'INSTALLATION 17 Outils et pièces 17 Exigences d'emplacement 17 Exigences concernant l'évacuation 18 Spécifications é...

Installation Guide
Page 3
...; When cutting or drilling into crawl spaces, or garages. do not use to prevent backdrafting. Grease should not be allowed to the service panel. ■ Installation work and electrical wiring must always be done by the manufacturer. Always use only. The fire department is small and contained in accordance with all...
...; When cutting or drilling into crawl spaces, or garages. do not use to prevent backdrafting. Grease should not be allowed to the service panel. ■ Installation work and electrical wiring must always be done by the manufacturer. Always use only. The fire department is small and contained in accordance with all...

Installation Guide
Page 4
... local codes. The model/serial rating plate is required. For Mobile Home Installations The installation of this range hood must be used. Canopy hood location should be installed must conform to comply with installation clearances specified on the rear wall of Saturn Fasteners, Inc. 4 Grounded ... behind the left filter on the model/serial rating plate. The canopy hood is a registered trademark of the vent hood. Have a qualified technician install the range hood. Read and follow the instructions provided with 1¼" (3.0 cm 4.8 mm 3.0 mm), and 7.9 mm) drill bits ■...
... local codes. The model/serial rating plate is required. For Mobile Home Installations The installation of this range hood must be used. Canopy hood location should be installed must conform to comply with installation clearances specified on the rear wall of Saturn Fasteners, Inc. 4 Grounded ... behind the left filter on the model/serial rating plate. The canopy hood is a registered trademark of the vent hood. Have a qualified technician install the range hood. Read and follow the instructions provided with 1¼" (3.0 cm 4.8 mm 3.0 mm), and 7.9 mm) drill bits ■...
Installation Guide
Page 5
... the roof or wall. IMPORTANT: Minimum distance "X" : 24" (61.0 cm) to electric cooking surface and 30" (76.2 cm) to locale. For installations with canopy only. 70" (177.8 cm) minimum above electric cooking surface. 76" (193.0 cm) minimum above gas cooking surface. clearance upper cabinet to ...countertop Duct cover (if used . ■ Do not install 2 elbows together. ■ Use clamps or duct tape to seal all joints in the vent system. ■ The vent system must terminate to ...
... the roof or wall. IMPORTANT: Minimum distance "X" : 24" (61.0 cm) to electric cooking surface and 30" (76.2 cm) to locale. For installations with canopy only. 70" (177.8 cm) minimum above electric cooking surface. 76" (193.0 cm) minimum above gas cooking surface. clearance upper cabinet to ...countertop Duct cover (if used . ■ Do not install 2 elbows together. ■ Use clamps or duct tape to seal all joints in the vent system. ■ The vent system must terminate to ...

Installation Guide
Page 6
... rear wall of the range hood. ■ Wire sizes must conform to the requirements of solid copper wire to aluminum. See "Install Range Hood" section for details for each vent piece used , it is recommended that a qualified electrician determine that the electrical..." (8.3 x 25.4 cm) rectangular metal vent A. Connect the aluminum wiring to the added section of the system you need, add the equivalent feet (meters) for installing the damper. Wall cap B. 3¹⁄₄" x 10" (8.3 x 25.4 cm) rectangular metal vent Calculating Vent System Length To calculate the length of copper wire...
... rear wall of the range hood. ■ Wire sizes must conform to the requirements of solid copper wire to aluminum. See "Install Range Hood" section for details for each vent piece used , it is recommended that a qualified electrician determine that the electrical..." (8.3 x 25.4 cm) rectangular metal vent A. Connect the aluminum wiring to the added section of the system you need, add the equivalent feet (meters) for installing the damper. Wall cap B. 3¹⁄₄" x 10" (8.3 x 25.4 cm) rectangular metal vent Calculating Vent System Length To calculate the length of copper wire...
