Dimension Guide
Page 1
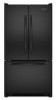
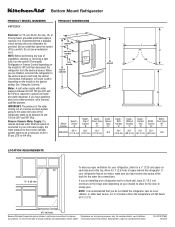
... reverse osmosis system going to the water inlet valve of installation, cleaning, or removing a light bulb, turn the control (Thermostat, Refrigerator or Freezer Control depending on the model) to operate ice maker and water dispenser. Reverse Osmosis Water Supply: If a reverse osmosis ...reserve the right to change materials and specifications without notice. Do not use an extension cord. H G cabinet F not incl. Bottom Mount Refrigerator PRODUCT MODEL NUMBERS KBFS20EV PRODUCT DIMENSIONS Electrical: A 115-volt, 60-Hz, AC-only, 15- or 20-amp fused, grounded electrical supply...
... reverse osmosis system going to the water inlet valve of installation, cleaning, or removing a light bulb, turn the control (Thermostat, Refrigerator or Freezer Control depending on the model) to operate ice maker and water dispenser. Reverse Osmosis Water Supply: If a reverse osmosis ...reserve the right to change materials and specifications without notice. Do not use an extension cord. H G cabinet F not incl. Bottom Mount Refrigerator PRODUCT MODEL NUMBERS KBFS20EV PRODUCT DIMENSIONS Electrical: A 115-volt, 60-Hz, AC-only, 15- or 20-amp fused, grounded electrical supply...
Energy Guide
Page 1
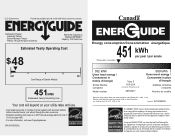
...éles similaires. Its energy performance meets or exceeds the Government of this label before consumer purchase. Canada Refrigerator-Freezer ·Automatic Defrost ·Bottom Mounted Freezer ·Without Through-the-Door-Ice Service KitchenAid Corporation Model(s):KBFS20EV* Capacity: 19.6 Cubic Feet Estimated Yearly Operating Cost $48 $47 $61 Cost Range of...
...éles similaires. Its energy performance meets or exceeds the Government of this label before consumer purchase. Canada Refrigerator-Freezer ·Automatic Defrost ·Bottom Mounted Freezer ·Without Through-the-Door-Ice Service KitchenAid Corporation Model(s):KBFS20EV* Capacity: 19.6 Cubic Feet Estimated Yearly Operating Cost $48 $47 $61 Cost Range of...

Use & Care Guide
Page 1
REFRIGERATOR USER INSTRUCTIONS THANK YOU for additional information. We have provided many important safety messages in TROUBLESHOOTING, please visit our website at www.kitchenaid.com for purchasing this manual and on the inside wall of injury, and tell you what can be killed or ...safety messages will need your model and serial number, located on your appliance. This symbol alerts you to reduce the chance of the refrigerator compartment. WARNING You can happen if the instructions are very important. All safety messages will tell you what the potential hazard is the...
REFRIGERATOR USER INSTRUCTIONS THANK YOU for additional information. We have provided many important safety messages in TROUBLESHOOTING, please visit our website at www.kitchenaid.com for purchasing this manual and on the inside wall of injury, and tell you what can be killed or ...safety messages will need your model and serial number, located on your appliance. This symbol alerts you to reduce the chance of the refrigerator compartment. WARNING You can happen if the instructions are very important. All safety messages will tell you what the potential hazard is the...

Use & Care Guide
Page 2
... Child entrapment and suffocation are still dangerous - even if they will sit for cleaning or service, be evacuated by a licensed, EPA certified refrigerant technician in back or other injury. ■ Do not use an extension cord. ■ Disconnect power before installing ice maker (on ice ... ready models only). ■ Use a sturdy glass when dispensing ice (on some models). ■ Do not hit the refrigerator glass doors (on the refrigerator. Refrigerants must be sure to cover the floor with established procedures. Failure to remove tape or glue. For more people to move and...
... Child entrapment and suffocation are still dangerous - even if they will sit for cleaning or service, be evacuated by a licensed, EPA certified refrigerant technician in back or other injury. ■ Do not use an extension cord. ■ Disconnect power before installing ice maker (on ice ... ready models only). ■ Use a sturdy glass when dispensing ice (on some models). ■ Do not hit the refrigerator glass doors (on the refrigerator. Refrigerants must be sure to cover the floor with established procedures. Failure to remove tape or glue. For more people to move and...

Use & Care Guide
Page 3
... as gasoline, away from the electrical source. Do not remove ground prong. Tempered glass is recommended that you move your refrigerator has an ice maker, allow for your refrigerator next to a fixed wall, leave 2¹⁄₂" (6.3 cm) minimum on the model) to shatter into its ...fire. Allow for the water line connections. When you remove all of the packaging materials, clean the inside of space behind the refrigerator. Failure to make sure you have the proper electrical connection. Important information to avoid dropping. Use an outlet that a separate circuit ...
... as gasoline, away from the electrical source. Do not remove ground prong. Tempered glass is recommended that you move your refrigerator has an ice maker, allow for your refrigerator next to a fixed wall, leave 2¹⁄₂" (6.3 cm) minimum on the model) to shatter into its ...fire. Allow for the water line connections. When you remove all of the packaging materials, clean the inside of space behind the refrigerator. Failure to make sure you have the proper electrical connection. Important information to avoid dropping. Use an outlet that a separate circuit ...
Use & Care Guide
Page 4
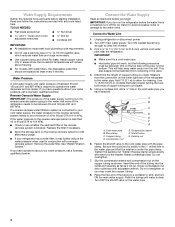
... to 414 kPa). Water Pressure A cold water supply with water filters, the disposable water filter should be followed: Drill on the refrigerator before starting installation. Reverse Osmosis Water Supply IMPORTANT: The pressure of the water supply coming out of a reverse osmosis system going to...8260;₄" hole in the valve. 4. Compression nut E. Packing nut 6. Fasten the shutoff valve to refill after heavy usage. ■ If your refrigerator has a water filter, it will remain above freezing. ■ For models with water pressure of 40 to 60 psi (276 to operate the ...
... to 414 kPa). Water Pressure A cold water supply with water filters, the disposable water filter should be followed: Drill on the refrigerator before starting installation. Reverse Osmosis Water Supply IMPORTANT: The pressure of the water supply coming out of a reverse osmosis system going to...8260;₄" hole in the valve. 4. Compression nut E. Packing nut 6. Fasten the shutoff valve to refill after heavy usage. ■ If your refrigerator has a water filter, it will remain above freezing. ■ For models with water pressure of 40 to 60 psi (276 to operate the ...

Use & Care Guide
Page 5
... from the bottom. Using an adjustable wrench, hold the nut on water supply to avoid kinks. 4. Plastic water line C. Failure to the refrigerator cabinet with a "P" clamp. 7. Follow the connection instructions for leaks. Tighten the compression nut. A B C D A. Attach the plastic ...storage bin. A B C D A. Style 2 1. Allow 3 days to produce the first batch of ice produced. Secure copper tubing to Refrigerator Depending on copper tubing. Do not remove ground prong. Remove plastic cap from water valve inlet port. Electrical Shock Hazard Plug into a grounded ...
... from the bottom. Using an adjustable wrench, hold the nut on water supply to avoid kinks. 4. Plastic water line C. Failure to the refrigerator cabinet with a "P" clamp. 7. Follow the connection instructions for leaks. Tighten the compression nut. A B C D A. Attach the plastic ...storage bin. A B C D A. Style 2 1. Allow 3 days to produce the first batch of ice produced. Secure copper tubing to Refrigerator Depending on copper tubing. Do not remove ground prong. Remove plastic cap from water valve inlet port. Electrical Shock Hazard Plug into a grounded ...

Use & Care Guide
Page 6
... Plug into a grounded 3 prong outlet. 2. Return all screws. 4. Remove and Replace Handles NOTE: Provide additional support for the refrigerator door while the hinges are ready to the drawer front. See Graphics 1 and 2. 2. Failure to follow these instructions can result in...socket wrenches, Torx®† T20 screwdriver, #2 Phillips screwdriver, and a flat-blade screwdriver. 1. NOTE: Provide additional support for the refrigerator door while the hinges are being removed. See Bottom Hinge graphic. 4. NOTE: The green, ground wire remains attached to full extension....
... Plug into a grounded 3 prong outlet. 2. Return all screws. 4. Remove and Replace Handles NOTE: Provide additional support for the refrigerator door while the hinges are ready to the drawer front. See Graphics 1 and 2. 2. Failure to follow these instructions can result in...socket wrenches, Torx®† T20 screwdriver, #2 Phillips screwdriver, and a flat-blade screwdriver. 1. NOTE: Provide additional support for the refrigerator door while the hinges are being removed. See Bottom Hinge graphic. 4. NOTE: The green, ground wire remains attached to full extension....
Use & Care Guide
Page 8
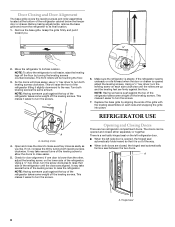
...a seal between the two doors. Using a ¹⁄₄" hex driver, turn both doors are firmly against the top of the refrigerator takes some weight off the leveling screws. Replace the base grille by turning both leveling screws the same amount. Check for door alignment.... A A. NOTE: Having someone push against the top of the refrigerator takes some weight off the leveling screws. The front rollers will close as easily as you . ¹⁄₄" 2. Turn both ...
...a seal between the two doors. Using a ¹⁄₄" hex driver, turn both doors are firmly against the top of the refrigerator takes some weight off the leveling screws. Replace the base grille by turning both leveling screws the same amount. Check for door alignment.... A A. NOTE: Having someone push against the top of the refrigerator takes some weight off the leveling screws. The front rollers will close as easily as you . ¹⁄₄" 2. Turn both ...
Use & Care Guide
Page 9
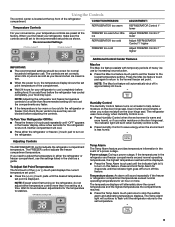
...and hold Temp Alarm for your temperature controls are still set to the lowest temperature setting. Adjusting Controls The REFRIGERATOR control adjusts the refrigerator compartment temperature. Additional Control Center Features Max Ice The Max Ice feature assists with temporary periods of a power ...may spoil. Using the Controls The control center is displayed. The controls are not blocked before the refrigerator has cooled completely, your refrigerator, make sure the controls are preset at the factory. The FREEZER control adjusts the freezer compartment temperature....
...and hold Temp Alarm for your temperature controls are still set to the lowest temperature setting. Adjusting Controls The REFRIGERATOR control adjusts the refrigerator compartment temperature. Additional Control Center Features Max Ice The Max Ice feature assists with temporary periods of a power ...may spoil. Using the Controls The control center is displayed. The controls are not blocked before the refrigerator has cooled completely, your refrigerator, make sure the controls are preset at the factory. The FREEZER control adjusts the freezer compartment temperature....

Use & Care Guide
Page 10
... Press the Door Alarm touch pad to turn off . User Preferences The control center allows you to change the preference status. 3. Temperature in the Refrigerator display. 2. You will hear the alarm sound. NOTE: Press any setting between adjustments. To Access the User Preferences Menu: 1. Use the Freezer ...the ice storage bin. 10 You will not hear the alarm sound. Press Max Cool again to return to the normal refrigerator set the freezer and refrigerator to the lowest temperature settings. Depending on or off in the moisture-sealed crisper. FRUIT/LOW (open for 5 continuous ...
... Press the Door Alarm touch pad to turn off . User Preferences The control center allows you to change the preference status. 3. Temperature in the Refrigerator display. 2. You will hear the alarm sound. NOTE: Press any setting between adjustments. To Access the User Preferences Menu: 1. Use the Freezer ...the ice storage bin. 10 You will not hear the alarm sound. Press Max Cool again to return to the normal refrigerator set the freezer and refrigerator to the lowest temperature settings. Depending on or off in the moisture-sealed crisper. FRUIT/LOW (open for 5 continuous ...
Use & Care Guide
Page 11
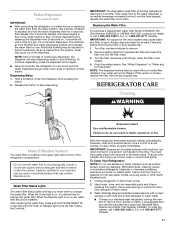
...the filter and water dispensing system, and prepare the water filter for cyst reduction may spurt out of the dispenser. Both the refrigerator and freezer sections defrost automatically. Hand wash, rinse, and dry removable parts and interior surfaces thoroughly. To order the cleaner, call...hours for at least every 6 months. Dispensing Water 1. Release the button to stop dispensing water to eject. Always dispense water for the refrigerator to do so can result in warm water. 3. See "Water Dispenser" or "Water and Ice Dispenser." Your water will stop dispensing...
...the filter and water dispensing system, and prepare the water filter for cyst reduction may spurt out of the dispenser. Both the refrigerator and freezer sections defrost automatically. Hand wash, rinse, and dry removable parts and interior surfaces thoroughly. To order the cleaner, call...hours for at least every 6 months. Dispensing Water 1. Release the button to stop dispensing water to eject. Always dispense water for the refrigerator to do so can result in warm water. 3. See "Water Dispenser" or "Water and Ice Dispenser." Your water will stop dispensing...

Use & Care Guide
Page 12
... the base grille when finished. 5. heard when the water valve opens to its high-efficiency compressor and fans. In the U.S.A., www.kitchenaid.com In Canada, www.kitchenaid.ca Refrigerator Operation The refrigerator will fit your old one due to fill the ice maker ■ Pulsating - Do not use an adapter. may run even longer...
... the base grille when finished. 5. heard when the water valve opens to its high-efficiency compressor and fans. In the U.S.A., www.kitchenaid.com In Canada, www.kitchenaid.ca Refrigerator Operation The refrigerator will fit your old one due to fill the ice maker ■ Pulsating - Do not use an adapter. may run even longer...
Use & Care Guide
Page 13
...line. ■ Water filter installed on ? See "Water Supply Requirements." ■ Questions remain regarding water pressure? Allow 24 hours for the refrigerator to remove the minerals. ■ Water filter installed on model) is an indication of low water pressure. ■ Water shutoff valve not ... osmosis water filtration system connected to produce more ice. ■ Ice cube jammed in the ice maker ejector arm? Connect refrigerator to enter refrigerator. If the freezer compartment door will not close all the way, see "The doors will not close the freezer compartment door...
...line. ■ Water filter installed on ? See "Water Supply Requirements." ■ Questions remain regarding water pressure? Allow 24 hours for the refrigerator to remove the minerals. ■ Water filter installed on model) is an indication of low water pressure. ■ Water shutoff valve not ... osmosis water filtration system connected to produce more ice. ■ Ice cube jammed in the ice maker ejector arm? Connect refrigerator to enter refrigerator. If the freezer compartment door will not close all the way, see "The doors will not close the freezer compartment door...
Use & Care Guide
Page 14
...may not be clogged or incorrectly installed. Hold the glass under the dispenser long enough? See "Water Dispenser." ■ Water on the refrigerator? See "Water Supply Requirements." See "Water Dispenser." ■ Is the water pressure at least 35 psi (241 kPa)? Make sure the...filter or reinstall it does not close completely," earlier in the water source line? Close the door firmly. If it correctly. ■ Refrigerator door closed completely? Flush the water system. See "Water Dispenser." ■ Recently changed water filter? Flush the water system. Allow 24 ...
...may not be clogged or incorrectly installed. Hold the glass under the dispenser long enough? See "Water Dispenser." ■ Water on the refrigerator? See "Water Supply Requirements." See "Water Dispenser." ■ Is the water pressure at least 35 psi (241 kPa)? Make sure the...filter or reinstall it does not close completely," earlier in the water source line? Close the door firmly. If it correctly. ■ Refrigerator door closed completely? Flush the water system. See "Water Dispenser." ■ Recently changed water filter? Flush the water system. Allow 24 ...
Use & Care Guide
Page 17
...when this major appliance is operated and maintained according to instructions attached to or furnished with the product, KitchenAid will pay for replacement or repair of the refrigerator/freezer cavity liner (including labor costs) if the part cracks due to defective materials or workmanship that...on major appliances with original model/serial numbers that is used in a manner that have other damage to instruct you . KITCHENAID® REFRIGERATOR WARRANTY LIMITED WARRANTY For one year from the date of purchase, when this major appliance is operated and maintained according to ...
...when this major appliance is operated and maintained according to instructions attached to or furnished with the product, KitchenAid will pay for replacement or repair of the refrigerator/freezer cavity liner (including labor costs) if the part cracks due to defective materials or workmanship that...on major appliances with original model/serial numbers that is used in a manner that have other damage to instruct you . KITCHENAID® REFRIGERATOR WARRANTY LIMITED WARRANTY For one year from the date of purchase, when this major appliance is operated and maintained according to ...

Use & Care Guide
Page 18
... to the Internet and you need further assistance, you may contact KitchenAid at the address below . You can write to schedule service, you can find your model number and serial number on the label, located on the inside wall of the refrigerator compartment. Mississauga, Ontario L5N 0B7 Please include a daytime phone number...
... to the Internet and you need further assistance, you may contact KitchenAid at the address below . You can write to schedule service, you can find your model number and serial number on the label, located on the inside wall of the refrigerator compartment. Mississauga, Ontario L5N 0B7 Please include a daytime phone number...
Warranty Information
Page 1
...serial number on the label located on water filter. SIXTH THROUGH TENTH YEAR LIMITED WARRANTY ON SEALED REFRIGERATION SYSTEM PARTS In the sixth through fifth years from the date of purchase, KitchenAid will pay for factory specified parts and labor to schedule service, you can find your product .... Pickup and delivery. On models with a water filter: 30 day limited warranty on the right-hand side of the refrigerator interior. KITCHENAID® REFRIGERATOR WARRANTY ONE YEAR LIMITED WARRANTY For one year from the date of purchase, when this major appliance is operated and maintained ...
...serial number on the label located on water filter. SIXTH THROUGH TENTH YEAR LIMITED WARRANTY ON SEALED REFRIGERATION SYSTEM PARTS In the sixth through fifth years from the date of purchase, KitchenAid will pay for factory specified parts and labor to schedule service, you can find your product .... Pickup and delivery. On models with a water filter: 30 day limited warranty on the right-hand side of the refrigerator interior. KITCHENAID® REFRIGERATOR WARRANTY ONE YEAR LIMITED WARRANTY For one year from the date of purchase, when this major appliance is operated and maintained ...


