Use and Care Guide
Page 2
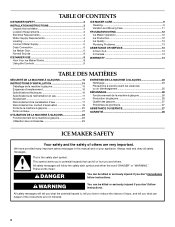
...seriously injured if you don't follow the safety alert symbol and either the word "DANGER" or "WARNING." TABLE OF CONTENTS ICE MAKER SAFETY 2 INSTALLATION INSTRUCTIONS 3 Unpack the Ice Maker 3 Location Requirements 3 Electrical Requirements 4 Water Supply Requirements 4 Leveling 4 Connect Water Supply 5 Drain Connection 6 Ice... 13 WARRANTY 14 TABLE DES MATIÈRES SÉCURITÉ DE LA MACHINE À GLAÇONS 15 INSTRUCTIONS D'INSTALLATION 15 Déballage de la machine à glaçons 15 Exigences d'emplacement 16 Spécifications électriques 16 Sp...
...seriously injured if you don't follow the safety alert symbol and either the word "DANGER" or "WARNING." TABLE OF CONTENTS ICE MAKER SAFETY 2 INSTALLATION INSTRUCTIONS 3 Unpack the Ice Maker 3 Location Requirements 3 Electrical Requirements 4 Water Supply Requirements 4 Leveling 4 Connect Water Supply 5 Drain Connection 6 Ice... 13 WARRANTY 14 TABLE DES MATIÈRES SÉCURITÉ DE LA MACHINE À GLAÇONS 15 INSTRUCTIONS D'INSTALLATION 15 Déballage de la machine à glaçons 15 Exigences d'emplacement 16 Spécifications électriques 16 Sp...

Use and Care Guide
Page 3
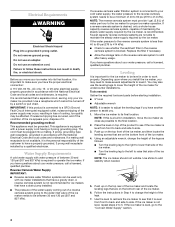
...all parts and panels before operating. ■ Use two or more people to work properly. See "Leveling." 3 SAVE THESE INSTRUCTIONS INSTALLATION INSTRUCTIONS Unpack the Ice Maker WARNING Excessive Weight Hazard Use two or more people to remove tape or glue. Place electrical and plumbing fixtures...Replace all of the packaging materials, clean the inside of the leveling legs. See the cleaning instructions in order to move and install ice maker. The ice maker may be completely unobstructed. Removing Packaging Materials Remove tape and glue from the exterior of your ice ...
...all parts and panels before operating. ■ Use two or more people to work properly. See "Leveling." 3 SAVE THESE INSTRUCTIONS INSTALLATION INSTRUCTIONS Unpack the Ice Maker WARNING Excessive Weight Hazard Use two or more people to remove tape or glue. Place electrical and plumbing fixtures...Replace all of the packaging materials, clean the inside of the leveling legs. See the cleaning instructions in order to move and install ice maker. The ice maker may be completely unobstructed. Removing Packaging Materials Remove tape and glue from the exterior of your ice ...
Use and Care Guide
Page 4
...osmosis system going to be grounded. Use the level to recheck the ice maker to assist you have a properly grounded, 3 prong wall receptacle installed by a switch or pull chain. Failure to work properly. Ice quality may occur, resulting in order to follow these instructions can be plugged ...that a separate circuit, serving only your ice maker, be level in loss of cooling. A reverse osmosis system is blocked. Depending upon where you install the ice maker, you have the proper electrical connection: A 115 Volt, 60 Hz., AC only, 15- Use shims to add stability when ...
...osmosis system going to be grounded. Use the level to recheck the ice maker to assist you have a properly grounded, 3 prong wall receptacle installed by a switch or pull chain. Failure to work properly. Ice quality may occur, resulting in order to follow these instructions can be plugged ...that a separate circuit, serving only your ice maker, be level in loss of cooling. A reverse osmosis system is blocked. Depending upon where you install the ice maker, you have the proper electrical connection: A 115 Volt, 60 Hz., AC only, 15- Use shims to add stability when ...
Use and Care Guide
Page 5
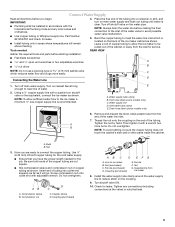
...including connections at the valve) or nuts that you have the proper length needed : REAR VIEW Gather the required tools and parts before starting installation. ■ Flat-blade screwdriver and ¹⁄₂" open-end wrenches or two adjustable wrenches A nut driver B NOTE: Do not ... line to connect the copper tubing. Remove and discard the short, black plastic tube from ice maker 8. Check for leaks. ■ Install tubing only in accordance with a quarter-turn on main water supply and flush out tubing until water is recommended. Now you begin. Coupling...
...including connections at the valve) or nuts that you have the proper length needed : REAR VIEW Gather the required tools and parts before starting installation. ■ Flat-blade screwdriver and ¹⁄₂" open-end wrenches or two adjustable wrenches A nut driver B NOTE: Do not ... line to connect the copper tubing. Remove and discard the short, black plastic tube from ice maker 8. Check for leaks. ■ Install tubing only in accordance with a quarter-turn on main water supply and flush out tubing until water is recommended. Now you begin. Coupling...

Use and Care Guide
Page 6
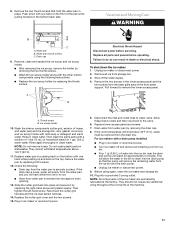
..., push the ice maker into a grounded 3 prong outlet. Tools needed: Ice Maker Door Gather the required tools and parts before starting installation. Do not use an extension cord. If the ice maker is positioned over the PVC drain reducer. Failure to follow these guidelines when.... WARNING Excessive Weight Hazard Use two or more people to the drain. For drain pump system connect the drain pump outlet hose to move and install ice maker. Drain hose B. 1" (2.54 cm) air gap C. Style 1 - Do not remove ground prong. See "Leveling." 4. Drain Connection Gravity Drain System...
..., push the ice maker into a grounded 3 prong outlet. Tools needed: Ice Maker Door Gather the required tools and parts before starting installation. Do not use an extension cord. If the ice maker is positioned over the PVC drain reducer. Failure to follow these guidelines when.... WARNING Excessive Weight Hazard Use two or more people to the drain. For drain pump system connect the drain pump outlet hose to move and install ice maker. Drain hose B. 1" (2.54 cm) air gap C. Style 1 - Do not remove ground prong. See "Leveling." 4. Drain Connection Gravity Drain System...
Use and Care Guide
Page 11
... remaining ice from the ice bin and the drain pump. ■ Unplug ice maker or disconnect power. 9. Then clean the same parts with a drain pump installed: ■ Plug in the bin to the valve. 6. Plug into place and secure it by removing the drain cap. 8. Water pan B. A. Before using the following...
... remaining ice from the ice bin and the drain pump. ■ Unplug ice maker or disconnect power. 9. Then clean the same parts with a drain pump installed: ■ Plug in the bin to the valve. 6. Plug into place and secure it by removing the drain cap. 8. Water pan B. A. Before using the following...
Use and Care Guide
Page 13
Grid is not used to build every new KITCHENAID® appliance. See "Interior Components" section of appliances. ■ Installation information. ■ Use and maintenance procedures. ■ Accessory and repair parts sales. ■ Specialized customer assistance (Spanish speaking, ... unusually high mineral content in the ice bin? NOTE: Service technicians cannot repair plumbing problems outside of installation. Do not store any questions or concerns at : KitchenAid Brand Home Appliances Customer eXperience Center 553 Benson Road Benton Harbor, MI 49022-2692 Please include a daytime...
Grid is not used to build every new KITCHENAID® appliance. See "Interior Components" section of appliances. ■ Installation information. ■ Use and maintenance procedures. ■ Accessory and repair parts sales. ■ Specialized customer assistance (Spanish speaking, ... unusually high mineral content in the ice bin? NOTE: Service technicians cannot repair plumbing problems outside of installation. Do not store any questions or concerns at : KitchenAid Brand Home Appliances Customer eXperience Center 553 Benson Road Benton Harbor, MI 49022-2692 Please include a daytime...

Use and Care Guide
Page 14
... not approved by calling KitchenAid. Service calls to refrigerator or freezer product failures. 6. Write down the following information about your major appliance is used for factory specified parts and repair labor to parts or systems resulting from accident, alteration, misuse, abuse, fire, flood, acts of God, improper installation, installation not in the home...
... not approved by calling KitchenAid. Service calls to refrigerator or freezer product failures. 6. Write down the following information about your major appliance is used for factory specified parts and repair labor to parts or systems resulting from accident, alteration, misuse, abuse, fire, flood, acts of God, improper installation, installation not in the home...


