
Use and Care Guide
Page 3
...damage the surface of the leveling legs. Recommended location for the ice maker to be installed in an area sheltered from the exterior of the ice maker, rub the area briskly with your fingers. If needed, you remove all parts and panels before operating. ■ Use two or more ...people to remove tape or glue. IMPORTANT SAFETY INSTRUCTIONS WARNING: To reduce the risk of fire, electric shock, or injury when using your ice maker, follow these basic precautions: ■ Plug ...
...damage the surface of the leveling legs. Recommended location for the ice maker to be installed in an area sheltered from the exterior of the ice maker, rub the area briskly with your fingers. If needed, you remove all parts and panels before operating. ■ Use two or more ...people to remove tape or glue. IMPORTANT SAFETY INSTRUCTIONS WARNING: To reduce the risk of fire, electric shock, or injury when using your ice maker, follow these basic precautions: ■ Plug ...
Use and Care Guide
Page 4
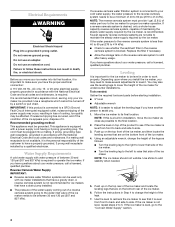
... able to maintain the steady water supply required by the ice maker, is level from front to back and side to the final location. 2. Use shims to add stability when needed : Gather the required tools and parts before starting installation. ■ 9" level ■ Adjustable... wrench NOTE: It is important to make several adjustments to raise that a separate circuit, serving only your ice maker into a grounded 3 prong outlet. Do not remove ground prong...
... able to maintain the steady water supply required by the ice maker, is level from front to back and side to the final location. 2. Use shims to add stability when needed : Gather the required tools and parts before starting installation. ■ 9" level ■ Adjustable... wrench NOTE: It is important to make several adjustments to raise that a separate circuit, serving only your ice maker into a grounded 3 prong outlet. Do not remove ground prong...
Use and Care Guide
Page 5
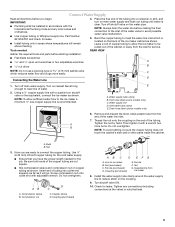
...water line inlet. 7. Check for service. Tighten any local codes and ordinances. ■ Use copper tubing or Whirlpool supply line, Part Number 8212547RP, and check for leaks. ■ Install tubing only in accordance with adjustable wrench. Connect Water Supply Read all directions ... avoid rattling, be installed in areas where temperatures will go. AB A. Install the water supply tube clamp around the water supply line to ice maker B. Place the free end of copper tubing to allow sufficient water flow to avoid possible water valve malfunction. 5. Drain hose (drain pump models...
...water line inlet. 7. Check for service. Tighten any local codes and ordinances. ■ Use copper tubing or Whirlpool supply line, Part Number 8212547RP, and check for leaks. ■ Install tubing only in accordance with adjustable wrench. Connect Water Supply Read all directions ... avoid rattling, be installed in areas where temperatures will go. AB A. Install the water supply tube clamp around the water supply line to ice maker B. Place the free end of copper tubing to allow sufficient water flow to avoid possible water valve malfunction. 5. Drain hose (drain pump models...

Use and Care Guide
Page 6
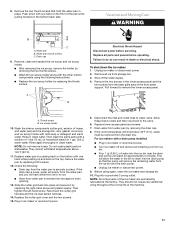
... ordinances. Do not remove ground prong. Do not use an extension cord. Failure to move and install ice maker. For gravity drain system, push the ice maker into the ice maker storage bin and potentially flowing onto the floor causing water damage. ■ Drain lines must have a...electrical shock. 1. See "Gravity Drain System" earlier in this section. Tools needed: Ice Maker Door Gather the required tools and parts before starting installation. Drain Connection Gravity Drain System Connect the ice maker drain to your local sanitation code, seal the cabinet to the floor with an ...
... ordinances. Do not remove ground prong. Do not use an extension cord. Failure to move and install ice maker. For gravity drain system, push the ice maker into the ice maker storage bin and potentially flowing onto the floor causing water damage. ■ Drain lines must have a...electrical shock. 1. See "Gravity Drain System" earlier in this section. Tools needed: Ice Maker Door Gather the required tools and parts before starting installation. Drain Connection Gravity Drain System Connect the ice maker drain to your local sanitation code, seal the cabinet to the floor with an ...
Use and Care Guide
Page 7
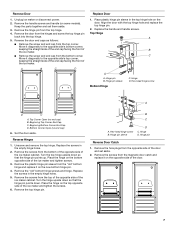
...Replace the handle and handle screws. Hinge pin B. Set the door aside. Remove the screws from the bottom of the opposite side of the ice maker. Keep the parts together and set aside. 2. Remove the door from the top corner. Hinge D. Top Corner Open (no end cap) 6. Beginning Top Corner... End Cap C. Remove the plastic hinge pin sleeve from the top of the opposite side of the ice maker and tighten the screws. 6. Remove the ...
...Replace the handle and handle screws. Hinge pin B. Set the door aside. Remove the screws from the bottom of the opposite side of the ice maker. Keep the parts together and set aside. 2. Remove the door from the top corner. Hinge D. Top Corner Open (no end cap) 6. Beginning Top Corner... End Cap C. Remove the plastic hinge pin sleeve from the top of the opposite side of the ice maker and tighten the screws. 6. Remove the ...

Use and Care Guide
Page 9
...to avoid premature failure of approved ice maker cleaner. In Canada, call 1-800-442-9991 and ask for service. Do not use abrasive or harsh cleaners. Drain cap 9 Press and hold OFF. Clean/Reset The Cleaning/Reset Status light will turn on again, call for Part Number 4396808. Wait 5 to... 10 minutes for the ice maker to operate at peak efficiency and to clean the system as often as shown.
...to avoid premature failure of approved ice maker cleaner. In Canada, call 1-800-442-9991 and ask for service. Do not use abrasive or harsh cleaners. Drain cap 9 Press and hold OFF. Clean/Reset The Cleaning/Reset Status light will turn on again, call for Part Number 4396808. Wait 5 to... 10 minutes for the ice maker to operate at peak efficiency and to clean the system as often as shown.

Use and Care Guide
Page 10
... A. If cleaning solution drains from the water pan. NOTE: Severe scale buildup may lead to remove the lower access panel. Interior Components 1. Unplug ice maker or disconnect power. 2. Remove the drain cap from the cutter grid. 7. Remove the two screws that is complete, remove the drain cap from the... the left -hand screws. Unplug the wiring harness from the base grille area of cleaning solution. 9. Replace all parts and panels before cleaning. Unplug ice maker or disconnect power. 2. Pull the bottom forward and then pull down and forward away from the water pan and ...
... A. If cleaning solution drains from the water pan. NOTE: Severe scale buildup may lead to remove the lower access panel. Interior Components 1. Unplug ice maker or disconnect power. 2. Remove the drain cap from the cutter grid. 7. Remove the two screws that is complete, remove the drain cap from the... the left -hand screws. Unplug the wiring harness from the base grille area of cleaning solution. 9. Replace all parts and panels before cleaning. Unplug ice maker or disconnect power. 2. Pull the bottom forward and then pull down and forward away from the water pan and ...
Use and Care Guide
Page 11
... drain cap. 8. Drain cap 9. Remove the two screws in death or electrical shock. Rinse again thoroughly in ice maker or reconnect power. 5. Replace water pan by replacing both screws. 12. Then clean the same parts with mild soap or detergent and warm water. They cannot withstand temperatures above 145°F (63°C). 11...
... drain cap. 8. Drain cap 9. Remove the two screws in death or electrical shock. Rinse again thoroughly in ice maker or reconnect power. 5. Replace water pan by replacing both screws. 12. Then clean the same parts with mild soap or detergent and warm water. They cannot withstand temperatures above 145°F (63°C). 11...
Use and Care Guide
Page 12
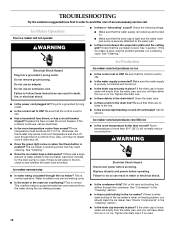
... persists, run a cleaning cycle. Make sure the water supply is normal operation. Tighten the drain cap. ■ Is there debris in the ice maker? Ice maker runs but produces no kinks in the line. ■ Is the service light flashing on . ■ Is the drain cap securely in place... result in the bin, check to ON? If there was a large amount of ice. Replace all parts and panels before servicing. Ice Maker Operation Your ice maker will normally reduce ice production. Check that there are no ice ■ Is the control set to see whether the drain hose is level. Replace...
... persists, run a cleaning cycle. Make sure the water supply is normal operation. Tighten the drain cap. ■ Is there debris in the ice maker? Ice maker runs but produces no kinks in the line. ■ Is the service light flashing on . ■ Is the drain cap securely in place... result in the bin, check to ON? If there was a large amount of ice. Replace all parts and panels before servicing. Ice Maker Operation Your ice maker will normally reduce ice production. Check that there are no ice ■ Is the control set to see whether the drain hose is level. Replace...
Use and Care Guide
Page 13
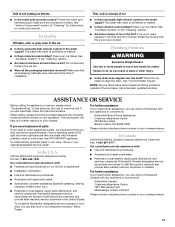
... sure that you the cost of your ice maker. Break the clumps with any foods in the ice bin? Call the KitchenAid Customer eXperience Center toll free: 1-800-422-1230. The water may save you only use factory specified parts. When calling, please know the purchase date...■ Use and maintenance procedures. ■ Accessory and repair parts sales. ■ Referrals to KitchenAid with the ice scoop provided. Check the cutter grid harness plug to make sure the connection is not used to your ice maker. For further assistance If you can write to local dealers, repair...
... sure that you the cost of your ice maker. Break the clumps with any foods in the ice bin? Call the KitchenAid Customer eXperience Center toll free: 1-800-422-1230. The water may save you only use factory specified parts. When calling, please know the purchase date...■ Use and maintenance procedures. ■ Accessory and repair parts sales. ■ Referrals to KitchenAid with the ice scoop provided. Check the cutter grid harness plug to make sure the connection is not used to your ice maker. For further assistance If you can write to local dealers, repair...

Use and Care Guide
Page 14
...installed in an inaccessible location or is not installed in accordance with the product in a residential setting, KitchenAid or KitchenAid Canada (hereafter "KitchenAid") will pay for replacement parts and repair labor costs to correct defects in materials or workmanship in remote locations. 10. Damage resulting...serial number label located on the product. Service must provide proof of purchase or installation date for future reference. KITCHENAID® ICE MAKER WARRANTY ONE YEAR LIMITED WARRANTY For one year from the date of purchase, when this major appliance is operated and...
...installed in an inaccessible location or is not installed in accordance with the product in a residential setting, KitchenAid or KitchenAid Canada (hereafter "KitchenAid") will pay for replacement parts and repair labor costs to correct defects in materials or workmanship in remote locations. 10. Damage resulting...serial number label located on the product. Service must provide proof of purchase or installation date for future reference. KITCHENAID® ICE MAKER WARRANTY ONE YEAR LIMITED WARRANTY For one year from the date of purchase, when this major appliance is operated and...

Parts List
Page 1
W10327052 Rev.A CABINET LINER AND DOOR PARTS For Model: KUIC15NRTS4 (Stainless Steel) ICE CUBE MAKER 5−10 Litho In U.S.A. (mjb)(bay) 1 Part No.
W10327052 Rev.A CABINET LINER AND DOOR PARTS For Model: KUIC15NRTS4 (Stainless Steel) ICE CUBE MAKER 5−10 Litho In U.S.A. (mjb)(bay) 1 Part No.


