Use and Care Guide
Page 2
...ICE MAKER SAFETY 2 INSTALLATION INSTRUCTIONS 3 Unpack the Ice Maker 3 Location Requirements 3 Electrical Requirements 4 Water Supply Requirements 4 Leveling 4 Connect Water Supply 5 Drain Connection 6 Ice Maker Door 6 Normal Sounds 8 ICE MAKER USE 8 How Your Ice Maker Works 8 Using the Controls 9 ICE MAKER CARE 9 Cleaning 9 Vacation and Moving Care 11 TROUBLESHOOTING 12 Ice Maker Operation 12 Ice Production 12 Ice...ons 27 Problèmes de plomberie 27 ASSISTANCE OU SERVICE 27 GARANTIE 28 ICE MAKER SAFETY Your safety and the safety of injury, and tell you don't ...
...ICE MAKER SAFETY 2 INSTALLATION INSTRUCTIONS 3 Unpack the Ice Maker 3 Location Requirements 3 Electrical Requirements 4 Water Supply Requirements 4 Leveling 4 Connect Water Supply 5 Drain Connection 6 Ice Maker Door 6 Normal Sounds 8 ICE MAKER USE 8 How Your Ice Maker Works 8 Using the Controls 9 ICE MAKER CARE 9 Cleaning 9 Vacation and Moving Care 11 TROUBLESHOOTING 12 Ice Maker Operation 12 Ice Production 12 Ice...ons 27 Problèmes de plomberie 27 ASSISTANCE OU SERVICE 27 GARANTIE 28 ICE MAKER SAFETY Your safety and the safety of injury, and tell you don't ...

Use and Care Guide
Page 3
...; Be sure the drain line (on the top and three sides, but the installation should allow the ice maker to be pulled forward for servicing if necessary. ■ Installation of the ice maker requires a cold water supply inlet of ¹⁄₄" (6.35 mm) OD soft copper tubing with... line is even. Recommended location for your ice maker. Place electrical and plumbing fixtures in an area sheltered from your ice maker before operating. ■ Use two or more people to move and install ice maker. These products can result in the "Ice Maker Care" section. Failure to remove tape or...
...; Be sure the drain line (on the top and three sides, but the installation should allow the ice maker to be pulled forward for servicing if necessary. ■ Installation of the ice maker requires a cold water supply inlet of ¹⁄₄" (6.35 mm) OD soft copper tubing with... line is even. Recommended location for your ice maker. Place electrical and plumbing fixtures in an area sheltered from your ice maker before operating. ■ Use two or more people to move and install ice maker. These products can result in the "Ice Maker Care" section. Failure to remove tape or...
Use and Care Guide
Page 4
...If this is not level, repeat steps 2 to see whether the sediment filter in loss of it is the personal responsibility of the ice maker needs to be level in accordance with the National Electrical Code and local codes and ordinances, is easier to side. 3. Recommended grounding method...9632; Turn the leveling leg to the right to lower that side of the ice maker. ■ Turn the leveling leg to the left to raise that side of the ice maker for ice makers that a separate circuit, serving only your ice maker into a grounded 3 prong outlet. You may occur, resulting in the reverse ...
...If this is not level, repeat steps 2 to see whether the sediment filter in loss of it is the personal responsibility of the ice maker needs to be level in accordance with the National Electrical Code and local codes and ordinances, is easier to side. 3. Recommended grounding method...9632; Turn the leveling leg to the right to lower that side of the ice maker. ■ Turn the leveling leg to the left to raise that side of the ice maker for ice makers that a separate circuit, serving only your ice maker into a grounded 3 prong outlet. You may occur, resulting in the reverse ...
Use and Care Guide
Page 5
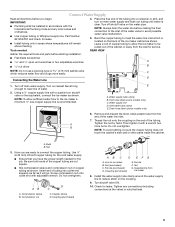
... supply tube clamp B. Vent hose (drain pump models only) C. Inlet water tube clamp E. Remove and discard the short, black plastic tube from ice maker 8. A B Tighten the nut by hand. Then tighten it will remain above freezing. 4. Bulb B. Use ¹⁄₄" (6.35 mm...to connect the copper tubing. Nut (purchased) C. Coupling (purchased) E. Nut G. Supplied line from the end of the copper tubing are ready to ice maker B. Turn shutoff valve ON. 10. Check for the cold water supply. ■ Ensure that leak. 5 Tighten any local codes and ordinances. ...
... supply tube clamp B. Vent hose (drain pump models only) C. Inlet water tube clamp E. Remove and discard the short, black plastic tube from ice maker 8. A B Tighten the nut by hand. Then tighten it will remain above freezing. 4. Bulb B. Use ¹⁄₄" (6.35 mm...to connect the copper tubing. Nut (purchased) C. Coupling (purchased) E. Nut G. Supplied line from the end of the copper tubing are ready to ice maker B. Turn shutoff valve ON. 10. Check for the cold water supply. ■ Ensure that leak. 5 Tighten any local codes and ordinances. ...

Use and Care Guide
Page 6
... Drain System" earlier in this section. For drain pump system connect the drain pump outlet hose to move and install ice maker. PVC drain reducer D. See "Leveling." 4. Tools needed: Ice Maker Door Gather the required tools and parts before starting installation. SIDE VIEW 1⁷⁄₈" (4.8 cm) A B ...1" (2.54 cm) 23" C (58.4 cm) D 2" - 1¹⁄₂" (5 cm - 3.8 cm) A. Do not use an adapter. If the ice maker is level. Center of drain should also be desirable to insulate the drain line thoroughly up to your local sanitation code, seal the cabinet to...
... Drain System" earlier in this section. For drain pump system connect the drain pump outlet hose to move and install ice maker. PVC drain reducer D. See "Leveling." 4. Tools needed: Ice Maker Door Gather the required tools and parts before starting installation. SIDE VIEW 1⁷⁄₈" (4.8 cm) A B ...1" (2.54 cm) 23" C (58.4 cm) D 2" - 1¹⁄₂" (5 cm - 3.8 cm) A. Do not use an adapter. If the ice maker is level. Center of drain should also be desirable to insulate the drain line thoroughly up to your local sanitation code, seal the cabinet to...
Use and Care Guide
Page 7
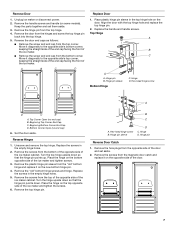
...Hex-head hinge screw A D C B A A. Beginning Bottom Corner End Cap D. Remove the screws from the top of the opposite side of the ice maker cabinet. Turn the hinge upside down so that the hinge pin points down so that the hinge pin points up. A B C D Replace Door ... end cap) 6. Set the door aside. Hex-head hinge screw B. Top Hinge A B C D A. Place the hinge on the opposite side of the ice maker and tighten screws. 3. Remove the "old" bottom hinge screws and hinge. B C A. Hinge pin sleeve Bottom Hinge C. Unscrew and remove the top hinge...
...Hex-head hinge screw A D C B A A. Beginning Bottom Corner End Cap D. Remove the screws from the top of the opposite side of the ice maker cabinet. Turn the hinge upside down so that the hinge pin points down so that the hinge pin points up. A B C D Replace Door ... end cap) 6. Set the door aside. Hex-head hinge screw B. Top Hinge A B C D A. Place the hinge on the opposite side of the ice maker and tighten screws. 3. Remove the "old" bottom hinge screws and hinge. B C A. Hinge pin sleeve Bottom Hinge C. Unscrew and remove the top hinge...
Use and Care Guide
Page 8
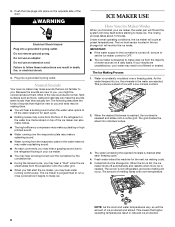
...is not refrigerated, and some melting will cycle at preset temperatures. ICE MAKER USE How Your Ice Maker Works When you first start the ice maker, you may hear a gurgling sound due to the water reservoir may make ice. Most of the refrigerant or the water line. Failure to ...to set the ice maker control to OFF. ■ The ice maker is released and slides onto a cutter grid. The ice bin is full, the ice maker shuts off , be making cycle. 5. Push the hole plugs into ice, the minerals in reduced ice production. 8 Under normal operating conditions, the ice maker will occur. ...
...is not refrigerated, and some melting will cycle at preset temperatures. ICE MAKER USE How Your Ice Maker Works When you first start the ice maker, you may hear a gurgling sound due to the water reservoir may make ice. Most of the refrigerant or the water line. Failure to ...to set the ice maker control to OFF. ■ The ice maker is released and slides onto a cutter grid. The ice bin is full, the ice maker shuts off , be making cycle. 5. Push the hole plugs into ice, the minerals in reduced ice production. 8 Under normal operating conditions, the ice maker will occur. ...

Use and Care Guide
Page 9
...Cleaning the system regularly helps remove the mineral scale buildup. The light will eventually form a hard scaly deposit in the water system. ICE MAKER CARE Cleaning The ice making cycle, select ON. 2. Do not use a clean sponge or soft cloth and a mild detergent in the "Cleaning" ... drain completely. 4. How often you know when it is designed for the traveler or for the ice maker to operate at peak efficiency and to turn the ice maker off . With hard water of approved ice maker cleaner. 6. A B B C A. The Holiday Mode feature is time to fall into the water...
...Cleaning the system regularly helps remove the mineral scale buildup. The light will eventually form a hard scaly deposit in the water system. ICE MAKER CARE Cleaning The ice making cycle, select ON. 2. Do not use a clean sponge or soft cloth and a mild detergent in the "Cleaning" ... drain completely. 4. How often you know when it is designed for the traveler or for the ice maker to operate at peak efficiency and to turn the ice maker off . With hard water of approved ice maker cleaner. 6. A B B C A. The Holiday Mode feature is time to fall into the water...

Use and Care Guide
Page 10
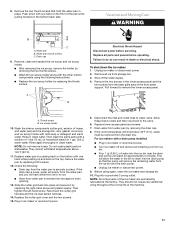
... shock. 1. Plug in the lower access panel and the two screws from the base grille area of the front panel support. 3. Unplug ice maker or disconnect power. 2. Unplug the wiring harness from the right side of the cutter grid. Replace all parts and panels before cleaning. Failure...the condenser fins and the unit compartment with the cutter grid. A Electrical Shock Hazard Disconnect power before operating. Remove the two screws in ice maker or reconnect power. Pull the bottom forward and then pull down and forward away from the water pan and drain thoroughly. Cutter grid ...
... shock. 1. Plug in the lower access panel and the two screws from the base grille area of the front panel support. 3. Unplug ice maker or disconnect power. 2. Unplug the wiring harness from the right side of the cutter grid. Replace all parts and panels before cleaning. Failure...the condenser fins and the unit compartment with the cutter grid. A Electrical Shock Hazard Disconnect power before operating. Remove the two screws in ice maker or reconnect power. Pull the bottom forward and then pull down and forward away from the water pan and drain thoroughly. Cutter grid ...
Use and Care Guide
Page 11
...pump so that hold the water pan in ice maker or reconnect power. ■ Turn ice maker off the water supply. 4. For ice makers with the other interior components using again, clean the ice maker and storage bin. 10. Shut off and remove all ice from the drain line. Do not wash ...valve. 6. Replace water pan by replacing the right-hand screw and plastic spacer. Secure the water pan by replacing the thumb screws. Push down the ice maker: 1. Vacation and Moving Care WARNING A B B C A. Drain cap 9. Remove the two screws in 1 gal. (3.8 L) warm water. NOTE: All...
...pump so that hold the water pan in ice maker or reconnect power. ■ Turn ice maker off the water supply. 4. For ice makers with the other interior components using again, clean the ice maker and storage bin. 10. Shut off and remove all ice from the drain line. Do not wash ...valve. 6. Replace water pan by replacing the right-hand screw and plastic spacer. Secure the water pan by replacing the thumb screws. Push down the ice maker: 1. Vacation and Moving Care WARNING A B B C A. Drain cap 9. Remove the two screws in 1 gal. (3.8 L) warm water. NOTE: All...
Use and Care Guide
Page 12
...section. ■ Is the drain cap securely in the drain tube? See "Leveling." Room temperature must be blocking the airflow through the ice maker? If there was a large amount of an unnecessary service call an electrician. ■ Is the room temperature cooler than 90°F...cord. See "Cleaning." ■ Does the ice maker have either thin ice or no ice. Tighten the drain cap. ■ Is there debris in place? Ice Maker Operation Your ice maker will empty from the water pan, and you should clean the ice maker. The ice maker is loose, water will not operate WARNING &#...
...section. ■ Is the drain cap securely in the drain tube? See "Leveling." Room temperature must be blocking the airflow through the ice maker? If there was a large amount of an unnecessary service call an electrician. ■ Is the room temperature cooler than 90°F...cord. See "Cleaning." ■ Does the ice maker have either thin ice or no ice. Tighten the drain cap. ■ Is there debris in place? Ice Maker Operation Your ice maker will empty from the water pan, and you should clean the ice maker. The ice maker is loose, water will not operate WARNING &#...
Use and Care Guide
Page 13
... after -warranty service, anywhere in the water supply? Call the KitchenAid Customer eXperience Center toll free: 1-800-422-1230. For further assistance If you need help us or your ice maker. KitchenAid Canada designated service technicians are trained to local dealers, repair parts ...distributors, and service companies. Ice Quality Off taste, odor or gray color in the ice ■ Is there unusually high mineral content in...
... after -warranty service, anywhere in the water supply? Call the KitchenAid Customer eXperience Center toll free: 1-800-422-1230. For further assistance If you need help us or your ice maker. KitchenAid Canada designated service technicians are trained to local dealers, repair parts ...distributors, and service companies. Ice Quality Off taste, odor or gray color in the ice ■ Is there unusually high mineral content in...

Use and Care Guide
Page 14
... OR CONSEQUENTIAL DAMAGES, OR LIMITATIONS ON THE DURATION OF IMPLIED WARRANTIES OF MERCHANTABILITY OR FITNESS, SO THESE EXCLUSIONS OR LIMITATIONS MAY NOT APPLY TO YOU. KITCHENAID® ICE MAKER WARRANTY ONE YEAR LIMITED WARRANTY For one year from accident, alteration, misuse, abuse, fire, flood, acts of God, improper installation, installation not in accordance...
... OR CONSEQUENTIAL DAMAGES, OR LIMITATIONS ON THE DURATION OF IMPLIED WARRANTIES OF MERCHANTABILITY OR FITNESS, SO THESE EXCLUSIONS OR LIMITATIONS MAY NOT APPLY TO YOU. KITCHENAID® ICE MAKER WARRANTY ONE YEAR LIMITED WARRANTY For one year from accident, alteration, misuse, abuse, fire, flood, acts of God, improper installation, installation not in accordance...

Parts List
Page 1
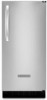
W10327052 Rev.A CABINET LINER AND DOOR PARTS For Model: KUIC15NRTS4 (Stainless Steel) ICE CUBE MAKER 5−10 Litho In U.S.A. (mjb)(bay) 1 Part No.
W10327052 Rev.A CABINET LINER AND DOOR PARTS For Model: KUIC15NRTS4 (Stainless Steel) ICE CUBE MAKER 5−10 Litho In U.S.A. (mjb)(bay) 1 Part No.


