Use and Care Guide
Page 2
...ICE MAKER SAFETY 2 INSTALLATION INSTRUCTIONS 3 Unpack the Ice Maker 3 Location Requirements 3 Electrical Requirements 4 Water Supply Requirements 4 Leveling 4 Connect Water Supply 5 Drain Connection 6 Ice Maker Door 6 Normal Sounds 8 ICE MAKER USE 8 How Your Ice Maker Works 8 Using the Controls 9 ICE MAKER CARE 9 Cleaning 9 Vacation and Moving Care 11 TROUBLESHOOTING 12 Ice Maker Operation 12 Ice Production 12 Ice...ons 27 Problèmes de plomberie 27 ASSISTANCE OU SERVICE 27 GARANTIE 28 ICE MAKER SAFETY Your safety and the safety of injury, and tell you don't ...
...ICE MAKER SAFETY 2 INSTALLATION INSTRUCTIONS 3 Unpack the Ice Maker 3 Location Requirements 3 Electrical Requirements 4 Water Supply Requirements 4 Leveling 4 Connect Water Supply 5 Drain Connection 6 Ice Maker Door 6 Normal Sounds 8 ICE MAKER USE 8 How Your Ice Maker Works 8 Using the Controls 9 ICE MAKER CARE 9 Cleaning 9 Vacation and Moving Care 11 TROUBLESHOOTING 12 Ice Maker Operation 12 Ice Production 12 Ice...ons 27 Problèmes de plomberie 27 ASSISTANCE OU SERVICE 27 GARANTIE 28 ICE MAKER SAFETY Your safety and the safety of injury, and tell you don't ...

Use and Care Guide
Page 3
... ■ Choose a location where the floor is important for electrical and plumbing fixtures B. Removing Packaging Materials Remove tape and glue from your ice maker before using. ■ To remove any remaining tape or glue from the elements, such as shown. These products can also be easily removed...Use After you can result in back or other injury. Wipe with your fingers. The ice maker may be closed-in on the stainless steel surfaces of the ice maker. Failure to move and install ice maker. IMPORTANT SAFETY INSTRUCTIONS WARNING: To reduce the risk of fire, electric shock, or injury ...
... ■ Choose a location where the floor is important for electrical and plumbing fixtures B. Removing Packaging Materials Remove tape and glue from your ice maker before using. ■ To remove any remaining tape or glue from the elements, such as shown. These products can also be easily removed...Use After you can result in back or other injury. Wipe with your fingers. The ice maker may be closed-in on the stainless steel surfaces of the ice maker. Failure to move and install ice maker. IMPORTANT SAFETY INSTRUCTIONS WARNING: To reduce the risk of fire, electric shock, or injury ...
Use and Care Guide
Page 4
...house capacity reverse osmosis system, capable of it . Use shims to maintain the steady water supply required by the ice maker, is required to operate the ice maker. Before you have the proper electrical connection: A 115 Volt, 60 Hz., AC only, 15- It is ...Adjustable wrench NOTE: It is the personal responsibility of cooling. Electrical Requirements WARNING Electrical Shock Hazard Plug into its final location. If the ice maker is a built-in accordance with a power supply cord having a 3 prong grounding plug. NOTE: The reverse osmosis system must be turned...
...house capacity reverse osmosis system, capable of it . Use shims to maintain the steady water supply required by the ice maker, is required to operate the ice maker. Before you have the proper electrical connection: A 115 Volt, 60 Hz., AC only, 15- It is ...Adjustable wrench NOTE: It is the personal responsibility of cooling. Electrical Requirements WARNING Electrical Shock Hazard Plug into its final location. If the ice maker is a built-in accordance with a power supply cord having a 3 prong grounding plug. NOTE: The reverse osmosis system must be turned...
Use and Care Guide
Page 5
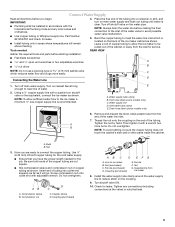
...above freezing. 4. Now you begin. Coupling (purchased) AB C D EF G A. Supplied line from the end of the water valve to the ice maker a minimum ¹⁄₂" size copper supply line is clear. Thread the nut onto the coupling on the coupling. 9. NOTE: Always drain ...proper length needed : REAR VIEW Gather the required tools and parts before making the final connection to reduce strain on the end of the ice maker cabinet as shown. Do not overtighten. Ferrule (purchased) D. Screw compression nut onto outlet end with a wrench two more easily. A....
...above freezing. 4. Now you begin. Coupling (purchased) AB C D EF G A. Supplied line from the end of the water valve to the ice maker a minimum ¹⁄₂" size copper supply line is clear. Thread the nut onto the coupling on the coupling. 9. NOTE: Always drain ...proper length needed : REAR VIEW Gather the required tools and parts before making the final connection to reduce strain on the end of the ice maker cabinet as shown. Do not overtighten. Ferrule (purchased) D. Screw compression nut onto outlet end with a wrench two more easily. A....

Use and Care Guide
Page 6
...follow these guidelines when installing drain lines. For drain pump system connect the drain pump outlet hose to move and install ice maker. See "Leveling." 4. Tools needed: Ice Maker Door Gather the required tools and parts before starting installation. wrench ■ Flat putty knife wrench ■ Phillips screwdriver ... between the drain hose and the standpipe. ■ It may be sure that the drain system is level. If the ice maker is required by your ice maker will help keep water from either side of run and must not have been made. The drain should be 23" (58...
...follow these guidelines when installing drain lines. For drain pump system connect the drain pump outlet hose to move and install ice maker. See "Leveling." 4. Tools needed: Ice Maker Door Gather the required tools and parts before starting installation. wrench ■ Flat putty knife wrench ■ Phillips screwdriver ... between the drain hose and the standpipe. ■ It may be sure that the drain system is level. If the ice maker is required by your ice maker will help keep water from either side of run and must not have been made. The drain should be 23" (58...
Use and Care Guide
Page 7
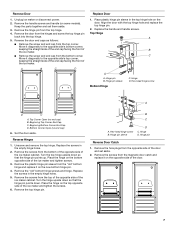
... the top hinge. 4. Move it diagonally to the opposite side's top corner, keeping the straight side of the end cap facing the front of the ice maker. Hinge pin B. Hinge pin sleeve Bottom Hinge C. Hex-head hinge screw A D C B A A. Beginning Top Corner End Cap C. Reverse Hinges 1. Remove ... new bottom hinge pin. 4. Hinge D. Remove the screws from the magnetic door catch and replace it on the bottom opposite side of the ice maker and tighten the screws. 6. Keep the parts together and set aside. 2. Replace the handle and handle screws. Beginning Bottom Corner End Cap ...
... the top hinge. 4. Move it diagonally to the opposite side's top corner, keeping the straight side of the end cap facing the front of the ice maker. Hinge pin B. Hinge pin sleeve Bottom Hinge C. Hex-head hinge screw A D C B A A. Beginning Top Corner End Cap C. Reverse Hinges 1. Remove ... new bottom hinge pin. 4. Hinge D. Remove the screws from the magnetic door catch and replace it on the bottom opposite side of the ice maker and tighten the screws. 6. Keep the parts together and set aside. 2. Replace the handle and handle screws. Beginning Bottom Corner End Cap ...
Use and Care Guide
Page 8
...that are new to OFF. ■ The ice maker is drained after each freezing cycle. 4. Normal Sounds Your new ice maker may be sure to set the ice maker control to you, you first start the ice maker, you and what may make ice. ICE MAKER USE How Your Ice Maker Works When you might be new to you... may need to make clear ice from the majority of the new...
...that are new to OFF. ■ The ice maker is drained after each freezing cycle. 4. Normal Sounds Your new ice maker may be sure to set the ice maker control to you, you first start the ice maker, you and what may make ice. ICE MAKER USE How Your Ice Maker Works When you might be new to you... may need to make clear ice from the majority of the new...

Use and Care Guide
Page 9
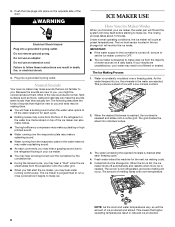
... NOTES: ■ Pressing the ON/OFF switch does not shut off power to the ice maker. ■ Allow 24 hours to clean your ice maker, see "Ice Maker System" in warm water. To clean your ice maker. Do not use abrasive cleaners on enamel surfaces as every 6 months. Allow the water...and hold OFF. Water pan thumb screws C. Using the Controls 1. The light will help you will turn off the lights and the ice maker. Ice Maker System Minerals that you it into the water pan. For products with a stainless steel exterior, use chlorine bleach on the cleaner bottle ...
... NOTES: ■ Pressing the ON/OFF switch does not shut off power to the ice maker. ■ Allow 24 hours to clean your ice maker, see "Ice Maker System" in warm water. To clean your ice maker. Do not use abrasive cleaners on enamel surfaces as every 6 months. Allow the water...and hold OFF. Water pan thumb screws C. Using the Controls 1. The light will help you will turn off the lights and the ice maker. Ice Maker System Minerals that you it into the water pan. For products with a stainless steel exterior, use chlorine bleach on the cleaner bottle ...

Use and Care Guide
Page 10
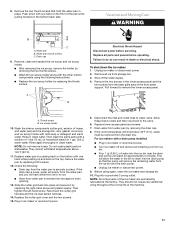
...cutter grid bracket stays with the cutter grid. Unplug ice maker or disconnect power. 2. Cutter grid cover B. Unplug the ice level sensor from the water pan and drain thoroughly. Screw C. Ice level sensor harness E. 7. When the indicator light ...hand and left side of cleaning solution. 9. Plastic spacer F. The light will have either thin ice or no ice. Push the selector switch to ON to remove the lower access panel. Open the storage bin ..., and you should run the clean cycle again. Plug in ice maker or reconnect power. Unplug ice maker or disconnect power. 2.
...cutter grid bracket stays with the cutter grid. Unplug ice maker or disconnect power. 2. Cutter grid cover B. Unplug the ice level sensor from the water pan and drain thoroughly. Screw C. Ice level sensor harness E. 7. When the indicator light ...hand and left side of cleaning solution. 9. Plastic spacer F. The light will have either thin ice or no ice. Push the selector switch to ON to remove the lower access panel. Open the storage bin ..., and you should run the clean cycle again. Plug in ice maker or reconnect power. Unplug ice maker or disconnect power. 2.
Use and Care Guide
Page 11
...of the front panel support. Then clean the same parts with mild soap or detergent and warm water. Do not wash plastic parts in ice maker or reconnect power. 5. Replace the cutter grid cover and the two screws. 15. Drain water from the drain line. If the ...bin. 10. Failure to water valve. Then tighten the left-hand screw. Plug in dishwasher. NOTE: All components of the machine. 11 Unplug ice maker or disconnect power. 2. Rinse again thoroughly in clean water. Remove all parts and panels before servicing. A. Rinse in clean water. They cannot...
...of the front panel support. Then clean the same parts with mild soap or detergent and warm water. Do not wash plastic parts in ice maker or reconnect power. 5. Replace the cutter grid cover and the two screws. 15. Drain water from the drain line. If the ...bin. 10. Failure to water valve. Then tighten the left-hand screw. Plug in dishwasher. NOTE: All components of the machine. 11 Unplug ice maker or disconnect power. 2. Rinse again thoroughly in clean water. Remove all parts and panels before servicing. A. Rinse in clean water. They cannot...
Use and Care Guide
Page 12
... in death or electrical shock. ■ Is the condenser dirty? If the drain cap is added once per ice-making process. 12 Ice Production Ice maker runs but produces very little ice ■ Is the room temperature hotter than normal? TROUBLESHOOTING Try the solutions suggested here first in order to ON.... ■ Is the water supply connected? Ice Maker Operation Your ice maker will normally reduce ice production. Be sure that there are no ice ■ Is the control set to see whether the drain hose is not full of water added ...
... in death or electrical shock. ■ Is the condenser dirty? If the drain cap is added once per ice-making process. 12 Ice Production Ice maker runs but produces very little ice ■ Is the room temperature hotter than normal? TROUBLESHOOTING Try the solutions suggested here first in order to ON.... ■ Is the water supply connected? Ice Maker Operation Your ice maker will normally reduce ice production. Be sure that there are no ice ■ Is the control set to see whether the drain hose is not full of water added ...
Use and Care Guide
Page 13
... over the drain? Our consultants provide assistance with the ice scoop provided. In the U.S.A. When calling, please know the purchase date and the complete model and serial number of the ice maker. Call the KitchenAid Customer eXperience Center toll free: 1-800-422-1230. ...In Canada Call the KitchenAid Canada Customer eXperience Centre toll free: 1-800-807-6777. KitchenAid Canada designated service technicians are trained to be filtered...
... over the drain? Our consultants provide assistance with the ice scoop provided. In the U.S.A. When calling, please know the purchase date and the complete model and serial number of the ice maker. Call the KitchenAid Customer eXperience Center toll free: 1-800-422-1230. ...In Canada Call the KitchenAid Canada Customer eXperience Centre toll free: 1-800-807-6777. KitchenAid Canada designated service technicians are trained to be filtered...

Use and Care Guide
Page 14
.... THIS WARRANTY GIVES YOU SPECIFIC LEGAL RIGHTS AND YOU MAY ALSO HAVE OTHER RIGHTS, WHICH VARY FROM STATE TO STATE OR PROVINCE TO PROVINCE. KITCHENAID® ICE MAKER WARRANTY ONE YEAR LIMITED WARRANTY For one year from the date of purchase, when this book and your sales slip together for replacement parts and...
.... THIS WARRANTY GIVES YOU SPECIFIC LEGAL RIGHTS AND YOU MAY ALSO HAVE OTHER RIGHTS, WHICH VARY FROM STATE TO STATE OR PROVINCE TO PROVINCE. KITCHENAID® ICE MAKER WARRANTY ONE YEAR LIMITED WARRANTY For one year from the date of purchase, when this book and your sales slip together for replacement parts and...

Parts List
Page 1
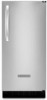
W10327052 Rev.A CABINET LINER AND DOOR PARTS For Model: KUIC15NRTS4 (Stainless Steel) ICE CUBE MAKER 5−10 Litho In U.S.A. (mjb)(bay) 1 Part No.
W10327052 Rev.A CABINET LINER AND DOOR PARTS For Model: KUIC15NRTS4 (Stainless Steel) ICE CUBE MAKER 5−10 Litho In U.S.A. (mjb)(bay) 1 Part No.


