

Dimension Guide
Page 1
...ready models, dishwasher depth is recommended. For Pro Line® handle, depth is not long enough, use a new drain hose with a power supply cord: Use Power Supply Cord Kit (Part No. 4317824) marked for your dishwasher. W10321585 2/7/11 Water temperature must plug into a grounded three-prong, outlet,... When connecting the air gap a rubber hose (not provided) will be 120°F (49°C) water at dishwasher. Copper wire only. Power supply cord must be needed to connect to 862 kPa) water pressure. Use a 90° elbow with your home and local codes and ordinances...
...ready models, dishwasher depth is recommended. For Pro Line® handle, depth is not long enough, use a new drain hose with a power supply cord: Use Power Supply Cord Kit (Part No. 4317824) marked for your dishwasher. W10321585 2/7/11 Water temperature must plug into a grounded three-prong, outlet,... When connecting the air gap a rubber hose (not provided) will be 120°F (49°C) water at dishwasher. Copper wire only. Power supply cord must be needed to connect to 862 kPa) water pressure. Use a 90° elbow with your home and local codes and ordinances...

Installation Guide
Page 2
... Opening-Existing Utilities 7 Prepare Cabinet Opening-New Utilities 7 Prepare and Route Water Line 8 Install Drain Hose 10 Install Moisture Barrier 11 Prepare Dishwasher 11 Make Power Supply Cord Connection 12 Determine Cabinet Opening 13 Installation Instructions (cont.) Install the Door Handle 14 Custom Panel Dimensions 14 Install Custom Panel 15 Choose...
... Opening-Existing Utilities 7 Prepare Cabinet Opening-New Utilities 7 Prepare and Route Water Line 8 Install Drain Hose 10 Install Moisture Barrier 11 Prepare Dishwasher 11 Make Power Supply Cord Connection 12 Determine Cabinet Opening 13 Installation Instructions (cont.) Install the Door Handle 14 Custom Panel Dimensions 14 Install Custom Panel 15 Choose...

Installation Guide
Page 3
...in Kit: 4 Plastic studs (attached to each other by a licensed electrical installer. NOTE: Parts available for use UL Listed/CSA Approved power supply cord kit marked for purchase in the literature package. See "Electrical Requirements" section. under a wood countertop. INSTALLATION REQUIREMENTS Tools and...Gather the recommended tools and parts before starting installation. For Direct Wire: use UL Listed/ CSA Approved strain relief hole For Power Supply Cord: use with certain models only: Bottom sound pad (located in lower rack) Make sure all these parts are ...
...in Kit: 4 Plastic studs (attached to each other by a licensed electrical installer. NOTE: Parts available for use UL Listed/CSA Approved power supply cord kit marked for purchase in the literature package. See "Electrical Requirements" section. under a wood countertop. INSTALLATION REQUIREMENTS Tools and...Gather the recommended tools and parts before starting installation. For Direct Wire: use UL Listed/ CSA Approved strain relief hole For Power Supply Cord: use with certain models only: Bottom sound pad (located in lower rack) Make sure all these parts are ...

Installation Guide
Page 6
... 02269 You must have: • 120-volt, 60 Hz, AC-only, 15- When you are adequate and in conformance with dishwasher. • Power supply cord must meet all local codes and ordinances. or 20-amp, fused electrical supply. • Copper wire only. Use of the above code ... 20" (50.8 cm) minimum above subfloor or floor. • Use ¹⁄₂" minimum I.D. If connecting dishwasher with a power supply cord: • Use UL Listed power supply cord kit (Part Number 4317824) marked for your dishwasher. It is not long enough, use with the National Electrical Code, ANSI...
... 02269 You must have: • 120-volt, 60 Hz, AC-only, 15- When you are adequate and in conformance with dishwasher. • Power supply cord must meet all local codes and ordinances. or 20-amp, fused electrical supply. • Copper wire only. Use of the above code ... 20" (50.8 cm) minimum above subfloor or floor. • Use ¹⁄₂" minimum I.D. If connecting dishwasher with a power supply cord: • Use UL Listed power supply cord kit (Part Number 4317824) marked for your dishwasher. It is not long enough, use with the National Electrical Code, ANSI...

Installation Guide
Page 7
...type of electrical connection will you already have utility hookups? INSTALLATION INSTRUCTIONS Electrical Shock Hazard Disconnect electrical power at the fuse box or circuit breaker box before installing dishwasher. Yes -Follow instructions in the "Prepare Cabinet Opening...-New Utilities" section. Power Supply Cord: Follow Option A instructions Direct Wire: Follow Option B instructions Option A, Power Supply Cord: NOTE: A grounded 3 prong outlet is required inside a cabinet next to the ...
...type of electrical connection will you already have utility hookups? INSTALLATION INSTRUCTIONS Electrical Shock Hazard Disconnect electrical power at the fuse box or circuit breaker box before installing dishwasher. Yes -Follow instructions in the "Prepare Cabinet Opening...-New Utilities" section. Power Supply Cord: Follow Option A instructions Direct Wire: Follow Option B instructions Option A, Power Supply Cord: NOTE: A grounded 3 prong outlet is required inside a cabinet next to the ...

Installation Guide
Page 8
... hole PrPerfeefrerrereddloloccations OpOtipotnioanlallolcoaacttiioonnss (1.3 cm) Drill a ¹⁄₂" (1.3 cm) hole in compliance with local codes and ordinances. 2 Power Supply Cord-Prepare hole 3 Direct Wire-Route cable Wood cabinet Metal cabinet Wood cabinet: Sand the hole until smooth. Option B, Direct...cable to the hot water line using a connection configuration that is moved into cabinet opening ). Metal cabinet: Cover hole with power supply cord kit. Drill hole Optional location PPrreferrreedd lolocactaitoionn (1.9 cm) Drill a ³⁄₄" (1.9 cm) hole in...
... hole PrPerfeefrerrereddloloccations OpOtipotnioanlallolcoaacttiioonnss (1.3 cm) Drill a ¹⁄₂" (1.3 cm) hole in compliance with local codes and ordinances. 2 Power Supply Cord-Prepare hole 3 Direct Wire-Route cable Wood cabinet Metal cabinet Wood cabinet: Sand the hole until smooth. Option B, Direct...cable to the hot water line using a connection configuration that is moved into cabinet opening ). Metal cabinet: Cover hole with power supply cord kit. Drill hole Optional location PPrreferrreedd lolocactaitoionn (1.9 cm) Drill a ³⁄₄" (1.9 cm) hole in...

Installation Guide
Page 12
... Option A instructions Direct Wire: Follow Option B instructions NOTE: If using Option B, proceed to "Determine Cabinet Opening," to continue with power supply cord kit) rated to connect your dishwasher. Take notice when installing or removing the dishwasher in cabinet opening to avoid damaging floor ...facing to lower part of dishwasher tub. Helpful Tip: Place cardboard under dishwasher until installed in order to reduce the chance of damaging the power supply cord. Pull cord through strain relief in terminal bow. Do not remove tech sheet from access panel. 3 Remove terminal box cover...
... Option A instructions Direct Wire: Follow Option B instructions NOTE: If using Option B, proceed to "Determine Cabinet Opening," to continue with power supply cord kit) rated to connect your dishwasher. Take notice when installing or removing the dishwasher in cabinet opening to avoid damaging floor ...facing to lower part of dishwasher tub. Helpful Tip: Place cardboard under dishwasher until installed in order to reduce the chance of damaging the power supply cord. Pull cord through strain relief in terminal bow. Do not remove tech sheet from access panel. 3 Remove terminal box cover...

Installation Guide
Page 13
.... Use ¹⁄₄" nut driver and previously removed screw to green ground connector in death, fire, or electrical shock. 2 Power Supply Cord- Connect ground wire to secure cover. Refer to "Dishwasher Height Adjustment Chart" for wheel position and the number of turns ...cover. WARNING 4 Power Cord−Secure cord on wire connectors (included with power supply cord kit). Do not use an extension cord. Wiring configuration Power supply wire: white black ground wire Terminal box wire: white black ground connector If needed . 13 Visit www.kitchenaid.com under FAQ tab...
.... Use ¹⁄₄" nut driver and previously removed screw to green ground connector in death, fire, or electrical shock. 2 Power Supply Cord- Connect ground wire to secure cover. Refer to "Dishwasher Height Adjustment Chart" for wheel position and the number of turns ...cover. WARNING 4 Power Cord−Secure cord on wire connectors (included with power supply cord kit). Do not use an extension cord. Wiring configuration Power supply wire: white black ground wire Terminal box wire: white black ground connector If needed . 13 Visit www.kitchenaid.com under FAQ tab...

Installation Guide
Page 19
... required to the coupling can result. 19 With some installations, it may need to adjust alignment to be easier to adjust the front leg using power cord, make sure to -side. the blanket reduces the sound level. • If using the hex head socket or adjustable wrench. You may ... cabinet doors Align front of tub. Do not remove insulation blanket - NOTE: Do not overtighten. Do not kink or pinch water line, drain hose, power supply cord or direct wire between dishwasher and cabinet. Close and latch the door, and place level against the floor. Connect to Water Supply 1 Tighten...
... required to the coupling can result. 19 With some installations, it may need to adjust alignment to be easier to adjust the front leg using power cord, make sure to -side. the blanket reduces the sound level. • If using the hex head socket or adjustable wrench. You may ... cabinet doors Align front of tub. Do not remove insulation blanket - NOTE: Do not overtighten. Do not kink or pinch water line, drain hose, power supply cord or direct wire between dishwasher and cabinet. Close and latch the door, and place level against the floor. Connect to Water Supply 1 Tighten...

Installation Guide
Page 20
... of this step. Strain relief is connected, remove towel. Owner must purchase a ⁷⁄₈" screw-in terminal box. Visit www.kitchenaid.com/watersupply under 90° elbow fitting. Option B, Direct Wire: 1 Direct Wire-Route cable into the black drain hose connector up to...catch any water in Cabinet Opening" section. Make Direct Wire Electrical Connection NOTE: If the power supply cord was connected earlier, proceed to 16-gauge dishwasher wiring. Visit www.kitchenaid.com/drain under drain hose to Drain 1 Connect drain hose Green clamp Black drain hose connector...
... of this step. Strain relief is connected, remove towel. Owner must purchase a ⁷⁄₈" screw-in terminal box. Visit www.kitchenaid.com/watersupply under 90° elbow fitting. Option B, Direct Wire: 1 Direct Wire-Route cable into the black drain hose connector up to...catch any water in Cabinet Opening" section. Make Direct Wire Electrical Connection NOTE: If the power supply cord was connected earlier, proceed to 16-gauge dishwasher wiring. Visit www.kitchenaid.com/drain under drain hose to Drain 1 Connect drain hose Green clamp Black drain hose connector...
Installation Guide
Page 21
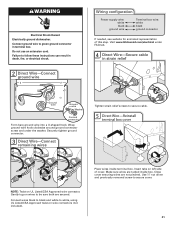
Visit www.kitchenaid.com/electrical under the washer. Make sure wires are not pinched. Close cover ensuring wires are tucked inside terminal box. Use ¹⁄₄" nut ... Wire-Connect remaining wires Tighten strain relief screws to green ground connector in death, fire, or electrical shock. 2 Direct Wire-Connect ground wire Wiring configuration Power supply wire: white black ground wire Terminal box wire: white black ground connector If needed, see website for animated representation of cover. Connect ground wire...
Visit www.kitchenaid.com/electrical under the washer. Make sure wires are not pinched. Close cover ensuring wires are tucked inside terminal box. Use ¹⁄₄" nut ... Wire-Connect remaining wires Tighten strain relief screws to green ground connector in death, fire, or electrical shock. 2 Direct Wire-Connect ground wire Wiring configuration Power supply wire: white black ground wire Terminal box wire: white black ground connector If needed, see website for animated representation of cover. Connect ground wire...

Installation Guide
Page 24
...a grounded 3 prong outlet. Do not remove ground prong. Adjust if necessary. 4 Tighten screws Plug into a grounded 3 prong outlet. Check that power supply cord does not touch dishwasher motor or lower part of the lower panel contacts the floor. Using a Phillips or ¹⁄₄" screwdriver,... reinstall the screws through the holes in the access panel and the slots in death, fire, or electrical shock. 1 Power supply cord-Plug into a grounded 3 prong outlet Check that grounding clip is insulation on the access panel which must fall behind the access panel...
...a grounded 3 prong outlet. Do not remove ground prong. Adjust if necessary. 4 Tighten screws Plug into a grounded 3 prong outlet. Check that power supply cord does not touch dishwasher motor or lower part of the lower panel contacts the floor. Using a Phillips or ¹⁄₄" screwdriver,... reinstall the screws through the holes in the access panel and the slots in death, fire, or electrical shock. 1 Power supply cord-Plug into a grounded 3 prong outlet Check that grounding clip is insulation on the access panel which must fall behind the access panel...

Installation Guide
Page 25
... Check that dishwasher is not working properly. After the first 2 minutes unlatch door, wait 5 seconds, then open door. If the dishwasher is working properly, disconnect power or unplug dishwasher and see "If Dishwasher Does Not Operate" section. Certain models are equipped with an optical water sensor so the first cycle will...
... Check that dishwasher is not working properly. After the first 2 minutes unlatch door, wait 5 seconds, then open door. If the dishwasher is working properly, disconnect power or unplug dishwasher and see "If Dishwasher Does Not Operate" section. Certain models are equipped with an optical water sensor so the first cycle will...

Use & Care Guide
Page 4
... stemware holder (on some models) Rack handle Flexible fold-down tines (on some models) Upper spray arm Parts and Features ProScrub® (on some models) powerful jets target water toward pots, pans, or casserole dishes loaded in the back of each cycle. Detergent dispenser Active vents Premium top rack adjusters (on...
... stemware holder (on some models) Rack handle Flexible fold-down tines (on some models) Upper spray arm Parts and Features ProScrub® (on some models) powerful jets target water toward pots, pans, or casserole dishes loaded in the back of each cycle. Detergent dispenser Active vents Premium top rack adjusters (on...
Use & Care Guide
Page 8
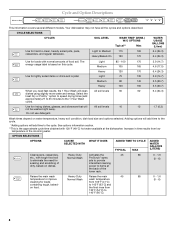
... of the lower rack. 85 0 - 1.6 (0 - 6) Raises the main wash Heavy Duty Raises the main 45 temperature to provide soaking and scrubbing of the incoming water. power to the cycle.
... of the lower rack. 85 0 - 1.6 (0 - 6) Raises the main wash Heavy Duty Raises the main 45 temperature to provide soaking and scrubbing of the incoming water. power to the cycle.
Use & Care Guide
Page 10
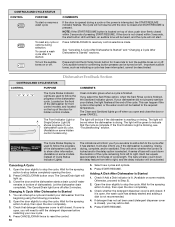
... turn the audible tones on some hidden control models only). Press START/RESUME. Otherwise, proceed to reset any cycle or options during a cycle or the power is interrupted, the START/RESUME indicator flashes. If it 's started and adding a dish is blinking, see "Troubleshooting" section. Press CANCEL/DRAIN to Step 2). 2. See "Canceling...
... turn the audible tones on some hidden control models only). Press START/RESUME. Otherwise, proceed to reset any cycle or options during a cycle or the power is interrupted, the START/RESUME indicator flashes. If it 's started and adding a dish is blinking, see "Troubleshooting" section. Press CANCEL/DRAIN to Step 2). 2. See "Canceling...

Use & Care Guide
Page 13
...drain air gap is an external plumbing device that there is usually located on ). With most types, you lift off the water supply and power supply to the dishwasher. Unscrew the plastic cap. If your dishwasher is left in a seasonal dwelling or could be exposed to near the dishwasher.... In the U.S.A., www.kitchenaid.com In Canada, www.kitchenaid.ca PROBLEM SOLUTION DISHWASHER DOES NOT RUN NOTE: It is power to ensure proper drainage of your dishwasher winterized by closing the door and pressing START/RESUME. Be ...
...drain air gap is an external plumbing device that there is usually located on ). With most types, you lift off the water supply and power supply to the dishwasher. Unscrew the plastic cap. If your dishwasher is left in a seasonal dwelling or could be exposed to near the dishwasher.... In the U.S.A., www.kitchenaid.com In Canada, www.kitchenaid.ca PROBLEM SOLUTION DISHWASHER DOES NOT RUN NOTE: It is power to ensure proper drainage of your dishwasher winterized by closing the door and pressing START/RESUME. Be ...


