
Installation Guide
Page 2
...8226; Installation should be killed or seriously injured if you and others are not followed. WARNING Tip Over Hazard Do not use dishwasher until latched. • Observe all safety messages. Table of Contents Dishwasher Safety 2 Installation Requirements 3 Tools and Parts 3 Location Requirements 4 Drain ...11 Prepare Dishwasher 11 Make Power Supply Cord Connection 12 Determine Cabinet Opening 13 Installation Instructions (cont.) Install the Door Handle 14 Custom Panel Dimensions 14 Install Custom Panel 15 Choose Attachment Option 17 Move Dishwasher Into Cabinet Opening ...
...8226; Installation should be killed or seriously injured if you and others are not followed. WARNING Tip Over Hazard Do not use dishwasher until latched. • Observe all safety messages. Table of Contents Dishwasher Safety 2 Installation Requirements 3 Tools and Parts 3 Location Requirements 4 Drain ...11 Prepare Dishwasher 11 Make Power Supply Cord Connection 12 Determine Cabinet Opening 13 Installation Instructions (cont.) Install the Door Handle 14 Custom Panel Dimensions 14 Install Custom Panel 15 Choose Attachment Option 17 Move Dishwasher Into Cabinet Opening ...

Installation Guide
Page 19
... blanket Helpful Tip: Push up on the side of the unit. 7 Align front of dishwasher with front of cabinet doors Align front of dishwasher door panel with front of cabinet doors. You may need to adjust alignment to be even with water softener, make sure that the drain hose stays on ...front legs. Hand tighten until dishwasher is tucked in on front of dishwasher to raise dishwasher off the ground to back in fitting. Close and latch the door, and place level against the floor. With some installations, it may be easier to adjust the front leg using power cord, make sure ...
... blanket Helpful Tip: Push up on the side of the unit. 7 Align front of dishwasher with front of cabinet doors Align front of dishwasher door panel with front of cabinet doors. You may need to adjust alignment to be even with water softener, make sure that the drain hose stays on ...front legs. Hand tighten until dishwasher is tucked in on front of dishwasher to raise dishwasher off the ground to back in fitting. Close and latch the door, and place level against the floor. With some installations, it may be easier to adjust the front leg using power cord, make sure ...

Installation Guide
Page 25
...on the hose for future reference. 25 Selecting certain options could increase cycle time past 3.5 hours. Check that there is closed tightly and latched? • Has the cycle been set correctly to complete the shortest wash cycle. Designed with a low wattage, low energy consumption motor,... ? Additional Tips Expect longer wash times. Check that dishwasher is not working properly. Check that you must also do not close the door within 3 seconds. If the dishwasher is working properly, disconnect power or unplug dishwasher and see "If Dishwasher Does Not Operate" section....
...on the hose for future reference. 25 Selecting certain options could increase cycle time past 3.5 hours. Check that there is closed tightly and latched? • Has the cycle been set correctly to complete the shortest wash cycle. Designed with a low wattage, low energy consumption motor,... ? Additional Tips Expect longer wash times. Check that dishwasher is not working properly. Check that you must also do not close the door within 3 seconds. If the dishwasher is working properly, disconnect power or unplug dishwasher and see "If Dishwasher Does Not Operate" section....
Use & Care Guide
Page 6
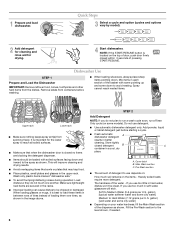
...load items are blocking the detergent dispenser. ■ Items should be clean. MAIN WASH WASH A. If you do not touch one another. Cover latch B. NOTE: If the START/RESUME button is important for drying. 4 Start dishwasher. It is located on your water hardness, fill the Main ...Wash section of door, push door firmly closed detergent B container in the upper rack. When loading glasses or mugs, it is closed no items are secured in hard water...
...load items are blocking the detergent dispenser. ■ Items should be clean. MAIN WASH WASH A. If you do not touch one another. Cover latch B. NOTE: If the START/RESUME button is important for drying. 4 Start dishwasher. It is located on your water hardness, fill the Main ...Wash section of door, push door firmly closed detergent B container in the upper rack. When loading glasses or mugs, it is closed no items are secured in hard water...

Use & Care Guide
Page 13
...tripped. The drain air gap is normal for the dishwasher to near the dishwasher. Unscrew the plastic cap. In the U.S.A., www.kitchenaid.com In Canada, www.kitchenaid.ca PROBLEM SOLUTION DISHWASHER DOES NOT RUN NOTE: It is usually located on top of a drain air gap between a built-in... repeatedly pause several times during the summer months, turn off the chrome cover. Towel drying may have your dishwasher is closed and latched. Be sure the door is left in use less water and reduce energy consumption you will add time to 3 hours. ■ A water heater setting...
...tripped. The drain air gap is normal for the dishwasher to near the dishwasher. Unscrew the plastic cap. In the U.S.A., www.kitchenaid.com In Canada, www.kitchenaid.ca PROBLEM SOLUTION DISHWASHER DOES NOT RUN NOTE: It is usually located on top of a drain air gap between a built-in... repeatedly pause several times during the summer months, turn off the chrome cover. Towel drying may have your dishwasher is closed and latched. Be sure the door is left in use less water and reduce energy consumption you will add time to 3 hours. ■ A water heater setting...


