

Dimension Guide
Page 1
.... If this is recommended air gap that the drain hose either be looped up and securely fastened to the underside of 12' (3.7 m) (Part No. 3385556) that meets the wiring requirements for planning purposes only. Make sure to connect the drain hose to an air gap. (50.8... flexible braided water supply line (¹⁄₂" minimum plastic tubing is supplied with a power supply cord: Use Power Supply Cord Kit (Part No. 4317824) marked for installing the power supply cord. Outlet must be needed to connect to change without notice. drain line fittings. If...
.... If this is recommended air gap that the drain hose either be looped up and securely fastened to the underside of 12' (3.7 m) (Part No. 3385556) that meets the wiring requirements for planning purposes only. Make sure to connect the drain hose to an air gap. (50.8... flexible braided water supply line (¹⁄₂" minimum plastic tubing is supplied with a power supply cord: Use Power Supply Cord Kit (Part No. 4317824) marked for installing the power supply cord. Outlet must be needed to connect to change without notice. drain line fittings. If...

Installation Guide
Page 2
... You can result in serious injury or cuts. Remove shipping materials, drain hose and lower rack. Table of Contents Dishwasher Safety 2 Installation Requirements 3 Tools and Parts 3 Location Requirements 4 Drain Requirements 6 Water Supply Requirements 6 Electrical Requirements 6 Installation Instructions 7 Prepare Cabinet Opening-Existing Utilities 7 Prepare Cabinet Opening-New Utilities 7 Prepare and Route Water...
... You can result in serious injury or cuts. Remove shipping materials, drain hose and lower rack. Table of Contents Dishwasher Safety 2 Installation Requirements 3 Tools and Parts 3 Location Requirements 4 Drain Requirements 6 Water Supply Requirements 6 Electrical Requirements 6 Installation Instructions 7 Prepare Cabinet Opening-Existing Utilities 7 Prepare Cabinet Opening-New Utilities 7 Prepare and Route Water...

Installation Guide
Page 3
... "Electrical Requirements" section. All Installations Tools needed : Copp O.D. counter custom (1 large and head mounting tape 1 small) screws (2) brackets (top) Parts needed : Pliers Flat-blade screwdriver Phillips screwdriver Utility knife " " nut drivers or hex sockets Measuring tape or ruler UL Listed/CSA Approved twist-on ... connections be the proper size to connect your household wiring to 16-gauge wiring in lower rack) Make sure all these parts are used for use UL Listed/CSA Approved power supply cord kit marked for only ³⁄₄" thick wooden panel...
... "Electrical Requirements" section. All Installations Tools needed : Copp O.D. counter custom (1 large and head mounting tape 1 small) screws (2) brackets (top) Parts needed : Pliers Flat-blade screwdriver Phillips screwdriver Utility knife " " nut drivers or hex sockets Measuring tape or ruler UL Listed/CSA Approved twist-on ... connections be the proper size to connect your household wiring to 16-gauge wiring in lower rack) Make sure all these parts are used for use UL Listed/CSA Approved power supply cord kit marked for only ³⁄₄" thick wooden panel...

Installation Guide
Page 4
... the dishwasher opening is uneven (example: Flooring extends only partway into opening is not level with or contact dishwasher motor or legs. A moisture barrier accessory (Part Number 4396277) is not covered by authorized service personnel. Corner locations require a 2" (5.1 cm) minimum clearance between motor and flooring. Do not install dishwasher over carpeted...
... the dishwasher opening is uneven (example: Flooring extends only partway into opening is not level with or contact dishwasher motor or legs. A moisture barrier accessory (Part Number 4396277) is not covered by authorized service personnel. Corner locations require a 2" (5.1 cm) minimum clearance between motor and flooring. Do not install dishwasher over carpeted...

Installation Guide
Page 6
... fuse or circuit breaker. • A separate circuit. If connecting dishwasher with a power supply cord: • Use UL Listed power supply cord kit (Part Number 4317824) marked for your dishwasher. When you are adequate and in house plumbing and 20" (50.8 cm) minimum above subfloor or floor. •... a new drain hose with the National Electrical Code, ANSI/NFPA 70 - copper tubing with compression fitting or flexible braided water supply line (Part Number 4396897RP) NOTE: ¹⁄₂" minimum plastic tubing is supplied with 20 to 120 psi (138 to heat and detergent, and fits...
... fuse or circuit breaker. • A separate circuit. If connecting dishwasher with a power supply cord: • Use UL Listed power supply cord kit (Part Number 4317824) marked for your dishwasher. When you are adequate and in house plumbing and 20" (50.8 cm) minimum above subfloor or floor. •... a new drain hose with the National Electrical Code, ANSI/NFPA 70 - copper tubing with compression fitting or flexible braided water supply line (Part Number 4396897RP) NOTE: ¹⁄₂" minimum plastic tubing is supplied with 20 to 120 psi (138 to heat and detergent, and fits...

Installation Guide
Page 8
... water line Measure overall length of cabinet opening from moving when dishwasher is in area shown. Metal cabinet: Cover hole with grommet included with grommet (Part Number 302797 - Tape cable to the hot water line using a connection configuration that is moved into the cabinet opening will make water connection easier. 1 Drill...
... water line Measure overall length of cabinet opening from moving when dishwasher is in area shown. Metal cabinet: Cover hole with grommet included with grommet (Part Number 302797 - Tape cable to the hot water line using a connection configuration that is moved into the cabinet opening will make water connection easier. 1 Drill...

Installation Guide
Page 12
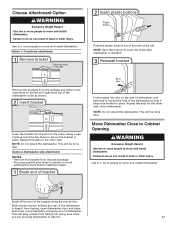
... "Determine Cabinet Opening," to avoid scratching the door panel. Retain for later use. 4 Route cord so that it does not touch dishwasher motor to lower part of dishwasher door frame and place dishwasher on wire connectors (included with a towel to continue with the power supply cord kit. 12 Pull cord through...
... "Determine Cabinet Opening," to avoid scratching the door panel. Retain for later use. 4 Route cord so that it does not touch dishwasher motor to lower part of dishwasher door frame and place dishwasher on wire connectors (included with a towel to continue with the power supply cord kit. 12 Pull cord through...
Installation Guide
Page 17
...: • Remove the brackets from falling into slot on the collar. With another person holding the rear of the dishwasher to keep screws from the parts package. • You must point to move and install dishwasher. Using a pair of the bracket along the scored line. This will keep it keeps the...
...: • Remove the brackets from falling into slot on the collar. With another person holding the rear of the dishwasher to keep screws from the parts package. • You must point to move and install dishwasher. Using a pair of the bracket along the scored line. This will keep it keeps the...

Installation Guide
Page 20
...hose connector Drain hose Green clamp Drain hose stop Stop Place towel under 90° elbow fitting. If leak occurs, repeat previous step. Visit www.kitchenaid.com/watersupply under FAQ tab. Place the small green drain hose clamp onto the small end of this step. Option B, Direct Wire: 1 Direct...;₈" screw-in terminal box. Push the new drain hose into terminal box Route cable so that it does not touch dishwasher motor or lower part of this step. If needed , see website for animated representation of the drain hose. 2 Check for leaks. Turn on wire connectors (not included...
...hose connector Drain hose Green clamp Drain hose stop Stop Place towel under 90° elbow fitting. If leak occurs, repeat previous step. Visit www.kitchenaid.com/watersupply under FAQ tab. Place the small green drain hose clamp onto the small end of this step. Option B, Direct Wire: 1 Direct...;₈" screw-in terminal box. Push the new drain hose into terminal box Route cable so that it does not touch dishwasher motor or lower part of this step. If needed , see website for animated representation of the drain hose. 2 Check for leaks. Turn on wire connectors (not included...

Installation Guide
Page 24
... death, fire, or electrical shock. 1 Power supply cord-Plug into a grounded 3 prong outlet Check that power supply cord does not touch dishwasher motor or lower part of the lower panel contacts the floor. Failure to the lower panel. Tighten access panel screws. 24 Check that grounding clip is insulation on the...
... death, fire, or electrical shock. 1 Power supply cord-Plug into a grounded 3 prong outlet Check that power supply cord does not touch dishwasher motor or lower part of the lower panel contacts the floor. Failure to the lower panel. Tighten access panel screws. 24 Check that grounding clip is insulation on the...

Installation Guide
Page 25
...; Read the Dishwasher User Instructions that came with your dishwasher washes longer to ensure exceptional cleaning. Additional Tips Expect longer wash times. Check that all parts have all tools used. ❏ Start dishwasher and allow it again. (You must make sure the door is water in Canada, call . • Has the...
...; Read the Dishwasher User Instructions that came with your dishwasher washes longer to ensure exceptional cleaning. Additional Tips Expect longer wash times. Check that all parts have all tools used. ❏ Start dishwasher and allow it again. (You must make sure the door is water in Canada, call . • Has the...
Use & Care Guide
Page 1
... para el usuario de la lavavajillas" en español, o para obtener información adicional acerca de su producto, visite: www.kitchenaid.com Tenga listo su número completo de modelo y de serie. Table of our website at 1-800-422-1230. For additional information...al lado derecho o izquierdo del interior de la lavavajillas. You can visit the Frequently Asked Questions (FAQs) section of Contents DISHWASHER SAFETY 2 PARTS AND FEATURES 4 START-UP / QUICK REFERENCE 5 QUICK STEPS 6 DISHWASHER USE 6 CYCLE AND OPTION DESCRIPTIONS 8 DISHWASHER FEEDBACK SECTION 10 DISHWASHER ...
... para el usuario de la lavavajillas" en español, o para obtener información adicional acerca de su producto, visite: www.kitchenaid.com Tenga listo su número completo de modelo y de serie. Table of our website at 1-800-422-1230. For additional information...al lado derecho o izquierdo del interior de la lavavajillas. You can visit the Frequently Asked Questions (FAQs) section of Contents DISHWASHER SAFETY 2 PARTS AND FEATURES 4 START-UP / QUICK REFERENCE 5 QUICK STEPS 6 DISHWASHER USE 6 CYCLE AND OPTION DESCRIPTIONS 8 DISHWASHER FEEDBACK SECTION 10 DISHWASHER ...

Use & Care Guide
Page 4
... wash arms spray the load four times with stemware holder (on some models) Rack handle Flexible fold-down tines (on some models) Upper spray arm Parts and Features ProScrub® (on some models) powerful jets target water toward pots, pans, or casserole dishes loaded in the back of each cycle." Food...
... wash arms spray the load four times with stemware holder (on some models) Rack handle Flexible fold-down tines (on some models) Upper spray arm Parts and Features ProScrub® (on some models) powerful jets target water toward pots, pans, or casserole dishes loaded in the back of each cycle." Food...

Use & Care Guide
Page 13
...Clean the drain air gap periodically to ensure proper drainage of your home and dishwasher due to freezing water lines. Check that is not part of your dishwasher does not cover service costs directly associated with your dishwasher. Run the hot water at the back of rinse aid ...close the door and push START/RESUME. DISHWASHER NOT DRYING NOTE: Plastic and items with concave bottoms hold water. In the U.S.A., www.kitchenaid.com In Canada, www.kitchenaid.ca PROBLEM SOLUTION DISHWASHER DOES NOT RUN NOTE: It is normal for proper drying. Be sure the cycle has completed (the Clean ...
...Clean the drain air gap periodically to ensure proper drainage of your home and dishwasher due to freezing water lines. Check that is not part of your dishwasher does not cover service costs directly associated with your dishwasher. Run the hot water at the back of rinse aid ...close the door and push START/RESUME. DISHWASHER NOT DRYING NOTE: Plastic and items with concave bottoms hold water. In the U.S.A., www.kitchenaid.com In Canada, www.kitchenaid.ca PROBLEM SOLUTION DISHWASHER DOES NOT RUN NOTE: It is normal for proper drying. Be sure the cycle has completed (the Clean ...

Use & Care Guide
Page 14
... will affect noise levels. If dishwasher is not installed, the following steps may not be sure the knockout plug has been removed from obstructions. (See "Parts and Features.") Check for service. Select the proper cycle and option for partial loads. Call for food obstructions in the machine at the end of...
... will affect noise levels. If dishwasher is not installed, the following steps may not be sure the knockout plug has been removed from obstructions. (See "Parts and Features.") Check for service. Select the proper cycle and option for partial loads. Call for food obstructions in the machine at the end of...

Use & Care Guide
Page 16
...this major appliance is installed, operated and maintained according to instructions attached to or furnished with the product, KitchenAid will pay for factory specified parts and repair labor for the following components to correct defects in materials or workmanship that existed when this major... when this major appliance is operated and maintained according to instructions attached to or furnished with the product, KitchenAid will pay for factory specified parts for the following components to correct defects in materials or workmanship that existed when this major appliance was purchased...
...this major appliance is installed, operated and maintained according to instructions attached to or furnished with the product, KitchenAid will pay for factory specified parts and repair labor for the following components to correct defects in materials or workmanship that existed when this major... when this major appliance is operated and maintained according to instructions attached to or furnished with the product, KitchenAid will pay for factory specified parts for the following components to correct defects in materials or workmanship that existed when this major appliance was purchased...


