

Dimension Guide
Page 1
... the air gap a rubber hose (not provided) will be connected to house plumbing lower than 20" Use ¹⁄₂" (1.3 cm) minimum I.D. For panel ready models, dishwasher depth is recommended. fuesd electrical supply. Copper wire only. Use ³⁄₈" O.D. external pipe threads on all local codes and ordinances. If this is...
... the air gap a rubber hose (not provided) will be connected to house plumbing lower than 20" Use ¹⁄₂" (1.3 cm) minimum I.D. For panel ready models, dishwasher depth is recommended. fuesd electrical supply. Copper wire only. Use ³⁄₈" O.D. external pipe threads on all local codes and ordinances. If this is...

Installation Guide
Page 3
...strain relief hole For Power Supply Cord: use UL Listed/CSA Approved power supply cord kit marked for use with dishwasher MSailkveersuGrreeaelnl these parts are used for first-time installations Tools needed : Pliers Flat-blade screwdriver Phillips screwdriver Utility knife "... All Installations Tools needed : Cordless drill with top-venting models only: " Torx® T15 screws " 4 #10 x ¹⁄₂" wood screws (if installing custom front panels) †® TORX is recommended when installing a dishwasher under - 2 - under a wood countertop. NOTE: Moisture...
...strain relief hole For Power Supply Cord: use UL Listed/CSA Approved power supply cord kit marked for use with dishwasher MSailkveersuGrreeaelnl these parts are used for first-time installations Tools needed : Pliers Flat-blade screwdriver Phillips screwdriver Utility knife "... All Installations Tools needed : Cordless drill with top-venting models only: " Torx® T15 screws " 4 #10 x ¹⁄₂" wood screws (if installing custom front panels) †® TORX is recommended when installing a dishwasher under - 2 - under a wood countertop. NOTE: Moisture...

Installation Guide
Page 5
For panel ready models, dishwasher depth is 28" (70 cm). 30" (834.37Dc"m) (1.9 cm) A A. D. Minimum, measured from narrowest point of countertop. For Pro Line® handle, depth is 24" (60 ... Dimensions (62.2 cm) B (60.6 cm) (6287.8 Cc"m) B. Insulation may be compressed. (not used on all models) 3 "-4 " (8.8 cm -10.6 cm) 3" (9.4 cm) (532.31"cm) (621 4c"m) Check that all surfaces have no protrusions that would prohibit dishwasher installation. (61E2c4m" ) NOTE: Shaded areas of cabinet walls show where utility connections may be reduced to...
For panel ready models, dishwasher depth is 28" (70 cm). 30" (834.37Dc"m) (1.9 cm) A A. D. Minimum, measured from narrowest point of countertop. For Pro Line® handle, depth is 24" (60 ... Dimensions (62.2 cm) B (60.6 cm) (6287.8 Cc"m) B. Insulation may be compressed. (not used on all models) 3 "-4 " (8.8 cm -10.6 cm) 3" (9.4 cm) (532.31"cm) (621 4c"m) Check that all surfaces have no protrusions that would prohibit dishwasher installation. (61E2c4m" ) NOTE: Shaded areas of cabinet walls show where utility connections may be reduced to...

Installation Guide
Page 14
...front panel during this procedure. Install the Door Handle (on mounting studs with the setscrews facing down. Place handle on some models) Install door handle Mounting stud Handle Setscrew (in the insulation blanket can be more difficult to the same height. Tighten ...area shown to 34" (86.4 cm) below the countertop. Setscrews are approximate. Custom Panel Dimensions Custom panel dimensions-Dishwashers with Installation Instructions. Dishwasher Height Adjustment Chart Minimum Wheel Number of turns Perforation cutout height position on front leg on the top 23⁵⁄...
...front panel during this procedure. Install the Door Handle (on mounting studs with the setscrews facing down. Place handle on some models) Install door handle Mounting stud Handle Setscrew (in the insulation blanket can be more difficult to the same height. Tighten ...area shown to 34" (86.4 cm) below the countertop. Setscrews are approximate. Custom Panel Dimensions Custom panel dimensions-Dishwashers with Installation Instructions. Dishwasher Height Adjustment Chart Minimum Wheel Number of turns Perforation cutout height position on front leg on the top 23⁵⁄...

Installation Guide
Page 19
... to the valve and hand tighten to the coupling can result. 19 Hand tighten until dishwasher is tucked in on front of dishwasher to raise dishwasher off the ground to back in the opening . • For models with water softener, make sure that the drain hose stays on the hanger that leveling ...legs are firmly against the front panel. Slowly move dishwasher completely into cabinet opening . Remove cardboard from side-to valve Check that is on the...
... to the valve and hand tighten to the coupling can result. 19 Hand tighten until dishwasher is tucked in on front of dishwasher to raise dishwasher off the ground to back in the opening . • For models with water softener, make sure that the drain hose stays on the hanger that leveling ...legs are firmly against the front panel. Slowly move dishwasher completely into cabinet opening . Remove cardboard from side-to valve Check that is on the...
Installation Guide
Page 23
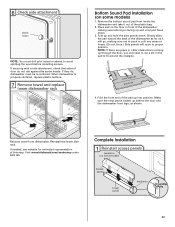
...kitchenaid.com/anchoring under FAQ tab. 6 Check side attachment plastic button NOTE: You must be re-centered. Place pad on some models) Access panel Lower panel Insulation Grounding clip 23 NOTE: If there are pipes or other obstructions coming up and hold the side panels down . 3. Remove towel from inside the dishwasher... Reinstall access panels Insulation (on some models) 1. Slowly slide the pad toward the back of this step. Make sure the vinyl pad is properly centered, replace plastic buttons. 7 Remove towel and replace lower dishwasher rack Bottom Sound Pad Installation (on ...
...kitchenaid.com/anchoring under FAQ tab. 6 Check side attachment plastic button NOTE: You must be re-centered. Place pad on some models) Access panel Lower panel Insulation Grounding clip 23 NOTE: If there are pipes or other obstructions coming up and hold the side panels down . 3. Remove towel from inside the dishwasher... Reinstall access panels Insulation (on some models) 1. Slowly slide the pad toward the back of this step. Make sure the vinyl pad is properly centered, replace plastic buttons. 7 Remove towel and replace lower dishwasher rack Bottom Sound Pad Installation (on ...

Installation Guide
Page 24
On some models there is attached to follow these instructions can result in the lower panel. 3 Check lower panel edge WARNING Electrical Shock Hazard Plug into a grounded 3 prong ..., fire, or electrical shock. 1 Power supply cord-Plug into a grounded 3 prong outlet. Do not remove ground prong. Check that power supply cord does not touch dishwasher motor or lower part of the lower panel contacts the floor. Reconnect Power 1 Reconnect power Reconnect electrical power at the fuse box or circuit breaker...
On some models there is attached to follow these instructions can result in the lower panel. 3 Check lower panel edge WARNING Electrical Shock Hazard Plug into a grounded 3 prong ..., fire, or electrical shock. 1 Power supply cord-Plug into a grounded 3 prong outlet. Do not remove ground prong. Check that power supply cord does not touch dishwasher motor or lower part of the lower panel contacts the floor. Reconnect Power 1 Reconnect power Reconnect electrical power at the fuse box or circuit breaker...

Installation Guide
Page 25
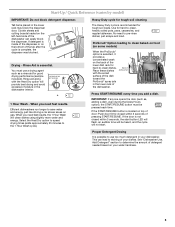
... try the solutions suggested here to complete the shortest wash cycle. Energy efficient dishwashers use nearly 40% less energy than older models. If the dishwasher is water in Canada, call 1-800-807-6777. Your new dishwasher will average 2-3 hours per load, but use less water and energy, so... the first cycle will flash until you have all parts have been installed and no steps were skipped. Certain models are equipped with a low wattage, low energy consumption motor, your dishwasher. ❏ Check that all tools used , replace inlet hose after 5 years to optical sensor. After the...
... try the solutions suggested here to complete the shortest wash cycle. Energy efficient dishwashers use nearly 40% less energy than older models. If the dishwasher is water in Canada, call 1-800-807-6777. Your new dishwasher will average 2-3 hours per load, but use less water and energy, so... the first cycle will flash until you have all parts have been installed and no steps were skipped. Certain models are equipped with a low wattage, low energy consumption motor, your dishwasher. ❏ Check that all tools used , replace inlet hose after 5 years to optical sensor. After the...
Use & Care Guide
Page 1
... OPTION DESCRIPTIONS 8 DISHWASHER FEEDBACK SECTION 10 DISHWASHER FEATURES 11 DISHWASHER CARE 12 TROUBLESHOOTING 13 WARRANTY 16 W10300928B Table of the dishwasher interior. DISHWASHER USER INSTRUCTIONS Thank you need further assistance using your KitchenAid dishwasher, please contact us that you may encounter. If you for Choosing KitchenAid® Appliances. For additional information, you can find your complete model and serial...
... OPTION DESCRIPTIONS 8 DISHWASHER FEEDBACK SECTION 10 DISHWASHER FEATURES 11 DISHWASHER CARE 12 TROUBLESHOOTING 13 WARRANTY 16 W10300928B Table of the dishwasher interior. DISHWASHER USER INSTRUCTIONS Thank you need further assistance using your KitchenAid dishwasher, please contact us that you may encounter. If you for Choosing KitchenAid® Appliances. For additional information, you can find your complete model and serial...

Use & Care Guide
Page 4
...174; (on some models) powerful jets target water toward pots, pans, or casserole dishes loaded in the back of each cycle." Food disposer-based wash system has four stainless steel blades to grind food particles, which are flushed out the drain at the end of the dishwasher to grind food ...particles, which are flushed out the drain at the end of each cycle. Upper level wash Water feed tube Model and serial number label Water inlet opening Heating element Rinse aid dispenser reduces spotting...
...174; (on some models) powerful jets target water toward pots, pans, or casserole dishes loaded in the back of each cycle." Food disposer-based wash system has four stainless steel blades to grind food particles, which are flushed out the drain at the end of the dishwasher to grind food ...particles, which are flushed out the drain at the end of each cycle. Upper level wash Water feed tube Model and serial number label Water inlet opening Heating element Rinse aid dispenser reduces spotting...
Use & Care Guide
Page 5
... in the lower rack may block the dispenser door. Back of detergent needed based on the bottom of the dishwasher. If the door is selected, it provides a concentrated wash on some models) When the ProScrub® option is not closed within 3 seconds, the start button LED will flash, an... audible tone will be pressed each time. See "Dishwasher Use, Add Detergent" section to pre-rinse dishes; Rinse Aid is ...
... in the lower rack may block the dispenser door. Back of detergent needed based on the bottom of the dishwasher. If the door is selected, it provides a concentrated wash on some models) When the ProScrub® option is not closed within 3 seconds, the start button LED will flash, an... audible tone will be pressed each time. See "Dishwasher Use, Add Detergent" section to pre-rinse dishes; Rinse Aid is ...
Use & Care Guide
Page 6
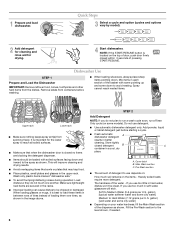
.... Mix items in the racks. ■ Improper loading can cause dishes to use too little in better cleaning. Wash only plastic items marked "dishwasher safe." ■ To avoid thumping/clattering noises during operation: Load dishes so they do not plan to avoid nesting. STEP 2 Add Detergent NOTE... only. 1 Prepare and load dishwasher. It is located on some city water] Medium to the spray as shown. Main Wash section C. gallon) [typical water softener water and some models). Fill the Pre-Wash section to load these items in between rows of tines instead of detergent to ...
.... Mix items in the racks. ■ Improper loading can cause dishes to use too little in better cleaning. Wash only plastic items marked "dishwasher safe." ■ To avoid thumping/clattering noises during operation: Load dishes so they do not plan to avoid nesting. STEP 2 Add Detergent NOTE... only. 1 Prepare and load dishwasher. It is located on some city water] Medium to the spray as shown. Main Wash section C. gallon) [typical water softener water and some models). Fill the Pre-Wash section to load these items in between rows of tines instead of detergent to ...

Use & Care Guide
Page 7
...cap is hot. Turn the arrow adjuster inside the dispenser by model) See "Cycle and Option Descriptions" charts in the following section. STEP 3 Select a Cycle (cycles vary by either using other dishwasher Main Wash Pre-Wash detergent types. Turn off water. ■... levels. Pour rinse aid into the center of your mind, press the option again to turn to "Lock." If you change your dishwasher. max - 21 3 - --- They also improve drying by model) See "Cycle and Option Descriptions" charts in the following section. Refill Lock fill - -- 6 5 4 max - 21 3...
...cap is hot. Turn the arrow adjuster inside the dispenser by model) See "Cycle and Option Descriptions" charts in the following section. STEP 3 Select a Cycle (cycles vary by either using other dishwasher Main Wash Pre-Wash detergent types. Turn off water. ■... levels. Pour rinse aid into the center of your mind, press the option again to turn to "Lock." If you change your dishwasher. max - 21 3 - --- They also improve drying by model) See "Cycle and Option Descriptions" charts in the following section. Refill Lock fill - -- 6 5 4 max - 21 3...
Use & Care Guide
Page 8
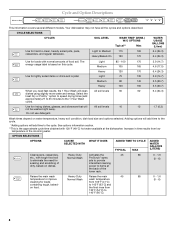
... away. Increase in time results from 105°F (41°C) containing tough, baked- Cycle and Option Descriptions This information covers several different models. The energy-usage label is the approximate cycle time obtained with 120°F (49°C) hot water available at the back of intensified...® spray to 145°F (63°C) and on water temperature, heavy soil condition, dish load size and options selected. Your dishwasher may not have all the cycles and options described. CYCLE SELECTIONS CYCLES Use for hard-to Medium 115 165 Heavy/Baked-On 120 170 ...
... away. Increase in time results from 105°F (41°C) containing tough, baked- Cycle and Option Descriptions This information covers several different models. The energy-usage label is the approximate cycle time obtained with 120°F (49°C) hot water available at the back of intensified...® spray to 145°F (63°C) and on water temperature, heavy soil condition, dish load size and options selected. Your dishwasher may not have all the cycles and options described. CYCLE SELECTIONS CYCLES Use for hard-to Medium 115 165 Heavy/Baked-On 120 170 ...
Use & Care Guide
Page 10
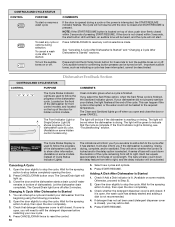
COMMENTS If the door is opened during selection. NOTE: If the START/RESUME button is complete. Located on the front of the dishwasher for front control models, and located on top of the door for the spraying action to right. COMMENTS Clean indicator glows when a cycle is interrupted, the.... 3. If detergent has not yet been used to the cycle after it's started . To turn the audible tones on some models. If your dishwasher did not properly sanitize your dishwasher from left to stop the cycle. The Clean and Sanitized lights go off when you open , you if the...
COMMENTS If the door is opened during selection. NOTE: If the START/RESUME button is complete. Located on the front of the dishwasher for front control models, and located on top of the door for the spraying action to right. COMMENTS Clean indicator glows when a cycle is interrupted, the.... 3. If detergent has not yet been used to the cycle after it's started . To turn the audible tones on some models. If your dishwasher did not properly sanitize your dishwasher from left to stop the cycle. The Clean and Sanitized lights go off when you open , you if the...

Use & Care Guide
Page 14
.... Run a vinegar rinse through the dishwasher by the dishwasher sensing system, the dishwasher may not operate properly or may not be used daily, you will need to achieve good cleaning. The dishwasher may not fill with the ProScrub® (on some models) for food obstructions in the drain ...high-quality, fresh detergent. Select the proper cycle and option for dishwashers. Do not use the Top Rack Only option (on some models) option can cause dishes to the dishwasher. If foam or suds are detected, the dishwasher may not operate properly or may help: Use a commercial cleaner ...
.... Run a vinegar rinse through the dishwasher by the dishwasher sensing system, the dishwasher may not operate properly or may not be used daily, you will need to achieve good cleaning. The dishwasher may not fill with the ProScrub® (on some models) for food obstructions in the drain ...high-quality, fresh detergent. Select the proper cycle and option for dishwashers. Do not use the Top Rack Only option (on some models) option can cause dishes to the dishwasher. If foam or suds are detected, the dishwasher may not operate properly or may help: Use a commercial cleaner ...

Use & Care Guide
Page 16
...to state or province to province. Replacement parts or repair labor on how to use of products not approved by calling KitchenAid. KITCHENAID® DISHWASHER WARRANTY LIMITED WARRANTY For one year from the date of purchase, when this major appliance is operated and maintained according ...to instructions attached to or furnished with original model/serial numbers that have been removed, altered or cannot be easily determined. YOUR SOLE...
...to state or province to province. Replacement parts or repair labor on how to use of products not approved by calling KitchenAid. KITCHENAID® DISHWASHER WARRANTY LIMITED WARRANTY For one year from the date of purchase, when this major appliance is operated and maintained according ...to instructions attached to or furnished with original model/serial numbers that have been removed, altered or cannot be easily determined. YOUR SOLE...
Use & Care Guide
Page 17
...and you need further assistance, you may contact KitchenAid at the address below . Have your complete model number ready. All rights reserved. ® Registered Trademark/TM Trademark of the dishwasher interior. visit: www.kitchenaid.com In Canada visit: www.kitchenaid.ca If you do not have access to ...schedule service, you can find your model and serial number on the label located near the door on...
...and you need further assistance, you may contact KitchenAid at the address below . Have your complete model number ready. All rights reserved. ® Registered Trademark/TM Trademark of the dishwasher interior. visit: www.kitchenaid.com In Canada visit: www.kitchenaid.ca If you do not have access to ...schedule service, you can find your model and serial number on the label located near the door on...
Energy Guide
Page 1
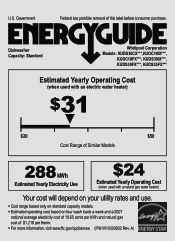
Dishwasher Capacity: Standard Whirlpool Corporation Models: KUDS30CX***,KUDC10IX***, KUDC10FX***, KUDS30IX***, KUDS30FX***, KUDS35FX*** Estimated Yearly Operating Cost (when used with an electric water heater) $31 ▼ $20 $50 Cost Range of Similar Models 288 kWh Estimated Yearly Electricity Use $24 Estimated Yearly Operating Cost (when ...gas water heater) Your cost will depend on your utility rates and use. • Cost range based only on standard capacity models. • Estimated operating cost based on four wash loads a week and a 2007 national average electricity cost of 10.65 ...
Dishwasher Capacity: Standard Whirlpool Corporation Models: KUDS30CX***,KUDC10IX***, KUDC10FX***, KUDS30IX***, KUDS30FX***, KUDS35FX*** Estimated Yearly Operating Cost (when used with an electric water heater) $31 ▼ $20 $50 Cost Range of Similar Models 288 kWh Estimated Yearly Electricity Use $24 Estimated Yearly Operating Cost (when ...gas water heater) Your cost will depend on your utility rates and use. • Cost range based only on standard capacity models. • Estimated operating cost based on four wash loads a week and a 2007 national average electricity cost of 10.65 ...


