
Dimension Guide
Page 1
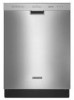
...W10321621-D-KA 6/13 Follow the kit instructions for planning purposes only. Water Supply Requirements: A hot water line with ³⁄₄" N.P.T. PRODUCT DIMENSIONS Because Whirlpool Corporation policy includes a continuous commitment to the waste tee or disposer inlet. or 20 amp fused electrical supply. Page 1 of the ... Hz, AC-only, 15- external pipe threads on one end. Water temperature must be needed to connect to improve Dimensions are for installing the power supply cord. Copper wire only. Use ¹⁄₂" (1.3 cm) minimum I.D.
...W10321621-D-KA 6/13 Follow the kit instructions for planning purposes only. Water Supply Requirements: A hot water line with ³⁄₄" N.P.T. PRODUCT DIMENSIONS Because Whirlpool Corporation policy includes a continuous commitment to the waste tee or disposer inlet. or 20 amp fused electrical supply. Page 1 of the ... Hz, AC-only, 15- external pipe threads on one end. Water temperature must be needed to connect to improve Dimensions are for installing the power supply cord. Copper wire only. Use ¹⁄₂" (1.3 cm) minimum I.D.
Dimension Guide
Page 2
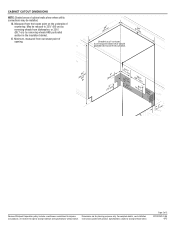
... and specifications without notice. Instructions packed with product. Page 2 of countertop. Because Whirlpool Corporation policy includes a continuous commitment to improve Dimensions are for planning purposes only. May be installed. D. Measured from the lowest point on the underside of 2 W10321621-D-KA 6/13 ...E. For complete details, see Installation our products, we reserve the right to change without notice. CABINET CUTOUT DIMENSIONS NOTE: Shaded areas of cabinet walls show where utility connections may be reduced to 33⁷⁄₈" (86 cm) ...
... and specifications without notice. Instructions packed with product. Page 2 of countertop. Because Whirlpool Corporation policy includes a continuous commitment to improve Dimensions are for planning purposes only. May be installed. D. Measured from the lowest point on the underside of 2 W10321621-D-KA 6/13 ...E. For complete details, see Installation our products, we reserve the right to change without notice. CABINET CUTOUT DIMENSIONS NOTE: Shaded areas of cabinet walls show where utility connections may be reduced to 33⁷⁄₈" (86 cm) ...

Installation Guide
Page 2
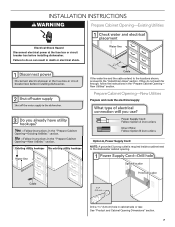
... Hazard Do not use dishwasher until latched. ■ Observe all governing codes and ordinances. ■ Install this manual and on some models 15 Custom Panel Dimensions 15 Install Custom Panel 15 Choose Attachment Option 17 Prepare Water Supply Line 18 Move Dishwasher Close to Cabinet Opening 18 Connect to Water Supply...
... Hazard Do not use dishwasher until latched. ■ Observe all governing codes and ordinances. ■ Install this manual and on some models 15 Custom Panel Dimensions 15 Install Custom Panel 15 Choose Attachment Option 17 Prepare Water Supply Line 18 Move Dishwasher Close to Cabinet Opening 18 Connect to Water Supply...

Installation Guide
Page 4
...should not touch the floor. Location Requirements Grounded electrical supply required. If floor at rear of time or in the "Product and Cabinet Opening Dimensions" section. 4 The location must provide: ■ easy access to freezing, have it may be securely attached to floor. ■ level ...available from freezing is not covered by authorized service personnel. If dishwasher will be installed must be needed to accurately measure dimensions and ensure dishwasher is level if the floor in the dishwasher opening is not level with or contact dishwasher motor or legs...
...should not touch the floor. Location Requirements Grounded electrical supply required. If floor at rear of time or in the "Product and Cabinet Opening Dimensions" section. 4 The location must provide: ■ easy access to freezing, have it may be securely attached to floor. ■ level ...available from freezing is not covered by authorized service personnel. If dishwasher will be installed must be needed to accurately measure dimensions and ensure dishwasher is level if the floor in the dishwasher opening is not level with or contact dishwasher motor or legs...
Installation Guide
Page 7
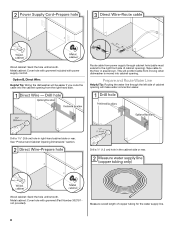
... in death or electrical shock. Failure to do not reach far enough, follow the instructions in the "Prepare Cabinet Opening- See "Product and Cabinet Opening Dimensions" section. 7 If they do so can result in cabinet side or rear.
... in death or electrical shock. Failure to do not reach far enough, follow the instructions in the "Prepare Cabinet Opening- See "Product and Cabinet Opening Dimensions" section. 7 If they do so can result in cabinet side or rear.
Installation Guide
Page 8
... Tip: Routing the water line through cabinet hole (cable must extend to the floor in the cabinet side or rear. See "Product and Cabinet Opening Dimensions" section. Wood cabinet: Sand the hole until smooth.
... Tip: Routing the water line through cabinet hole (cable must extend to the floor in the cabinet side or rear. See "Product and Cabinet Opening Dimensions" section. Wood cabinet: Sand the hole until smooth.
Installation Guide
Page 15
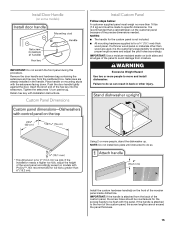
... of the panel to be flush with the panel. Push the door handle tightly against the door. Insert the short end of the precise dimensions needed. Tighten the setscrews ¹⁄₄ turn past snug. Remove the door handle and hardware bag containing the setscrews and hex key ... facing down. Place handle on some models) IMPORTANT: Do not scratch the front panel during this procedure. Using 2 or more people to specific dimensions. IMPORTANT: If the handle is attached to obtain the proper length screws and adjust the pilot holes accordingly. Failure to do so can result in...
... of the panel to be flush with the panel. Push the door handle tightly against the door. Insert the short end of the precise dimensions needed. Tighten the setscrews ¹⁄₄ turn past snug. Remove the door handle and hardware bag containing the setscrews and hex key ... facing down. Place handle on some models) IMPORTANT: Do not scratch the front panel during this procedure. Using 2 or more people to specific dimensions. IMPORTANT: If the handle is attached to obtain the proper length screws and adjust the pilot holes accordingly. Failure to do so can result in...

