
Dimension Guide
Page 1
If direct wiring dishwasher: Use flexible, armored or nonmetallic, sheathed copper wire with a maximum length of 12' (3.7 m) (Part Number 3385556) that meets all local codes and ordinances. Use ³⁄₈" O.D. external pipe threads on one end. If this is recommended ...or be 120°F (49°C) water at dishwasher. Copper wire only. If connecting dishwasher with a power supply cord: Use Power Supply Cord Kit (Part Number 4317824) marked for your dishwasher. Water temperature must be connected to the waste tee or disposer inlet. Use a 90° elbow with 20 to...
If direct wiring dishwasher: Use flexible, armored or nonmetallic, sheathed copper wire with a maximum length of 12' (3.7 m) (Part Number 3385556) that meets all local codes and ordinances. Use ³⁄₈" O.D. external pipe threads on one end. If this is recommended ...or be 120°F (49°C) water at dishwasher. Copper wire only. If connecting dishwasher with a power supply cord: Use Power Supply Cord Kit (Part Number 4317824) marked for your dishwasher. Water temperature must be connected to the waste tee or disposer inlet. Use a 90° elbow with 20 to...

Installation Guide
Page 2
... can kill or hurt you and others are not followed. Close dishwasher door until completely installed. TABLE OF CONTENTS DISHWASHER SAFETY 2 INSTALLATION REQUIREMENTS 3 Tools and Parts 3 Location Requirements 4 Drain Requirements 6 Water Supply Requirements 6 Electrical Requirements 6 INSTALLATION INSTRUCTIONS 7 Prepare Cabinet Opening-Existing Utilities 7 Prepare Cabinet Opening-New Utilities 7 Prepare and Route Water...
... can kill or hurt you and others are not followed. Close dishwasher door until completely installed. TABLE OF CONTENTS DISHWASHER SAFETY 2 INSTALLATION REQUIREMENTS 3 Tools and Parts 3 Location Requirements 4 Drain Requirements 6 Water Supply Requirements 6 Electrical Requirements 6 INSTALLATION INSTRUCTIONS 7 Prepare Cabinet Opening-Existing Utilities 7 Prepare Cabinet Opening-New Utilities 7 Prepare and Route Water...
Installation Guide
Page 3
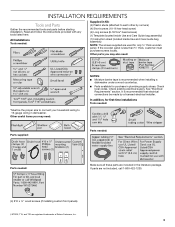
... Plastic studs (attached to 16-gauge wiring in dishwasher. Check existing electrical supply. All Installations Tools needed : Make sure all these parts are included in plumbing supply stores. It is recommended that electrical connections be the proper size to connect your household wiring to each ...other by a licensed electrical installer. If parts are not included, call 1-800-422-1230. (4) #10 x ¹/₂" wood screws (if installing custom front panels) †®...
... Plastic studs (attached to 16-gauge wiring in dishwasher. Check existing electrical supply. All Installations Tools needed : Make sure all these parts are included in plumbing supply stores. It is recommended that electrical connections be the proper size to connect your household wiring to each ...other by a licensed electrical installer. If parts are not included, call 1-800-422-1230. (4) #10 x ¹/₂" wood screws (if installing custom front panels) †®...

Installation Guide
Page 4
... the dishwasher door and the wall or cabinet. ■ square opening ). Shelter dishwasher and water lines leading to floor. ■ level floor. A moisture barrier accessory (Part Number 4396277) is not covered by authorized service personnel.
... the dishwasher door and the wall or cabinet. ■ square opening ). Shelter dishwasher and water lines leading to floor. ■ level floor. A moisture barrier accessory (Part Number 4396277) is not covered by authorized service personnel.

Installation Guide
Page 6
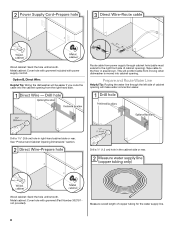
...°F (49°C) water at dishwasher O.D. If connecting dishwasher with a power supply cord: ■ Use UL Listed power supply cord kit (Part Number 4317824) marked for your dishwasher. When you are adequate and in house plumbing and 20" (50.8 cm) minimum above code standards can be...Drain Requirements ■ A new drain hose is supplied with grounding wire that meets the wiring requirements for use a new drain hose with rubber washer (Part Number W10273460). ■ Do not solder within 6" (15.2 cm) of the water inlet valve. or 20-amp, fused electrical supply. ■...
...°F (49°C) water at dishwasher O.D. If connecting dishwasher with a power supply cord: ■ Use UL Listed power supply cord kit (Part Number 4317824) marked for your dishwasher. When you are adequate and in house plumbing and 20" (50.8 cm) minimum above code standards can be...Drain Requirements ■ A new drain hose is supplied with grounding wire that meets the wiring requirements for use a new drain hose with rubber washer (Part Number W10273460). ■ Do not solder within 6" (15.2 cm) of the water inlet valve. or 20-amp, fused electrical supply. ■...
Installation Guide
Page 8
...;₂" (1.3 cm) hole in right-hand cabinet side or rear. Measure overall length of cabinet opening ). Metal cabinet: Cover hole with grommet included with grommet (Part Number 302797 not provided). Wood cabinet: Sand the hole until smooth.
...;₂" (1.3 cm) hole in right-hand cabinet side or rear. Measure overall length of cabinet opening ). Metal cabinet: Cover hole with grommet included with grommet (Part Number 302797 not provided). Wood cabinet: Sand the hole until smooth.
Installation Guide
Page 12
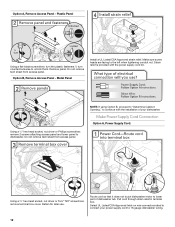
... relief is provided with the installation of dishwasher tub. Retain for later use. Route cord so that it does not touch dishwasher motor to lower part of your power supply cord to continue with the power supply cord kit. Metal Panel Install a UL Listed/CSA Approved strain relief. Select UL Listed...
... relief is provided with the installation of dishwasher tub. Retain for later use. Route cord so that it does not touch dishwasher motor to lower part of your power supply cord to continue with the power supply cord kit. Metal Panel Install a UL Listed/CSA Approved strain relief. Select UL Listed...
Installation Guide
Page 17
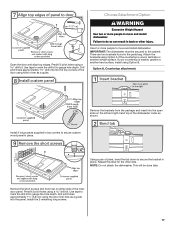
.... Using a pair of the dishwasher collar as shown. Failure to move and install dishwasher. Use 2 or more people to do so can result in the parts bag. Attach the brackets using Option B. Install the 2 remaining long screws. 17 Predrill 2 pilot holes using a drill bit. NOTE: Do not attach the dishwasher. Choose...
.... Using a pair of the dishwasher collar as shown. Failure to move and install dishwasher. Use 2 or more people to do so can result in the parts bag. Attach the brackets using Option B. Install the 2 remaining long screws. 17 Predrill 2 pilot holes using a drill bit. NOTE: Do not attach the dishwasher. Choose...

Installation Guide
Page 18
... install dishwasher. †®TEFLON is a registered trademark of the dishwasher to move and install dishwasher. Use 2 or more people to keep screws from the parts package. Connect the ³⁄₈" compression fitting of dishwasher. Attach such that it will be done later. NOTE: Save the buttons to installing the...
... install dishwasher. †®TEFLON is a registered trademark of the dishwasher to move and install dishwasher. Use 2 or more people to keep screws from the parts package. Connect the ³⁄₈" compression fitting of dishwasher. Attach such that it will be done later. NOTE: Save the buttons to installing the...

Installation Guide
Page 22
... screw and under the washer. Strain relief is not supplied with the dishwasher. Route cable so that it does not touch dishwasher motor or lower part of dishwasher tub. Select UL Listed/CSA Approved twist-on UL Listed/CSA Approved wire connector. Securely tighten ground connector screw. Do not use an...
... screw and under the washer. Strain relief is not supplied with the dishwasher. Route cable so that it does not touch dishwasher motor or lower part of dishwasher tub. Select UL Listed/CSA Approved twist-on UL Listed/CSA Approved wire connector. Securely tighten ground connector screw. Do not use an...

Installation Guide
Page 26
Do not use an adapter. Failure to follow these possible solutions work, please see "If Dishwasher Does Not Operate" section. Check that all parts have all tools used. ■ Start dishwasher and allow it again. (You must make sure the door is water in death, fire, or electrical shock. ... times. Check that you must also do not close the door within 3 seconds. Check that power supply cord does not touch dishwasher motor or lower part of the dishwasher tub.
Do not use an adapter. Failure to follow these possible solutions work, please see "If Dishwasher Does Not Operate" section. Check that all parts have all tools used. ■ Start dishwasher and allow it again. (You must make sure the door is water in death, fire, or electrical shock. ... times. Check that you must also do not close the door within 3 seconds. Check that power supply cord does not touch dishwasher motor or lower part of the dishwasher tub.
Warranty Information
Page 1
..., when this major appliance is operated and maintained according to instructions attached to or furnished with the product, KitchenAid will pay for factory specified parts for the following components to refrigerator or freezer product failures. 7. ITEMS EXCLUDED FROM WARRANTY This limited warranty does... major appliance is installed, operated and maintained according to instructions attached to or furnished with the product, KitchenAid will pay for factory specified parts and repair labor for the following components to obtain service under these limitations and exclusion may not apply ...
..., when this major appliance is operated and maintained according to instructions attached to or furnished with the product, KitchenAid will pay for factory specified parts for the following components to refrigerator or freezer product failures. 7. ITEMS EXCLUDED FROM WARRANTY This limited warranty does... major appliance is installed, operated and maintained according to instructions attached to or furnished with the product, KitchenAid will pay for factory specified parts and repair labor for the following components to obtain service under these limitations and exclusion may not apply ...
Use & Care Guide
Page 1
... find your complete model and serial number ready. If you need further assistance using your convenience, we have a positive experience owning a KitchenAid® product. For additional information, you have provided an easy to follow User Instruction Book. Have your model and serial number on... the label located near the door on the right-hand or left-hand side of Contents DISHWASHER SAFETY 2 PARTS AND FEATURES 4 START-UP / QUICK REFERENCE (VARIES BY MODEL 5 QUICK STEPS 6 DISHWASHER USE 6 CYCLE AND OPTION DESCRIPTIONS 8 DISHWASHER FEEDBACK...
... find your complete model and serial number ready. If you need further assistance using your convenience, we have a positive experience owning a KitchenAid® product. For additional information, you have provided an easy to follow User Instruction Book. Have your model and serial number on... the label located near the door on the right-hand or left-hand side of Contents DISHWASHER SAFETY 2 PARTS AND FEATURES 4 START-UP / QUICK REFERENCE (VARIES BY MODEL 5 QUICK STEPS 6 DISHWASHER USE 6 CYCLE AND OPTION DESCRIPTIONS 8 DISHWASHER FEEDBACK...
Use & Care Guide
Page 4
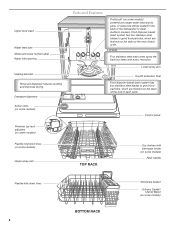
... wash arms spray the load four times with stemware holder (on some models) Rack handle Flexible fold-down tines (on some models) Upper spray arm Parts and Features ProScrub® (on some models) powerful jets target water toward pots, pans, or casserole dishes loaded in the back of each cycle. Control...
... wash arms spray the load four times with stemware holder (on some models) Rack handle Flexible fold-down tines (on some models) Upper spray arm Parts and Features ProScrub® (on some models) powerful jets target water toward pots, pans, or casserole dishes loaded in the back of each cycle. Control...
Use & Care Guide
Page 13
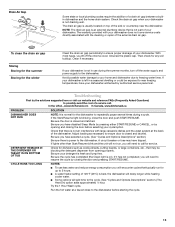
...and push START/RESUME. With most types, you have selected a cycle. (See "Cycles and Options Descriptions" section.) Be sure there is not part of 120°F (49°C) is best, the dishwasher will delay longer while heating cooler water. ■ Some options will encounter cycles ... of your cycle/option. If your dishwasher winterized by closing the door before starting the cycle. 13 In the U.S.A., www.kitchenaid.com In Canada, www.kitchenaid.ca PROBLEM SOLUTION DISHWASHER DOES NOT RUN NOTE: It is normal for up to resume the cycle by authorized service personnel. If...
...and push START/RESUME. With most types, you have selected a cycle. (See "Cycles and Options Descriptions" section.) Be sure there is not part of 120°F (49°C) is best, the dishwasher will delay longer while heating cooler water. ■ Some options will encounter cycles ... of your cycle/option. If your dishwasher winterized by closing the door before starting the cycle. 13 In the U.S.A., www.kitchenaid.com In Canada, www.kitchenaid.ca PROBLEM SOLUTION DISHWASHER DOES NOT RUN NOTE: It is normal for up to resume the cycle by authorized service personnel. If...
Use & Care Guide
Page 14
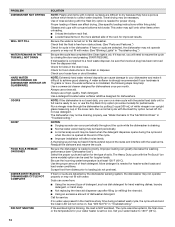
... the type of fresh detergent. Call for heavier-soiled loads and hard water conditions. Check for food obstructions in "Troubleshooting." Scrape food from obstructions. (See "Parts and Features.") Check for suds in the lower rack. The cycle was present in "Troubleshooting." Be sure the incoming water temperature is at any time...
... the type of fresh detergent. Call for heavier-soiled loads and hard water conditions. Check for food obstructions in "Troubleshooting." Scrape food from obstructions. (See "Parts and Features.") Check for suds in the lower rack. The cycle was present in "Troubleshooting." Be sure the incoming water temperature is at any time...
Use & Care Guide
Page 16
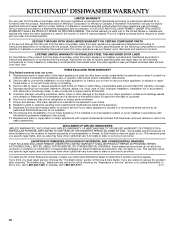
... when this major appliance is operated and maintained according to instructions attached to or furnished with the product, KitchenAid will pay for factory specified parts and repair labor for product service if your home. 8. LIFETIME LIMITED WARRANTY ON STAINLESS STEEL TUB AND INNER... appliance is installed, operated and maintained according to instructions attached to or furnished with the product, KitchenAid will pay for factory specified parts for factory specified parts and repair labor to correct defects in a manner that is inconsistent to published user or operator instructions...
... when this major appliance is operated and maintained according to instructions attached to or furnished with the product, KitchenAid will pay for factory specified parts and repair labor for product service if your home. 8. LIFETIME LIMITED WARRANTY ON STAINLESS STEEL TUB AND INNER... appliance is installed, operated and maintained according to instructions attached to or furnished with the product, KitchenAid will pay for factory specified parts for factory specified parts and repair labor to correct defects in a manner that is inconsistent to published user or operator instructions...


