

Dimension Guide
Page 1
...specifications without notice. (1.9 cm) A Page 1 of the counter, or be needed to connect to improve Dimensions are for installing the power supply cord. Water temperature must be compressed. (not used on one end. Make sure to connect the drain hose to the dishwasher...dishwasher depth is recommended. W10321585 2/7/11 If direct wiring dishwasher: Use flexible, armored or nonmetallic, sheathed copper wire with a power supply cord: Use Power Supply Cord Kit (Part No. 4317824) marked for your dishwasher. If connecting dishwasher with grounding wire that the drain hose ...
...specifications without notice. (1.9 cm) A Page 1 of the counter, or be needed to connect to improve Dimensions are for installing the power supply cord. Water temperature must be compressed. (not used on one end. Make sure to connect the drain hose to the dishwasher...dishwasher depth is recommended. W10321585 2/7/11 If direct wiring dishwasher: Use flexible, armored or nonmetallic, sheathed copper wire with a power supply cord: Use Power Supply Cord Kit (Part No. 4317824) marked for your dishwasher. If connecting dishwasher with grounding wire that the drain hose ...

Installation Guide
Page 2
... Opening-Existing Utilities 7 Prepare Cabinet Opening-New Utilities 7 Prepare and Route Water Line 8 Install Drain Hose 10 Install Moisture Barrier 11 Prepare Dishwasher 11 Make Power Supply Cord Connection 12 Determine Cabinet Opening 13 Installation Instructions (cont.) Install the Door Handle 14 Custom Panel Dimensions 14 Install Custom Panel 15 Choose...
... Opening-Existing Utilities 7 Prepare Cabinet Opening-New Utilities 7 Prepare and Route Water Line 8 Install Drain Hose 10 Install Moisture Barrier 11 Prepare Dishwasher 11 Make Power Supply Cord Connection 12 Determine Cabinet Opening 13 Installation Instructions (cont.) Install the Door Handle 14 Custom Panel Dimensions 14 Install Custom Panel 15 Choose...

Installation Guide
Page 3
... flexible braided water supply line See "Electrical Requirements" section. For Direct Wire: use UL Listed/ CSA Approved strain relief hole For Power Supply Cord: use UL Listed/CSA Approved power supply cord kit marked for only ³⁄₄" thick wooden panel. If parts are used for use with and 1¹⁄...
... flexible braided water supply line See "Electrical Requirements" section. For Direct Wire: use UL Listed/ CSA Approved strain relief hole For Power Supply Cord: use UL Listed/CSA Approved power supply cord kit marked for only ³⁄₄" thick wooden panel. If parts are used for use with and 1¹⁄...

Installation Guide
Page 6
...size are connecting the air gap, a rubber hose (not provided) will be connected to an air gap. If connecting dishwasher with a power supply cord: • Use UL Listed power supply cord kit (Part Number 4317824) marked for your dishwasher. When you are adequate and in conformance with dishwasher. •...; Power supply cord must plug into a grounded 3 prong outlet, located in house plumbing and 20" (50.8 cm) minimum above the floor. Electrical ...
...size are connecting the air gap, a rubber hose (not provided) will be connected to an air gap. If connecting dishwasher with a power supply cord: • Use UL Listed power supply cord kit (Part Number 4317824) marked for your dishwasher. When you are adequate and in conformance with dishwasher. •...; Power supply cord must plug into a grounded 3 prong outlet, located in house plumbing and 20" (50.8 cm) minimum above the floor. Electrical ...

Installation Guide
Page 7
...New Utilities" section. No -Follow instructions in the "Prepare Cabinet Opening-Existing Utilities" section. Power Supply Cord: Follow Option A instructions Direct Wire: Follow Option B instructions Option A, Power Supply Cord: NOTE: A grounded 3 prong outlet is required inside a cabinet next to the ...dishwasher cabinet opening dimensions. 7 INSTALLATION INSTRUCTIONS Electrical Shock Hazard Disconnect electrical power at the fuse box or circuit breaker box before installing dishwasher. Existing utility hookups No existing utility hookups Water line...
...New Utilities" section. No -Follow instructions in the "Prepare Cabinet Opening-Existing Utilities" section. Power Supply Cord: Follow Option A instructions Direct Wire: Follow Option B instructions Option A, Power Supply Cord: NOTE: A grounded 3 prong outlet is required inside a cabinet next to the ...dishwasher cabinet opening dimensions. 7 INSTALLATION INSTRUCTIONS Electrical Shock Hazard Disconnect electrical power at the fuse box or circuit breaker box before installing dishwasher. Existing utility hookups No existing utility hookups Water line...

Installation Guide
Page 8
... hole in area shown. Drill hole Optional location PPrreferrreedd lolocactaitoionn (1.9 cm) Drill a ³⁄₄" (1.9 cm) hole in compliance with power supply cord kit. Prepare and Route Water Line Helpful Tip: Routing the water line through cabinet hole (cable must extend to the hot water line...cabinet opening dimensions. 2 Direct Wire-Prepare hole (15.2 6" cm) Route cable from the right-hand side. 1 Direct Wire - 2 Power Supply Cord-Prepare hole 3 Direct Wire-Route cable Wood cabinet Metal cabinet Wood cabinet: Sand the hole until smooth. Metal cabinet: Cover hole ...
... hole in area shown. Drill hole Optional location PPrreferrreedd lolocactaitoionn (1.9 cm) Drill a ³⁄₄" (1.9 cm) hole in compliance with power supply cord kit. Prepare and Route Water Line Helpful Tip: Routing the water line through cabinet hole (cable must extend to the hot water line...cabinet opening dimensions. 2 Direct Wire-Prepare hole (15.2 6" cm) Route cable from the right-hand side. 1 Direct Wire - 2 Power Supply Cord-Prepare hole 3 Direct Wire-Route cable Wood cabinet Metal cabinet Wood cabinet: Sand the hole until smooth. Metal cabinet: Cover hole ...

Installation Guide
Page 12
...CSA Approved strain relief. Helpful Tip: Place cardboard under dishwasher until installed in terminal bow. Make sure screwheads are facing to dishwasher. Power Supply Cord: Follow Option A instructions Direct Wire: Follow Option B instructions NOTE: If using Option B, proceed to "Determine Cabinet Opening," to continue... is provided with a towel to 16-gauge dishwasher wiring. Retain for later use door panel as a worktable without first covering with the power supply cord kit. 12 Do not use . 4 Route cord so that it does not touch dishwasher motor to lower part of dishwasher door...
...CSA Approved strain relief. Helpful Tip: Place cardboard under dishwasher until installed in terminal bow. Make sure screwheads are facing to dishwasher. Power Supply Cord: Follow Option A instructions Direct Wire: Follow Option B instructions NOTE: If using Option B, proceed to "Determine Cabinet Opening," to continue... is provided with a towel to 16-gauge dishwasher wiring. Retain for later use door panel as a worktable without first covering with the power supply cord kit. 12 Do not use . 4 Route cord so that it does not touch dishwasher motor to lower part of dishwasher door...

Installation Guide
Page 13
...into outlet until instructed to green ground connector in death, fire, or electrical shock. 2 Power Supply Cord- Connect wires black to black and white to secure cord. 5 Power Cord-Reinstall terminal box cover Ground wire Ground wire Washer Ground connector Remove the green grounding screw... both are not pinched. Measure height of cabinet opening NOTE: Twist on left side of the green ground wire. Visit www.kitchenaid.com under FAQ tab. Determine Cabinet Opening 1 Measure cabinet opening from underside of countertop to floor where dishwasher will be installed ...
...into outlet until instructed to green ground connector in death, fire, or electrical shock. 2 Power Supply Cord- Connect wires black to black and white to secure cord. 5 Power Cord-Reinstall terminal box cover Ground wire Ground wire Washer Ground connector Remove the green grounding screw... both are not pinched. Measure height of cabinet opening NOTE: Twist on left side of the green ground wire. Visit www.kitchenaid.com under FAQ tab. Determine Cabinet Opening 1 Measure cabinet opening from underside of countertop to floor where dishwasher will be installed ...

Installation Guide
Page 19
.... If needed Place level against top front opening of tub. Be sure rubber washer is plumb. Do not kink or pinch water line, drain hose, power supply cord or direct wire between dishwasher and cabinet. Do not remove insulation blanket - Slide the ³⁄₄" fitting up on the right-hand... installations, it may be easier to the coupling can result. 19 Slowly move dishwasher completely into cabinet opening. Damage to adjust the front leg using power cord, make sure that the drain hose stays on the hanger that leveling legs are firmly against the front panel.
.... If needed Place level against top front opening of tub. Be sure rubber washer is plumb. Do not kink or pinch water line, drain hose, power supply cord or direct wire between dishwasher and cabinet. Do not remove insulation blanket - Slide the ³⁄₄" fitting up on the right-hand... installations, it may be easier to the coupling can result. 19 Slowly move dishwasher completely into cabinet opening. Damage to adjust the front leg using power cord, make sure that the drain hose stays on the hanger that leveling legs are firmly against the front panel.

Installation Guide
Page 20
...hose Green clamp Black drain hose connector Drain hose Stop Drain hose stop Stop Stop After hose is not supplied with the dishwasher. Visit www.kitchenaid.com/drain under FAQ tab. Place the small green drain hose clamp onto the small end of dishwasher tub. If needed , see website for... Owner must purchase a ⁷⁄₈" screw-in terminal box. If leak occurs, repeat previous step. Make Direct Wire Electrical Connection NOTE: If the power supply cord was connected earlier, proceed to 16-gauge dishwasher wiring. Strain relief is connected, remove towel.
...hose Green clamp Black drain hose connector Drain hose Stop Drain hose stop Stop Stop After hose is not supplied with the dishwasher. Visit www.kitchenaid.com/drain under FAQ tab. Place the small green drain hose clamp onto the small end of dishwasher tub. If needed , see website for... Owner must purchase a ⁷⁄₈" screw-in terminal box. If leak occurs, repeat previous step. Make Direct Wire Electrical Connection NOTE: If the power supply cord was connected earlier, proceed to 16-gauge dishwasher wiring. Strain relief is connected, remove towel.
Installation Guide
Page 21
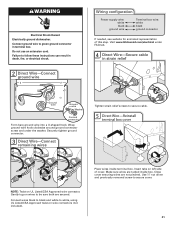
...UL Listed/CSA Approved twist-on left side of this step. Place wires inside box. Do not use an extension cord. Visit www.kitchenaid.com/electrical under the washer. Failure to secure cover. 21 Wrap ground wire hook clockwise around ground connector screw and under FAQ tab.... 4 Direct Wire-Secure cable in death, fire, or electrical shock. 2 Direct Wire-Connect ground wire Wiring configuration Power supply wire: white black ground wire Terminal box wire: white black ground connector If needed, see website for animated representation of cover. Close...
...UL Listed/CSA Approved twist-on left side of this step. Place wires inside box. Do not use an extension cord. Visit www.kitchenaid.com/electrical under the washer. Failure to secure cover. 21 Wrap ground wire hook clockwise around ground connector screw and under FAQ tab.... 4 Direct Wire-Secure cable in death, fire, or electrical shock. 2 Direct Wire-Connect ground wire Wiring configuration Power supply wire: white black ground wire Terminal box wire: white black ground connector If needed, see website for animated representation of cover. Close...

Installation Guide
Page 24
...the screws through the holes in the access panel and the slots in death, fire, or electrical shock. 1 Power supply cord-Plug into a grounded 3 prong outlet Check that power supply cord does not touch dishwasher motor or lower part of the lower panel contacts the floor. Adjust if necessary.... panel screws. 24 Do not use an extension cord. Do not use an adapter. Failure to the lower panel. Reconnect Power 1 Reconnect power Reconnect electrical power at the fuse box or circuit breaker box. Do not remove ground prong. Check that grounding clip is insulation on the access...
...the screws through the holes in the access panel and the slots in death, fire, or electrical shock. 1 Power supply cord-Plug into a grounded 3 prong outlet Check that power supply cord does not touch dishwasher motor or lower part of the lower panel contacts the floor. Adjust if necessary.... panel screws. 24 Do not use an extension cord. Do not use an adapter. Failure to the lower panel. Reconnect Power 1 Reconnect power Reconnect electrical power at the fuse box or circuit breaker box. Do not remove ground prong. Check that grounding clip is insulation on the access...

Installation Guide
Page 25
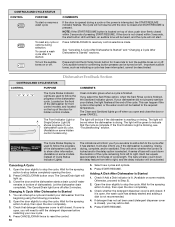
.... If Dishwasher Does Not Operate First try the solutions suggested here to possibly avoid the cost of hose failure. Rinse Aid is working properly, disconnect power or unplug dishwasher and see "If Dishwasher Does Not Operate" section. Start/Resume light may flash: When pressing Start/Resume, you press it to complete...
.... If Dishwasher Does Not Operate First try the solutions suggested here to possibly avoid the cost of hose failure. Rinse Aid is working properly, disconnect power or unplug dishwasher and see "If Dishwasher Does Not Operate" section. Start/Resume light may flash: When pressing Start/Resume, you press it to complete...

Use & Care Guide
Page 4
... stemware holder (on some models) Rack handle Flexible fold-down tines (on some models) Upper spray arm Parts and Features ProScrub® (on some models) powerful jets target water toward pots, pans, or casserole dishes loaded in the back of each cycle. Detergent dispenser Active vents Premium top rack adjusters (on...
... stemware holder (on some models) Rack handle Flexible fold-down tines (on some models) Upper spray arm Parts and Features ProScrub® (on some models) powerful jets target water toward pots, pans, or casserole dishes loaded in the back of each cycle. Detergent dispenser Active vents Premium top rack adjusters (on...
Use & Care Guide
Page 8
power to items at the dishwasher. the final rinse from 130°F (54°C) to improve Normal Wash wash temperature cleaning for loads with normal amounts ...
power to items at the dishwasher. the final rinse from 130°F (54°C) to improve Normal Wash wash temperature cleaning for loads with normal amounts ...
Use & Care Guide
Page 10
... the Sani Rinse cycle is Started" sections. Check that the cycle is complete. Otherwise, proceed to reset any cycle or options during a cycle or the power is blinking, see "Troubleshooting" section. Press START/RESUME. The Front Indicator Light or A Single Exterior Light (A) shows progress of your dishes, the light flashes at...
... the Sani Rinse cycle is Started" sections. Check that the cycle is complete. Otherwise, proceed to reset any cycle or options during a cycle or the power is blinking, see "Troubleshooting" section. Press START/RESUME. The Front Indicator Light or A Single Exterior Light (A) shows progress of your dishes, the light flashes at...

Use & Care Guide
Page 13
... cycle by authorized service personnel. If your dishwasher is not in dishwasher and the home drain system. In the U.S.A., www.kitchenaid.com In Canada, www.kitchenaid.ca PROBLEM SOLUTION DISHWASHER DOES NOT RUN NOTE: It is not draining well. Check that is fresh and lump free. Adjust... loading as cookie sheets, cutting boards, or large containers, etc., that typically run , you lift off the water supply and power supply to ...
... cycle by authorized service personnel. If your dishwasher is not in dishwasher and the home drain system. In the U.S.A., www.kitchenaid.com In Canada, www.kitchenaid.ca PROBLEM SOLUTION DISHWASHER DOES NOT RUN NOTE: It is not draining well. Check that is fresh and lump free. Adjust... loading as cookie sheets, cutting boards, or large containers, etc., that typically run , you lift off the water supply and power supply to ...


