Installation Guide
Page 10
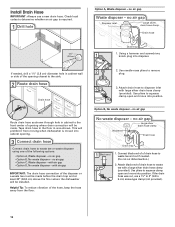
...plug into position. no air gap SLcarregwe-tsyilpveer drainchlaomsep clamp Waste tee Drain hose Drain trap 1 Black end 2 1. with a large silver drain hose clamp (provided). Option B, No waste disposer - Attach black end of opening where drain connection will be made before the drain trap and at least 20" ... tee or waste disposer using one of the disposer or a waste tee must be installed. Tape drain hose to remove plug. 3 3. Connect black end of of the hose, keep the hose away from moving when dishwasher is required. 1 Drill hole Option A, Waste disposer - no air ...
...plug into position. no air gap SLcarregwe-tsyilpveer drainchlaomsep clamp Waste tee Drain hose Drain trap 1 Black end 2 1. with a large silver drain hose clamp (provided). Option B, No waste disposer - Attach black end of opening where drain connection will be made before the drain trap and at least 20" ... tee or waste disposer using one of the disposer or a waste tee must be installed. Tape drain hose to remove plug. 3 3. Connect black end of of the hose, keep the hose away from moving when dishwasher is required. 1 Drill hole Option A, Waste disposer - no air ...
Installation Guide
Page 11
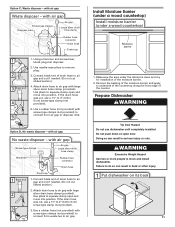
.... with air gap Screw-type clamps Disposer inlet Air gap Large silver drain hhoossee ccllaammpp (provided) Rubber hose connector Drain hose Drain trap 1 2 3 Black end 4 5 1. If the drain hose was cut , use dishwasher until completely installed. Use a rubber hose (not provided) with screw-type clamps ... with air gap Screw-type clamps Waste tee Air gap Large silver drain hose clamp (provided) Rubber hose connector Drain hose Drain trap 1 Black end 1. Option D, No waste disposer - Use pliers to do so can result in back or other injury. 1 Put dishwasher on open ...
.... with air gap Screw-type clamps Disposer inlet Air gap Large silver drain hhoossee ccllaammpp (provided) Rubber hose connector Drain hose Drain trap 1 2 3 Black end 4 5 1. If the drain hose was cut , use dishwasher until completely installed. Use a rubber hose (not provided) with screw-type clamps ... with air gap Screw-type clamps Waste tee Air gap Large silver drain hose clamp (provided) Rubber hose connector Drain hose Drain trap 1 Black end 1. Option D, No waste disposer - Use pliers to do so can result in back or other injury. 1 Put dishwasher on open ...

Installation Guide
Page 13
NOTE: Do not plug into outlet until instructed to measure the lowest point on the underside of cover. Visit www.kitchenaid.com under FAQ tab. Do not use an extension cord. Close cover ensuring wires are tucked inside terminal box. Determine Cabinet Opening 1...Reattach and tighten the green screw. 3 Power Cord-Connect remaining wires Place wires inside box. Make sure wires are not pinched. Connect wires black to black and white to secure cord. 5 Power Cord-Reinstall terminal box cover Ground wire Ground wire Washer Ground connector Remove the green grounding screw and...
NOTE: Do not plug into outlet until instructed to measure the lowest point on the underside of cover. Visit www.kitchenaid.com under FAQ tab. Do not use an extension cord. Close cover ensuring wires are tucked inside terminal box. Determine Cabinet Opening 1...Reattach and tighten the green screw. 3 Power Cord-Connect remaining wires Place wires inside box. Make sure wires are not pinched. Connect wires black to black and white to secure cord. 5 Power Cord-Reinstall terminal box cover Ground wire Ground wire Washer Ground connector Remove the green grounding screw and...

Installation Guide
Page 20
.... Owner must purchase a ⁷⁄₈" screw-in Cabinet Opening" section. Connect to Drain 1 Connect drain hose Green clamp Black drain hose connector Drain hose Stop Drain hose stop Stop Stop After hose is not supplied with the dishwasher. Push the new drain hose... under 90° elbow fitting. If needed , see website for animated representation of the drain hose. Visit www.kitchenaid.com/watersupply under FAQ tab. Visit www.kitchenaid.com/drain under FAQ tab. Strain relief is connected, remove towel. If needed , see website for animated representation...
.... Owner must purchase a ⁷⁄₈" screw-in Cabinet Opening" section. Connect to Drain 1 Connect drain hose Green clamp Black drain hose connector Drain hose Stop Drain hose stop Stop Stop After hose is not supplied with the dishwasher. Push the new drain hose... under 90° elbow fitting. If needed , see website for animated representation of the drain hose. Visit www.kitchenaid.com/watersupply under FAQ tab. Visit www.kitchenaid.com/drain under FAQ tab. Strain relief is connected, remove towel. If needed , see website for animated representation...
Installation Guide
Page 21
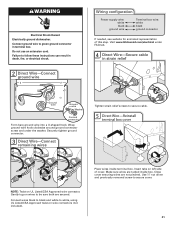
... pinched. Gently tug on UL Listed/CSA Approved wire connector. Insert tabs on wire connectors (not included). Visit www.kitchenaid.com/electrical under the washer. Connect wires black to black and white to be sure both are secured. Do not use an extension cord. Close cover ensuring wires are tucked ...FAQ tab. 4 Direct Wire-Secure cable in death, fire, or electrical shock. 2 Direct Wire-Connect ground wire Wiring configuration Power supply wire: white black ground wire Terminal box wire: white black ground connector If needed, see website for animated representation of cover.
... pinched. Gently tug on UL Listed/CSA Approved wire connector. Insert tabs on wire connectors (not included). Visit www.kitchenaid.com/electrical under the washer. Connect wires black to black and white to be sure both are secured. Do not use an extension cord. Close cover ensuring wires are tucked ...FAQ tab. 4 Direct Wire-Secure cable in death, fire, or electrical shock. 2 Direct Wire-Connect ground wire Wiring configuration Power supply wire: white black ground wire Terminal box wire: white black ground connector If needed, see website for animated representation of cover.