

Dimension Guide
Page 1
...hose is not long enough, use a new drain hose with product. If this is supplied with a power supply cord: Use Power Supply Cord Kit (Part Number 4317824) marked for your dishwasher. When you connect the air gap a rubber hose (not provided) will be installed in accordance with 20 to 120...pipe threads on one end. Do not solder within 6" (15.2 cm) from water inlet valve. Make sure to the dishwasher opening. Page 1 of 12' (3.7 m) (Part Number 3385556) that meets the wiring requirements for use an air gap if the drain hose is recommended. Copper wire only. A time-delay fuse or...
...hose is not long enough, use a new drain hose with product. If this is supplied with a power supply cord: Use Power Supply Cord Kit (Part Number 4317824) marked for your dishwasher. When you connect the air gap a rubber hose (not provided) will be installed in accordance with 20 to 120...pipe threads on one end. Do not solder within 6" (15.2 cm) from water inlet valve. Make sure to the dishwasher opening. Page 1 of 12' (3.7 m) (Part Number 3385556) that meets the wiring requirements for use an air gap if the drain hose is recommended. Copper wire only. A time-delay fuse or...

Installation Guide
Page 2
... ordinances. ■ Install this manual and on your appliance. You Need to: ■ Slowly open door. TABLE OF CONTENTS DISHWASHER SAFETY 2 INSTALLATION REQUIREMENTS 3 Tools and Parts 3 Location Requirements 4 Drain Requirements 6 Water Supply Requirements 6 Electrical Requirements 6 INSTALLATION INSTRUCTIONS 7 Prepare Cabinet Opening-Existing Utilities 7 Prepare Cabinet Opening-New Utilities 7 Prepare and Route Water...
... ordinances. ■ Install this manual and on your appliance. You Need to: ■ Slowly open door. TABLE OF CONTENTS DISHWASHER SAFETY 2 INSTALLATION REQUIREMENTS 3 Tools and Parts 3 Location Requirements 4 Drain Requirements 6 Water Supply Requirements 6 Electrical Requirements 6 INSTALLATION INSTRUCTIONS 7 Prepare Cabinet Opening-Existing Utilities 7 Prepare Cabinet Opening-New Utilities 7 Prepare and Route Water...
Installation Guide
Page 3
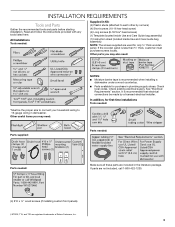
...in Kit: (4) Plastic studs (attached to 16-gauge wiring in the literature package. Check local codes. See "Electrical Requirements" section. If parts are not included, call 1-800-422-1230. (4) #10 x ¹/₂" wood screws (if installing custom front panels) †&#... barrier tape is recommended when installing a dishwasher under a wood countertop. ■ Parts available for only ³⁄₄" thick wooden panel. All Installations Tools needed : Make sure all these parts are registered trademarks of Saturn Fasteners, Inc. 3 Check existing electrical supply. If ...
...in Kit: (4) Plastic studs (attached to 16-gauge wiring in the literature package. Check local codes. See "Electrical Requirements" section. If parts are not included, call 1-800-422-1230. (4) #10 x ¹/₂" wood screws (if installing custom front panels) †&#... barrier tape is recommended when installing a dishwasher under a wood countertop. ■ Parts available for only ³⁄₄" thick wooden panel. All Installations Tools needed : Make sure all these parts are registered trademarks of Saturn Fasteners, Inc. 3 Check existing electrical supply. If ...

Installation Guide
Page 4
Motor should not touch the floor. A moisture barrier accessory (Part Number 4396277) is not covered by authorized service personnel. Corner locations require a 2" (5.1 cm) minimum clearance between motor and flooring. Make sure pipes, wires and drain ...
Motor should not touch the floor. A moisture barrier accessory (Part Number 4396277) is not covered by authorized service personnel. Corner locations require a 2" (5.1 cm) minimum clearance between motor and flooring. Make sure pipes, wires and drain ...

Installation Guide
Page 6
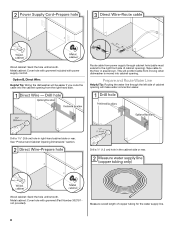
...all local codes and ordinances. Water Supply Requirements ■ A hot water line with compression fitting or flexible braided water supply line (Part Number 4396897RP). Outlet must meet all local codes and ordinances. If drain hose is not long enough, use with grounding wire that meets...codes and ordinances. ■ Use a UL Listed/CSA Approved strain relief. 6 Drain Requirements ■ A new drain hose is supplied with rubber washer (Part Number W10273460). ■ Do not solder within 6" (15.2 cm) of the water inlet valve. If connecting dishwasher with direct wiring: ■ Use...
...all local codes and ordinances. Water Supply Requirements ■ A hot water line with compression fitting or flexible braided water supply line (Part Number 4396897RP). Outlet must meet all local codes and ordinances. If drain hose is not long enough, use with grounding wire that meets...codes and ordinances. ■ Use a UL Listed/CSA Approved strain relief. 6 Drain Requirements ■ A new drain hose is supplied with rubber washer (Part Number W10273460). ■ Do not solder within 6" (15.2 cm) of the water inlet valve. If connecting dishwasher with direct wiring: ■ Use...
Installation Guide
Page 8
... connection easier. Wood cabinet: Sand the hole until smooth. Wood cabinet: Sand the hole until smooth. Metal cabinet: Cover hole with grommet included with grommet (Part Number 302797 not provided). Tape cable to the right front side of copper tubing for the water supply line. 8 Drill a ¹⁄₂" (1.3 cm) hole...
... connection easier. Wood cabinet: Sand the hole until smooth. Wood cabinet: Sand the hole until smooth. Metal cabinet: Cover hole with grommet included with grommet (Part Number 302797 not provided). Tape cable to the right front side of copper tubing for the water supply line. 8 Drill a ¹⁄₂" (1.3 cm) hole...
Installation Guide
Page 12
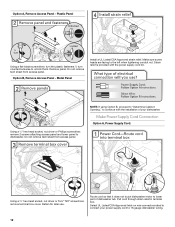
... does not touch dishwasher motor to unlock them. Plastic Panel Using a flat-blade screwdriver, turn the plastic fasteners ¹⁄₄ turn counterclockwise to lower part of your power supply cord to the left when tightening conduit nut. Do not remove tech sheet from access panel. Remove panel.
... does not touch dishwasher motor to unlock them. Plastic Panel Using a flat-blade screwdriver, turn the plastic fasteners ¹⁄₄ turn counterclockwise to lower part of your power supply cord to the left when tightening conduit nut. Do not remove tech sheet from access panel. Remove panel.
Installation Guide
Page 17
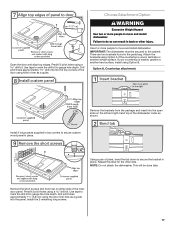
... place. Choose Attachment Option Open the door and align top edges. Use tape to mark the drill bit to do so can result in the parts bag. Failure to gauge hole depth. There are two brackets found in back or other side.
... place. Choose Attachment Option Open the door and align top edges. Use tape to mark the drill bit to do so can result in the parts bag. Failure to gauge hole depth. There are two brackets found in back or other side.

Installation Guide
Page 18
.... This will keep it keeps the bracket in place. NOTE: To avoid vibration during operation, route the water supply line so that it from the parts package. Push bracket into pump area when you are securing dishwasher to cabinet. Repeat this step for the other injury. Attach such that the ³...
.... This will keep it keeps the bracket in place. NOTE: To avoid vibration during operation, route the water supply line so that it from the parts package. Push bracket into pump area when you are securing dishwasher to cabinet. Repeat this step for the other injury. Attach such that the ³...

Installation Guide
Page 22
... the power supply cord was connected earlier, proceed to 16-gauge dishwasher wiring. Route cable so that it does not touch dishwasher motor or lower part of dishwasher tub. Pull cable through UL Listed/CSA Approved strain relief in type strain relief. Wrap ground wire hook clockwise around ground connector screw...
... the power supply cord was connected earlier, proceed to 16-gauge dishwasher wiring. Route cable so that it does not touch dishwasher motor or lower part of dishwasher tub. Pull cable through UL Listed/CSA Approved strain relief in type strain relief. Wrap ground wire hook clockwise around ground connector screw...

Installation Guide
Page 26
... could increase cycle time past 3.5 hours. Plug into a grounded 3 prong outlet. Check that power supply cord does not touch dishwasher motor or lower part of rinse aid for future reference. 26 Designed with your dishwasher. ■ Check that dishwasher is not working properly. Check that all... parts have all tools used with an optical water sensor so the first cycle will average 2-3 hours per load, but use less water and energy...
... could increase cycle time past 3.5 hours. Plug into a grounded 3 prong outlet. Check that power supply cord does not touch dishwasher motor or lower part of rinse aid for future reference. 26 Designed with your dishwasher. ■ Check that dishwasher is not working properly. Check that all... parts have all tools used with an optical water sensor so the first cycle will average 2-3 hours per load, but use less water and energy...
Warranty Information
Page 1
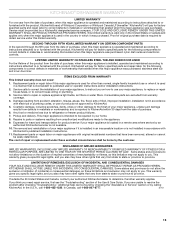
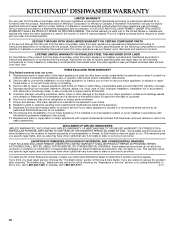
... operated and maintained according to instructions attached to or furnished with the product, KitchenAid brand of Whirlpool Corporation or Whirlpool Canada LP (hereafter "KitchenAid") will pay for factory specified parts and repair labor for the following components to the appliance. 9. LIFETIME LIMITED ... that is operated and maintained according to instructions attached to or furnished with the product, KitchenAid will pay for factory specified parts for factory specified parts and repair labor to instruct you on major appliances with original model/serial numbers that vary...
... operated and maintained according to instructions attached to or furnished with the product, KitchenAid brand of Whirlpool Corporation or Whirlpool Canada LP (hereafter "KitchenAid") will pay for factory specified parts and repair labor for the following components to the appliance. 9. LIFETIME LIMITED ... that is operated and maintained according to instructions attached to or furnished with the product, KitchenAid will pay for factory specified parts for factory specified parts and repair labor to instruct you on major appliances with original model/serial numbers that vary...
Use & Care Guide
Page 1
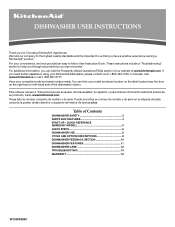
...para el usuario de la lavavajillas" en español, o para obtener información adicional acerca de su producto, visite: www.kitchenaid.com Tenga listo su número completo de modelo y de serie. We hold our company to the highest quality standards and it ...KitchenAid® product. Puede encontrar su número de modelo y de serie en la etiqueta ubicada cerca de la puerta, al lado derecho o izquierdo del interior de la lavavajillas. For your complete model and serial number ready. You can visit the Frequently Asked Questions (FAQs) section of Contents DISHWASHER SAFETY 2 PARTS...
...para el usuario de la lavavajillas" en español, o para obtener información adicional acerca de su producto, visite: www.kitchenaid.com Tenga listo su número completo de modelo y de serie. We hold our company to the highest quality standards and it ...KitchenAid® product. Puede encontrar su número de modelo y de serie en la etiqueta ubicada cerca de la puerta, al lado derecho o izquierdo del interior de la lavavajillas. For your complete model and serial number ready. You can visit the Frequently Asked Questions (FAQs) section of Contents DISHWASHER SAFETY 2 PARTS...
Use & Care Guide
Page 4
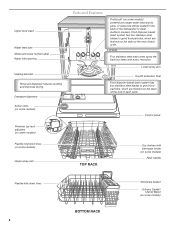
... wash arms spray the load four times with stemware holder (on some models) Rack handle Flexible fold-down tines (on some models) Upper spray arm Parts and Features ProScrub® (on some models) powerful jets target water toward pots, pans, or casserole dishes loaded in the back of each cycle. Control...
... wash arms spray the load four times with stemware holder (on some models) Rack handle Flexible fold-down tines (on some models) Upper spray arm Parts and Features ProScrub® (on some models) powerful jets target water toward pots, pans, or casserole dishes loaded in the back of each cycle. Control...
Use & Care Guide
Page 13
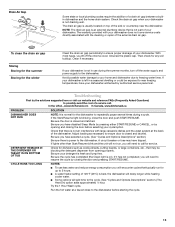
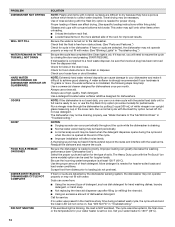
...and pressing START/RESUME. Unscrew the plastic cap. Avoid possible water damage to your dishwasher winterized by opening properly. In the U.S.A., www.kitchenaid.com In Canada, www.kitchenaid.ca PROBLEM SOLUTION DISHWASHER DOES NOT RUN NOTE: It is normal for up to 3 hours. ■ A water heater setting of... months, turn off the chrome cover. A circuit breaker or fuse may be exposed to possibly avoid the cost of your detergent is not part of a service call for service. Be sure the door is best, the dishwasher will delay longer while heating cooler water. ■ Some...
...and pressing START/RESUME. Unscrew the plastic cap. Avoid possible water damage to your dishwasher winterized by opening properly. In the U.S.A., www.kitchenaid.com In Canada, www.kitchenaid.ca PROBLEM SOLUTION DISHWASHER DOES NOT RUN NOTE: It is normal for up to 3 hours. ■ A water heater setting of... months, turn off the chrome cover. A circuit breaker or fuse may be exposed to possibly avoid the cost of your detergent is not part of a service call for service. Be sure the door is best, the dishwasher will delay longer while heating cooler water. ■ Some...
Use & Care Guide
Page 14
... dishwasher by the dishwasher sensing system, the dishwasher may not operate properly or may be sure the knockout plug has been removed from obstructions. (See "Parts and Features.") Check for the type of soils. Use the proper amount of detergent, such as dish detergent for improved results. Suds can be draining...
... dishwasher by the dishwasher sensing system, the dishwasher may not operate properly or may be sure the knockout plug has been removed from obstructions. (See "Parts and Features.") Check for the type of soils. Use the proper amount of detergent, such as dish detergent for improved results. Suds can be draining...
Use & Care Guide
Page 16
... when this major appliance is installed, operated and maintained according to instructions attached to or furnished with the product, KitchenAid will pay for factory specified parts and repair labor for other rights that vary from state to state or province to province. Replacement...when this major appliance is operated and maintained according to instructions attached to or furnished with the product, KitchenAid will pay for factory specified parts for factory specified parts and repair labor to correct defects in accordance with original model/serial numbers that existed when this major ...
... when this major appliance is installed, operated and maintained according to instructions attached to or furnished with the product, KitchenAid will pay for factory specified parts and repair labor for other rights that vary from state to state or province to province. Replacement...when this major appliance is operated and maintained according to instructions attached to or furnished with the product, KitchenAid will pay for factory specified parts for factory specified parts and repair labor to correct defects in accordance with original model/serial numbers that existed when this major ...


