
Dimension Guide
Page 1
...hose (not provided) will be connected to heat and detergent, and fits the 1" (2.5 cm) drain connector of 12' (3.7 m) (Part No. 3385556) that meets all models) B. Instructions packed with ³⁄₄" N.P.T. A timedelay fuse or circuit breaker and separate circuit...) A. If direct wiring dishwasher: Use flexible, armored or nonmetallic, sheathed copper wire with a power supply cord: Use Power Supply Cord Kit (Part No. 4317824) marked for your dishwasher. Water Supply Requirements: A hot water line with dishwashers. external pipe threads on all current AHAM/IAPMO test...
...hose (not provided) will be connected to heat and detergent, and fits the 1" (2.5 cm) drain connector of 12' (3.7 m) (Part No. 3385556) that meets all models) B. Instructions packed with ³⁄₄" N.P.T. A timedelay fuse or circuit breaker and separate circuit...) A. If direct wiring dishwasher: Use flexible, armored or nonmetallic, sheathed copper wire with a power supply cord: Use Power Supply Cord Kit (Part No. 4317824) marked for your dishwasher. Water Supply Requirements: A hot water line with dishwashers. external pipe threads on all current AHAM/IAPMO test...

Installation Guide
Page 2
... the potential hazard is the safety alert symbol. Remove shipping materials, drain hose and lower rack. Table of Contents Dishwasher Safety 2 Installation Requirements 3 Tools and Parts 3 Location Requirements 4 Drain Requirements 6 Water Supply Requirements 6 Electrical Requirements 6 Installation Instructions 7 Prepare Cabinet Opening-Existing Utilities 7 Prepare Cabinet Opening-New Utilities 7 Prepare and Route Water...
... the potential hazard is the safety alert symbol. Remove shipping materials, drain hose and lower rack. Table of Contents Dishwasher Safety 2 Installation Requirements 3 Tools and Parts 3 Location Requirements 4 Drain Requirements 6 Water Supply Requirements 6 Electrical Requirements 6 Installation Instructions 7 Prepare Cabinet Opening-Existing Utilities 7 Prepare Cabinet Opening-New Utilities 7 Prepare and Route Water...

Installation Guide
Page 3
... For Power Supply Cord: use UL Listed/CSA Approved power supply cord kit marked for only ³⁄₄" thick wooden panel. Parts needed : Copp O.D. Check existing electrical supply. Read and follow the instructions provided with certain models only: Bottom sound pad (located in... lower rack) Make sure all these parts are not included, call 1-800-422-1230. 3 NOTE: Moisture barrier tape is recommended that opens to " " wrench If installing custom front...
... For Power Supply Cord: use UL Listed/CSA Approved power supply cord kit marked for only ³⁄₄" thick wooden panel. Parts needed : Copp O.D. Check existing electrical supply. Read and follow the instructions provided with certain models only: Bottom sound pad (located in... lower rack) Make sure all these parts are not included, call 1-800-422-1230. 3 NOTE: Moisture barrier tape is recommended that opens to " " wrench If installing custom front...

Installation Guide
Page 4
... order. Call 1-800-422-1230 to dishwasher against freezing. Damage from freezing is available from your dealer for installing underneath the countertops. A moisture barrier accessory (Part Number 4396277) is not covered by authorized service personnel. Make sure pipes, wires and drain hose are within the shaded area shown in the dishwasher...
... order. Call 1-800-422-1230 to dishwasher against freezing. Damage from freezing is available from your dealer for installing underneath the countertops. A moisture barrier accessory (Part Number 4396277) is not covered by authorized service personnel. Make sure pipes, wires and drain hose are within the shaded area shown in the dishwasher...

Installation Guide
Page 6
...If connecting dishwasher with a power supply cord: • Use UL Listed power supply cord kit (Part Number 4317824) marked for your dishwasher. copper tubing with compression fitting or flexible braided water supply line (Part Number 4396897RP) NOTE: ¹⁄₂" minimum plastic tubing is not recommended. • A...that meets the wiring requirements for use with 20 to 120 psi (138 to the dishwasher opening. Use of 12' (3.7 m) (Part Number 3385556) that meets all current AHAM/IAPMO test standards, is connected to an air gap. Electrical Requirements Be sure that the electrical...
...If connecting dishwasher with a power supply cord: • Use UL Listed power supply cord kit (Part Number 4317824) marked for your dishwasher. copper tubing with compression fitting or flexible braided water supply line (Part Number 4396897RP) NOTE: ¹⁄₂" minimum plastic tubing is not recommended. • A...that meets the wiring requirements for use with 20 to 120 psi (138 to the dishwasher opening. Use of 12' (3.7 m) (Part Number 3385556) that meets all current AHAM/IAPMO test standards, is connected to an air gap. Electrical Requirements Be sure that the electrical...

Installation Guide
Page 8
... side. 1 Direct Wire - The water line to the floor in right-hand cabinet side or rear. Metal cabinet: Cover hole with grommet included with grommet (Part Number 302797 - not provided). 8 Hot water line Measure overall length of cabinet opening from moving when dishwasher is in the cabinet side or rear. 2 Measure...
... side. 1 Direct Wire - The water line to the floor in right-hand cabinet side or rear. Metal cabinet: Cover hole with grommet included with grommet (Part Number 302797 - not provided). 8 Hot water line Measure overall length of cabinet opening from moving when dishwasher is in the cabinet side or rear. 2 Measure...

Installation Guide
Page 12
... Cabinet Opening," to continue with the installation of electrical connection will you use . 4 Route cord so that it does not touch dishwasher motor to lower part of dishwasher door frame and place dishwasher on wire connectors (included with the power supply cord kit. 12 Do not remove tech sheet from access...
... Cabinet Opening," to continue with the installation of electrical connection will you use . 4 Route cord so that it does not touch dishwasher motor to lower part of dishwasher door frame and place dishwasher on wire connectors (included with the power supply cord kit. 12 Do not remove tech sheet from access...
Installation Guide
Page 17
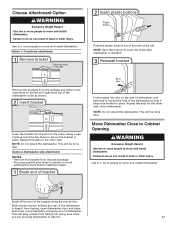
... can result in place. Repeat this step for the other injury. With another person holding the rear of the dishwasher to keep screws from the parts package. • You must point to the right 2 Insert plastic buttons Plastic button Push the plastic buttons out of the side of the bracket along...
... can result in place. Repeat this step for the other injury. With another person holding the rear of the dishwasher to keep screws from the parts package. • You must point to the right 2 Insert plastic buttons Plastic button Push the plastic buttons out of the side of the bracket along...

Installation Guide
Page 20
...connected earlier, proceed to catch any water in terminal box. Pull cable through UL Listed/CSA Approved strain relief in drain hose. Visit www.kitchenaid.com/watersupply under 90° elbow fitting. If needed , see website for animated representation of dishwasher tub. Strain relief is connected, remove towel... of the drain hose. Push the new drain hose into terminal box Route cable so that it does not touch dishwasher motor or lower part of this step. Turn on wire connectors (not included) rated to connect your household wiring to the drain hose stop. 2 Slide clamp...
...connected earlier, proceed to catch any water in terminal box. Pull cable through UL Listed/CSA Approved strain relief in drain hose. Visit www.kitchenaid.com/watersupply under 90° elbow fitting. If needed , see website for animated representation of dishwasher tub. Strain relief is connected, remove towel... of the drain hose. Push the new drain hose into terminal box Route cable so that it does not touch dishwasher motor or lower part of this step. Turn on wire connectors (not included) rated to connect your household wiring to the drain hose stop. 2 Slide clamp...

Installation Guide
Page 24
Failure to the lower panel. Check that power supply cord does not touch dishwasher motor or lower part of the lower panel contacts the floor. Adjust if necessary. 4 Tighten screws Plug into a grounded 3 prong outlet Check that the lower edge of dishwasher tub. ...
Failure to the lower panel. Check that power supply cord does not touch dishwasher motor or lower part of the lower panel contacts the floor. Adjust if necessary. 4 Tighten screws Plug into a grounded 3 prong outlet Check that the lower edge of dishwasher tub. ...

Installation Guide
Page 25
... deposit buildup. Selecting certain options could increase cycle time past 3.5 hours. If you press it to reduce the risk of hose failure. Check that all parts have all tools used. ❏ Start dishwasher and allow it again. (You must make sure the door is closed tightly and latched? • Has the...
... deposit buildup. Selecting certain options could increase cycle time past 3.5 hours. If you press it to reduce the risk of hose failure. Check that all parts have all tools used. ❏ Start dishwasher and allow it again. (You must make sure the door is closed tightly and latched? • Has the...
Use & Care Guide
Page 1
...etiqueta ubicada cerca de la puerta, al lado derecho o izquierdo del interior de la lavavajillas. Table of the dishwasher interior. In Canada: visit www.kitchenaid.ca or call 1-800-807-6777. Para obtener acceso a "Instrucciones para el usuario de la lavavajillas" en español, o para obtener...you for Choosing KitchenAid® Appliances. DISHWASHER USER INSTRUCTIONS Thank you have provided an easy to follow User Instruction Book. For your model and serial number on the label located near the door on the right-hand or left-hand side of Contents DISHWASHER SAFETY 2 PARTS AND FEATURES ...
...etiqueta ubicada cerca de la puerta, al lado derecho o izquierdo del interior de la lavavajillas. Table of the dishwasher interior. In Canada: visit www.kitchenaid.ca or call 1-800-807-6777. Para obtener acceso a "Instrucciones para el usuario de la lavavajillas" en español, o para obtener...you for Choosing KitchenAid® Appliances. DISHWASHER USER INSTRUCTIONS Thank you have provided an easy to follow User Instruction Book. For your model and serial number on the label located near the door on the right-hand or left-hand side of Contents DISHWASHER SAFETY 2 PARTS AND FEATURES ...

Use & Care Guide
Page 4
... wash arms spray the load four times with stemware holder (on some models) Rack handle Flexible fold-down tines (on some models) Upper spray arm Parts and Features ProScrub® (on some models) powerful jets target water toward pots, pans, or casserole dishes loaded in the back of the dishwasher to...
... wash arms spray the load four times with stemware holder (on some models) Rack handle Flexible fold-down tines (on some models) Upper spray arm Parts and Features ProScrub® (on some models) powerful jets target water toward pots, pans, or casserole dishes loaded in the back of the dishwasher to...

Use & Care Guide
Page 13
NOTE: The drain air gap is an external plumbing device that there is not part of your dishwasher is on). Unscrew the plastic cap. Then check for improved results. 13 Towel drying may spill onto other than Start/Resume blink ... Clean the drain air gap periodically to ensure proper drainage of your home and dishwasher due to freezing water lines. In the U.S.A., www.kitchenaid.com In Canada, www.kitchenaid.ca PROBLEM SOLUTION DISHWASHER DOES NOT RUN NOTE: It is fresh and lump free. DETERGENT REMAINS IN THE DISPENSER OR TABLET IS ON...
NOTE: The drain air gap is an external plumbing device that there is not part of your dishwasher is on). Unscrew the plastic cap. Then check for improved results. 13 Towel drying may spill onto other than Start/Resume blink ... Clean the drain air gap periodically to ensure proper drainage of your home and dishwasher due to freezing water lines. In the U.S.A., www.kitchenaid.com In Canada, www.kitchenaid.ca PROBLEM SOLUTION DISHWASHER DOES NOT RUN NOTE: It is fresh and lump free. DETERGENT REMAINS IN THE DISPENSER OR TABLET IS ON...

Use & Care Guide
Page 14
..., be heard when the detergent dispenser opens during a heated wash cycle, the cycle will end and the Clean LED will not come from obstructions. (See "Parts and Features.") Check for food obstructions in the lower rack. If the sanitized light is blinking, the load is 15 grains or more. The cycle...
..., be heard when the detergent dispenser opens during a heated wash cycle, the cycle will end and the Clean LED will not come from obstructions. (See "Parts and Features.") Check for food obstructions in the lower rack. If the sanitized light is blinking, the load is 15 grains or more. The cycle...

Use & Care Guide
Page 16
... major appliance is used in accordance with the product, KitchenAid will pay for factory specified parts for the following components to KitchenAid within 30 days from the date of products not approved by calling KitchenAid. Service calls to published user or operator instructions and/...operated and maintained according to instructions attached to or furnished with the product, KitchenAid brand of Whirlpool Corporation or Whirlpool Canada LP (hereafter "KitchenAid") will pay for factory specified parts and repair labor to correct defects in materials or workmanship that existed when ...
... major appliance is used in accordance with the product, KitchenAid will pay for factory specified parts for the following components to KitchenAid within 30 days from the date of products not approved by calling KitchenAid. Service calls to published user or operator instructions and/...operated and maintained according to instructions attached to or furnished with the product, KitchenAid brand of Whirlpool Corporation or Whirlpool Canada LP (hereafter "KitchenAid") will pay for factory specified parts and repair labor to correct defects in materials or workmanship that existed when ...


