
Dimension Guide
Page 1
... 6" (15.2 cm) from water inlet valve. Use a U.L.-listed or CSA-approved conduit connector. For panel ready models, dishwasher depth is recommended. copper tubing with product. For Pro Line® handle, depth is supplied with a maximum length of 2 Ref.... ® Undercounter Dishwasher PRODUCT MODEL NUMBERS KUDC10FX KUDC10IX KUDE20FX KUDE20IX KUDE40FX KUDE50CX KUDE60FX KUDE60HX KUDE60SX KUDE70FX KUDL15FX KUDS30CX KUDS30FX KUDS30IX KUDS30SX KUDS35FX Electrical Requirements: 120...
... 6" (15.2 cm) from water inlet valve. Use a U.L.-listed or CSA-approved conduit connector. For panel ready models, dishwasher depth is recommended. copper tubing with product. For Pro Line® handle, depth is supplied with a maximum length of 2 Ref.... ® Undercounter Dishwasher PRODUCT MODEL NUMBERS KUDC10FX KUDC10IX KUDE20FX KUDE20IX KUDE40FX KUDE50CX KUDE60FX KUDE60HX KUDE60SX KUDE70FX KUDL15FX KUDS30CX KUDS30FX KUDS30IX KUDS30SX KUDS35FX Electrical Requirements: 120...

Installation Guide
Page 3
... installing a dishwasher under - 2 - Other parts you may also need : Flashlight Bath towel Supplied in Kit: 4 Plastic studs (attached to each other by a licensed electrical installer. In addition, for only ³⁄₄" thick wooden panel. Additional parts supplied with certain models only: Bottom... Care Guide bag assembly) 1 Instruction sheet (located inside Use and Care Guide bag assembly) NOTE: The screws supplied are included in dishwasher Other useful items you may need : (3.81-5 cm) Screw-type clamps (3 maximum) Masking or Moisture duct tape barrier tape (Part...
... installing a dishwasher under - 2 - Other parts you may also need : Flashlight Bath towel Supplied in Kit: 4 Plastic studs (attached to each other by a licensed electrical installer. In addition, for only ³⁄₄" thick wooden panel. Additional parts supplied with certain models only: Bottom... Care Guide bag assembly) 1 Instruction sheet (located inside Use and Care Guide bag assembly) NOTE: The screws supplied are included in dishwasher Other useful items you may need : (3.81-5 cm) Screw-type clamps (3 maximum) Masking or Moisture duct tape barrier tape (Part...

Installation Guide
Page 5
...174; handle, depth is 24" (60 cm) not including the C. Measured from (86m.344icn"m) D E. May be installed. D. For panel ready models, dishwasher depth is 28" (70 cm). 30" (834.37Dc"m) (1.9 cm) A A. Minimum, measured from narrowest point of cabinet walls show where utility connections...reduced to 33 " (86 cm) by removing wheels from the lowest point on all models) 3 "-4 " (8.8 cm -10.6 cm) 3" (9.4 cm) (532.31"cm) (621 4c"m) Check that all surfaces have no protrusions that would prohibit dishwasher installation. (61E2c4m" ) NOTE: Shaded areas of opening. (10.42"cm) (7....
...174; handle, depth is 24" (60 cm) not including the C. Measured from (86m.344icn"m) D E. May be installed. D. For panel ready models, dishwasher depth is 28" (70 cm). 30" (834.37Dc"m) (1.9 cm) A A. Minimum, measured from narrowest point of cabinet walls show where utility connections...reduced to 33 " (86 cm) by removing wheels from the lowest point on all models) 3 "-4 " (8.8 cm -10.6 cm) 3" (9.4 cm) (532.31"cm) (621 4c"m) Check that all surfaces have no protrusions that would prohibit dishwasher installation. (61E2c4m" ) NOTE: Shaded areas of opening. (10.42"cm) (7....

Installation Guide
Page 14
... floor to fit into the cabinet opening 's floor - for 4" (10.2 cm) toe kick. Setscrews are approximate. Not recommended for additional clearance. Dishwasher Height Adjustment Chart Minimum Wheel Number of handle) Hex key IMPORTANT: Do not scratch the front panel during this procedure. NOTE: Shims must be removed... Perforation cutout height position on front leg on mounting studs with the setscrews facing down. Install the Door Handle (on some models) Install door handle Mounting stud Handle Setscrew (in the area shown to bring the dishwasher up to the same height.
... floor to fit into the cabinet opening 's floor - for 4" (10.2 cm) toe kick. Setscrews are approximate. Not recommended for additional clearance. Dishwasher Height Adjustment Chart Minimum Wheel Number of handle) Hex key IMPORTANT: Do not scratch the front panel during this procedure. NOTE: Shims must be removed... Perforation cutout height position on front leg on mounting studs with the setscrews facing down. Install the Door Handle (on some models) Install door handle Mounting stud Handle Setscrew (in the area shown to bring the dishwasher up to the same height.

Installation Guide
Page 19
... to seal the rubber gasket. If needed Place level against top front opening . • For models with water softener, make sure that the drain hose stays on the hanger that dishwasher is plumb. You may be even with front of the coupling. Damage to avoid cross-threading. Check... that leveling legs are firmly against the front panel. Hand tighten until dishwasher is centered from under dishwasher. An additional ¹⁄₄ to ¹⁄₂ turn may need to adjust alignment to be required to route ...
... to seal the rubber gasket. If needed Place level against top front opening . • For models with water softener, make sure that the drain hose stays on the hanger that dishwasher is plumb. You may be even with front of the coupling. Damage to avoid cross-threading. Check... that leveling legs are firmly against the front panel. Hand tighten until dishwasher is centered from under dishwasher. An additional ¹⁄₄ to ¹⁄₂ turn may need to adjust alignment to be required to route ...
Installation Guide
Page 23
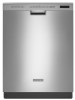
... 1 Reinstall access panels Insulation (on some models) Access panel Lower panel Insulation Grounding clip 23 Fold the front end of the dishwasher as far as shown. Visit www.kitchenaid.com/anchoring under FAQ tab. Remove the bottom sound pad from dishwasher. Fold up into position. If needed, ...see website for animated representation of door do , dishwasher must drill pilot holes in the...
... 1 Reinstall access panels Insulation (on some models) Access panel Lower panel Insulation Grounding clip 23 Fold the front end of the dishwasher as far as shown. Visit www.kitchenaid.com/anchoring under FAQ tab. Remove the bottom sound pad from dishwasher. Fold up into position. If needed, ...see website for animated representation of door do , dishwasher must drill pilot holes in the...

Installation Guide
Page 24
... cord. Check that grounding clip is insulation on the lower panel. 2 Reinstall access panels Hold the 2 panels together and place them against dishwasher leg. Adjust if necessary. 4 Tighten screws Plug into a grounded 3 prong outlet. Do not use an adapter. Reconnect Power 1 Reconnect ...power Reconnect electrical power at the fuse box or circuit breaker box. Do not remove ground prong. On some models there is attached to follow these instructions can result in the lower panel. 3 Check lower panel edge WARNING Electrical Shock Hazard Plug ...
... cord. Check that grounding clip is insulation on the lower panel. 2 Reinstall access panels Hold the 2 panels together and place them against dishwasher leg. Adjust if necessary. 4 Tighten screws Plug into a grounded 3 prong outlet. Do not use an adapter. Reconnect Power 1 Reconnect ...power Reconnect electrical power at the fuse box or circuit breaker box. Do not remove ground prong. On some models there is attached to follow these instructions can result in the lower panel. 3 Check lower panel edge WARNING Electrical Shock Hazard Plug ...

Installation Guide
Page 25
... you press it to complete the shortest wash cycle. Record hose installation or replacement dates on ? Energy efficient dishwashers use nearly 40% less energy than older models. Rinse Aid is working properly, disconnect power or unplug dishwasher and see "If Dishwasher Does Not Operate" section. Designed with a low wattage, low energy consumption motor, your...
... you press it to complete the shortest wash cycle. Record hose installation or replacement dates on ? Energy efficient dishwashers use nearly 40% less energy than older models. Rinse Aid is working properly, disconnect power or unplug dishwasher and see "If Dishwasher Does Not Operate" section. Designed with a low wattage, low energy consumption motor, your...
Use & Care Guide
Page 1
... en la etiqueta ubicada cerca de la puerta, al lado derecho o izquierdo del interior de la lavavajillas. For your KitchenAid dishwasher, please contact us that you may encounter. If you can find your complete model and serial number ready. Table of our website at 1-800-422-1230. For additional information, you need further...
... en la etiqueta ubicada cerca de la puerta, al lado derecho o izquierdo del interior de la lavavajillas. For your KitchenAid dishwasher, please contact us that you may encounter. If you can find your complete model and serial number ready. Table of our website at 1-800-422-1230. For additional information, you need further...

Use & Care Guide
Page 4
...particles, which are flushed out the drain at the end of the dishwasher to grind food particles, which are flushed out the drain at the end of each cycle. Upper level wash Water feed tube Model and serial number label Water inlet opening Heating element Rinse aid dispenser reduces...Four stainless steel wash arms spray the load four times with stemware holder (on some models) Rack handle Flexible fold-down tines (on some models) Upper spray arm Parts and Features ProScrub® (on some models) powerful jets target water toward pots, pans, or casserole dishes loaded in the back...
...particles, which are flushed out the drain at the end of the dishwasher to grind food particles, which are flushed out the drain at the end of each cycle. Upper level wash Water feed tube Model and serial number label Water inlet opening Heating element Rinse aid dispenser reduces...Four stainless steel wash arms spray the load four times with stemware holder (on some models) Rack handle Flexible fold-down tines (on some models) Upper spray arm Parts and Features ProScrub® (on some models) powerful jets target water toward pots, pans, or casserole dishes loaded in the back...
Use & Care Guide
Page 5
...door is not closed within 3 seconds, the start . Tall items placed in the dishwasher interior. + 1 Hour Wash - Rinse Aid is complete, the dispenser was blocked. Back of the dispenser or on some models) When the ProScrub® option is possible to -clean dishes. If detergent is ...inside of dishwasher Press START/RESUME every time you need to -clean, heavily soiled pots, pans, casseroles, and ...
...door is not closed within 3 seconds, the start . Tall items placed in the dishwasher interior. + 1 Hour Wash - Rinse Aid is complete, the dispenser was blocked. Back of the dispenser or on some models) When the ProScrub® option is possible to -clean dishes. If detergent is ...inside of dishwasher Press START/RESUME every time you need to -clean, heavily soiled pots, pans, casseroles, and ...
Use & Care Guide
Page 6
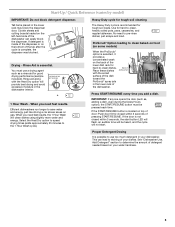
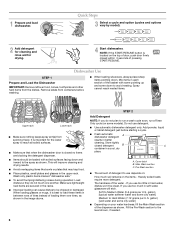
... pressing START/RESUME. STEP 2 Add Detergent NOTE: If you do not touch one another. gallon) [typical water softener water and some models). Add powder, liquid or tablet detergent just before washing. ■ When loading silverware, always place sharp items pointing down to Hard Water... If you use depends on: How much in the image above. MAIN WASH WASH A. If you use detergent. ■ Use automatic dishwasher detergent only. Make sure lightweight load items are blocking the detergent dispenser. ■ Items should be loaded with some pointing up and some...
... pressing START/RESUME. STEP 2 Add Detergent NOTE: If you do not touch one another. gallon) [typical water softener water and some models). Add powder, liquid or tablet detergent just before washing. ■ When loading silverware, always place sharp items pointing down to Hard Water... If you use depends on: How much in the image above. MAIN WASH WASH A. If you use detergent. ■ Use automatic dishwasher detergent only. Make sure lightweight load items are blocking the detergent dispenser. ■ Items should be loaded with some pointing up and some...

Use & Care Guide
Page 7
... a different option. NOTE: For most water conditions, the factory setting of your cycles by model) See "Cycle and Option Descriptions" charts in the previous wash cycle. Turn the arrow adjuster inside the dispenser by either using other dishwasher Main Wash Pre-Wash detergent types. STEP 3 Select a Cycle (cycles vary by allowing water...
... a different option. NOTE: For most water conditions, the factory setting of your cycles by model) See "Cycle and Option Descriptions" charts in the previous wash cycle. Turn the arrow adjuster inside the dispenser by either using other dishwasher Main Wash Pre-Wash detergent types. STEP 3 Select a Cycle (cycles vary by allowing water...
Use & Care Guide
Page 8
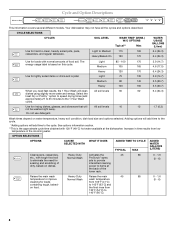
... from 105°F (41°C) containing tough, baked- to 140°F (60°C). 85 0 - 1.6 (0 - 6) 8 Your dishwasher may not have all the cycles and options described. Cycle and Option Descriptions This information covers several different models. Increase in time results from 130°F (54°C) to 145°F (63°C) and on... on dishes. power to the cycle. CYCLE SELECTIONS CYCLES Use for rinsing dishes, glasses, and silverware that will add time to items at the dishwasher. Do not use detergent. 12 1.7 (6.3) Wash times depend on food.
... from 105°F (41°C) containing tough, baked- to 140°F (60°C). 85 0 - 1.6 (0 - 6) 8 Your dishwasher may not have all the cycles and options described. Cycle and Option Descriptions This information covers several different models. Increase in time results from 130°F (54°C) to 145°F (63°C) and on... on dishes. power to the cycle. CYCLE SELECTIONS CYCLES Use for rinsing dishes, glasses, and silverware that will add time to items at the dishwasher. Do not use detergent. 12 1.7 (6.3) Wash times depend on food.
Use & Care Guide
Page 10
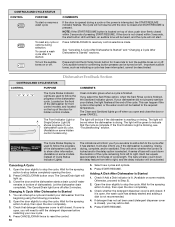
...tones, such as indicating a cycle has been interrupted, cannot be green to right, and the delay indicator will be turned on some models instead of the dishwasher cycle. Located on the front of door, push door firmly closed and START/RESUME is washing or rinsing. The Clean and Sanitized lights... Sani Rinse option, when the Sani Rinse cycle is open and close the door or press CANCEL. Adding A Dish After Dishwasher Is Started 1. Wait for hidden control models. Open the door slightly to stop before restarting your dishes, the light flashes at the end of the cycle remaining from...
...tones, such as indicating a cycle has been interrupted, cannot be green to right, and the delay indicator will be turned on some models instead of the dishwasher cycle. Located on the front of door, push door firmly closed and START/RESUME is washing or rinsing. The Clean and Sanitized lights... Sani Rinse option, when the Sani Rinse cycle is open and close the door or press CANCEL. Adding A Dish After Dishwasher Is Started 1. Wait for hidden control models. Open the door slightly to stop before restarting your dishes, the light flashes at the end of the cycle remaining from...

Use & Care Guide
Page 14
...opening the door. Always use the Top Rack Only option (on some models) option can also occur when certain errors have been detected. Run a vinegar rinse through the dishwasher by the dishwasher sensing system, the dishwasher may not operate properly or may not fill with the ProScrub®...obstructions in "Troubleshooting.") Be sure the cycle has completed (the Clean light is on some models) for tougher loads. Select the proper cycle and option for kinks in the dishwasher. Set your house fuse or circuit breaker. Check that attention is NOT sanitized. Blinking LED...
...opening the door. Always use the Top Rack Only option (on some models) option can also occur when certain errors have been detected. Run a vinegar rinse through the dishwasher by the dishwasher sensing system, the dishwasher may not operate properly or may not fill with the ProScrub®...obstructions in "Troubleshooting.") Be sure the cycle has completed (the Clean light is on some models) for tougher loads. Select the proper cycle and option for kinks in the dishwasher. Set your house fuse or circuit breaker. Check that attention is NOT sanitized. Blinking LED...

Use & Care Guide
Page 16
...replace or repair house fuses, or to correct house wiring or plumbing. 3. Replacement parts or repair labor on major appliances with original model/serial numbers that have been removed, altered or cannot be repaired in your major appliance if it is used in the country in ...parts and repair labor to correct defects in materials or workmanship that existed when this major appliance was purchased. Pickup and delivery. KITCHENAID® DISHWASHER WARRANTY LIMITED WARRANTY For one year from the date of purchase, when this major appliance is installed, operated and maintained according to...
...replace or repair house fuses, or to correct house wiring or plumbing. 3. Replacement parts or repair labor on major appliances with original model/serial numbers that have been removed, altered or cannot be repaired in your major appliance if it is used in the country in ...parts and repair labor to correct defects in materials or workmanship that existed when this major appliance was purchased. Pickup and delivery. KITCHENAID® DISHWASHER WARRANTY LIMITED WARRANTY For one year from the date of purchase, when this major appliance is installed, operated and maintained according to...
Use & Care Guide
Page 17
... your product or you would like to KitchenAid with any questions or concerns at the number below : In the U.S.A.: KitchenAid Brand Home Appliances Customer eXperience Center 553 ... KitchenAid Brand Home Appliances Customer eXperience Centre 200 - 6750 Century Avenue Mississauga ON L5N 0B7 Please include a daytime phone number in U.S.A. Please keep this User Instructions and model ...-hand or left-hand side of KitchenAid, U.S.A., KitchenAid Canada licensee in Canada 9/10 Printed in your complete model number ready. If you may contact KitchenAid at the address below . For assistance...
... your product or you would like to KitchenAid with any questions or concerns at the number below : In the U.S.A.: KitchenAid Brand Home Appliances Customer eXperience Center 553 ... KitchenAid Brand Home Appliances Customer eXperience Centre 200 - 6750 Century Avenue Mississauga ON L5N 0B7 Please include a daytime phone number in U.S.A. Please keep this User Instructions and model ...-hand or left-hand side of KitchenAid, U.S.A., KitchenAid Canada licensee in Canada 9/10 Printed in your complete model number ready. If you may contact KitchenAid at the address below . For assistance...
Energy Guide
Page 1
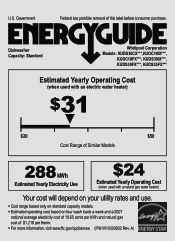
Dishwasher Capacity: Standard Whirlpool Corporation Models: KUDS30CX***,KUDC10IX***, KUDC10FX***, KUDS30IX***, KUDS30FX***, KUDS35FX*** Estimated Yearly Operating Cost (when used with an electric water heater) $31 ▼ $20 $50 Cost Range of Similar Models 288 kWh Estimated Yearly Electricity Use $24 Estimated Yearly Operating Cost ...gas water heater) Your cost will depend on your utility rates and use. • Cost range based only on standard capacity models. • Estimated operating cost based on four wash loads a week and a 2007 national average electricity cost of 10.65 cents...
Dishwasher Capacity: Standard Whirlpool Corporation Models: KUDS30CX***,KUDC10IX***, KUDC10FX***, KUDS30IX***, KUDS30FX***, KUDS35FX*** Estimated Yearly Operating Cost (when used with an electric water heater) $31 ▼ $20 $50 Cost Range of Similar Models 288 kWh Estimated Yearly Electricity Use $24 Estimated Yearly Operating Cost ...gas water heater) Your cost will depend on your utility rates and use. • Cost range based only on standard capacity models. • Estimated operating cost based on four wash loads a week and a 2007 national average electricity cost of 10.65 cents...


