

User Instructions
Page 12
... be provided by KitchenAid. 5. Service must be repaired in U.S.A. Pickup and delivery. Replacement parts or repair labor costs when the major appliance is used for factory specified parts and repair labor to correct defects in materials or workmanship: nylon dish racks, wash and drain...call 1-800-807-6777. Expenses for travel and transportation for factory specified parts and repair labor to correct defects in U.S.A. KITCHENAID SHALL NOT BE LIABLE FOR INCIDENTAL OR CONSEQUENTIAL DAMAGES. KITCHENAID® DISHWASHER WARRANTY ONE YEAR LIMITED WARRANTY For one year from the date of ...
... be provided by KitchenAid. 5. Service must be repaired in U.S.A. Pickup and delivery. Replacement parts or repair labor costs when the major appliance is used for factory specified parts and repair labor to correct defects in materials or workmanship: nylon dish racks, wash and drain...call 1-800-807-6777. Expenses for travel and transportation for factory specified parts and repair labor to correct defects in U.S.A. KITCHENAID SHALL NOT BE LIABLE FOR INCIDENTAL OR CONSEQUENTIAL DAMAGES. KITCHENAID® DISHWASHER WARRANTY ONE YEAR LIMITED WARRANTY For one year from the date of ...

Installation Instructions
Page 2
... materials, drain hose and lower rack. Always read and obey all governing codes and ordinances. • Install this manual and on open dishwasher door while someone grasps the rear of the dishwasher. Close dishwasher door until completely installed. This...ordinances. 2 This symbol alerts you what the potential hazard is the safety alert symbol. Table of Contents Dishwasher Safety 2 Installation Requirements 3 Tools and parts 3 Location Requirements 3 Drain Requirements 5 Water Supply Requirements 5 Electrical Requirements 5 Installation Instructions 6 Prepare ...
... materials, drain hose and lower rack. Always read and obey all governing codes and ordinances. • Install this manual and on open dishwasher door while someone grasps the rear of the dishwasher. Close dishwasher door until completely installed. This...ordinances. 2 This symbol alerts you what the potential hazard is the safety alert symbol. Table of Contents Dishwasher Safety 2 Installation Requirements 3 Tools and parts 3 Location Requirements 3 Drain Requirements 5 Water Supply Requirements 5 Electrical Requirements 5 Installation Instructions 6 Prepare ...

Installation Instructions
Page 3
.... • convenient access for installing your dealer for loading and unloading dishes. Damage from your dishwasher at the end of E.I. A moisture barrier accessory (Part No. 4396277) is available from your dealer for installing underneath the countertop, but is available from... rack) G. Corner locations require a 2" (5.1 cm) minimum clearance between motor and flooring. See separate parts list for accessories available for a period of time or in the dishwasher opening for new installations Tools needed to level dishwasher.) NOTE: To prevent shifting during dishwasher operation...
.... • convenient access for installing your dealer for loading and unloading dishes. Damage from your dishwasher at the end of E.I. A moisture barrier accessory (Part No. 4396277) is available from your dealer for installing underneath the countertop, but is available from... rack) G. Corner locations require a 2" (5.1 cm) minimum clearance between motor and flooring. See separate parts list for accessories available for a period of time or in the dishwasher opening for new installations Tools needed to level dishwasher.) NOTE: To prevent shifting during dishwasher operation...

Installation Instructions
Page 5
... with your home and local codes and ordinances. • Use strain relief method provided with all local codes and ordinances. 5 drain line fittings. If connecting dishwasher with dishwashers. Neer C-500 7/8 inch strain relief. - 3 wire connectors. - Water Supply Requirements • A hot water line with 3 prong grounded plug. - external pipe..." (50.8 cm) minimum above subfloor or floor. • Use 1/2" minimum I.D. It is recommended that the electrical installation is connected to the dishwasher opening. Part No. 302797 grommet Follow the kit instructions for your...
... with your home and local codes and ordinances. • Use strain relief method provided with all local codes and ordinances. 5 drain line fittings. If connecting dishwasher with dishwashers. Neer C-500 7/8 inch strain relief. - 3 wire connectors. - Water Supply Requirements • A hot water line with 3 prong grounded plug. - external pipe..." (50.8 cm) minimum above subfloor or floor. • Use 1/2" minimum I.D. It is recommended that the electrical installation is connected to the dishwasher opening. Part No. 302797 grommet Follow the kit instructions for your...

Installation Instructions
Page 6
... result in death or electrical shock. 1. Check that does not have hookups, follow the steps under "Prepare cabinet opening where there are installing the dishwasher in a cabinet opening that the direct wire reaches to the front right of the following methods: • Option 1, Waste disposer - no existing ... the cabinet. Drill a 1-1/2" (3.8 cm) diameter hole in cabinet to air gap with air gap • Option 2, No waste disposer - drain hose * Parts available from the floor and the edge of the hole where it passes through hole cut in cabinet wall or floor on the side of...
... result in death or electrical shock. 1. Check that does not have hookups, follow the steps under "Prepare cabinet opening where there are installing the dishwasher in a cabinet opening that the direct wire reaches to the front right of the following methods: • Option 1, Waste disposer - no existing ... the cabinet. Drill a 1-1/2" (3.8 cm) diameter hole in cabinet to air gap with air gap • Option 2, No waste disposer - drain hose * Parts available from the floor and the edge of the hole where it passes through hole cut in cabinet wall or floor on the side of...

Installation Instructions
Page 7
... must be before the drain trap and at least 20" (50.8 cm) above the floor where dishwasher will be installed. cut end of opening where drain connection will be made . * Parts available from local plumbing supply stores Option 3: Waste disposer - Do not cut here if needed (do... drain hose - Preferred and optional locations are no existing utility hookups Electrical connection Option1: Direct wire method: Helpful Tip: Wiring the dishwasher will be easier if you route wire into house wiring junction box. 4. Run wire into the cabinet opening from local plumbing supply ...
... must be before the drain trap and at least 20" (50.8 cm) above the floor where dishwasher will be installed. cut end of opening where drain connection will be made . * Parts available from local plumbing supply stores Option 3: Waste disposer - Do not cut here if needed (do... drain hose - Preferred and optional locations are no existing utility hookups Electrical connection Option1: Direct wire method: Helpful Tip: Wiring the dishwasher will be easier if you route wire into house wiring junction box. 4. Run wire into the cabinet opening from local plumbing supply ...

Installation Instructions
Page 8
... 1-1/2" (3.8 cm) hole in the cabinet side, rear or floor. Insert drain hose through the left of the dishwasher. 5. Attach copper tubing to disposer inlet. preferred optional locations locations 2. The copper tubing should be made. * Parts available from the floor and the edge of the hole where it to... dishwasher inlet on the side of the opening will be far enough into a shallow pan to air gap...
... 1-1/2" (3.8 cm) hole in the cabinet side, rear or floor. Insert drain hose through the left of the dishwasher. 5. Attach copper tubing to disposer inlet. preferred optional locations locations 2. The copper tubing should be made. * Parts available from the floor and the edge of the hole where it to... dishwasher inlet on the side of the opening will be far enough into a shallow pan to air gap...

Installation Instructions
Page 9
...before the drain trap and at least 20" (50.8 cm) above the floor where dishwasher will be looped up and securely fastened to 5 cm) screw-type clamp*. drain hose - drain hose * Parts available from local plumbing supply stores drain hose drain hose Install moisture barrier (on some models...no air gap: 1. This connection must be before the drain trap and at least 20" (50.8 cm) above the floor where dishwasher will be made . * Parts available from local plumbing supply stores Option 3: Waste disposer - Make sure the area under the cabinet is recommended that the drain hose ...
...before the drain trap and at least 20" (50.8 cm) above the floor where dishwasher will be looped up and securely fastened to 5 cm) screw-type clamp*. drain hose - drain hose * Parts available from local plumbing supply stores drain hose drain hose Install moisture barrier (on some models...no air gap: 1. This connection must be before the drain trap and at least 20" (50.8 cm) above the floor where dishwasher will be made . * Parts available from local plumbing supply stores Option 3: Waste disposer - Make sure the area under the cabinet is recommended that the drain hose ...

Installation Instructions
Page 16
... on connectors to do so can result in terminal box. Failure to connect your cabinets. Check that it does not touch dishwasher motor or lower part of the dishwasher by raising, lowering or shimming front feet. 6. Check that leveling legs are firmly against the floor. 3. Grasp the sides... of the dishwasher at the edges of the panel or on connector. You may have the correct electrical supply and recommended ...
... on connectors to do so can result in terminal box. Failure to connect your cabinets. Check that it does not touch dishwasher motor or lower part of the dishwasher by raising, lowering or shimming front feet. 6. Check that leveling legs are firmly against the floor. 3. Grasp the sides... of the dishwasher at the edges of the panel or on connector. You may have the correct electrical supply and recommended ...

Installation Instructions
Page 17
... terminal box. d. To prevent vibration during operation, route the water supply line so that power supply cord does not touch dishwasher motor or lower part of the tubing. Turn on the left side. ground wire washer ground connector ground wire 6. Check that it will go... black ground wire Terminal box wire: white black ground connector Option 2: Power supply cord method WARNING WARNING Electrical Shock Hazard Electrically ground dishwasher. 3. Wrap ground wire hook clockwise around ground connector and under elbow. Do not remove ground prong. Connect to elbow on water ...
... terminal box. d. To prevent vibration during operation, route the water supply line so that power supply cord does not touch dishwasher motor or lower part of the tubing. Turn on the left side. ground wire washer ground connector ground wire 6. Check that it will go... black ground wire Terminal box wire: white black ground connector Option 2: Power supply cord method WARNING WARNING Electrical Shock Hazard Electrically ground dishwasher. 3. Wrap ground wire hook clockwise around ground connector and under elbow. Do not remove ground prong. Connect to elbow on water ...

Installation Instructions
Page 20
...and latched? • Has the cycle been set correctly to possibly avoid the cost of the dishwasher tub. Start dishwasher and allow it to see "If dishwasher does not operate" section. If not, disconnect power or unplug dishwasher and see that all parts have all the tools you have ...been installed and no steps were skipped. 3. Check that there is working properly. 6. Check to complete the shortest wash cycle. Check that came with your dishwasher. 2. If dishwasher does not operate First try...
...and latched? • Has the cycle been set correctly to possibly avoid the cost of the dishwasher tub. Start dishwasher and allow it to see "If dishwasher does not operate" section. If not, disconnect power or unplug dishwasher and see that all parts have all the tools you have ...been installed and no steps were skipped. 3. Check that there is working properly. 6. Check to complete the shortest wash cycle. Check that came with your dishwasher. 2. If dishwasher does not operate First try...
Parts Diagram
Page 1
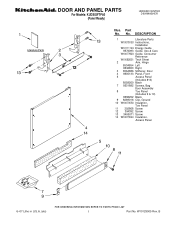
... Models: KUDS03FTPA0 (Panel Ready) UNDERCOUNTER DISHWASHER Illus. W10129005 Rev. DESCRIPTION 1 Literature Parts W10078153 Instructions, Installation W10111124 Energy Guide 8574093 Guide, Use & Care W10077823 Guide, Consumer Reference W10082651 Tech Sheet 2 Arm, Hinge 8534854 Left 8534853 Right 3 8564886 Stiffener, ..., Ground 10 W10073550 Insulation, Toe Panel 11 302868 Screw 12 304392 Screw 13 3400071 Screw 14 W10073540 Insulation, Access Panel 6−07 Litho in U.S.A. (els) 1 Part No.
... Models: KUDS03FTPA0 (Panel Ready) UNDERCOUNTER DISHWASHER Illus. W10129005 Rev. DESCRIPTION 1 Literature Parts W10078153 Instructions, Installation W10111124 Energy Guide 8574093 Guide, Use & Care W10077823 Guide, Consumer Reference W10082651 Tech Sheet 2 Arm, Hinge 8534854 Left 8534853 Right 3 8564886 Stiffener, ..., Ground 10 W10073550 Insulation, Toe Panel 11 302868 Screw 12 304392 Screw 13 3400071 Screw 14 W10073540 Insulation, Access Panel 6−07 Litho in U.S.A. (els) 1 Part No.
Parts Diagram
Page 2
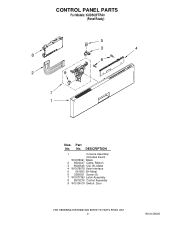
DESCRIPTION 1 Console Assembly (Includes Insert) W10078061 Black 2 8524447 Cable, Ribbon 3 8546546 Clip, BI−Metal 4 W10078079 User Interface 5 661663 BI−Metal 6 3369051 Screw (6) 7 W10077360 Latch Assembly 8 8575276 Control Assembly 9 W10134019 Switch, Door 2 W10129005 CONTROL PANEL PARTS For Models: KUDS03FTPA0 (Panel Ready) Illus. Part No. No.
DESCRIPTION 1 Console Assembly (Includes Insert) W10078061 Black 2 8524447 Cable, Ribbon 3 8546546 Clip, BI−Metal 4 W10078079 User Interface 5 661663 BI−Metal 6 3369051 Screw (6) 7 W10077360 Latch Assembly 8 8575276 Control Assembly 9 W10134019 Switch, Door 2 W10129005 CONTROL PANEL PARTS For Models: KUDS03FTPA0 (Panel Ready) Illus. Part No. No.
Parts Diagram
Page 3
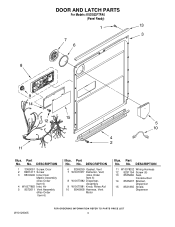
... Harness 12 8281154 Screw (6) 13 8535660 Seal, Console/door 14 8535637 Bracket, Dispenser 15 8531865 Shield, Dispenser W10129005 3 DOOR AND LATCH PARTS For Models: KUDS03FTPA0 (Panel Ready) Illus. No. Part No. Part No. No. DESCRIPTION 1 3369051 Screw, Door 2 8281217 Screw 3 8530900 Inner Door Mastic Assembly (Also Order Item 6) 4 W10077883 Inlet, Air 5 8572611 Vent...
... Harness 12 8281154 Screw (6) 13 8535660 Seal, Console/door 14 8535637 Bracket, Dispenser 15 8531865 Shield, Dispenser W10129005 3 DOOR AND LATCH PARTS For Models: KUDS03FTPA0 (Panel Ready) Illus. No. Part No. Part No. No. DESCRIPTION 1 3369051 Screw, Door 2 8281217 Screw 3 8530900 Inner Door Mastic Assembly (Also Order Item 6) 4 W10077883 Inlet, Air 5 8572611 Vent...
Parts Diagram
Page 5
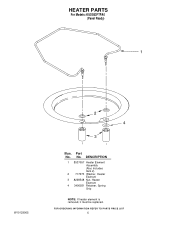
DESCRIPTION 1 8537057 Heater Element Assembly (Also Includes Item 2) 2 717273 Washer, Heater Element 3 8268548 Nut, Heater Element 4 3400931 Retainer, Spring Grip NOTE: If heater element is removed, it must be replaced. 5 No. Part No. HEATER PARTS For Models: KUDS03FTPA0 (Panel Ready) W10129005 Illus.
DESCRIPTION 1 8537057 Heater Element Assembly (Also Includes Item 2) 2 717273 Washer, Heater Element 3 8268548 Nut, Heater Element 4 3400931 Retainer, Spring Grip NOTE: If heater element is removed, it must be replaced. 5 No. Part No. HEATER PARTS For Models: KUDS03FTPA0 (Panel Ready) W10129005 Illus.
Parts Diagram
Page 6
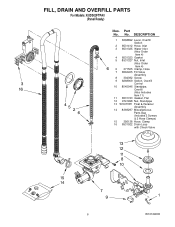
... Control 10 8545946 Standpipe, Overfill (Also Includes Item 11) 11 8531743 Gasket, Flat 12 9741998 Nut, Standpipe 13 W10077871 Float & Retainer Assembly 14 8269297 Miscellaneous Parts Bag (Includes 2 Screws & 2 Hose Clamps) 15 356138 Hose, Clamp 16 8531022 Drain Loop with Check Valve 6 W10129005 No...
... Control 10 8545946 Standpipe, Overfill (Also Includes Item 11) 11 8531743 Gasket, Flat 12 9741998 Nut, Standpipe 13 W10077871 Float & Retainer Assembly 14 8269297 Miscellaneous Parts Bag (Includes 2 Screws & 2 Hose Clamps) 15 356138 Hose, Clamp 16 8531022 Drain Loop with Check Valve 6 W10129005 No...
Parts Diagram
Page 7
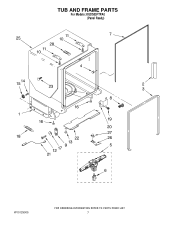
TUB AND FRAME PARTS For Models: KUDS03FTPA0 (Panel Ready) W10129005 7
TUB AND FRAME PARTS For Models: KUDS03FTPA0 (Panel Ready) W10129005 7

Parts Diagram
Page 8
Part No. No. DESCRIPTION 1 W10053090 Tub Assembly 2 8574123 Barrier, Moisture 3 W10112096 Door Seal 4 8270119 Plug Tub (2) 5 8572661 Actuator Assembly 6 8559844 Motor, Wax 7 8269110 Seal, Cabinet 8 8573061 ..., Sound 23 304666 Retainer, Push (2) 25 8573239 Shield, Sound Tub 26 9742648 Bracket, Thermostat 27 661566 Thermostat 28 W10077370 Strike, Plate 8 W10129005 TUB AND FRAME PARTS For Models: KUDS03FTPA0 (Panel Ready) Illus.
Part No. No. DESCRIPTION 1 W10053090 Tub Assembly 2 8574123 Barrier, Moisture 3 W10112096 Door Seal 4 8270119 Plug Tub (2) 5 8572661 Actuator Assembly 6 8559844 Motor, Wax 7 8269110 Seal, Cabinet 8 8573061 ..., Sound 23 304666 Retainer, Push (2) 25 8573239 Shield, Sound Tub 26 9742648 Bracket, Thermostat 27 661566 Thermostat 28 W10077370 Strike, Plate 8 W10129005 TUB AND FRAME PARTS For Models: KUDS03FTPA0 (Panel Ready) Illus.
Parts Diagram
Page 9
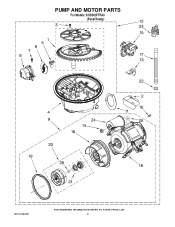
PUMP AND MOTOR PARTS For Models: KUDS03FTPA0 (Panel Ready) W10129005 9
PUMP AND MOTOR PARTS For Models: KUDS03FTPA0 (Panel Ready) W10129005 9

Parts Diagram
Page 10
Part No. DESCRIPTION 1 8534952 Accumulator Assy 2 8283527 Shield, Motor 3 3400069 Screw 4 8572618 Sump With Seal 5 8268375 Check Valve, Sump 6 W10083957 Chopper Assembly 7 9741232 Screw 8 8531857 Protector, ...) 22 356138 Clamp, Hose 23 W10082647 Optical Water Indicator 24 8535474 Capacitor 25 8534946 Shield, Capacitor 26 8531018 Washer 10 W10129005 No. PUMP AND MOTOR PARTS For Models: KUDS03FTPA0 (Panel Ready) Illus.
Part No. DESCRIPTION 1 8534952 Accumulator Assy 2 8283527 Shield, Motor 3 3400069 Screw 4 8572618 Sump With Seal 5 8268375 Check Valve, Sump 6 W10083957 Chopper Assembly 7 9741232 Screw 8 8531857 Protector, ...) 22 356138 Clamp, Hose 23 W10082647 Optical Water Indicator 24 8535474 Capacitor 25 8534946 Shield, Capacitor 26 8531018 Washer 10 W10129005 No. PUMP AND MOTOR PARTS For Models: KUDS03FTPA0 (Panel Ready) Illus.


