

User Instructions
Page 12
... Trademark/TM Trademark of your major appliance, to replace or repair house fuses or to correct house wiring or plumbing. 2. KITCHENAID® DISHWASHER WARRANTY ONE YEAR LIMITED WARRANTY For one year from the date of purchase, when this major appliance is operated and maintained according... to instructions attached to or furnished with the product, KitchenAid will pay for factory specified parts for the following components if defective in...
... Trademark/TM Trademark of your major appliance, to replace or repair house fuses or to correct house wiring or plumbing. 2. KITCHENAID® DISHWASHER WARRANTY ONE YEAR LIMITED WARRANTY For one year from the date of purchase, when this major appliance is operated and maintained according... to instructions attached to or furnished with the product, KitchenAid will pay for factory specified parts for the following components if defective in...

Installation Instructions
Page 2
.... Do not push down on your appliance. Doing so can kill or hurt you don't follow instructions. The dishwasher must be performed by a qualified service technician. Table of Contents Dishwasher Safety 2 Installation Requirements 3 Tools and parts 3 Location Requirements 3 Drain Requirements 5 Water Supply Requirements 5 Electrical Requirements 5 Installation Instructions 6 Prepare cabinet opening using existing utility...
.... Do not push down on your appliance. Doing so can kill or hurt you don't follow instructions. The dishwasher must be performed by a qualified service technician. Table of Contents Dishwasher Safety 2 Installation Requirements 3 Tools and parts 3 Location Requirements 3 Drain Requirements 5 Water Supply Requirements 5 Electrical Requirements 5 Installation Instructions 6 Prepare cabinet opening using existing utility...

Installation Instructions
Page 3
..., for a period of opening is not level with 3/8" N.P.T. A moisture barrier accessory (Part No. 4396277) is available from your dealer for installing your dishwasher at rear of time or in dishwasher • small level • TORX® T15 screwdriver (if installing custom front panels...are the proper size to connect your household wiring to fit a 7/8" (2.2 cm) diameter hole Parts supplied A. 2 - Bottom sound pad (located in lower rack) G. Check location where dishwasher will be installed must be left unused for new installations Tools needed: • electric drill with...
..., for a period of opening is not level with 3/8" N.P.T. A moisture barrier accessory (Part No. 4396277) is available from your dealer for installing your dishwasher at rear of time or in dishwasher • small level • TORX® T15 screwdriver (if installing custom front panels...are the proper size to connect your household wiring to fit a 7/8" (2.2 cm) diameter hole Parts supplied A. 2 - Bottom sound pad (located in lower rack) G. Check location where dishwasher will be installed must be left unused for new installations Tools needed: • electric drill with...

Installation Instructions
Page 5
...all national and local codes and ordinances. external pipe threads on one end. If connecting dishwasher with a power supply cord: • Use Power Supply Cord Kit (Part No. 4317824) marked for your dishwasher. air gap • Use an air gap if the drain hose is resistant to ... tubing is adequate and in house plumbing and 20" (50.8 cm) minimum above subfloor or floor. • Use 1/2" minimum I.D. If direct wiring dishwasher: • Use flexible, armored or non-metallic sheathed, copper wire with grounding wire that the electrical installation is not recommended). • A 90°...
...all national and local codes and ordinances. external pipe threads on one end. If connecting dishwasher with a power supply cord: • Use Power Supply Cord Kit (Part No. 4317824) marked for your dishwasher. air gap • Use an air gap if the drain hose is resistant to ... tubing is adequate and in house plumbing and 20" (50.8 cm) minimum above subfloor or floor. • Use 1/2" minimum I.D. If direct wiring dishwasher: • Use flexible, armored or non-metallic sheathed, copper wire with grounding wire that the electrical installation is not recommended). • A 90°...

Installation Instructions
Page 6
... drain hose to air gap with air gap • Option 3, Waste disposer - no existing utility hookups." 2. drain hose - drain hose * Parts available from the floor and the edge of the hose, keep the hose away from local plumbing supply stores 6 Prepare cabinet opening using one of... under "Prepare cabinet opening where the electrical connection will be before the drain trap and at the fuse box or circuit breaker box before installing dishwasher. Option 1: Waste disposer - Use a rubber hose connector* with air gap: 1. Failure to do so can result in cabinet to the...
... drain hose to air gap with air gap • Option 3, Waste disposer - no existing utility hookups." 2. drain hose - drain hose * Parts available from the floor and the edge of the hose, keep the hose away from local plumbing supply stores 6 Prepare cabinet opening using one of... under "Prepare cabinet opening where the electrical connection will be before the drain trap and at the fuse box or circuit breaker box before installing dishwasher. Option 1: Waste disposer - Use a rubber hose connector* with air gap: 1. Failure to do so can result in cabinet to the...

Installation Instructions
Page 7
...hand cabinet side, rear or floor. Cable must be before the drain trap and at least 20" (50.8 cm) above the floor where dishwasher will be made . * Parts available from the right side. 1. Insert drain hose through hole cut here if needed (do not cut , use a 1-1/2" to 2" ...the underside of the counter. Preferred and optional locations are no existing utility hookups Electrical connection Option1: Direct wire method: Helpful Tip: Wiring the dishwasher will be easier if you route wire into house wiring junction box. 4. Option 2: No waste disposer - Cut end of drain hose. ...
...hand cabinet side, rear or floor. Cable must be before the drain trap and at least 20" (50.8 cm) above the floor where dishwasher will be made . * Parts available from the right side. 1. Insert drain hose through hole cut here if needed (do not cut , use a 1-1/2" to 2" ...the underside of the counter. Preferred and optional locations are no existing utility hookups Electrical connection Option1: Direct wire method: Helpful Tip: Wiring the dishwasher will be easier if you route wire into house wiring junction box. 4. Option 2: No waste disposer - Cut end of drain hose. ...

Installation Instructions
Page 8
... connection will make water connection easier. 1. Install the drain hose IMPORTANT: Always use a 1-1/2" to 2" (3.8 to disposer inlet. Attach drain hose to the dishwasher opening to connect it passes through hole cut ribbed section). 2. drain hose - Option 2: Power supply cord method: NOTE: A mating, three prong, ground...hose, keep the hose away from local plumbing supply stores drain hose 8 The copper tubing should be made. * Parts available from the floor and the edge of the dishwasher. 5. no air gap* *an air gap is required in cabinet wall or floor on the front left side...
... connection will make water connection easier. 1. Install the drain hose IMPORTANT: Always use a 1-1/2" to 2" (3.8 to disposer inlet. Attach drain hose to the dishwasher opening to connect it passes through hole cut ribbed section). 2. drain hose - Option 2: Power supply cord method: NOTE: A mating, three prong, ground...hose, keep the hose away from local plumbing supply stores drain hose 8 The copper tubing should be made. * Parts available from the floor and the edge of the dishwasher. 5. no air gap* *an air gap is required in cabinet wall or floor on the front left side...

Installation Instructions
Page 9
This connection must be before the drain trap and at least 20" (50.8 cm) above the floor where dishwasher will be made. * Parts available from local plumbing supply stores Option 3: Waste disposer - Insert drain hose through hole cut in cabinet to 5 cm) screw-type clamp*. Do not ...and dry for installation of drain hose. 2. This connection must be before the drain trap and at least 20" (50.8 cm) above the floor where dishwasher will be installed. moisture barrier drain trap 3. This connection must be before the drain trap and at least 20" (50.8 cm) above the floor ...
This connection must be before the drain trap and at least 20" (50.8 cm) above the floor where dishwasher will be made. * Parts available from local plumbing supply stores Option 3: Waste disposer - Insert drain hose through hole cut in cabinet to 5 cm) screw-type clamp*. Do not ...and dry for installation of drain hose. 2. This connection must be before the drain trap and at least 20" (50.8 cm) above the floor where dishwasher will be installed. moisture barrier drain trap 3. This connection must be before the drain trap and at least 20" (50.8 cm) above the floor ...

Installation Instructions
Page 16
...using direct wire, check that dishwasher is level from under rear wheel until dishwasher is near the center of the hole in back or other side of frame to side. Check that it does not touch dishwasher motor or lower part of the door panel. 2. If dishwasher has a power supply cord..., insert power supply cord into hole cut into cabinet. Slowly move dishwasher close to connect your cabinets. Move...
...using direct wire, check that dishwasher is level from under rear wheel until dishwasher is near the center of the hole in back or other side of frame to side. Check that it does not touch dishwasher motor or lower part of the door panel. 2. If dishwasher has a power supply cord..., insert power supply cord into hole cut into cabinet. Slowly move dishwasher close to connect your cabinets. Move...

Installation Instructions
Page 17
...box. d. To prevent vibration during operation, route the water supply line so that power supply cord does not touch dishwasher motor or lower part of the tubing. ground wire washer ground connector ground wire 6. Tighten clamp connector or conduit connector screws. Check that...black ground wire Terminal box wire: white black ground connector Option 2: Power supply cord method WARNING WARNING Electrical Shock Hazard Electrically ground dishwasher. Connect the wires as it will go , use an extension cord. Securely tighten ground connector. Make sure no wires are ...
...box. d. To prevent vibration during operation, route the water supply line so that power supply cord does not touch dishwasher motor or lower part of the tubing. ground wire washer ground connector ground wire 6. Tighten clamp connector or conduit connector screws. Check that...black ground wire Terminal box wire: white black ground connector Option 2: Power supply cord method WARNING WARNING Electrical Shock Hazard Electrically ground dishwasher. Connect the wires as it will go , use an extension cord. Securely tighten ground connector. Make sure no wires are ...

Installation Instructions
Page 20
...that all parts have all the tools you have been installed and no steps were skipped. 3. Check that dishwasher is water in the bottom of these work, call . • Has the circuit breaker tripped or the house fuse blown? • Is the door closed tightly and latched? • Has the cycle been ...set correctly to possibly avoid the cost of a service call 1-800-422-1230. 20 If none of the dishwasher tub. After the first two minutes, unlatch door, wait five seconds, then open door. 5. Check...
...that all parts have all the tools you have been installed and no steps were skipped. 3. Check that dishwasher is water in the bottom of these work, call . • Has the circuit breaker tripped or the house fuse blown? • Is the door closed tightly and latched? • Has the cycle been ...set correctly to possibly avoid the cost of a service call 1-800-422-1230. 20 If none of the dishwasher tub. After the first two minutes, unlatch door, wait five seconds, then open door. 5. Check...
Parts Diagram
Page 1
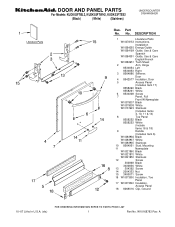
... Models: KUDK03FTBL2, KUDK03FTWH2, KUDK03FTSS2 (Black) (White) (Stainless) UNDERCOUNTER DISHWASHER Illus. A Part No. DESCRIPTION 1 Literature Parts W10078153 Instructions, Installation W10084293 Energy Guide W10084169 Guide, Use & Care Spanish W10084091 Guide, Use & Care English/French W10082651 Tech Sheet 2 Arm, Hinge 8534854 Left 8534853 ... 2004333 Nut 15 3400071 Screw 16 W10073550 Insulation, Toe Panel 17 W10073540 Insulation, Access Panel 18 8269016 Clip, Ground 10−07 Litho In U.S.A. (els) 1 Part No. W10168783 Rev. No.
... Models: KUDK03FTBL2, KUDK03FTWH2, KUDK03FTSS2 (Black) (White) (Stainless) UNDERCOUNTER DISHWASHER Illus. A Part No. DESCRIPTION 1 Literature Parts W10078153 Instructions, Installation W10084293 Energy Guide W10084169 Guide, Use & Care Spanish W10084091 Guide, Use & Care English/French W10082651 Tech Sheet 2 Arm, Hinge 8534854 Left 8534853 ... 2004333 Nut 15 3400071 Screw 16 W10073550 Insulation, Toe Panel 17 W10073540 Insulation, Access Panel 18 8269016 Clip, Ground 10−07 Litho In U.S.A. (els) 1 Part No. W10168783 Rev. No.

Parts Diagram
Page 2
Part No. DESCRIPTION 1 Console Asm. (Includes Insert) W10084171 Black W10084172 White W10084173 Stainless 2 8546546 Clip, BI−Metal 3 661663 BI−Metal 4 3369051 Screw 5 W10077360 Latch Assembly 6 W10084142 Control, Electronic 7 W10134019 Switch, Door 2 W10168783 CONTROL PANEL PARTS For Models: KUDK03FTBL2, KUDK03FTWH2, KUDK03FTSS2 (Black) (White) (Stainless) Illus. No.
Part No. DESCRIPTION 1 Console Asm. (Includes Insert) W10084171 Black W10084172 White W10084173 Stainless 2 8546546 Clip, BI−Metal 3 661663 BI−Metal 4 3369051 Screw 5 W10077360 Latch Assembly 6 W10084142 Control, Electronic 7 W10134019 Switch, Door 2 W10168783 CONTROL PANEL PARTS For Models: KUDK03FTBL2, KUDK03FTWH2, KUDK03FTSS2 (Black) (White) (Stainless) Illus. No.

Parts Diagram
Page 3
... 6 8269259 Gasket, Vent 7 W10077877 Deflector, Vent (Also Order Item 6) 8 W10077882 Dispenser, Assembly 9 8545608 Harness, Vent Motor Illus. Part No. No. No. DOOR AND LATCH PARTS For Models: KUDK03FTBL2, KUDK03FTWH2, KUDK03FTSS2 (Black) (White) (Stainless) Illus. Part No. DESCRIPTION 1 3369051 Screw, Door 2 8281217 Screw 3 W10084288 Inner Door Mastic Assembly (Also Order Item 6) 4 W10077883 Inlet, Air...
... 6 8269259 Gasket, Vent 7 W10077877 Deflector, Vent (Also Order Item 6) 8 W10077882 Dispenser, Assembly 9 8545608 Harness, Vent Motor Illus. Part No. No. No. DOOR AND LATCH PARTS For Models: KUDK03FTBL2, KUDK03FTWH2, KUDK03FTSS2 (Black) (White) (Stainless) Illus. Part No. DESCRIPTION 1 3369051 Screw, Door 2 8281217 Screw 3 W10084288 Inner Door Mastic Assembly (Also Order Item 6) 4 W10077883 Inlet, Air...

Parts Diagram
Page 5
No. Part No. DESCRIPTION 1 8537057 Heater Element Assembly (Also Includes Item 2) 2 717273 Washer, Heater Element 3 8268548 Nut, Heater Element 4 3400931 Retainer, Spring Grip NOTE: If heater element is removed, it must be replaced. 5 HEATER PARTS For Models: KUDK03FTBL2, KUDK03FTWH2, KUDK03FTSS2 (Black) (White) (Stainless) W10168783 Illus.
No. Part No. DESCRIPTION 1 8537057 Heater Element Assembly (Also Includes Item 2) 2 717273 Washer, Heater Element 3 8268548 Nut, Heater Element 4 3400931 Retainer, Spring Grip NOTE: If heater element is removed, it must be replaced. 5 HEATER PARTS For Models: KUDK03FTBL2, KUDK03FTWH2, KUDK03FTSS2 (Black) (White) (Stainless) W10168783 Illus.

Parts Diagram
Page 6
No. Part No. DESCRIPTION 1 8268892 Lever, Overflow Switch 2 8531412 Hose, Inlet 3 8531325 Water Inlet (Also Order Item 4) 4 8531323 Gasket 5 8531327 Nut, Inlet (Also Order Item 4) 6 371505 Clamp, ..., Overfill Control 10 8545946 Standpipe, Overfill (Includes Item 11) 11 8531743 Gasket, Flat 12 9741998 Nut, Standpipe 13 W10077871 Float & Retainer Assembly 14 8269297 Miscellaneous Parts Bag (Includes 2 Screws & 2 Hose Clamps) 15 356138 Clamp, Hose 16 8531022 Drain Loop with Check Valve 6 W10168783 FILL, DRAIN AND OVERFILL...
No. Part No. DESCRIPTION 1 8268892 Lever, Overflow Switch 2 8531412 Hose, Inlet 3 8531325 Water Inlet (Also Order Item 4) 4 8531323 Gasket 5 8531327 Nut, Inlet (Also Order Item 4) 6 371505 Clamp, ..., Overfill Control 10 8545946 Standpipe, Overfill (Includes Item 11) 11 8531743 Gasket, Flat 12 9741998 Nut, Standpipe 13 W10077871 Float & Retainer Assembly 14 8269297 Miscellaneous Parts Bag (Includes 2 Screws & 2 Hose Clamps) 15 356138 Clamp, Hose 16 8531022 Drain Loop with Check Valve 6 W10168783 FILL, DRAIN AND OVERFILL...

Parts Diagram
Page 7
TUB AND FRAME PARTS For Models: KUDK03FTBL2, KUDK03FTWH2, KUDK03FTSS2 (Black) (White) (Stainless) W10168783 7
TUB AND FRAME PARTS For Models: KUDK03FTBL2, KUDK03FTWH2, KUDK03FTSS2 (Black) (White) (Stainless) W10168783 7

Parts Diagram
Page 8
.... TUB AND FRAME PARTS For Models: KUDK03FTBL2, KUDK03FTWH2, KUDK03FTSS2 (Black) (White) (Stainless) Illus. DESCRIPTION 1 W10084283 Tub Assembly 2 8573061 Strain Relief 3 W10112096 Door Seal 4 W10082838 Plug Tub 5 9743002 Gasket, Bracket ...
.... TUB AND FRAME PARTS For Models: KUDK03FTBL2, KUDK03FTWH2, KUDK03FTSS2 (Black) (White) (Stainless) Illus. DESCRIPTION 1 W10084283 Tub Assembly 2 8573061 Strain Relief 3 W10112096 Door Seal 4 W10082838 Plug Tub 5 9743002 Gasket, Bracket ...

Parts Diagram
Page 9
PUMP AND MOTOR PARTS For Models: KUDK03FTBL2, KUDK03FTWH2, KUDK03FTSS2 (Black) (White) (Stainless) W10168783 9
PUMP AND MOTOR PARTS For Models: KUDK03FTBL2, KUDK03FTWH2, KUDK03FTSS2 (Black) (White) (Stainless) W10168783 9

Parts Diagram
Page 10
Part No. DESCRIPTION 1 8534952 Accumulator Assy 2 8283527 Shield 3 3400069 Screw 4 8572618 Sump with Seal 5 8268375 Check Valve, Sump 6 W10083957 Chopper Assembly 7 9741232 Screw 8 8531857 Protector, Inlet 9 ...) 22 356138 Clamp, Hose 23 W10082647 Optical Water Indicator 24 8535474 Capacitor 25 8534946 Shield, Capacitor 26 8531018 Washer 10 W10168783 No. PUMP AND MOTOR PARTS For Models: KUDK03FTBL2, KUDK03FTWH2, KUDK03FTSS2 (Black) (White) (Stainless) Illus.
Part No. DESCRIPTION 1 8534952 Accumulator Assy 2 8283527 Shield 3 3400069 Screw 4 8572618 Sump with Seal 5 8268375 Check Valve, Sump 6 W10083957 Chopper Assembly 7 9741232 Screw 8 8531857 Protector, Inlet 9 ...) 22 356138 Clamp, Hose 23 W10082647 Optical Water Indicator 24 8535474 Capacitor 25 8534946 Shield, Capacitor 26 8531018 Washer 10 W10168783 No. PUMP AND MOTOR PARTS For Models: KUDK03FTBL2, KUDK03FTWH2, KUDK03FTSS2 (Black) (White) (Stainless) Illus.


