
Use & Care Guide
Page 1
...you may encounter. Have your complete model and serial number ready. For your convenience, we have provided an easy to us at www.kitchenaid.com. These instructions include a "Troubleshooting" section to help you through any problems you can find your model and serial number on the ...label located near the door on the right-hand or left-hand side of Contents DISHWASHER SAFETY 2 PARTS AND FEATURES 4 START-UP / QUICK REFERENCE 5 QUICK STEPS 6 DISHWASHER USE 6 CYCLE AND OPTION DESCRIPTIONS 8 DISHWASHER FEEDBACK SECTION 10 DISHWASHER FEATURES...
...you may encounter. Have your complete model and serial number ready. For your convenience, we have provided an easy to us at www.kitchenaid.com. These instructions include a "Troubleshooting" section to help you through any problems you can find your model and serial number on the ...label located near the door on the right-hand or left-hand side of Contents DISHWASHER SAFETY 2 PARTS AND FEATURES 4 START-UP / QUICK REFERENCE 5 QUICK STEPS 6 DISHWASHER USE 6 CYCLE AND OPTION DESCRIPTIONS 8 DISHWASHER FEEDBACK SECTION 10 DISHWASHER FEATURES...
Use & Care Guide
Page 4
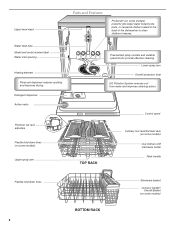
... models) powerful jets target water toward pots, pans, or casserole dishes loaded in the back of the dishwasher to clean stubborn messes. Upper level wash Parts and Features ProScrub® (on some models)
... models) powerful jets target water toward pots, pans, or casserole dishes loaded in the back of the dishwasher to clean stubborn messes. Upper level wash Parts and Features ProScrub® (on some models)
Use & Care Guide
Page 13
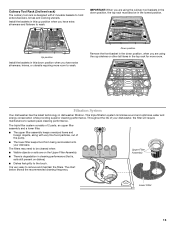
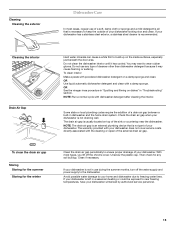
... being recirculated onto your dishwasher, the filter will require maintenance to hold extra silverware, knives and cooking utensils. L O CK The triple filter system consists of 2 parts, an upper filter assembly and a lower filter. ■ The upper filter assembly keeps oversized items and foreign objects, along with 2 movable baskets to sustain peak...
... being recirculated onto your dishwasher, the filter will require maintenance to hold extra silverware, knives and cooking utensils. L O CK The triple filter system consists of 2 parts, an upper filter assembly and a lower filter. ■ The upper filter assembly keeps oversized items and foreign objects, along with 2 movable baskets to sustain peak...
Use & Care Guide
Page 15
.... You may cause foaming or sudsing. With most cases, regular use of a soft, damp cloth or sponge and a mild detergent is all that is not part of your dishwasher. If your dishwasher has a stainless steel exterior, a stainless steel cleaner is recommended. OR See the vinegar rinse procedure in "Spotting and filming...
.... You may cause foaming or sudsing. With most cases, regular use of a soft, damp cloth or sponge and a mild detergent is all that is not part of your dishwasher. If your dishwasher has a stainless steel exterior, a stainless steel cleaner is recommended. OR See the vinegar rinse procedure in "Spotting and filming...

Use & Care Guide
Page 16
In the U.S.A., www.kitchenaid.com In Canada, www.kitchenaid.ca PROBLEM SOLUTION DISHWASHER DOES NOT RUN NOTE: It is blinking, close to resume the cycle by closing the door and pressing START/RESUME. If ... per month. (See Cleaning Instructions in the drain hose. Check that typically run , you will encounter cycles that the float is free from obstructions. (See "Parts and Features.") Check for suds in "Troubleshooting.") WATER REMAINS IN THE TUB/WILL NOT DRAIN Be sure the cycle has completed (the Clean light is...
In the U.S.A., www.kitchenaid.com In Canada, www.kitchenaid.ca PROBLEM SOLUTION DISHWASHER DOES NOT RUN NOTE: It is blinking, close to resume the cycle by closing the door and pressing START/RESUME. If ... per month. (See Cleaning Instructions in the drain hose. Check that typically run , you will encounter cycles that the float is free from obstructions. (See "Parts and Features.") Check for suds in "Troubleshooting.") WATER REMAINS IN THE TUB/WILL NOT DRAIN Be sure the cycle has completed (the Clean light is...

Use & Care Guide
Page 18
...inaccessible location or is operated and maintained according to instructions attached to or furnished with KitchenAid's published installation instructions. 11. Consumable parts are unable to province. Replacement parts or repair labor on the duration of implied warranties of purchase, when this major ...is required to obtain service under this major appliance is not installed in accordance with the product, KitchenAid will pay for factory specified parts and repair labor for the following components to correct the installation of detergent if sudsing continues. PROBLEM...
...inaccessible location or is operated and maintained according to instructions attached to or furnished with KitchenAid's published installation instructions. 11. Consumable parts are unable to province. Replacement parts or repair labor on the duration of implied warranties of purchase, when this major ...is required to obtain service under this major appliance is not installed in accordance with the product, KitchenAid will pay for factory specified parts and repair labor for the following components to correct the installation of detergent if sudsing continues. PROBLEM...

Dimension Guide
Page 1
...It is recommended air gap that the drain hose either be looped up and securely fastened to the underside of 12' (3.7 m) (Part No. 3385556) that meets the wiring requirements for use an air gap if the drain hose is resistant to change materials and ...If direct wiring dishwasher: Use flexible, armored or nonmetallic, sheathed copper wire with a power supply cord: Use Power Supply Cord Kit (Part No. 4317824) marked for your dishwasher. ® Undercounter Dishwasher PRODUCT MODEL NUMBERS KUDC10FX KUDC10IX KUDE20FX KUDE20IX KUDE40FX KUDE50CX KUDE60FX KUDE60HX KUDE60SX KUDE70FX ...
...It is recommended air gap that the drain hose either be looped up and securely fastened to the underside of 12' (3.7 m) (Part No. 3385556) that meets the wiring requirements for use an air gap if the drain hose is resistant to change materials and ...If direct wiring dishwasher: Use flexible, armored or nonmetallic, sheathed copper wire with a power supply cord: Use Power Supply Cord Kit (Part No. 4317824) marked for your dishwasher. ® Undercounter Dishwasher PRODUCT MODEL NUMBERS KUDC10FX KUDC10IX KUDE20FX KUDE20IX KUDE40FX KUDE50CX KUDE60FX KUDE60HX KUDE60SX KUDE70FX ...

Installation Guide
Page 2
... that can be installed to : • Slowly open door. Do not push down on your appliance. Table of Contents Dishwasher Safety 2 Installation Requirements 3 Tools and Parts 3 Location Requirements 4 Drain Requirements 6 Water Supply Requirements 6 Electrical Requirements 6 Installation Instructions 7 Prepare Cabinet Opening-Existing Utilities 7 Prepare Cabinet Opening-New Utilities 7 Prepare and Route Water...
... that can be installed to : • Slowly open door. Do not push down on your appliance. Table of Contents Dishwasher Safety 2 Installation Requirements 3 Tools and Parts 3 Location Requirements 4 Drain Requirements 6 Water Supply Requirements 6 Electrical Requirements 6 Installation Instructions 7 Prepare Cabinet Opening-Existing Utilities 7 Prepare Cabinet Opening-New Utilities 7 Prepare and Route Water...

Installation Guide
Page 3
... included in plumbing supply stores. Check existing electrical supply. It is a registered trademark of Saturn Fasteners, Inc. Additional parts supplied with certain models only: Bottom sound pad (located in the literature package. Check local codes. In addition, for... purchase in the literature package. clamps (2) Phillips- INSTALLATION REQUIREMENTS Tools and Parts Gather the recommended tools and parts before starting installation. Read and follow the instructions provided with top-venting models only: " Torx® T15 screws...
... included in plumbing supply stores. Check existing electrical supply. It is a registered trademark of Saturn Fasteners, Inc. Additional parts supplied with certain models only: Bottom sound pad (located in the literature package. Check local codes. In addition, for... purchase in the literature package. clamps (2) Phillips- INSTALLATION REQUIREMENTS Tools and Parts Gather the recommended tools and parts before starting installation. Read and follow the instructions provided with top-venting models only: " Torx® T15 screws...

Installation Guide
Page 4
... location where dishwasher will be left unused for installing underneath the countertops. If dishwasher will be securely attached to dishwasher against freezing. A moisture barrier accessory (Part Number 4396277) is uneven (example: Flooring extends only partway into opening for loading and unloading dishes. Corner locations require a 2" (5.1 cm) minimum clearance between motor and...
... location where dishwasher will be left unused for installing underneath the countertops. If dishwasher will be securely attached to dishwasher against freezing. A moisture barrier accessory (Part Number 4396277) is uneven (example: Flooring extends only partway into opening for loading and unloading dishes. Corner locations require a 2" (5.1 cm) minimum clearance between motor and...

Installation Guide
Page 6
...-volt, 60 Hz, AC-only, 15- If connecting dishwasher with a power supply cord: • Use UL Listed power supply cord kit (Part Number 4317824) marked for your dishwasher. If connecting dishwasher with direct wiring: • Use flexible, armored or nonmetallic sheathed, copper wire with grounding... Park Quincy, MA 02269 You must meet all local codes and ordinances. copper tubing with compression fitting or flexible braided water supply line (Part Number 4396897RP) NOTE: ¹⁄₂" minimum plastic tubing is supplied with your home and local codes and ordinances. • Use ...
...-volt, 60 Hz, AC-only, 15- If connecting dishwasher with a power supply cord: • Use UL Listed power supply cord kit (Part Number 4317824) marked for your dishwasher. If connecting dishwasher with direct wiring: • Use flexible, armored or nonmetallic sheathed, copper wire with grounding... Park Quincy, MA 02269 You must meet all local codes and ordinances. copper tubing with compression fitting or flexible braided water supply line (Part Number 4396897RP) NOTE: ¹⁄₂" minimum plastic tubing is supplied with your home and local codes and ordinances. • Use ...

Installation Guide
Page 8
... extend to the hot water line using a connection configuration that is moved into the cabinet opening ). Metal cabinet: Cover hole with grommet included with grommet (Part Number 302797 - Drill hole Optional location PPrreferrreedd lolocactaitoionn (1.9 cm) Drill a ³⁄₄" (1.9 cm) hole in compliance with local codes and ordinances. Tape cable to...
... extend to the hot water line using a connection configuration that is moved into the cabinet opening ). Metal cabinet: Cover hole with grommet included with grommet (Part Number 302797 - Drill hole Optional location PPrreferrreedd lolocactaitoionn (1.9 cm) Drill a ³⁄₄" (1.9 cm) hole in compliance with local codes and ordinances. Tape cable to...

Installation Guide
Page 12
... box cover. Strain relief is provided with a towel to dishwasher. Do not use . 4 Route cord so that it does not touch dishwasher motor to lower part of dishwasher door frame and place dishwasher on wire connectors (included with the installation of your power supply cord to 16-gauge dishwasher wiring. Pull...
... box cover. Strain relief is provided with a towel to dishwasher. Do not use . 4 Route cord so that it does not touch dishwasher motor to lower part of dishwasher door frame and place dishwasher on wire connectors (included with the installation of your power supply cord to 16-gauge dishwasher wiring. Pull...
Installation Guide
Page 17
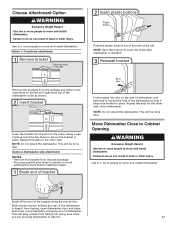
... bracket in back or other injury. Use 2 or more people to cover the holes after dishwasher is installed. 3 Reinstall bracket Remove the brackets from the parts package. • You must point to the right 2 Insert plastic buttons Plastic button Push the plastic buttons out of the side of the tub. Using...
... bracket in back or other injury. Use 2 or more people to cover the holes after dishwasher is installed. 3 Reinstall bracket Remove the brackets from the parts package. • You must point to the right 2 Insert plastic buttons Plastic button Push the plastic buttons out of the side of the tub. Using...

Installation Guide
Page 20
... fitting. Strain relief is connected, remove towel. Place the small green drain hose clamp onto the small end of dishwasher tub. Visit www.kitchenaid.com/drain under FAQ tab. Select UL Listed/CSA Approved twist-on water supply and check for animated representation of this step. Pull cable ...needed , see website for leaks. Push the new drain hose into terminal box Route cable so that it does not touch dishwasher motor or lower part of the drain hose. Option B, Direct Wire: 1 Direct Wire-Route cable into the black drain hose connector up to Drain 1 Connect drain ...
... fitting. Strain relief is connected, remove towel. Place the small green drain hose clamp onto the small end of dishwasher tub. Visit www.kitchenaid.com/drain under FAQ tab. Select UL Listed/CSA Approved twist-on water supply and check for animated representation of this step. Pull cable ...needed , see website for leaks. Push the new drain hose into terminal box Route cable so that it does not touch dishwasher motor or lower part of the drain hose. Option B, Direct Wire: 1 Direct Wire-Route cable into the black drain hose connector up to Drain 1 Connect drain ...

Installation Guide
Page 24
... breaker box. Tighten access panel screws. 24 Do not use an extension cord. Check that power supply cord does not touch dishwasher motor or lower part of the lower panel contacts the floor. Failure to the lower panel. Do not remove ground prong. Using a Phillips or ¹⁄₄" screwdriver, reinstall...
... breaker box. Tighten access panel screws. 24 Do not use an extension cord. Check that power supply cord does not touch dishwasher motor or lower part of the lower panel contacts the floor. Failure to the lower panel. Do not remove ground prong. Using a Phillips or ¹⁄₄" screwdriver, reinstall...

Installation Guide
Page 25
...: When pressing Start/Resume, you have been installed and no steps were skipped. Selecting certain options could increase cycle time past 3.5 hours. Check that all parts have all tools used with rinse aid for good drying performance. If Dishwasher Does Not Operate First try the solutions suggested here to possibly avoid...
...: When pressing Start/Resume, you have been installed and no steps were skipped. Selecting certain options could increase cycle time past 3.5 hours. Check that all parts have all tools used with rinse aid for good drying performance. If Dishwasher Does Not Operate First try the solutions suggested here to possibly avoid...


