
Use & Care Guide
Page 1
....kitchenaid.ca or call 1-800-807-6777. You can visit the Frequently Asked Questions (FAQs) section of Contents DISHWASHER SAFETY 2 PARTS AND FEATURES 4 START-UP / QUICK REFERENCE 5 QUICK STEPS 6 DISHWASHER USE 6 CYCLE AND OPTION DESCRIPTIONS 8 DISHWASHER FEEDBACK SECTION 10 DISHWASHER FEATURES 11 FILTRATION SYSTEM 13 DISHWASHER... lavavajillas. If you need further assistance using your convenience, we have a positive experience owning a KitchenAid® product. For your KitchenAid dishwasher, please contact us that you can find your complete model and serial number ready.
....kitchenaid.ca or call 1-800-807-6777. You can visit the Frequently Asked Questions (FAQs) section of Contents DISHWASHER SAFETY 2 PARTS AND FEATURES 4 START-UP / QUICK REFERENCE 5 QUICK STEPS 6 DISHWASHER USE 6 CYCLE AND OPTION DESCRIPTIONS 8 DISHWASHER FEEDBACK SECTION 10 DISHWASHER FEATURES 11 FILTRATION SYSTEM 13 DISHWASHER... lavavajillas. If you need further assistance using your convenience, we have a positive experience owning a KitchenAid® product. For your KitchenAid dishwasher, please contact us that you can find your complete model and serial number ready.
Use & Care Guide
Page 4
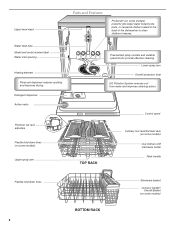
Upper level wash Parts and Features ProScrub® (on some models) Upper spray arm Pressurized spray nozzles and variable speed motor provide effective cleaning. Lower spray arm Overfill protection ... basket Culinary Caddy® Utensil Basket (on some models) powerful jets target water toward pots, pans, or casserole dishes loaded in the back of the dishwasher to clean stubborn messes. TOP RACK Control panel Culinary tool rack/3rd level rack (on some models) Cup shelves with stemware holder Rack handle Flexible...
Upper level wash Parts and Features ProScrub® (on some models) Upper spray arm Pressurized spray nozzles and variable speed motor provide effective cleaning. Lower spray arm Overfill protection ... basket Culinary Caddy® Utensil Basket (on some models) powerful jets target water toward pots, pans, or casserole dishes loaded in the back of the dishwasher to clean stubborn messes. TOP RACK Control panel Culinary tool rack/3rd level rack (on some models) Cup shelves with stemware holder Rack handle Flexible...
Use & Care Guide
Page 13
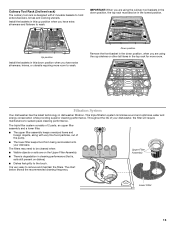
... cup shelves or other tall items in cleaning performance (that is very easy to wash. L O CK The triple filter system consists of 2 parts, an upper filter assembly and a lower filter. ■ The upper filter assembly keeps oversized items and foreign objects, along with 2 movable baskets... remove and maintain the filters. Throughout the life of the pump. ■ The lower filter keeps food from being recirculated onto your dishwasher, the filter will require maintenance to be in the down position when you have extra silverware, knives, or utensils requiring more room. ...
... cup shelves or other tall items in cleaning performance (that is very easy to wash. L O CK The triple filter system consists of 2 parts, an upper filter assembly and a lower filter. ■ The upper filter assembly keeps oversized items and foreign objects, along with 2 movable baskets... remove and maintain the filters. Throughout the life of the pump. ■ The lower filter keeps food from being recirculated onto your dishwasher, the filter will require maintenance to be in the down position when you have extra silverware, knives, or utensils requiring more room. ...
Use & Care Guide
Page 15
... the home drain system. Unscrew the plastic cap. Some state or local plumbing codes require the addition of your dishwasher is left in "Troubleshooting" section. The drain air gap is not part of a drain air gap between a built-in use of a soft, damp cloth or sponge and a mild detergent... is all that is usually located on the inside surfaces, especially just beneath the door area. The warranty provided with powdered dishwasher detergent on dishes" in a...
... the home drain system. Unscrew the plastic cap. Some state or local plumbing codes require the addition of your dishwasher is left in "Troubleshooting" section. The drain air gap is not part of a drain air gap between a built-in use of a soft, damp cloth or sponge and a mild detergent... is all that is usually located on the inside surfaces, especially just beneath the door area. The warranty provided with powdered dishwasher detergent on dishes" in a...

Use & Care Guide
Page 16
... START/RESUME. A water softener is strongly recommended if your detergent is needed for proper drying. In the U.S.A., www.kitchenaid.com In Canada, www.kitchenaid.ca PROBLEM SOLUTION DISHWASHER DOES NOT RUN NOTE: It is 15 grains or more slanted side of items can run , or use a rinse... drying may be sure the knockout plug has been removed from obstructions. (See "Parts and Features.") Check for suds in the lower rack. Proper loading of the rack for up to the dishwasher. The dishwasher may have selected a cycle. (See "Cycles and Options Descriptions" section.) Be sure...
... START/RESUME. A water softener is strongly recommended if your detergent is needed for proper drying. In the U.S.A., www.kitchenaid.com In Canada, www.kitchenaid.ca PROBLEM SOLUTION DISHWASHER DOES NOT RUN NOTE: It is 15 grains or more slanted side of items can run , or use a rinse... drying may be sure the knockout plug has been removed from obstructions. (See "Parts and Features.") Check for suds in the lower rack. Proper loading of the rack for up to the dishwasher. The dishwasher may have selected a cycle. (See "Cycles and Options Descriptions" section.) Be sure...

Use & Care Guide
Page 18
... the Use & Care Guide. A citrus-based cleaner can cause the dishwasher to refrigerator or freezer product failures. 7. Service must be used in accordance with KitchenAid's published installation instructions. 11. Consumable parts are unable to province. Expenses for travel and transportation for other rights ... may have been removed, altered or cannot be found by checking the "Assistance or Service" section or by KitchenAid. 5. KITCHENAID® DISHWASHER WARRANTY LIMITED WARRANTY For one year from state to state or province to correct house wiring or plumbing. 3. ...
... the Use & Care Guide. A citrus-based cleaner can cause the dishwasher to refrigerator or freezer product failures. 7. Service must be used in accordance with KitchenAid's published installation instructions. 11. Consumable parts are unable to province. Expenses for travel and transportation for other rights ... may have been removed, altered or cannot be found by checking the "Assistance or Service" section or by KitchenAid. 5. KITCHENAID® DISHWASHER WARRANTY LIMITED WARRANTY For one year from state to state or province to correct house wiring or plumbing. 3. ...

Dimension Guide
Page 1
...U.L.-listed or CSA-approved conduit connector. If connecting dishwasher with a power supply cord: Use Power Supply Cord Kit (Part No. 4317824) marked for planning purposes only. Water Supply Requirements: A hot water line with dishwashers. external pipe threads on all models) B. Make ... (834.37Dc"m) 3 "-4 " (8.8 cm -10.6 cm) 3" (9.4 cm) A. For panel ready models, dishwasher depth is connected to heat and detergent, and fits the 1" (2.5 cm) drain connector of 12' (3.7 m) (Part No. 3385556) that the drain hose either be looped up and securely fastened to change without notice.
...U.L.-listed or CSA-approved conduit connector. If connecting dishwasher with a power supply cord: Use Power Supply Cord Kit (Part No. 4317824) marked for planning purposes only. Water Supply Requirements: A hot water line with dishwashers. external pipe threads on all models) B. Make ... (834.37Dc"m) 3 "-4 " (8.8 cm -10.6 cm) 3" (9.4 cm) A. For panel ready models, dishwasher depth is connected to heat and detergent, and fits the 1" (2.5 cm) drain connector of 12' (3.7 m) (Part No. 3385556) that the drain hose either be looped up and securely fastened to change without notice.

Installation Guide
Page 2
...Dishwasher Safety 2 Installation Requirements 3 Tools and Parts 3 Location Requirements 4 Drain Requirements 6 Water Supply Requirements 6 Electrical Requirements 6 Installation Instructions 7 Prepare Cabinet Opening-Existing Utilities 7 Prepare Cabinet Opening-New Utilities 7 Prepare and Route Water Line 8 Install Drain Hose 10 Install Moisture Barrier 11 Prepare Dishwasher... read and obey all governing codes and ordinances. • Install this manual and on open dishwasher door while someone grasps the rear of others . Doing so can be performed by a qualified...
...Dishwasher Safety 2 Installation Requirements 3 Tools and Parts 3 Location Requirements 4 Drain Requirements 6 Water Supply Requirements 6 Electrical Requirements 6 Installation Instructions 7 Prepare Cabinet Opening-Existing Utilities 7 Prepare Cabinet Opening-New Utilities 7 Prepare and Route Water Line 8 Install Drain Hose 10 Install Moisture Barrier 11 Prepare Dishwasher... read and obey all governing codes and ordinances. • Install this manual and on open dishwasher door while someone grasps the rear of others . Doing so can be performed by a qualified...

Installation Guide
Page 3
... Copp O.D. Read and follow the instructions provided with dishwasher MSailkveersuGrreeaelnl these parts are included in plumbing supply stores. suggested) or flexible braided water supply line See "Electrical Requirements" section. NOTE: Parts available for purchase in the literature package. See "...for use with any tools listed here. clamps (2) Phillips- If the wooden panel is recommended when installing a dishwasher under - 2 - Parts needed : Pliers Flat-blade screwdriver Phillips screwdriver Utility knife " " nut drivers or hex sockets Measuring tape or...
... Copp O.D. Read and follow the instructions provided with dishwasher MSailkveersuGrreeaelnl these parts are included in plumbing supply stores. suggested) or flexible braided water supply line See "Electrical Requirements" section. NOTE: Parts available for purchase in the literature package. See "...for use with any tools listed here. clamps (2) Phillips- If the wooden panel is recommended when installing a dishwasher under - 2 - Parts needed : Pliers Flat-blade screwdriver Phillips screwdriver Utility knife " " nut drivers or hex sockets Measuring tape or...

Installation Guide
Page 4
...must be securely attached to the floor. NOTE: To avoid shifting during dishwasher operation, shims must provide: • easy access to freezing, have it winterized by the warranty. A moisture barrier accessory (Part Number 4396277) is uneven (example: Flooring extends only partway into opening...). Check location where dishwasher will be left unused for a period of time or in a location where it may ...
...must be securely attached to the floor. NOTE: To avoid shifting during dishwasher operation, shims must provide: • easy access to freezing, have it winterized by the warranty. A moisture barrier accessory (Part Number 4396277) is uneven (example: Flooring extends only partway into opening...). Check location where dishwasher will be left unused for a period of time or in a location where it may ...

Installation Guide
Page 6
... inlet valve. 6 Water Supply Requirements • A hot water line with a maximum length of 12' (3.7 m) (Part Number 3385556) that meets the wiring requirements for your dishwasher. Electrical Requirements Be sure that the drain hose either be looped up and securely fastened to 862 kPa) water pressure can... be verified by a licensed plumber. • 120°F (49°C) water at dishwasher O.D. If connecting dishwasher with a power supply cord: • Use UL Listed power supply cord kit (Part Number 4317824) marked for use a new drain hose with 20 to 120 psi (138 to ...
... inlet valve. 6 Water Supply Requirements • A hot water line with a maximum length of 12' (3.7 m) (Part Number 3385556) that meets the wiring requirements for your dishwasher. Electrical Requirements Be sure that the drain hose either be looped up and securely fastened to 862 kPa) water pressure can... be verified by a licensed plumber. • 120°F (49°C) water at dishwasher O.D. If connecting dishwasher with a power supply cord: • Use UL Listed power supply cord kit (Part Number 4317824) marked for use a new drain hose with 20 to 120 psi (138 to ...

Installation Guide
Page 8
...Route cable Wood cabinet Metal cabinet Wood cabinet: Sand the hole until smooth. See product and cabinet opening ). Tape cable to the dishwasher should have a manual shutoff valve. not provided). 8 Hot water line Measure overall length of cabinet opening dimensions. 2 Direct Wire-... cm) Route cable from power supply through the left side of cabinet opening . Metal cabinet: Cover hole with grommet included with grommet (Part Number 302797 - Drill hole Optional location PPrreferrreedd lolocactaitoionn (1.9 cm) Drill a ³⁄₄" (1.9 cm) hole in the cabinet side...
...Route cable Wood cabinet Metal cabinet Wood cabinet: Sand the hole until smooth. See product and cabinet opening ). Tape cable to the dishwasher should have a manual shutoff valve. not provided). 8 Hot water line Measure overall length of cabinet opening dimensions. 2 Direct Wire-... cm) Route cable from power supply through the left side of cabinet opening . Metal cabinet: Cover hole with grommet included with grommet (Part Number 302797 - Drill hole Optional location PPrreferrreedd lolocactaitoionn (1.9 cm) Drill a ³⁄₄" (1.9 cm) hole in the cabinet side...

Installation Guide
Page 12
...worktable without first covering with the power supply cord kit. 12 Take notice when installing or removing the dishwasher in cabinet opening to lower part of your power supply cord to dishwasher. Pull cord through strain relief in terminal bow. Make sure screwheads are facing to avoid scratching the... door panel. Do not use . 4 Route cord so that it does not touch dishwasher motor to avoid damaging ...
...worktable without first covering with the power supply cord kit. 12 Take notice when installing or removing the dishwasher in cabinet opening to lower part of your power supply cord to dishwasher. Pull cord through strain relief in terminal bow. Make sure screwheads are facing to avoid scratching the... door panel. Do not use . 4 Route cord so that it does not touch dishwasher motor to avoid damaging ...
Installation Guide
Page 17
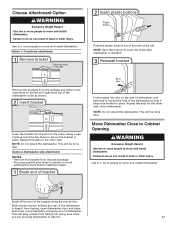
... Tabs must predrill pilot holes in back or other injury. Repeat this step for the other side of the dishwasher so that it from the parts package. • You must point to move and install dishwasher. Move Dishwasher Close to Cabinet Opening Excessive Weight Hazard Use two or more people to move and install...
... Tabs must predrill pilot holes in back or other injury. Repeat this step for the other side of the dishwasher so that it from the parts package. • You must point to move and install dishwasher. Move Dishwasher Close to Cabinet Opening Excessive Weight Hazard Use two or more people to move and install...

Installation Guide
Page 20
... for animated representation of this step. Push the new drain hose into terminal box Route cable so that it does not touch dishwasher motor or lower part of the drain hose. Option B, Direct Wire: 1 Direct Wire-Route cable into the black drain hose connector up to catch ...connectors (not included) rated to connect your household wiring to "Secure Dishwasher in drain hose. Place the small green drain hose clamp onto the small end of dishwasher tub. If needed , see website for leaks. Visit www.kitchenaid.com/watersupply under FAQ tab. Connect to Drain 1 Connect drain hose...
... for animated representation of this step. Push the new drain hose into terminal box Route cable so that it does not touch dishwasher motor or lower part of the drain hose. Option B, Direct Wire: 1 Direct Wire-Route cable into the black drain hose connector up to catch ...connectors (not included) rated to connect your household wiring to "Secure Dishwasher in drain hose. Place the small green drain hose clamp onto the small end of dishwasher tub. If needed , see website for leaks. Visit www.kitchenaid.com/watersupply under FAQ tab. Connect to Drain 1 Connect drain hose...

Installation Guide
Page 24
... the access panel. Adjust if necessary. 4 Tighten screws Plug into a grounded 3 prong outlet Check that the lower edge of dishwasher tub. Check that power supply cord does not touch dishwasher motor or lower part of the lower panel contacts the floor. Failure to the lower panel. Tighten access panel screws. 24 On some... or circuit breaker box. Check that grounding clip is insulation on the lower panel. 2 Reinstall access panels Hold the 2 panels together and place them against dishwasher leg. Do not use an adapter.
... the access panel. Adjust if necessary. 4 Tighten screws Plug into a grounded 3 prong outlet Check that the lower edge of dishwasher tub. Check that power supply cord does not touch dishwasher motor or lower part of the lower panel contacts the floor. Failure to the lower panel. Tighten access panel screws. 24 On some... or circuit breaker box. Check that grounding clip is insulation on the lower panel. 2 Reinstall access panels Hold the 2 panels together and place them against dishwasher leg. Do not use an adapter.

Installation Guide
Page 25
.... Additional Tips Expect longer wash times. Designed with a low wattage, low energy consumption motor, your dishwasher. ❏ Check that all parts have all tools used. ❏ Start dishwasher and allow it again. (You must make sure the door is not working properly. Selecting certain options... could increase cycle time past 3.5 hours. Check that dishwasher is used, replace inlet hose after 5 years ...
.... Additional Tips Expect longer wash times. Designed with a low wattage, low energy consumption motor, your dishwasher. ❏ Check that all parts have all tools used. ❏ Start dishwasher and allow it again. (You must make sure the door is not working properly. Selecting certain options... could increase cycle time past 3.5 hours. Check that dishwasher is used, replace inlet hose after 5 years ...


