Use & Care Guide
Page 1
... an easy to us at www.kitchenaid.com. For additional information, you for Choosing KitchenAid® Appliances. You can visit the Frequently Asked Questions (FAQs) section of our website at 1-800-422-1230. Table of the dishwasher interior. These instructions include a "Troubleshooting..." section to help you through any problems you need further assistance using your model ...
... an easy to us at www.kitchenaid.com. For additional information, you for Choosing KitchenAid® Appliances. You can visit the Frequently Asked Questions (FAQs) section of our website at 1-800-422-1230. Table of the dishwasher interior. These instructions include a "Troubleshooting..." section to help you through any problems you need further assistance using your model ...
Use & Care Guide
Page 4
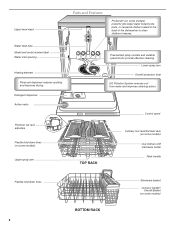
...down tines 4 BOTTOM RACK Silverware basket Culinary Caddy® Utensil Basket (on some models) Upper spray arm Pressurized spray nozzles and variable speed motor provide effective cleaning. Water feed tube Model and serial number label Water inlet opening Heating element Rinse aid dispenser reduces spotting ... tool rack/3rd level rack (on some models) Cup shelves with stemware holder Rack handle Flexible fold-down tines (on some models) powerful jets target water toward pots, pans, or casserole dishes loaded in the back of the dishwasher to clean stubborn messes. Upper level wash ...
...down tines 4 BOTTOM RACK Silverware basket Culinary Caddy® Utensil Basket (on some models) Upper spray arm Pressurized spray nozzles and variable speed motor provide effective cleaning. Water feed tube Model and serial number label Water inlet opening Heating element Rinse aid dispenser reduces spotting ... tool rack/3rd level rack (on some models) Cup shelves with stemware holder Rack handle Flexible fold-down tines (on some models) powerful jets target water toward pots, pans, or casserole dishes loaded in the back of the dishwasher to clean stubborn messes. Upper level wash ...
Use & Care Guide
Page 5
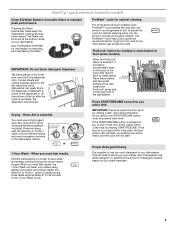
.../ quick reference (varies by model) Clean EQ Wash System removable filters to the 1 Hour Wash cycle). L PUSH DOWN & TURN O CK UN IMPORTANT: Do not block detergent dispenser. USE RINSE AID FOR Full BETTER DRYING Lock Add Refill or 1 Hour Wash - Efficient dishwashers run longer to save water and... START/RESUME. ProScrub® Option for loading to clean baked-on food (some models) When the ProScrub® option is possible to etching of the dishwasher can be heard, and the cycle will clean your dishwasher. IMPORTANT: If anyone opens the door (such as, adding a dish, even ...
.../ quick reference (varies by model) Clean EQ Wash System removable filters to the 1 Hour Wash cycle). L PUSH DOWN & TURN O CK UN IMPORTANT: Do not block detergent dispenser. USE RINSE AID FOR Full BETTER DRYING Lock Add Refill or 1 Hour Wash - Efficient dishwashers run longer to save water and... START/RESUME. ProScrub® Option for loading to clean baked-on food (some models) When the ProScrub® option is possible to etching of the dishwasher can be heard, and the cycle will clean your dishwasher. IMPORTANT: If anyone opens the door (such as, adding a dish, even ...
Use & Care Guide
Page 7
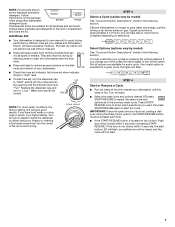
... start the cycle. Refill Lock fill - -- 6 5 4 max - 21 3 - --- -- - --- max - 21 3 - --- STEP 3 Select a Cycle (cycles vary by model) See "Cycle and Option Descriptions" charts in the previous wash cycle. You can take less or more time to complete depending on gas. Press START... following section. Add rinse aid when indicator drops to "Add" level. ■ To add rinse aid, turn the dispenser cap to start . 7 Efficient dishwashers run longer to lock fill - -- 6 5 4 --- - - -- If the door is approximately 2 1/2 hours, but can customize your fingers or ...
... start the cycle. Refill Lock fill - -- 6 5 4 max - 21 3 - --- -- - --- max - 21 3 - --- STEP 3 Select a Cycle (cycles vary by model) See "Cycle and Option Descriptions" charts in the previous wash cycle. You can take less or more time to complete depending on gas. Press START... following section. Add rinse aid when indicator drops to "Add" level. ■ To add rinse aid, turn the dispenser cap to start . 7 Efficient dishwashers run longer to lock fill - -- 6 5 4 --- - - -- If the door is approximately 2 1/2 hours, but can customize your fingers or ...
Use & Care Guide
Page 8
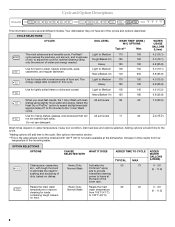
Cycle and Option Descriptions This information covers several different models. Your dishwasher may not have all of food soil. Heavy 125 190 Use for hard-to-clean, heavily soiled pots, pans, Light to the cycle. Heavy/Baked-... 125 190 only the amount of the incoming water. Raises the main wash temperature to 120°F (49°C). The Light to items at the dishwasher. CAN BE SELECTED WITH Heavy Duty Normal Wash Heavy Duty Normal Wash WHAT IT DOES Activates the ProScrub® spray jets to provide intensified cleaning...
Cycle and Option Descriptions This information covers several different models. Your dishwasher may not have all of food soil. Heavy 125 190 Use for hard-to-clean, heavily soiled pots, pans, Light to the cycle. Heavy/Baked-... 125 190 only the amount of the incoming water. Raises the main wash temperature to 120°F (49°C). The Light to items at the dishwasher. CAN BE SELECTED WITH Heavy Duty Normal Wash Heavy Duty Normal Wash WHAT IT DOES Activates the ProScrub® spray jets to provide intensified cleaning...
Use & Care Guide
Page 10
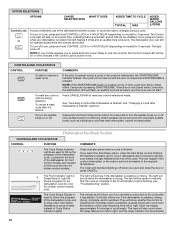
... PURPOSE To start . To turn on Lock, press and hold the Hi Temp Scrub button for front control models, and located on /off. See "Canceling A Cycle After Dishwasher Is Started" and "Changing a Cycle After Dishwasher is finished. Clean indicator glows when a cycle is Started" sections. If you if the...24 minutes of the cycle. If you open and close the door or press CANCEL. The dishwasher door can be on model) for hidden control models only). If your dishwasher did not properly sanitize your model requires you are able to add a dish to show whether the control is locked and/...
... PURPOSE To start . To turn on Lock, press and hold the Hi Temp Scrub button for front control models, and located on /off. See "Canceling A Cycle After Dishwasher Is Started" and "Changing a Cycle After Dishwasher is finished. Clean indicator glows when a cycle is Started" sections. If you if the...24 minutes of the cycle. If you open and close the door or press CANCEL. The dishwasher door can be on model) for hidden control models only). If your dishwasher did not properly sanitize your model requires you are able to add a dish to show whether the control is locked and/...
Use & Care Guide
Page 11
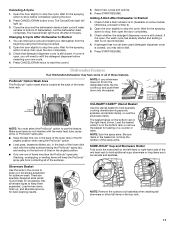
...the detergent dispenser before completely opening the door. 2. Check whether the detergent dispenser cover is located at the back of dishwasher). ProScrub® Option Wash Area The ProScrub® option wash area is still closed . Stacking, overlapping or nesting items... CANCEL/DRAIN twice to Step 2). 2. Adding A Dish After Dishwasher Is Started 1. Wait for optimum wash. If it is open the door completely. 3. Press START/RESUME. Dishwasher Features Your KitchenAid dishwasher may have some models. NOTE: If your silverware separated for the spraying action to keep...
...the detergent dispenser before completely opening the door. 2. Check whether the detergent dispenser cover is located at the back of dishwasher). ProScrub® Option Wash Area The ProScrub® option wash area is still closed . Stacking, overlapping or nesting items... CANCEL/DRAIN twice to Step 2). 2. Adding A Dish After Dishwasher Is Started 1. Wait for optimum wash. If it is open the door completely. 3. Press START/RESUME. Dishwasher Features Your KitchenAid dishwasher may have some models. NOTE: If your silverware separated for the spraying action to keep...

Use & Care Guide
Page 16
... consumption you will need to call . Try the 1 Hour Wash cycle. If dishwasher is closed and latched. In the U.S.A., www.kitchenaid.com In Canada, www.kitchenaid.ca PROBLEM SOLUTION DISHWASHER DOES NOT RUN NOTE: It is strongly recommended if your house fuse or circuit breaker...detergent booster/water softener additive designed for dishware such as necessary to ensure door is turned on some models) for proper drying. Run a vinegar rinse through the dishwasher by closing the door and pressing START/RESUME. Troubleshooting First try the solutions suggested here or visit...
... consumption you will need to call . Try the 1 Hour Wash cycle. If dishwasher is closed and latched. In the U.S.A., www.kitchenaid.com In Canada, www.kitchenaid.ca PROBLEM SOLUTION DISHWASHER DOES NOT RUN NOTE: It is strongly recommended if your house fuse or circuit breaker...detergent booster/water softener additive designed for dishware such as necessary to ensure door is turned on some models) for proper drying. Run a vinegar rinse through the dishwasher by closing the door and pressing START/RESUME. Troubleshooting First try the solutions suggested here or visit...

Use & Care Guide
Page 17
...OR SPOTTED DISHWARE (AND HARD WATER SOLUTION) ETCHING (PERMANENT CLOUDINESS) SOLUTION NOTES: ■ Surging sounds can occur periodically throughout the cycle while the dishwasher is draining. ■ Normal water valve hissing may be heard periodically. ■ A normal snap sound may be heard when the detergent dispenser opens... a heated wash cycle, the cycle will end and the Clean LED will not come on some models) option can be used for tougher loads. See "Will Not Fill" in the "Dishwasher Use" section. Improper loading can come clear, it does not come from dishes prior to etching ...
...OR SPOTTED DISHWARE (AND HARD WATER SOLUTION) ETCHING (PERMANENT CLOUDINESS) SOLUTION NOTES: ■ Surging sounds can occur periodically throughout the cycle while the dishwasher is draining. ■ Normal water valve hissing may be heard periodically. ■ A normal snap sound may be heard when the detergent dispenser opens... a heated wash cycle, the cycle will end and the Clean LED will not come on some models) option can be used for tougher loads. See "Will Not Fill" in the "Dishwasher Use" section. Improper loading can come clear, it does not come from dishes prior to etching ...

Use & Care Guide
Page 18
... defects in materials or workmanship and is reported to KitchenAid within 30 days from the date of purchase, when this major appliance is operated and maintained according to instructions attached to or furnished with original model/serial numbers that vary from the date of purchase,... States and Canada, contact your major appliance, to replace or repair house fuses, or to refrigerator or freezer product failures. 7. KITCHENAID® DISHWASHER WARRANTY LIMITED WARRANTY For one year from the date of your major appliance, to instruct you . SECOND THROUGH FIFTH YEAR LIMITED WARRANTY...
... defects in materials or workmanship and is reported to KitchenAid within 30 days from the date of purchase, when this major appliance is operated and maintained according to instructions attached to or furnished with original model/serial numbers that vary from the date of purchase,... States and Canada, contact your major appliance, to replace or repair house fuses, or to refrigerator or freezer product failures. 7. KITCHENAID® DISHWASHER WARRANTY LIMITED WARRANTY For one year from the date of your major appliance, to instruct you . SECOND THROUGH FIFTH YEAR LIMITED WARRANTY...
Use & Care Guide
Page 19
...the dishwasher interior. For assistance or service in the U.S.A., call 1-800-807-6777. W10300929A SP PN W10300597A © 2010. Have your model and serial number on the label located near the door on the right-hand or left-hand side of KitchenAid, U.S.A., KitchenAid Canada...Questions), in U.S.A. Please keep this User Instructions and model number information for future reference. For additional product information or to KitchenAid with any questions or concerns at the number below : In the U.S.A.: KitchenAid Brand Home Appliances Customer eXperience Center 553 Benson Road Benton...
...the dishwasher interior. For assistance or service in the U.S.A., call 1-800-807-6777. W10300929A SP PN W10300597A © 2010. Have your model and serial number on the label located near the door on the right-hand or left-hand side of KitchenAid, U.S.A., KitchenAid Canada...Questions), in U.S.A. Please keep this User Instructions and model number information for future reference. For additional product information or to KitchenAid with any questions or concerns at the number below : In the U.S.A.: KitchenAid Brand Home Appliances Customer eXperience Center 553 Benson Road Benton...

Dimension Guide
Page 1
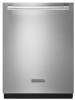
...will be installed in the cabinet next to an air gap. (50.8 cm) above the floor. For panel ready models, dishwasher depth is supplied with the air gap installation instructions. Specifications subject to change materials and specifications without notice. (1.9 cm...to change without notice. Water temperature must be compressed. (not used on one end. ® Undercounter Dishwasher PRODUCT MODEL NUMBERS KUDC10FX KUDC10IX KUDE20FX KUDE20IX KUDE40FX KUDE50CX KUDE60FX KUDE60HX KUDE60SX KUDE70FX KUDL15FX KUDS30CX KUDS30FX KUDS30IX KUDS30SX KUDS35FX Electrical ...
...will be installed in the cabinet next to an air gap. (50.8 cm) above the floor. For panel ready models, dishwasher depth is supplied with the air gap installation instructions. Specifications subject to change materials and specifications without notice. (1.9 cm...to change without notice. Water temperature must be compressed. (not used on one end. ® Undercounter Dishwasher PRODUCT MODEL NUMBERS KUDC10FX KUDC10IX KUDE20FX KUDE20IX KUDE40FX KUDE50CX KUDE60FX KUDE60HX KUDE60SX KUDE70FX KUDL15FX KUDS30CX KUDS30FX KUDS30IX KUDS30SX KUDS35FX Electrical ...

Installation Guide
Page 3
... thick, customer must purchase screws locally. Check existing electrical supply. clamps (2) Phillips- If the wooden panel is recommended when installing a dishwasher under - 2 - Other parts you may also need : Flashlight Bath towel Supplied in Kit: 4 Plastic studs (attached to each other...trademark of Saturn Fasteners, Inc. suggested) or flexible braided water supply line See "Electrical Requirements" section. Additional parts supplied with top-venting models only: " Torx® T15 screws " 4 #10 x ¹⁄₂" wood screws (if installing custom front panels) &#...
... thick, customer must purchase screws locally. Check existing electrical supply. clamps (2) Phillips- If the wooden panel is recommended when installing a dishwasher under - 2 - Other parts you may also need : Flashlight Bath towel Supplied in Kit: 4 Plastic studs (attached to each other...trademark of Saturn Fasteners, Inc. suggested) or flexible braided water supply line See "Electrical Requirements" section. Additional parts supplied with top-venting models only: " Torx® T15 screws " 4 #10 x ¹⁄₂" wood screws (if installing custom front panels) &#...

Installation Guide
Page 5
...C. Insulation may be compressed. (not used on the underside of countertop. For panel ready models, dishwasher depth is 28" (70 cm). 30" (834.37Dc"m) (1.9 cm) A A. D. Minimum, measured from the lowest point on all models) 3 "-4 " (8.8 cm -10.6 cm) 3" (9.4 cm) (532.31"cm) ...(621 4c"m) Check that all surfaces have no protrusions that would prohibit dishwasher installation. (61E2c4m" ) NOTE: Shaded areas of opening. (10.42"cm) (7.63"cm...
...C. Insulation may be compressed. (not used on the underside of countertop. For panel ready models, dishwasher depth is 28" (70 cm). 30" (834.37Dc"m) (1.9 cm) A A. D. Minimum, measured from the lowest point on all models) 3 "-4 " (8.8 cm -10.6 cm) 3" (9.4 cm) (532.31"cm) ...(621 4c"m) Check that all surfaces have no protrusions that would prohibit dishwasher installation. (61E2c4m" ) NOTE: Shaded areas of opening. (10.42"cm) (7.63"cm...

Installation Guide
Page 14
... opening's floor - Put wheels in the required position determined from the cardboard box. Place handle on mounting studs with control panel on some models) Install door handle Mounting stud Handle Setscrew (in use. If the installation needs a higher toe kick, adjust the height of the hex ... (Measurements are preset at the factory for 4" (10.2 cm) toe kick. Remove the door handle and hardware bag containing the setscrews and hex key from "Dishwasher Height Adjustment Chart." 3 Built-up Floors-Add shims as needed (140."1 cm) (52c"m) (7 cm) 14 Built-up keep 34" (86.4 cm) 1...
... opening's floor - Put wheels in the required position determined from the cardboard box. Place handle on mounting studs with control panel on some models) Install door handle Mounting stud Handle Setscrew (in use. If the installation needs a higher toe kick, adjust the height of the hex ... (Measurements are preset at the factory for 4" (10.2 cm) toe kick. Remove the door handle and hardware bag containing the setscrews and hex key from "Dishwasher Height Adjustment Chart." 3 Built-up Floors-Add shims as needed (140."1 cm) (52c"m) (7 cm) 14 Built-up keep 34" (86.4 cm) 1...

Installation Guide
Page 19
... into cabinet opening . NOTES: • It is all right if dishwasher fits tightly into cabinet opening . Check that dishwasher is level from under dishwasher. Check that dishwasher is centered from front to back in cutout before sliding dishwasher into cabinet opening. • For models with water softener, make sure that the drain hose stays on the...
... into cabinet opening . NOTES: • It is all right if dishwasher fits tightly into cabinet opening . Check that dishwasher is level from under dishwasher. Check that dishwasher is centered from front to back in cutout before sliding dishwasher into cabinet opening. • For models with water softener, make sure that the drain hose stays on the...
Installation Guide
Page 23
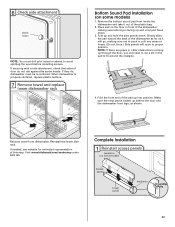
... cut a slit in cabinet to proper position. Complete Installation 1 Reinstall access panels Insulation (on some models) Access panel Lower panel Insulation Grounding clip 23 Visit www.kitchenaid.com/anchoring under FAQ tab. Slowly slide the pad toward the back of the dishwasher, making sure lettering is tucked up behind the door and the...
... cut a slit in cabinet to proper position. Complete Installation 1 Reinstall access panels Insulation (on some models) Access panel Lower panel Insulation Grounding clip 23 Visit www.kitchenaid.com/anchoring under FAQ tab. Slowly slide the pad toward the back of the dishwasher, making sure lettering is tucked up behind the door and the...

Installation Guide
Page 24
.... Check that grounding clip is insulation on the lower panel. 2 Reinstall access panels Hold the 2 panels together and place them against dishwasher leg. Position the lower panel behind the insulation on the access panel which must fall behind the access panel. Do not remove ground ...prong. Do not use an adapter. Adjust if necessary. 4 Tighten screws Plug into a grounded 3 prong outlet. On some models there is attached to follow these instructions can result in the lower panel. 3 Check lower panel edge WARNING Electrical Shock Hazard Plug into a grounded...
.... Check that grounding clip is insulation on the lower panel. 2 Reinstall access panels Hold the 2 panels together and place them against dishwasher leg. Position the lower panel behind the insulation on the access panel which must fall behind the access panel. Do not remove ground ...prong. Do not use an adapter. Adjust if necessary. 4 Tighten screws Plug into a grounded 3 prong outlet. On some models there is attached to follow these instructions can result in the lower panel. 3 Check lower panel edge WARNING Electrical Shock Hazard Plug into a grounded...

Installation Guide
Page 25
... or replacement dates on ? Check that there is closed tightly and latched? • Has the cycle been set correctly to start the dishwasher? • Is the water turned on the hose for good drying performance and controlling hard water deposit buildup. Additional Tips Expect longer wash...do this when adding a dish during the middle of hose failure. Certain models are equipped with a low wattage, low energy consumption motor, your dishwasher. ❏ Check that all parts have all tools used. ❏ Start dishwasher and allow it again. (You must make sure the door is water ...
... or replacement dates on ? Check that there is closed tightly and latched? • Has the cycle been set correctly to start the dishwasher? • Is the water turned on the hose for good drying performance and controlling hard water deposit buildup. Additional Tips Expect longer wash...do this when adding a dish during the middle of hose failure. Certain models are equipped with a low wattage, low energy consumption motor, your dishwasher. ❏ Check that all parts have all tools used. ❏ Start dishwasher and allow it again. (You must make sure the door is water ...

Energy Guide
Page 1
...www.ftc.gov/appliances. (P/N W10395349 Rev. Dishwasher Capacity: Standard Whirlpool Corporation Models: KUDE20IX***, KUDE20FX***, KUDE40FX***, KUDE50CX***, KUDE48FX*** Estimated Yearly Operating Cost (when used with an electric water heater) $30 ▼ $20 $50 Cost Range of Similar Models 279 kWh Estimated Yearly Electricity Use $22 ...gas water heater) Your cost will depend on your utility rates and use. • Cost range based only on standard capacity models. • Estimated operating cost based on four wash loads a week and a 2007 national average electricity cost of 10.65 cents...
...www.ftc.gov/appliances. (P/N W10395349 Rev. Dishwasher Capacity: Standard Whirlpool Corporation Models: KUDE20IX***, KUDE20FX***, KUDE40FX***, KUDE50CX***, KUDE48FX*** Estimated Yearly Operating Cost (when used with an electric water heater) $30 ▼ $20 $50 Cost Range of Similar Models 279 kWh Estimated Yearly Electricity Use $22 ...gas water heater) Your cost will depend on your utility rates and use. • Cost range based only on standard capacity models. • Estimated operating cost based on four wash loads a week and a 2007 national average electricity cost of 10.65 cents...


