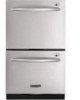

Use and Care Guide
Page 19
.../ RINSE CLEAN CHINA Fill failure. Check the chart below .) To solve a failure issue 1. After attending to the failure, turn the dishwasher on the dishwasher water supply. If the error code and continuous beeps cannot be removed by pressing POWER, turn the water and power supply off and call... sure that water going in through the inlet hose is full of the error code that has appeared on the wash cycle panel. (For specific failures see the illustrations below and correct the failure wherever possible. 4. Call your authorized service center. If you have any questions about operating ...
.../ RINSE CLEAN CHINA Fill failure. Check the chart below .) To solve a failure issue 1. After attending to the failure, turn the dishwasher on the dishwasher water supply. If the error code and continuous beeps cannot be removed by pressing POWER, turn the water and power supply off and call... sure that water going in through the inlet hose is full of the error code that has appeared on the wash cycle panel. (For specific failures see the illustrations below and correct the failure wherever possible. 4. Call your authorized service center. If you have any questions about operating ...

Use and Care Guide
Page 20
.... s Accessory and repair parts sales. This information will fit right and work right, because they are made with : s Features and specifications on our full line of appliances. s Accessory and repair parts sales. Our consultants provide assistance with the same precision used to fulfill the... and serial number of your area, you need help us with : s Features and specifications on our full line of a service call us with any questions or concerns at : KitchenAid Brand Home Appliances Customer eXperience Center 553 Benson Road Benton Harbor, MI 49022-2692 Please...
.... s Accessory and repair parts sales. This information will fit right and work right, because they are made with : s Features and specifications on our full line of appliances. s Accessory and repair parts sales. Our consultants provide assistance with the same precision used to fulfill the... and serial number of your area, you need help us with : s Features and specifications on our full line of a service call us with any questions or concerns at : KitchenAid Brand Home Appliances Customer eXperience Center 553 Benson Road Benton Harbor, MI 49022-2692 Please...

Use and Care Guide
Page 21
...down the following components if defective in materials or workmanship: the upper and lower drawer nylon dish racks, the nylon cup shelves and the silverware baskets. Dealer name ... or is not installed in accordance with published installation instructions. THIS WARRANTY GIVES YOU SPECIFIC LEGAL RIGHTS AND YOU MAY ALSO HAVE OTHER RIGHTS, WHICH VARY FROM STATE TO STATE...THE SHORTEST PERIOD ALLOWED BY LAW. Contact your authorized KitchenAid dealer to know your complete model number and serial number. KITCHENAID® DISHWASHER WARRANTY TWO YEAR LIMITED WARRANTY For two years from the...
...down the following components if defective in materials or workmanship: the upper and lower drawer nylon dish racks, the nylon cup shelves and the silverware baskets. Dealer name ... or is not installed in accordance with published installation instructions. THIS WARRANTY GIVES YOU SPECIFIC LEGAL RIGHTS AND YOU MAY ALSO HAVE OTHER RIGHTS, WHICH VARY FROM STATE TO STATE...THE SHORTEST PERIOD ALLOWED BY LAW. Contact your authorized KitchenAid dealer to know your complete model number and serial number. KITCHENAID® DISHWASHER WARRANTY TWO YEAR LIMITED WARRANTY For two years from the...
Installation Instructions
Page 13
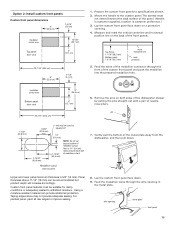
...of the metal plate away from the dishwasher, and then pull down . 9. Measure and mark the vertical centerline and horizontal position line on a protective covering. 4. Lay the custom front panel face down . Mount the handle to specifications shown. 2. Upper and lower panel ... edges to withstand moisture. Rout a 1/4" (6.4 mm) radius around back side of needlenose pliers. Remove the pins on both sides of the dishwasher drawer by pulling the pins straight out with a pair of medallion cutout. Option 2: Install custom front panels Custom front panel dimensions 9" (22.9 ...
...of the metal plate away from the dishwasher, and then pull down . 9. Measure and mark the vertical centerline and horizontal position line on a protective covering. 4. Lay the custom front panel face down . Mount the handle to specifications shown. 2. Upper and lower panel ... edges to withstand moisture. Rout a 1/4" (6.4 mm) radius around back side of needlenose pliers. Remove the pins on both sides of the dishwasher drawer by pulling the pins straight out with a pair of medallion cutout. Option 2: Install custom front panels Custom front panel dimensions 9" (22.9 ...
Installation Instructions
Page 14
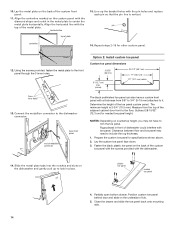
10. Using the screws provided, fasten the metal plate to specifications shown above. 2. Determine the height of plate 15. Subtract 28-15/32"...front of the custom toe panel with the screws provided with toe panel. pin centerline 16. Partially open bottom drawer. Align the horizontal line with the pin holes and replace each pin so that the pin line is 2-3/4"... (70.5 mm). NOTES: Depending on the back of dishwasher could interfere with the dishwasher. 14. Slide the metal plate tabs into the notches and slots on the underside of the ...
10. Using the screws provided, fasten the metal plate to specifications shown above. 2. Determine the height of plate 15. Subtract 28-15/32"...front of the custom toe panel with the screws provided with toe panel. pin centerline 16. Partially open bottom drawer. Align the horizontal line with the pin holes and replace each pin so that the pin line is 2-3/4"... (70.5 mm). NOTES: Depending on the back of dishwasher could interfere with the dishwasher. 14. Slide the metal plate tabs into the notches and slots on the underside of the ...