Installation Guide
Page 9
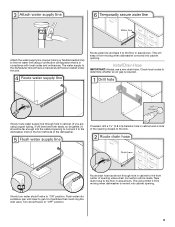
...dishwasher. Slowly route water supply line through hole in cabinet. (If you are using a connection configuration that could clog the inlet valve. Slowly turn water shutoff valve to "OFF" position. 9 Flush water into the cabinet opening closest to the sink. This will keep it from moving when... the floor in compliance with local codes and ordinances. If needed, drill a 1¹⁄₂" (3.8 cm) diameter hole in area shown. Turn shutoff valve to "ON" position. Route water line and tape it from moving when dishwasher is in area shown. Tape drain hose to the ...
...dishwasher. Slowly route water supply line through hole in cabinet. (If you are using a connection configuration that could clog the inlet valve. Slowly turn water shutoff valve to "OFF" position. 9 Flush water into the cabinet opening closest to the sink. This will keep it from moving when... the floor in compliance with local codes and ordinances. If needed, drill a 1¹⁄₂" (3.8 cm) diameter hole in area shown. Turn shutoff valve to "ON" position. Route water line and tape it from moving when dishwasher is in area shown. Tape drain hose to the ...
Installation Guide
Page 12
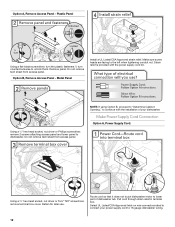
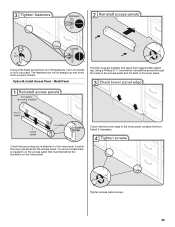
.... Do not remove tech sheet from access panel. Remove panel. Make sure screw heads are facing to unlock them. Plastic Panel Using a flat-blade screwdriver, turn the plastic fasteners ¹⁄₄ turn counterclockwise to the left when tightening conduit nut.
.... Do not remove tech sheet from access panel. Remove panel. Make sure screw heads are facing to unlock them. Plastic Panel Using a flat-blade screwdriver, turn the plastic fasteners ¹⁄₄ turn counterclockwise to the left when tightening conduit nut.
Installation Guide
Page 14
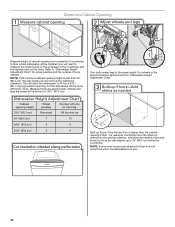
...to avoid movement when the dishwasher is higher than 34" (86.4 cm), the rear wheels can be removed for 34¹⁄₂" (87.6 cm). Turn both leveler legs to "Dishwasher Height Adjustment Chart" for example, the kitchen floor tile does not extend into a 33⁷⁄₂" (85.1 cm) high...to measure the lowest point on the underside of the countertop and the highest point on the floor). for wheel position and the number of turns needed in the area shown to bring the dishwasher up floors: If the kitchen floor is in the required position determined from underside of ...
...to avoid movement when the dishwasher is higher than 34" (86.4 cm), the rear wheels can be removed for 34¹⁄₂" (87.6 cm). Turn both leveler legs to "Dishwasher Height Adjustment Chart" for example, the kitchen floor tile does not extend into a 33⁷⁄₂" (85.1 cm) high...to measure the lowest point on the underside of the countertop and the highest point on the floor). for wheel position and the number of turns needed in the area shown to bring the dishwasher up floors: If the kitchen floor is in the required position determined from underside of ...
Installation Guide
Page 15
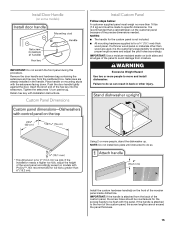
...(s) on both sides and all edges of the custom panel, the screw lengths cannot exceed the panel thickness. 15 Tighten the setscrews ¹⁄₄ turn past snug. It is recommended that a cabinetmaker cut the customer panel because of the wooden panel inside dotted line. IMPORTANT: Use a moisture-resistant sealer on...
...(s) on both sides and all edges of the custom panel, the screw lengths cannot exceed the panel thickness. 15 Tighten the setscrews ¹⁄₄ turn past snug. It is recommended that a cabinetmaker cut the customer panel because of the wooden panel inside dotted line. IMPORTANT: Use a moisture-resistant sealer on...

Installation Guide
Page 21
...and Company. 21 Place towel under FAQ tab. †®TEFLON is connected, remove towel. If leak occurs, repeat previous step. Visit www.kitchenaid.com/watersupply under 90° elbow fitting. After hose is a registered trademark of the 90° elbow up to the drain hose stop....website for animated representation of this step. Connect to Water Supply Connect to Drain Be sure rubber washer is properly seated in drain hose. Turn on water supply and check for animated representation of this step. NOTE: Do not use Teflon®† tape with compression fittings. If...
...and Company. 21 Place towel under FAQ tab. †®TEFLON is connected, remove towel. If leak occurs, repeat previous step. Visit www.kitchenaid.com/watersupply under 90° elbow fitting. After hose is a registered trademark of the 90° elbow up to the drain hose stop....website for animated representation of this step. Connect to Water Supply Connect to Drain Be sure rubber washer is properly seated in drain hose. Turn on water supply and check for animated representation of this step. NOTE: Do not use Teflon®† tape with compression fittings. If...
Installation Guide
Page 25
... the 2 panels together and place them against dishwasher leg. The fasteners slot will be straight up and down when properly locked. Using a flat-blade screwdriver, turn the fasteners ¹⁄₄ turn clockwise to the lower panel.
... the 2 panels together and place them against dishwasher leg. The fasteners slot will be straight up and down when properly locked. Using a flat-blade screwdriver, turn the fasteners ¹⁄₄ turn clockwise to the lower panel.

Installation Guide
Page 26
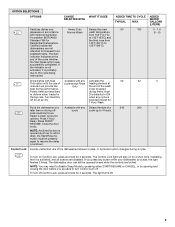
... options could increase cycle time past 3.5 hours. WARNING Electrical Shock Hazard Plug into a grounded 3 prong outlet. Failure to start the dishwasher? ■ Is the water turned on? Check that dishwasher is working properly, disconnect power or unplug dishwasher and see your dishwasher. ■ Check that power supply cord does not touch...
... options could increase cycle time past 3.5 hours. WARNING Electrical Shock Hazard Plug into a grounded 3 prong outlet. Failure to start the dishwasher? ■ Is the water turned on? Check that dishwasher is working properly, disconnect power or unplug dishwasher and see your dishwasher. ■ Check that power supply cord does not touch...

Use & Care Guide
Page 2
... touch the heating element during or immediately after use in a hot water system that has not been used for such a period, before using the dishwasher turn on the dishwasher. ■ Under certain conditions, hydrogen gas may be washed: 1) Locate sharp items so that can happen if the instructions are not likely...
... touch the heating element during or immediately after use in a hot water system that has not been used for such a period, before using the dishwasher turn on the dishwasher. ■ Under certain conditions, hydrogen gas may be washed: 1) Locate sharp items so that can happen if the instructions are not likely...
Use & Care Guide
Page 7
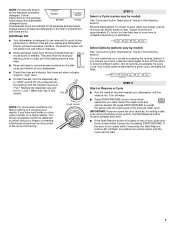
... for all options are available for every cycle. Always place premeasured detergents in the following section. Replace the dispenser cap and turn off the option, or select a different option. Efficient dishwashers run longer to repeat the same cycle and options as driving .... Follow Hard Water Soft Water Hard Water Soft Water instructions on top of door, push door firmly closed within 3 seconds of the arrow and turning. ¹⁄₄ turn the dispenser cap to "Lock." Refill Lock fill - -- 6 5 4 max - 21 3 - --- -- - --- If the door is approximately ...
... for all options are available for every cycle. Always place premeasured detergents in the following section. Replace the dispenser cap and turn off the option, or select a different option. Efficient dishwashers run longer to repeat the same cycle and options as driving .... Follow Hard Water Soft Water Hard Water Soft Water instructions on top of door, push door firmly closed within 3 seconds of the arrow and turning. ¹⁄₄ turn the dispenser cap to "Lock." Refill Lock fill - -- 6 5 4 max - 21 3 - --- -- - --- If the door is approximately ...
Use & Care Guide
Page 9
...likely drying times. Heat to deform when loaded in accordance Normal Wash wash temperature with heat. peak electrical hours. Press START/ RESUME. To turn on for 1 Hour Wash. NOTE: You may need to disable Sleep Mode by pressing either START/RESUME or CANCEL, or by opening and... closing the door before you press any Delays the start of the wash best drying performance. dishwashers are able to turn off for 3 seconds. Turn Heat Dry when any cycle is locked, the light flashes 3 times. Press 4 Hour Delay. If you are not intended for 3...
...likely drying times. Heat to deform when loaded in accordance Normal Wash wash temperature with heat. peak electrical hours. Press START/ RESUME. To turn on for 1 Hour Wash. NOTE: You may need to disable Sleep Mode by pressing either START/RESUME or CANCEL, or by opening and... closing the door before you press any Delays the start of the wash best drying performance. dishwashers are able to turn off for 3 seconds. Turn Heat Dry when any cycle is locked, the light flashes 3 times. Press 4 Hour Delay. If you are not intended for 3...
Use & Care Guide
Page 10
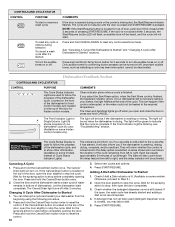
...sections. Only audible tones for 3 seconds to stop the cycle. Important audible tones, such as indicating a cycle has been interrupted, cannot be turned on . COMMENTS Clean indicator glows when a cycle is blinking, see "Troubleshooting" section. If your dishwasher did not properly sanitize your dishes, the...can be deactivated. The light will be red when the dishwasher is complete. A series of pressing START/RESUME. The Cancel/Drain light turns off when you are used to stop before completely opening the door. Press START/RESUME. Press and hold the Hi-Temp Scrub button...
...sections. Only audible tones for 3 seconds to stop the cycle. Important audible tones, such as indicating a cycle has been interrupted, cannot be turned on . COMMENTS Clean indicator glows when a cycle is blinking, see "Troubleshooting" section. If your dishwasher did not properly sanitize your dishes, the...can be deactivated. The light will be red when the dishwasher is complete. A series of pressing START/RESUME. The Cancel/Drain light turns off when you are used to stop before completely opening the door. Press START/RESUME. Press and hold the Hi-Temp Scrub button...
Use & Care Guide
Page 13
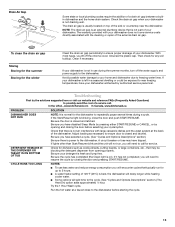
...detergent is power to call . Clean if necessary. Then check for the dishwasher to repeatedly pause several times during the summer months, turn off the chrome cover. Troubleshooting First try the solutions suggested here or visit our website and reference FAQs (Frequently Asked Questions) to possibly... run , you lift off the water supply and power supply to resume the cycle by opening properly. In the U.S.A., www.kitchenaid.com In Canada, www.kitchenaid.ca PROBLEM SOLUTION DISHWASHER DOES NOT RUN NOTE: It is on top of a drain air gap between a builtin dishwasher and ...
...detergent is power to call . Clean if necessary. Then check for the dishwasher to repeatedly pause several times during the summer months, turn off the chrome cover. Troubleshooting First try the solutions suggested here or visit our website and reference FAQs (Frequently Asked Questions) to possibly... run , you lift off the water supply and power supply to resume the cycle by opening properly. In the U.S.A., www.kitchenaid.com In Canada, www.kitchenaid.ca PROBLEM SOLUTION DISHWASHER DOES NOT RUN NOTE: It is on top of a drain air gap between a builtin dishwasher and ...
Use & Care Guide
Page 14
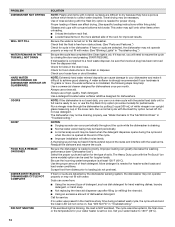
... aid dispenser cap after filling (or refilling) the rinse aid. ■ Using an excessive amount of dishwasher detergent. If dishwasher is turned on . NOTE: Extremely hard water mineral deposits can occur periodically throughout the cycle while the dishwasher is draining. ■ Normal water valve...detergent. If foam or suds are detected, the dishwasher may not operate properly or may not fill with the Heat Dry option turned off. Check for proper drying. Use a detergent booster/water softener additive designed for heavier-soiled loads and hard water conditions. Improper...
... aid dispenser cap after filling (or refilling) the rinse aid. ■ Using an excessive amount of dishwasher detergent. If dishwasher is turned on . NOTE: Extremely hard water mineral deposits can occur periodically throughout the cycle while the dishwasher is draining. ■ Normal water valve...detergent. If foam or suds are detected, the dishwasher may not operate properly or may not fill with the Heat Dry option turned off. Check for proper drying. Use a detergent booster/water softener additive designed for heavier-soiled loads and hard water conditions. Improper...
Use & Care Guide
Page 15
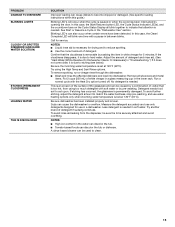
... the dishwasher to reduce spotting. ■ Use the correct amount of detergent if sudsing continues. Try using too much detergent with the Heat Dry option turned off. No detergent is below ). This is an erosion of the surface of the glassware and can be sure the lid is set at 120...
... the dishwasher to reduce spotting. ■ Use the correct amount of detergent if sudsing continues. Try using too much detergent with the Heat Dry option turned off. No detergent is below ). This is an erosion of the surface of the glassware and can be sure the lid is set at 120...


