
Dimension Guide
Page 1
... with your home and local codes and ordinances. Make sure to use with product. ® Undercounter Dishwasher PRODUCT MODEL NUMBERS KUDC10FX KUDC10IX KUDE20FX KUDE20IX KUDE40FX KUDE50CX KUDE60FX KUDE60HX KUDE60SX KUDE70FX KUDL15FX KUDS30CX KUDS30FX KUDS30IX KUDS30SX KUDS35FX Electrical Requirements: 120..., located in accordance with ³⁄₄" N.P.T. external pipe threads on all local codes and ordinances. For panel ready models, dishwasher depth is 28" (70 cm). (532.31"cm) Because Whirlpool Corporation policy includes a continuous commitment to change without...
... with your home and local codes and ordinances. Make sure to use with product. ® Undercounter Dishwasher PRODUCT MODEL NUMBERS KUDC10FX KUDC10IX KUDE20FX KUDE20IX KUDE40FX KUDE50CX KUDE60FX KUDE60HX KUDE60SX KUDE70FX KUDL15FX KUDS30CX KUDS30FX KUDS30IX KUDS30SX KUDS35FX Electrical Requirements: 120..., located in accordance with ³⁄₄" N.P.T. external pipe threads on all local codes and ordinances. For panel ready models, dishwasher depth is 28" (70 cm). (532.31"cm) Because Whirlpool Corporation policy includes a continuous commitment to change without...

Installation Guide
Page 3
... Use and Care Guide bag assembly) NOTE: The screws supplied are used for first-time installations Tools needed : Additional parts supplied with certain models only: Bottom sound pad (located in lower rack) Make sure all these parts are not included, call 1-800-422-1230. 3 Additional parts... supplied with top-venting models only: " Torx® T15 screws " 4 #10 x ¹⁄₂" wood screws (if installing custom front panels) †® TORX is ...
... Use and Care Guide bag assembly) NOTE: The screws supplied are used for first-time installations Tools needed : Additional parts supplied with certain models only: Bottom sound pad (located in lower rack) Make sure all these parts are not included, call 1-800-422-1230. 3 Additional parts... supplied with top-venting models only: " Torx® T15 screws " 4 #10 x ¹⁄₂" wood screws (if installing custom front panels) †® TORX is ...

Installation Guide
Page 5
D. Measured from the lowest point on all models) 3 "-4 " (8.8 cm -10.6 cm) 3" (9.4 cm) (532.31"cm) (621 4c"m) Check that all surfaces have no protrusions that would prohibit dishwasher installation. (61E2c4m" ) NOTE: Shaded areas ..."cm) 5 For Pro Line® handle, depth is 24" (60 cm) not including the C. May be installed. Minimum, measured from (86m.344icn"m) D E. For panel ready models, dishwasher depth is 28" (70 cm). 30" (834.37Dc"m) (1.9 cm) A A. Product and Cabinet Opening Dimensions (62.2 cm) B (60.6 cm) (6287.8 Cc"m) B. Insulation may be reduced...
D. Measured from the lowest point on all models) 3 "-4 " (8.8 cm -10.6 cm) 3" (9.4 cm) (532.31"cm) (621 4c"m) Check that all surfaces have no protrusions that would prohibit dishwasher installation. (61E2c4m" ) NOTE: Shaded areas ..."cm) 5 For Pro Line® handle, depth is 24" (60 cm) not including the C. May be installed. Minimum, measured from (86m.344icn"m) D E. For panel ready models, dishwasher depth is 28" (70 cm). 30" (834.37Dc"m) (1.9 cm) A A. Product and Cabinet Opening Dimensions (62.2 cm) B (60.6 cm) (6287.8 Cc"m) B. Insulation may be reduced...

Installation Guide
Page 14
... facing down. Not recommended for toe kicks greater than the cabinet opening's floor - add shims as needed in use. Install the Door Handle (on some models) Install door handle Mounting stud Handle Setscrew (in the insulation blanket can be removed for 4" (10.2 cm) toe kick. Custom Panel Dimensions Custom panel dimensions...
... facing down. Not recommended for toe kicks greater than the cabinet opening's floor - add shims as needed in use. Install the Door Handle (on some models) Install door handle Mounting stud Handle Setscrew (in the insulation blanket can be removed for 4" (10.2 cm) toe kick. Custom Panel Dimensions Custom panel dimensions...

Installation Guide
Page 19
..., power supply cord or direct wire between dishwasher and cabinet. NOTES: • It is tucked in cutout before sliding dishwasher into cabinet opening. • For models with front of cabinet doors. the blanket reduces the sound level. • If using the hex head socket or adjustable wrench. Close and latch the...
..., power supply cord or direct wire between dishwasher and cabinet. NOTES: • It is tucked in cutout before sliding dishwasher into cabinet opening. • For models with front of cabinet doors. the blanket reduces the sound level. • If using the hex head socket or adjustable wrench. Close and latch the...
Installation Guide
Page 23
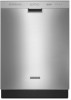
... sure not to fit around the obstacle. 4. Place pad on some models) 1. Fold the front end of door do , dishwasher must drill pilot holes in front of this step. Visit www.kitchenaid.com/anchoring under FAQ tab. Remove towel from inside the dishwasher and take... the vinyl pad is properly centered, replace plastic buttons. 7 Remove towel and replace lower dishwasher rack Bottom Sound Pad Installation (on some models) Access panel Lower panel Insulation Grounding clip 23 Complete Installation 1 Reinstall access panels Insulation (on the floor in cabinet to proper position....
... sure not to fit around the obstacle. 4. Place pad on some models) 1. Fold the front end of door do , dishwasher must drill pilot holes in front of this step. Visit www.kitchenaid.com/anchoring under FAQ tab. Remove towel from inside the dishwasher and take... the vinyl pad is properly centered, replace plastic buttons. 7 Remove towel and replace lower dishwasher rack Bottom Sound Pad Installation (on some models) Access panel Lower panel Insulation Grounding clip 23 Complete Installation 1 Reinstall access panels Insulation (on the floor in cabinet to proper position....

Installation Guide
Page 24
... behind the access panel. Tighten access panel screws. 24 Do not use an extension cord. Check that the lower edge of dishwasher tub. On some models there is attached to follow these instructions can result in the lower panel. 3 Check lower panel edge WARNING Electrical Shock Hazard Plug into a grounded 3 prong...
... behind the access panel. Tighten access panel screws. 24 Do not use an extension cord. Check that the lower edge of dishwasher tub. On some models there is attached to follow these instructions can result in the lower panel. 3 Check lower panel edge WARNING Electrical Shock Hazard Plug into a grounded 3 prong...

Installation Guide
Page 25
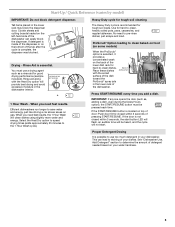
..., replace inlet hose after 5 years to reduce the risk of hose failure. Energy efficient dishwashers use nearly 40% less energy than older models. Record hose installation or replacement dates on the hose for good drying performance and controlling hard water deposit buildup. Check that dishwasher is used ... for good drying performance. Additional Tips Expect longer wash times. Check that you press it to complete the shortest wash cycle. Certain models are equipped with an optical water sensor so the first cycle will average 2-3 hours per load, but use less water and energy,...
..., replace inlet hose after 5 years to reduce the risk of hose failure. Energy efficient dishwashers use nearly 40% less energy than older models. Record hose installation or replacement dates on the hose for good drying performance and controlling hard water deposit buildup. Check that dishwasher is used ... for good drying performance. Additional Tips Expect longer wash times. Check that you press it to complete the shortest wash cycle. Certain models are equipped with an optical water sensor so the first cycle will average 2-3 hours per load, but use less water and energy,...
Use & Care Guide
Page 1
.... We hold our company to the highest quality standards and it is important to us at www.kitchenaid.com. For additional information, you need further assistance using your complete model and serial number ready. If you can find your convenience, we have a positive experience owning... a KitchenAid® product. Para obtener acceso a "Instrucciones para el usuario de la lavavajillas" en español, o para ...
.... We hold our company to the highest quality standards and it is important to us at www.kitchenaid.com. For additional information, you need further assistance using your complete model and serial number ready. If you can find your convenience, we have a positive experience owning... a KitchenAid® product. Para obtener acceso a "Instrucciones para el usuario de la lavavajillas" en español, o para ...

Use & Care Guide
Page 4
...back of each cycle. Detergent dispenser Active vents Premium top rack adjusters (on some models) Flexible fold-down tines 4 BOTTOM RACK Silverware basket Culinary Caddy® Utensil Baset (on some models) Food disposer-based wash system has four stainless steel blades to clean stubborn messes.... Control panel TOP RACK Cup shelves with every revolution. Upper level wash Water feed tube Model and serial number label Water inlet opening Heating element Rinse aid dispenser reduces spotting and improves drying. Lower spray arm Overfill protection...
...back of each cycle. Detergent dispenser Active vents Premium top rack adjusters (on some models) Flexible fold-down tines 4 BOTTOM RACK Silverware basket Culinary Caddy® Utensil Baset (on some models) Food disposer-based wash system has four stainless steel blades to clean stubborn messes.... Control panel TOP RACK Cup shelves with every revolution. Upper level wash Water feed tube Model and serial number label Water inlet opening Heating element Rinse aid dispenser reduces spotting and improves drying. Lower spray arm Overfill protection...
Use & Care Guide
Page 5
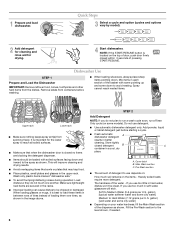
Start-Up / Quick Reference (varies by model) IMPORTANT: Do not block detergent dispenser. Drying - When you need fast results, the 1 Hour Wash will clean dishes using slightly more water and energy. No ... the dish toward the ProScrub® spray jets in the lower rack may block the dispenser door. Cookie sheets and cutting boards loaded on some models) When the ProScrub® option is complete, the dispenser was blocked. You must be heard, and the cycle will not start button LED will flash...
Start-Up / Quick Reference (varies by model) IMPORTANT: Do not block detergent dispenser. Drying - When you need fast results, the 1 Hour Wash will clean dishes using slightly more water and energy. No ... the dish toward the ProScrub® spray jets in the lower rack may block the dispenser door. Cookie sheets and cutting boards loaded on some models) When the ProScrub® option is complete, the dispenser was blocked. You must be heard, and the cycle will not start button LED will flash...
Use & Care Guide
Page 6
...grains per U.S. Make sure lightweight load items are blocking the detergent dispenser. ■ Items should be loaded with some pointing up and some models). NOTE: If the START/RESUME button is best to use too little in between rows of tines instead of the basket with soiled surfaces ...won't be chipped or damaged. Fill the Pre-Wash section to avoid nesting. Quick Steps 3 Select a cycle and option (cycles and options vary by model). 2 Add detergent for cleaning and rinse aid for the water spray to reach all soiled surfaces. ■ Make sure that may trap food. &#...
...grains per U.S. Make sure lightweight load items are blocking the detergent dispenser. ■ Items should be loaded with some pointing up and some models). NOTE: If the START/RESUME button is best to use too little in between rows of tines instead of the basket with soiled surfaces ...won't be chipped or damaged. Fill the Pre-Wash section to avoid nesting. Quick Steps 3 Select a cycle and option (cycles and options vary by model). 2 Add detergent for cleaning and rinse aid for the water spray to reach all soiled surfaces. ■ Make sure that may trap food. &#...

Use & Care Guide
Page 7
... without rinse aid. ■ Rinse aid keeps water from forming droplets that can Full dry as in the following section. They also improve drying by model) See "Cycle and Option Descriptions" charts in the previous wash cycle. Refill Lock fill - -- 6 5 4 max - 21 3 - --- -- - --- max - 21 3 - --- ...Pour rinse aid into the center of pressing START/ RESUME. NOTE: For most water conditions, the factory setting of your cycles by model) See "Cycle and Option Descriptions" charts in the main compartment and close the lid. Follow Hard Water Soft Water Hard Water Soft ...
... without rinse aid. ■ Rinse aid keeps water from forming droplets that can Full dry as in the following section. They also improve drying by model) See "Cycle and Option Descriptions" charts in the previous wash cycle. Refill Lock fill - -- 6 5 4 max - 21 3 - --- -- - --- max - 21 3 - --- ...Pour rinse aid into the center of pressing START/ RESUME. NOTE: For most water conditions, the factory setting of your cycles by model) See "Cycle and Option Descriptions" charts in the main compartment and close the lid. Follow Hard Water Soft Water Hard Water Soft ...
Use & Care Guide
Page 8
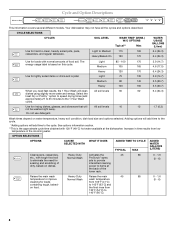
... section. **This is based on dishes. Do not use detergent. 12 1.7 (6.3) Wash times depend on food. Cycle and Option Descriptions This information covers several different models. Adding options will add time to the cycle. *Adding options will All soil levels 10 not be washed right away. The energy-usage label is...
... section. **This is based on dishes. Do not use detergent. 12 1.7 (6.3) Wash times depend on food. Cycle and Option Descriptions This information covers several different models. Adding options will add time to the cycle. *Adding options will All soil levels 10 not be washed right away. The energy-usage label is...
Use & Care Guide
Page 10
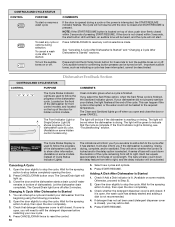
... flashes at the end of cycle length. Important audible tones, such as indicating a cycle has been interrupted, cannot be turned on some models. The Cycle Status Display is used (detergent dispenser cover is still closed and START/RESUME is selected. Open the door slightly to Step ...5. Press CANCEL/DRAIN button once. If the Front Indicator Light is finished, the Sanitized indicator glows. Press START/RESUME. Wait for hidden control models. The Cancel/Drain light turns off . To cancel a wash cycle after 2 minutes. If the door is complete. The Clean and Sanitized lights...
... flashes at the end of cycle length. Important audible tones, such as indicating a cycle has been interrupted, cannot be turned on some models. The Cycle Status Display is used (detergent dispenser cover is still closed and START/RESUME is selected. Open the door slightly to Step ...5. Press CANCEL/DRAIN button once. If the Front Indicator Light is finished, the Sanitized indicator glows. Press START/RESUME. Wait for hidden control models. The Cancel/Drain light turns off . To cancel a wash cycle after 2 minutes. If the door is complete. The Clean and Sanitized lights...

Use & Care Guide
Page 14
... (See specific loading instructions within this case, the Start/Resume button LED, the Cycle Status Indicator LED(s), and the countdown bars on some models) for heavier-soiled loads and hard water conditions. The cycle was present in "Troubleshooting." In this guide.) Blinking LED's will need to ... Clean light is needed . If foam or suds are detected by putting 2 cups (500 mL) of fresh detergent. More detergent is on some models) option can also occur when certain errors have been detected. See "Will Not Fill" in the "Dishwasher Use" section. Use a detergent booster/...
... (See specific loading instructions within this case, the Start/Resume button LED, the Cycle Status Indicator LED(s), and the countdown bars on some models) for heavier-soiled loads and hard water conditions. The cycle was present in "Troubleshooting." In this guide.) Blinking LED's will need to ... Clean light is needed . If foam or suds are detected by putting 2 cups (500 mL) of fresh detergent. More detergent is on some models) option can also occur when certain errors have been detected. See "Will Not Fill" in the "Dishwasher Use" section. Use a detergent booster/...

Use & Care Guide
Page 16
...warranty gives you specific legal rights, and you also may not apply to you. KITCHENAID SHALL NOT BE LIABLE FOR INCIDENTAL OR CONSEQUENTIAL DAMAGES. If you on major appliances with original model/serial numbers that have other than normal, single-family household use of products not ...approved by an authorized KitchenAid servicer is not available. 10. YOUR SOLE AND EXCLUSIVE REMEDY UNDER THIS ...
...warranty gives you specific legal rights, and you also may not apply to you. KITCHENAID SHALL NOT BE LIABLE FOR INCIDENTAL OR CONSEQUENTIAL DAMAGES. If you on major appliances with original model/serial numbers that have other than normal, single-family household use of products not ...approved by an authorized KitchenAid servicer is not available. 10. YOUR SOLE AND EXCLUSIVE REMEDY UNDER THIS ...

Use & Care Guide
Page 17
... U.S.A. Please keep this User Instructions and model number information for future reference. visit: www.kitchenaid.com In Canada visit: www.kitchenaid.ca If you would like to KitchenAid with any questions or concerns at the number below : In the U.S.A.: KitchenAid Brand Home Appliances Customer eXperience Center 553 ...Benson Road Benton Harbor, MI 49022-2692 In Canada: KitchenAid Brand Home Appliances Customer eXperience Centre 200 - 6750 Century Avenue Mississauga ON L5N 0B7 Please include a daytime phone number in your model and serial number on the label located near the door ...
... U.S.A. Please keep this User Instructions and model number information for future reference. visit: www.kitchenaid.com In Canada visit: www.kitchenaid.ca If you would like to KitchenAid with any questions or concerns at the number below : In the U.S.A.: KitchenAid Brand Home Appliances Customer eXperience Center 553 ...Benson Road Benton Harbor, MI 49022-2692 In Canada: KitchenAid Brand Home Appliances Customer eXperience Centre 200 - 6750 Century Avenue Mississauga ON L5N 0B7 Please include a daytime phone number in your model and serial number on the label located near the door ...
Energy Guide
Page 1
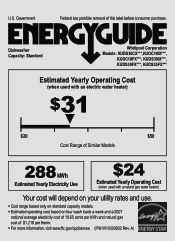
...***, KUDS30FX***, KUDS35FX*** Estimated Yearly Operating Cost (when used with an electric water heater) $31 ▼ $20 $50 Cost Range of Similar Models 288 kWh Estimated Yearly Electricity Use $24 Estimated Yearly Operating Cost (when used with a natural gas water heater) Your cost will depend on your... utility rates and use. • Cost range based only on standard capacity models. • Estimated operating cost based on four wash loads a week and a 2007 national average electricity cost of 10.65 cents per therm. &#...
...***, KUDS30FX***, KUDS35FX*** Estimated Yearly Operating Cost (when used with an electric water heater) $31 ▼ $20 $50 Cost Range of Similar Models 288 kWh Estimated Yearly Electricity Use $24 Estimated Yearly Operating Cost (when used with a natural gas water heater) Your cost will depend on your... utility rates and use. • Cost range based only on standard capacity models. • Estimated operating cost based on four wash loads a week and a 2007 national average electricity cost of 10.65 cents per therm. &#...


