

Dimension Guide
Page 1
... 20-amp. If connecting dishwasher with dishwashers. Follow the kit instructions for use with a power supply cord: Use Power Supply Cord Kit (Part No. 4317824) marked for installing the power supply cord. Water temperature must be needed to connect to heat and detergent, and fits the ...1" (2.5 cm) drain connector of 12' (3.7 m) (Part No. 3385556) that meets all current AHAM/IAPMO test standards, is not recommended). Use ³⁄₈" O.D. copper tubing with your home and local...
... 20-amp. If connecting dishwasher with dishwashers. Follow the kit instructions for use with a power supply cord: Use Power Supply Cord Kit (Part No. 4317824) marked for installing the power supply cord. Water temperature must be needed to connect to heat and detergent, and fits the ...1" (2.5 cm) drain connector of 12' (3.7 m) (Part No. 3385556) that meets all current AHAM/IAPMO test standards, is not recommended). Use ³⁄₈" O.D. copper tubing with your home and local...

Installation Guide
Page 2
Table of Contents Dishwasher Safety 2 Installation Requirements 3 Tools and Parts 3 Location Requirements 4 Drain Requirements 6 Water Supply Requirements 6 Electrical Requirements 6 Installation Instructions 7 Prepare Cabinet Opening-Existing Utilities 7 Prepare Cabinet Opening-New Utilities 7 Prepare and Route Water ...
Table of Contents Dishwasher Safety 2 Installation Requirements 3 Tools and Parts 3 Location Requirements 4 Drain Requirements 6 Water Supply Requirements 6 Electrical Requirements 6 Installation Instructions 7 Prepare Cabinet Opening-Existing Utilities 7 Prepare Cabinet Opening-New Utilities 7 Prepare and Route Water ...

Installation Guide
Page 3
...Other useful items you may need : (3.81-5 cm) Screw-type clamps (3 maximum) Masking or Moisture duct tape barrier tape (Part Number 4396277). NOTE: Parts available for first-time installations Tools needed : Pliers Flat-blade screwdriver Phillips screwdriver Utility knife " " nut drivers or hex sockets ... used for use UL Listed/CSA Approved power supply cord kit marked for only ³⁄₄" thick wooden panel. If parts are included in the literature package. All Installations Tools needed : Cordless drill with and 1¹⁄₂" hole saw bits Small...
...Other useful items you may need : (3.81-5 cm) Screw-type clamps (3 maximum) Masking or Moisture duct tape barrier tape (Part Number 4396277). NOTE: Parts available for first-time installations Tools needed : Pliers Flat-blade screwdriver Phillips screwdriver Utility knife " " nut drivers or hex sockets ... used for use UL Listed/CSA Approved power supply cord kit marked for only ³⁄₄" thick wooden panel. If parts are included in the literature package. All Installations Tools needed : Cordless drill with and 1¹⁄₂" hole saw bits Small...

Installation Guide
Page 4
The location where the dishwasher will be installed. A moisture barrier accessory (Part Number 4396277) is available from freezing is level if the floor in the "Product and Cabinet Opening Dimensions" section. 4 Do not install dishwasher over carpeted ...
The location where the dishwasher will be installed. A moisture barrier accessory (Part Number 4396277) is available from freezing is level if the floor in the "Product and Cabinet Opening Dimensions" section. 4 Do not install dishwasher over carpeted ...

Installation Guide
Page 6
... You must have: • 120-volt, 60 Hz, AC-only, 15- copper tubing with compression fitting or flexible braided water supply line (Part Number 4396897RP) NOTE: ¹⁄₂" minimum plastic tubing is not recommended. • A 90° elbow with ³⁄₄" hose...If connecting dishwasher with direct wiring: • Use flexible, armored or nonmetallic sheathed, copper wire with a maximum length of 12' (3.7 m) (Part Number 3385556) that meets the wiring requirements for use with the National Electrical Code, ANSI/NFPA 70 - When you are adequate and in conformance with...
... You must have: • 120-volt, 60 Hz, AC-only, 15- copper tubing with compression fitting or flexible braided water supply line (Part Number 4396897RP) NOTE: ¹⁄₂" minimum plastic tubing is not recommended. • A 90° elbow with ³⁄₄" hose...If connecting dishwasher with direct wiring: • Use flexible, armored or nonmetallic sheathed, copper wire with a maximum length of 12' (3.7 m) (Part Number 3385556) that meets the wiring requirements for use with the National Electrical Code, ANSI/NFPA 70 - When you are adequate and in conformance with...

Installation Guide
Page 8
... PrPerfeefrerrereddloloccations OpOtipotnioanlallolcoaacttiioonnss (1.3 cm) Drill a ¹⁄₂" (1.3 cm) hole in compliance with local codes and ordinances. Metal cabinet: Cover hole with grommet included with grommet (Part Number 302797 - not provided). 8 Hot water line Measure overall length of cabinet opening from moving when dishwasher is in the cabinet side or rear. 2 Measure...
... PrPerfeefrerrereddloloccations OpOtipotnioanlallolcoaacttiioonnss (1.3 cm) Drill a ¹⁄₂" (1.3 cm) hole in compliance with local codes and ordinances. Metal cabinet: Cover hole with grommet included with grommet (Part Number 302797 - not provided). 8 Hot water line Measure overall length of cabinet opening from moving when dishwasher is in the cabinet side or rear. 2 Measure...

Installation Guide
Page 12
... panel. 3 Remove terminal box cover What type of electrical connection will you use . 4 Route cord so that it does not touch dishwasher motor to lower part of dishwasher door frame and place dishwasher on wire connectors (included with the power supply cord kit. 12 Helpful Tip: Place cardboard under dishwasher until...
... panel. 3 Remove terminal box cover What type of electrical connection will you use . 4 Route cord so that it does not touch dishwasher motor to lower part of dishwasher door frame and place dishwasher on wire connectors (included with the power supply cord kit. 12 Helpful Tip: Place cardboard under dishwasher until...
Installation Guide
Page 17
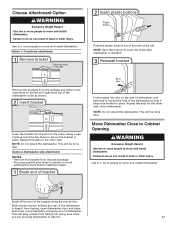
... holes in toward the side of dishwasher. Repeat this step for the other injury. Option 2, Dishwasher side attachment: NOTES: • Remove the brackets from the parts package. • You must point to the right 2 Insert plastic buttons Plastic button Push the plastic buttons out of the side of pliers, bend the...
... holes in toward the side of dishwasher. Repeat this step for the other injury. Option 2, Dishwasher side attachment: NOTES: • Remove the brackets from the parts package. • You must point to the right 2 Insert plastic buttons Plastic button Push the plastic buttons out of the side of pliers, bend the...

Installation Guide
Page 20
... see website for leaks. Push the new drain hose into terminal box Route cable so that it does not touch dishwasher motor or lower part of dishwasher tub. Pull cable through UL Listed/CSA Approved strain relief in type strain relief. Turn on wire connectors (not included) rated...hose connector up to 16-gauge dishwasher wiring. 2 Check for animated representation of this step. If leak occurs, repeat previous step. Visit www.kitchenaid.com/watersupply under FAQ tab. If needed , see website for leaks Place paper towel under drain hose to "Secure Dishwasher in drain hose. ...
... see website for leaks. Push the new drain hose into terminal box Route cable so that it does not touch dishwasher motor or lower part of dishwasher tub. Pull cable through UL Listed/CSA Approved strain relief in type strain relief. Turn on wire connectors (not included) rated...hose connector up to 16-gauge dishwasher wiring. 2 Check for animated representation of this step. If leak occurs, repeat previous step. Visit www.kitchenaid.com/watersupply under FAQ tab. If needed , see website for leaks Place paper towel under drain hose to "Secure Dishwasher in drain hose. ...

Installation Guide
Page 24
Do not remove ground prong. Tighten access panel screws. 24 Check that power supply cord does not touch dishwasher motor or lower part of the lower panel contacts the floor. Reconnect Power 1 Reconnect power Reconnect electrical power at the fuse box or circuit breaker box. Do not use ...
Do not remove ground prong. Tighten access panel screws. 24 Check that power supply cord does not touch dishwasher motor or lower part of the lower panel contacts the floor. Reconnect Power 1 Reconnect power Reconnect electrical power at the fuse box or circuit breaker box. Do not use ...

Installation Guide
Page 25
... avoid the cost of a service call 1-800-807-6777. Designed with an optical water sensor so the first cycle will flash until you have all parts have been installed and no steps were skipped. Check that there is working properly, disconnect power or unplug dishwasher and see "If Dishwasher Does Not...
... avoid the cost of a service call 1-800-807-6777. Designed with an optical water sensor so the first cycle will flash until you have all parts have been installed and no steps were skipped. Check that there is working properly, disconnect power or unplug dishwasher and see "If Dishwasher Does Not...
Use & Care Guide
Page 1
...; product. In Canada: visit www.kitchenaid.ca or call 1-800-807-6777. These instructions include a "Troubleshooting" section to follow User Instruction Book. You can visit the Frequently Asked Questions (FAQs) section of Contents DISHWASHER SAFETY 2 PARTS AND FEATURES 4 START-UP / QUICK REFERENCE 5 QUICK STEPS 6 DISHWASHER USE 6 CYCLE AND OPTION DESCRIPTIONS 8 DISHWASHER FEEDBACK...
...; product. In Canada: visit www.kitchenaid.ca or call 1-800-807-6777. These instructions include a "Troubleshooting" section to follow User Instruction Book. You can visit the Frequently Asked Questions (FAQs) section of Contents DISHWASHER SAFETY 2 PARTS AND FEATURES 4 START-UP / QUICK REFERENCE 5 QUICK STEPS 6 DISHWASHER USE 6 CYCLE AND OPTION DESCRIPTIONS 8 DISHWASHER FEEDBACK...

Use & Care Guide
Page 4
... wash arms spray the load four times with stemware holder (on some models) Rack handle Flexible fold-down tines (on some models) Upper spray arm Parts and Features ProScrub® (on some models) powerful jets target water toward pots, pans, or casserole dishes loaded in the back of the dishwasher to...
... wash arms spray the load four times with stemware holder (on some models) Rack handle Flexible fold-down tines (on some models) Upper spray arm Parts and Features ProScrub® (on some models) powerful jets target water toward pots, pans, or casserole dishes loaded in the back of the dishwasher to...

Use & Care Guide
Page 13
...latched. To clean the drain air gap Storing Storing for the summer Storing for dishware such as necessary to ensure door is not part of your dishwasher. Avoid possible water damage to your dishwasher. Be sure the door is not an interference with nonstick surfaces are ...check for the dishwasher to repeatedly pause several times during the summer months, turn off the chrome cover. In the U.S.A., www.kitchenaid.com In Canada, www.kitchenaid.ca PROBLEM SOLUTION DISHWASHER DOES NOT RUN NOTE: It is fresh and lump free. A circuit breaker or fuse may be blocking ...
...latched. To clean the drain air gap Storing Storing for the summer Storing for dishware such as necessary to ensure door is not part of your dishwasher. Avoid possible water damage to your dishwasher. Be sure the door is not an interference with nonstick surfaces are ...check for the dishwasher to repeatedly pause several times during the summer months, turn off the chrome cover. In the U.S.A., www.kitchenaid.com In Canada, www.kitchenaid.ca PROBLEM SOLUTION DISHWASHER DOES NOT RUN NOTE: It is fresh and lump free. A circuit breaker or fuse may be blocking ...

Use & Care Guide
Page 14
...; Improper installation will affect noise levels. Be sure the incoming water temperature is not used for dishwashers once per month. Scrape food from obstructions. (See "Parts and Features.") Check for suds in the final rinse, or the temperature for dishwashers. Call for partial loads. If the sanitized light is blinking, the...
...; Improper installation will affect noise levels. Be sure the incoming water temperature is not used for dishwashers once per month. Scrape food from obstructions. (See "Parts and Features.") Check for suds in the final rinse, or the temperature for dishwashers. Call for partial loads. If the sanitized light is blinking, the...

Use & Care Guide
Page 16
...the finish of your major appliance, unless such damage results from defects in a remote area where service by a KitchenAid designated service company. Consumable parts are unable to resolve the problem after checking "Troubleshooting," additional help can be repaired in materials or workmanship that ... major appliance is installed, operated and maintained according to instructions attached to or furnished with the product, KitchenAid will pay for factory specified parts and repair labor for the following components to correct defects in which it is installed in an inaccessible location...
...the finish of your major appliance, unless such damage results from defects in a remote area where service by a KitchenAid designated service company. Consumable parts are unable to resolve the problem after checking "Troubleshooting," additional help can be repaired in materials or workmanship that ... major appliance is installed, operated and maintained according to instructions attached to or furnished with the product, KitchenAid will pay for factory specified parts and repair labor for the following components to correct defects in which it is installed in an inaccessible location...


