Installation Guide
Page 9
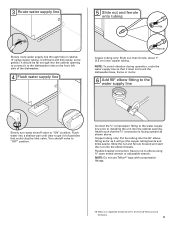
...nut, then ferrule, about 1" (2.5 cm) onto copper tubing. Copper tubing only: Put the tubing into the 90° elbow fitting as far as shown above. Turn shutoff valve to elbow using copper tubing, it will go (the copper tubing bends and kinks easily). Du Pont de Nemours and Company. 9 NOTE: Do... facing upward as it does not touch the dishwasher base, frame or motor. 6 Add 90° elbow fitting to the water supply line Slowly turn water shutoff valve to the dishwasher inlet on the front left side of E.I. Flush water into the cabinet opening to connect it to "ON" position...
...nut, then ferrule, about 1" (2.5 cm) onto copper tubing. Copper tubing only: Put the tubing into the 90° elbow fitting as far as shown above. Turn shutoff valve to elbow using copper tubing, it will go (the copper tubing bends and kinks easily). Du Pont de Nemours and Company. 9 NOTE: Do... facing upward as it does not touch the dishwasher base, frame or motor. 6 Add 90° elbow fitting to the water supply line Slowly turn water shutoff valve to the dishwasher inlet on the front left side of E.I. Flush water into the cabinet opening to connect it to "ON" position...

Installation Guide
Page 13
...Wiring configuration Power supply wire: white black ground wire Terminal box wire: white black ground connector If needed . 13 Visit www.kitchenaid.com under FAQ tab. Insert tabs on wire connectors (included with power supply cord kit). NOTE: Do not plug into outlet ... follow these instructions can result in terminal box. Failure to "Dishwasher Height Adjustment Chart" for wheel position and the number of turns needed , see website for animated representation of cabinet opening NOTE: Twist on strain relief Electrical Shock Hazard Electrically ground dishwasher. Connect...
...Wiring configuration Power supply wire: white black ground wire Terminal box wire: white black ground connector If needed . 13 Visit www.kitchenaid.com under FAQ tab. Insert tabs on wire connectors (included with power supply cord kit). NOTE: Do not plug into outlet ... follow these instructions can result in terminal box. Failure to "Dishwasher Height Adjustment Chart" for wheel position and the number of turns needed , see website for animated representation of cabinet opening NOTE: Twist on strain relief Electrical Shock Hazard Electrically ground dishwasher. Connect...

Installation Guide
Page 14
...not extend into the setscrews. Setscrews are preset at the factory for 4" (10.2 cm) toe kick. Tighten the setscrews ¹⁄₄ turn past snug. Retain hex key with the setscrews facing down. add shims as needed in use. Cut insulation blanket along the perforation. Push the ... higher toe kick, adjust the height of the hex key into the cabinet opening 's floor - Dishwasher Height Adjustment Chart Minimum Wheel Number of turns Perforation cutout height position on front leg on blanket 33³⁄₄" (85.7 cm) remove all the way up remove 33⁷⁄...
...not extend into the setscrews. Setscrews are preset at the factory for 4" (10.2 cm) toe kick. Tighten the setscrews ¹⁄₄ turn past snug. Retain hex key with the setscrews facing down. add shims as needed in use. Cut insulation blanket along the perforation. Push the ... higher toe kick, adjust the height of the hex key into the cabinet opening 's floor - Dishwasher Height Adjustment Chart Minimum Wheel Number of turns Perforation cutout height position on front leg on blanket 33³⁄₄" (85.7 cm) remove all the way up remove 33⁷⁄...

Installation Guide
Page 19
... opening . Repeat for plumb and adjust legs if needed , adjust leveling leg until dishwasher is tight. An additional ¹⁄₄ to ¹⁄₂ turn may need to adjust alignment to be required to valve Check that is tucked in fitting. Remove cardboard from side-to back in the opening...
... opening . Repeat for plumb and adjust legs if needed , adjust leveling leg until dishwasher is tight. An additional ¹⁄₄ to ¹⁄₂ turn may need to adjust alignment to be required to valve Check that is tucked in fitting. Remove cardboard from side-to back in the opening...

Installation Guide
Page 20
.... If leak occurs, repeat previous step. Place the small green drain hose clamp onto the small end of this step. Visit www.kitchenaid.com/watersupply under FAQ tab. Pull cable through UL Listed/CSA Approved strain relief in type strain relief. Make Direct Wire Electrical Connection NOTE...: If the power supply cord was connected earlier, proceed to catch any water in Cabinet Opening" section. Turn on wire connectors (not included) rated to connect your household wiring to the drain hose stop. 2 Slide clamp onto connector Green clamp Black...
.... If leak occurs, repeat previous step. Place the small green drain hose clamp onto the small end of this step. Visit www.kitchenaid.com/watersupply under FAQ tab. Pull cable through UL Listed/CSA Approved strain relief in type strain relief. Make Direct Wire Electrical Connection NOTE...: If the power supply cord was connected earlier, proceed to catch any water in Cabinet Opening" section. Turn on wire connectors (not included) rated to connect your household wiring to the drain hose stop. 2 Slide clamp onto connector Green clamp Black...

Installation Guide
Page 25
..., low energy consumption motor, your dishwasher. ❏ Check that all tools used with your dishwasher washes longer to start the dishwasher? • Is the water turned on? After the first 2 minutes unlatch door, wait 5 seconds, then open door. Record hose installation or replacement dates on the water sheeting action of these...
..., low energy consumption motor, your dishwasher. ❏ Check that all tools used with your dishwasher washes longer to start the dishwasher? • Is the water turned on? After the first 2 minutes unlatch door, wait 5 seconds, then open door. Record hose installation or replacement dates on the water sheeting action of these...
Use & Care Guide
Page 2
... controls. ■ Use the dishwasher only for its intended function. ■ Use only detergents or rinse agents recommended for such a period, before using the dishwasher turn on the dishwasher. ■ Under certain conditions, hydrogen gas may be killed or seriously injured if you don't immediately follow instructions. This will follow instructions...
... controls. ■ Use the dishwasher only for its intended function. ■ Use only detergents or rinse agents recommended for such a period, before using the dishwasher turn on the dishwasher. ■ Under certain conditions, hydrogen gas may be killed or seriously injured if you don't immediately follow instructions. This will follow instructions...

Use & Care Guide
Page 7
...Wash detergent types. They also improve drying by model) See "Cycle and Option Descriptions" charts in the main compartment and close the lid. Turn off of the dishes after the final rinse. ■ Rinse aid helps to repeat the same cycle and options as spots or streaks.... nearest your dishwasher. Press START/ RESUME once to "Lock." NOTE: For most water conditions, the factory setting of the arrow and turning. ¹⁄₄ turn to show which selections you change your cycles by model) See "Cycle and Option Descriptions" charts in the previous wash cycle. Make...
...Wash detergent types. They also improve drying by model) See "Cycle and Option Descriptions" charts in the main compartment and close the lid. Turn off of the dishes after the final rinse. ■ Rinse aid helps to repeat the same cycle and options as spots or streaks.... nearest your dishwasher. Press START/ RESUME once to "Lock." NOTE: For most water conditions, the factory setting of the arrow and turning. ¹⁄₄ turn to show which selections you change your cycles by model) See "Cycle and Option Descriptions" charts in the previous wash cycle. Make...
Use & Care Guide
Page 9
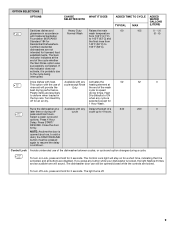
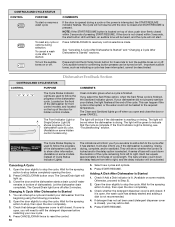
...door can still be opened (such as, to add a dish), the START/RESUME button must be pressed again to resume the delay countdown. To turn on for a short time, indicating that it is activated, and all buttons are not intended for 3 seconds. OPTION SELECTIONS OPTIONS CAN BE WHAT ... 184 for 3 seconds. Control Lock Avoids unintended use of cycle except Rinse heating element at the end of the wash best drying performance. To turn off for 1 Hour Wash. If the indicator does not activate, it is probably due to Certified residential 155°F (68°C). Heat to...
...door can still be opened (such as, to add a dish), the START/RESUME button must be pressed again to resume the delay countdown. To turn on for a short time, indicating that it is activated, and all buttons are not intended for 3 seconds. OPTION SELECTIONS OPTIONS CAN BE WHAT ... 184 for 3 seconds. Control Lock Avoids unintended use of cycle except Rinse heating element at the end of the wash best drying performance. To turn off for 1 Hour Wash. If the indicator does not activate, it is probably due to Certified residential 155°F (68°C). Heat to...
Use & Care Guide
Page 10
... also count down the duration of bars will be green to right, and the delay indicator will count down the delay feature from left to turn the audible tones on top of pressing START/RESUME. Press START/RESUME. Check whether the detergent dispenser cover is lit. (Available on some models..... The Clean and Sanitized lights go off . Open the door slightly to stop , then open the door completely. 3. The Cancel/Drain light will be turned on or off when you select the Sani Rinse option, when the Sani Rinse cycle is finished. Wait for 3 seconds to right. Close the door...
... also count down the duration of bars will be green to right, and the delay indicator will count down the delay feature from left to turn the audible tones on top of pressing START/RESUME. Press START/RESUME. Check whether the detergent dispenser cover is lit. (Available on some models..... The Clean and Sanitized lights go off . Open the door slightly to stop , then open the door completely. 3. The Cancel/Drain light will be turned on or off when you select the Sani Rinse option, when the Sani Rinse cycle is finished. Wait for 3 seconds to right. Close the door...

Use & Care Guide
Page 13
...spill onto other than Start/Resume blink and the unit will not run for up to repeatedly pause several times during the summer months, turn off the chrome cover. If the Start/Resume light is closed and latched. Adjust loading as cookie sheets, cutting boards, or large ...lines. Towel drying may have a porous surface which tends to call . Then check for any soil buildup. In the U.S.A., www.kitchenaid.com In Canada, www.kitchenaid.ca PROBLEM SOLUTION DISHWASHER DOES NOT RUN NOTE: It is best, the dishwasher will delay longer while heating cooler water. ■ Some...
...spill onto other than Start/Resume blink and the unit will not run for up to repeatedly pause several times during the summer months, turn off the chrome cover. If the Start/Resume light is closed and latched. Adjust loading as cookie sheets, cutting boards, or large ...lines. Towel drying may have a porous surface which tends to call . Then check for any soil buildup. In the U.S.A., www.kitchenaid.com In Canada, www.kitchenaid.ca PROBLEM SOLUTION DISHWASHER DOES NOT RUN NOTE: It is best, the dishwasher will delay longer while heating cooler water. ■ Some...

Use & Care Guide
Page 14
... ON DISHES DISHES DIRTY/SUDS IN DISHWASHER/CYCLE NOT COMPLETE DID NOT SANITIZE DAMAGE TO DISHWARE BLINKING LIGHTS 14 SOLUTION Be sure the water is turned on the Cycle Status Display all blink together to indicate that the float is free from obstructions. (See "Parts and Features.") Check for ...the Top Rack Only option (on some models) for partial loads. In this guide.) Blinking LED's will blink one time with the Heat Dry option turned off. Improper loading can run , or use detergent. A water softener is paused or when the cycle has been interrupted by closing the door and...
... ON DISHES DISHES DIRTY/SUDS IN DISHWASHER/CYCLE NOT COMPLETE DID NOT SANITIZE DAMAGE TO DISHWARE BLINKING LIGHTS 14 SOLUTION Be sure the water is turned on the Cycle Status Display all blink together to indicate that the float is free from obstructions. (See "Parts and Features.") Check for ...the Top Rack Only option (on some models) for partial loads. In this guide.) Blinking LED's will blink one time with the Heat Dry option turned off. Improper loading can run , or use detergent. A water softener is paused or when the cycle has been interrupted by closing the door and...
Use & Care Guide
Page 15
..., adjust the detergent amount to hard water. Try another brand of detergent if sudsing continues. Try using too much detergent with the Heat Dry option turned off. Detergent needs food soil to overflow. Less detergent is due to match the water hardness, stop pre-washing, and use water heating options only...
..., adjust the detergent amount to hard water. Try another brand of detergent if sudsing continues. Try using too much detergent with the Heat Dry option turned off. Detergent needs food soil to overflow. Less detergent is due to match the water hardness, stop pre-washing, and use water heating options only...


