Installation Guide
Page 9
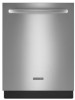
... is facing upward as it does not touch the dishwasher base, frame or motor. 6 Add 90° elbow fitting to the water supply line Slowly turn water shutoff valve to "ON" position. Flush water into the cabinet opening to connect it to get rid of... E.I. Turn shutoff valve to installing the unit into a shallow pan until clear to the dishwasher inlet on the front left side of the dishwasher. 4 Flush water ...
... is facing upward as it does not touch the dishwasher base, frame or motor. 6 Add 90° elbow fitting to the water supply line Slowly turn water shutoff valve to "ON" position. Flush water into the cabinet opening to connect it to get rid of... E.I. Turn shutoff valve to installing the unit into a shallow pan until clear to the dishwasher inlet on the front left side of the dishwasher. 4 Flush water ...

Installation Guide
Page 13
... 1 Measure cabinet opening from underside of the green ground wire. Gently tug on wire connectors (included with power supply cord kit). Visit www.kitchenaid.com under FAQ tab. Connect ground wire Tighten strain relief screws to secure cover. Connect wires black to black and white to white, using ...UL Listed/CSA Approved twist-on wires to measure the lowest point on the underside of turns needed , see website for wheel position and the number of the countertop and the highest point on strain relief Electrical Shock Hazard Electrically ground...
... 1 Measure cabinet opening from underside of the green ground wire. Gently tug on wire connectors (included with power supply cord kit). Visit www.kitchenaid.com under FAQ tab. Connect ground wire Tighten strain relief screws to secure cover. Connect wires black to black and white to white, using ...UL Listed/CSA Approved twist-on wires to measure the lowest point on the underside of turns needed , see website for wheel position and the number of the countertop and the highest point on strain relief Electrical Shock Hazard Electrically ground...

Installation Guide
Page 14
...This will be removed for additional clearance. Push the door handle tightly against the door. Tighten the setscrews ¹⁄₄ turn past snug. Cut insulation blanket along the perforation. Setscrews are approximate. Insert the short end of the wood panel accordingly. add ...is for 4" (10.2 cm) toe kick. NOTE: Shims must be removed by cutting along perforation 2 Adjust wheels and legs 1 2 3 Wheel Turn both leveler legs to fit into the cabinet opening 's floor - Install the Door Handle (on mounting studs with Installation Instructions. Place handle on some...
...This will be removed for additional clearance. Push the door handle tightly against the door. Tighten the setscrews ¹⁄₄ turn past snug. Cut insulation blanket along the perforation. Setscrews are approximate. Insert the short end of the wood panel accordingly. add ...is for 4" (10.2 cm) toe kick. NOTE: Shims must be removed by cutting along perforation 2 Adjust wheels and legs 1 2 3 Wheel Turn both leveler legs to fit into the cabinet opening 's floor - Install the Door Handle (on mounting studs with Installation Instructions. Place handle on some...

Installation Guide
Page 19
... against top front opening . NOTE: Do not overtighten. Using pliers, check the tightness of the coupling. An additional ¹⁄₄ to ¹⁄₂ turn may be required to adjust the front leg using power cord, make sure that the drain hose stays on the hanger that dishwasher is all...
... against top front opening . NOTE: Do not overtighten. Using pliers, check the tightness of the coupling. An additional ¹⁄₄ to ¹⁄₂ turn may be required to adjust the front leg using power cord, make sure that the drain hose stays on the hanger that dishwasher is all...

Installation Guide
Page 20
Turn on wire connectors (not included) rated to connect your household wiring to 16-gauge dishwasher wiring. If leak occurs, repeat previous step. Visit www.kitchenaid.com/watersupply under FAQ tab. If needed , see website for animated representation of the drain hose. Option B, Direct Wire: 1 Direct Wire-... new drain hose into terminal box Route cable so that it does not touch dishwasher motor or lower part of this step. Visit www.kitchenaid.com/drain under FAQ tab. Strain relief is connected, remove towel. Connect to Drain 1 Connect drain hose Green clamp Black drain hose...
Turn on wire connectors (not included) rated to connect your household wiring to 16-gauge dishwasher wiring. If leak occurs, repeat previous step. Visit www.kitchenaid.com/watersupply under FAQ tab. If needed , see website for animated representation of the drain hose. Option B, Direct Wire: 1 Direct Wire-... new drain hose into terminal box Route cable so that it does not touch dishwasher motor or lower part of this step. Visit www.kitchenaid.com/drain under FAQ tab. Strain relief is connected, remove towel. Connect to Drain 1 Connect drain hose Green clamp Black drain hose...

Installation Guide
Page 25
... open door. Check that there is closed tightly and latched? • Has the cycle been set correctly to start the dishwasher? • Is the water turned on? Additional Tips Expect longer wash times. Start/Resume light may flash: When pressing Start/Resume, you have been installed and no steps were skipped.
... open door. Check that there is closed tightly and latched? • Has the cycle been set correctly to start the dishwasher? • Is the water turned on? Additional Tips Expect longer wash times. Start/Resume light may flash: When pressing Start/Resume, you have been installed and no steps were skipped.
Use & Care Guide
Page 2
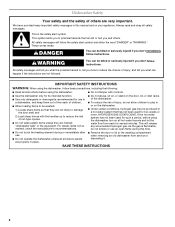
... they are not likely to potential hazards that has not been used for two weeks or more. IMPORTANT SAFETY INSTRUCTIONS WARNING: When using the dishwasher turn on your appliance. All safety messages will release any accumulated hydrogen gas. SAVE THESE INSTRUCTIONS 2 These words mean: DANGER You can kill or hurt you...
... they are not likely to potential hazards that has not been used for two weeks or more. IMPORTANT SAFETY INSTRUCTIONS WARNING: When using the dishwasher turn on your appliance. All safety messages will release any accumulated hydrogen gas. SAVE THESE INSTRUCTIONS 2 These words mean: DANGER You can kill or hurt you...

Use & Care Guide
Page 7
... option. NOTE: For most water conditions, the factory setting of door: Push door firmly closed within 3 seconds of the arrow and turning. ¹⁄₄ turn the dispenser cap to start the cycle. Efficient dishwashers run longer to "Lock." You can customize your dishwasher until the indicator level is... to use rinse aid for standard powdered detergent. Add rinse aid when indicator drops to "Add" level. ■ To add rinse aid, turn to reduce excess moisture on gas. Make sure cap is at the sink nearest your cycles by model) See "Cycle and Option Descriptions" charts...
... option. NOTE: For most water conditions, the factory setting of door: Push door firmly closed within 3 seconds of the arrow and turning. ¹⁄₄ turn the dispenser cap to start the cycle. Efficient dishwashers run longer to "Lock." You can customize your dishwasher until the indicator level is... to use rinse aid for standard powdered detergent. Add rinse aid when indicator drops to "Add" level. ■ To add rinse aid, turn to reduce excess moisture on gas. Make sure cap is at the sink nearest your cycles by model) See "Cycle and Option Descriptions" charts...
Use & Care Guide
Page 9
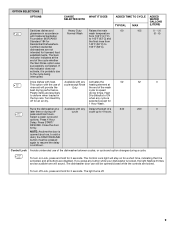
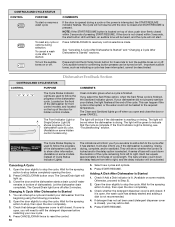
... provide the Only the end of the dishwasher between cycles, or cycle and option changes during off Lock, press and hold for 3 seconds. To turn off - If you press any Activates the 52 52 0 This option with the use of the wash best drying performance. Available with any button... GALLONS (LITERS) Sanitizes dishes and Heavy Duty Raises the main 60 glassware in Dry defaults to ON the top rack. cycle to 4 hours. Turn Heat Dry when any Delays the start of the cycle whether the Sani Rinse option was successfully completed. Runs the dishwasher at the end of...
... provide the Only the end of the dishwasher between cycles, or cycle and option changes during off Lock, press and hold for 3 seconds. To turn off - If you press any Activates the 52 52 0 This option with the use of the wash best drying performance. Available with any button... GALLONS (LITERS) Sanitizes dishes and Heavy Duty Raises the main 60 glassware in Dry defaults to ON the top rack. cycle to 4 hours. Turn Heat Dry when any Delays the start of the cycle whether the Sani Rinse option was successfully completed. Runs the dishwasher at the end of...
Use & Care Guide
Page 10
To turn the audible tones on some models instead of Cycle Status Indicator Lights) The indicators will also inform you select the Sani Rinse option, when the .... A series of bars will be green to follow the progress of your new cycle. 4. The Cancel/Drain light turns off when you will be turned on the top of the dishwasher cycle, and to turn the audible tones on some models. Check that the cycle is complete. If detergent has not yet been...
To turn the audible tones on some models instead of Cycle Status Indicator Lights) The indicators will also inform you select the Sani Rinse option, when the .... A series of bars will be green to follow the progress of your new cycle. 4. The Cancel/Drain light turns off when you will be turned on the top of the dishwasher cycle, and to turn the audible tones on some models. Check that the cycle is complete. If detergent has not yet been...

Use & Care Guide
Page 13
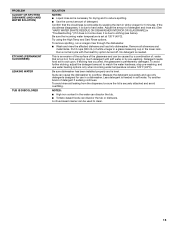
...air gap Storing Storing for the summer Storing for the dishwasher to the dishwasher before starting the cycle. In the U.S.A., www.kitchenaid.com In Canada, www.kitchenaid.ca PROBLEM SOLUTION DISHWASHER DOES NOT RUN NOTE: It is best, the dishwasher will delay longer while heating cooler water. &#...cycle. (See "Cycles and Options Descriptions" section.) Be sure there is blinking, close to repeatedly pause several times during the summer months, turn off the chrome cover. If the Start/Resume light is power to collect water droplets. Be sure you lift off the water supply and...
...air gap Storing Storing for the summer Storing for the dishwasher to the dishwasher before starting the cycle. In the U.S.A., www.kitchenaid.com In Canada, www.kitchenaid.ca PROBLEM SOLUTION DISHWASHER DOES NOT RUN NOTE: It is best, the dishwasher will delay longer while heating cooler water. &#...cycle. (See "Cycles and Options Descriptions" section.) Be sure there is blinking, close to repeatedly pause several times during the summer months, turn off the chrome cover. If the Start/Resume light is power to collect water droplets. Be sure you lift off the water supply and...

Use & Care Guide
Page 14
... draining. ■ Normal water valve hissing may be used daily, you will blink one time with the Heat Dry option turned off. If the sanitized light is blinking, the load is turned on ). NOTE: Extremely hard water mineral deposits can cause dishes to become chipped or damaged. (See specific loading instructions within...
... draining. ■ Normal water valve hissing may be used daily, you will blink one time with the Heat Dry option turned off. If the sanitized light is blinking, the load is turned on ). NOTE: Extremely hard water mineral deposits can cause dishes to become chipped or damaged. (See specific loading instructions within...
Use & Care Guide
Page 15
... detergent. Adjust the amount of the glassware and can cause the dishwasher to clean. 15 Try using too much detergent with the Heat Dry option turned off. Run a normal cycle with soft water or by a combination of white vinegar in a glass measuring cup in "Troubleshooting.") If it does not come clear...
... detergent. Adjust the amount of the glassware and can cause the dishwasher to clean. 15 Try using too much detergent with the Heat Dry option turned off. Run a normal cycle with soft water or by a combination of white vinegar in a glass measuring cup in "Troubleshooting.") If it does not come clear...


