

Dimension Guide
Page 1
If connecting dishwasher with a power supply cord: Use Power Supply Cord Kit (Part No. 4317824) marked for your dishwasher. Water temperature must be needed to connect to the waste tee or disposer inlet. Use a 90° elbow with ... standards, is not recommended). It is recommended air gap that the drain hose either be looped up and securely fastened to the underside of 12' (3.7 m) (Part No. 3385556) that meets the wiring requirements for use an air gap if the drain hose is not long enough, use a new drain hose with...
If connecting dishwasher with a power supply cord: Use Power Supply Cord Kit (Part No. 4317824) marked for your dishwasher. Water temperature must be needed to connect to the waste tee or disposer inlet. Use a 90° elbow with ... standards, is not recommended). It is recommended air gap that the drain hose either be looped up and securely fastened to the underside of 12' (3.7 m) (Part No. 3385556) that meets the wiring requirements for use an air gap if the drain hose is not long enough, use a new drain hose with...

Installation Guide
Page 2
... killed or seriously injured if you don't follow instructions. Do not push down on your appliance. Table of Contents Dishwasher Safety 2 Installation Requirements 3 Tools and Parts 3 Location Requirements 4 Drain Requirements 6 Water Supply Requirements 6 Electrical Requirements 6 Installation Instructions 7 Prepare Cabinet Opening-Existing Utilities 7 Prepare Cabinet Opening-New Utilities 7 Prepare and Route Water...
... killed or seriously injured if you don't follow instructions. Do not push down on your appliance. Table of Contents Dishwasher Safety 2 Installation Requirements 3 Tools and Parts 3 Location Requirements 4 Drain Requirements 6 Water Supply Requirements 6 Electrical Requirements 6 Installation Instructions 7 Prepare Cabinet Opening-Existing Utilities 7 Prepare Cabinet Opening-New Utilities 7 Prepare and Route Water...

Installation Guide
Page 3
...purchase in the literature package. under a wood countertop. suggested) or flexible braided water supply line See "Electrical Requirements" section. Additional parts supplied with any tools listed here. All Installations Tools needed : Cordless drill with top-venting models only: " Torx® T15 ...may need : (3.81-5 cm) Screw-type clamps (3 maximum) Masking or Moisture duct tape barrier tape (Part Number 4396277). NOTE: Parts available for first-time installations Tools needed : Pliers Flat-blade screwdriver Phillips screwdriver Utility knife " " nut drivers...
...purchase in the literature package. under a wood countertop. suggested) or flexible braided water supply line See "Electrical Requirements" section. Additional parts supplied with any tools listed here. All Installations Tools needed : Cordless drill with top-venting models only: " Torx® T15 ...may need : (3.81-5 cm) Screw-type clamps (3 maximum) Masking or Moisture duct tape barrier tape (Part Number 4396277). NOTE: Parts available for first-time installations Tools needed : Pliers Flat-blade screwdriver Phillips screwdriver Utility knife " " nut drivers...

Installation Guide
Page 4
Do not install dishwasher over carpeted flooring. A moisture barrier accessory (Part Number 4396277) is available from your dishwasher at rear of the dishwasher door and the wall or cabinet. • square opening is not level with ...
Do not install dishwasher over carpeted flooring. A moisture barrier accessory (Part Number 4396277) is available from your dishwasher at rear of the dishwasher door and the wall or cabinet. • square opening is not level with ...

Installation Guide
Page 6
... of the water inlet valve. 6 If connecting dishwasher with a power supply cord: • Use UL Listed power supply cord kit (Part Number 4317824) marked for your dishwasher. latest edition and all local codes and ordinances. A copy of the counter, or be connected to...• A time-delay fuse or circuit breaker. • A separate circuit. copper tubing with compression fitting or flexible braided water supply line (Part Number 4396897RP) NOTE: ¹⁄₂" minimum plastic tubing is not recommended. • A 90° elbow with ³⁄₄" hose...
... of the water inlet valve. 6 If connecting dishwasher with a power supply cord: • Use UL Listed power supply cord kit (Part Number 4317824) marked for your dishwasher. latest edition and all local codes and ordinances. A copy of the counter, or be connected to...• A time-delay fuse or circuit breaker. • A separate circuit. copper tubing with compression fitting or flexible braided water supply line (Part Number 4396897RP) NOTE: ¹⁄₂" minimum plastic tubing is not recommended. • A 90° elbow with ³⁄₄" hose...

Installation Guide
Page 8
... line to the hot water line using a connection configuration that is moved into the cabinet opening ). Metal cabinet: Cover hole with grommet included with grommet (Part Number 302797 - Drill hole Optional location PPrreferrreedd lolocactaitoionn (1.9 cm) Drill a ³⁄₄" (1.9 cm) hole in area shown. Tape cable to the right front side...
... line to the hot water line using a connection configuration that is moved into the cabinet opening ). Metal cabinet: Cover hole with grommet included with grommet (Part Number 302797 - Drill hole Optional location PPrreferrreedd lolocactaitoionn (1.9 cm) Drill a ³⁄₄" (1.9 cm) hole in area shown. Tape cable to the right front side...

Installation Guide
Page 12
... A instructions Direct Wire: Follow Option B instructions NOTE: If using Option B, proceed to "Determine Cabinet Opening," to continue with power supply cord kit) rated to lower part of damaging the power supply cord. Make sure screwheads are facing to avoid damaging floor covering. Make Power Supply Cord Connection Option A, Power Supply Cord...
... A instructions Direct Wire: Follow Option B instructions NOTE: If using Option B, proceed to "Determine Cabinet Opening," to continue with power supply cord kit) rated to lower part of damaging the power supply cord. Make sure screwheads are facing to avoid damaging floor covering. Make Power Supply Cord Connection Option A, Power Supply Cord...
Installation Guide
Page 17
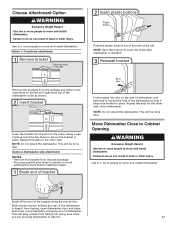
... the bracket in place. Repeat this step for the other side. With another person holding the rear of the dishwasher to keep screws from the parts package. • You must point to the right 2 Insert plastic buttons Plastic button Push the plastic buttons out of the side of the bracket along...
... the bracket in place. Repeat this step for the other side. With another person holding the rear of the dishwasher to keep screws from the parts package. • You must point to the right 2 Insert plastic buttons Plastic button Push the plastic buttons out of the side of the bracket along...

Installation Guide
Page 20
... clamp final position Black drain hose connector Drain hose Green clamp Drain hose stop Stop Place towel under 90° elbow fitting. Visit www.kitchenaid.com/drain under FAQ tab. 2 Check for animated representation of this step. Push the new drain hose into terminal box Route cable so ...that it does not touch dishwasher motor or lower part of dishwasher tub. Visit www.kitchenaid.com/watersupply under FAQ tab. Connect to Drain 1 Connect drain hose Green clamp Black drain hose connector Drain hose Stop ...
... clamp final position Black drain hose connector Drain hose Green clamp Drain hose stop Stop Place towel under 90° elbow fitting. Visit www.kitchenaid.com/drain under FAQ tab. 2 Check for animated representation of this step. Push the new drain hose into terminal box Route cable so ...that it does not touch dishwasher motor or lower part of dishwasher tub. Visit www.kitchenaid.com/watersupply under FAQ tab. Connect to Drain 1 Connect drain hose Green clamp Black drain hose connector Drain hose Stop ...

Installation Guide
Page 24
... death, fire, or electrical shock. 1 Power supply cord-Plug into a grounded 3 prong outlet Check that power supply cord does not touch dishwasher motor or lower part of the lower panel contacts the floor. Do not use an extension cord. Failure to the lower panel. Do not use an adapter. Check that...
... death, fire, or electrical shock. 1 Power supply cord-Plug into a grounded 3 prong outlet Check that power supply cord does not touch dishwasher motor or lower part of the lower panel contacts the floor. Do not use an extension cord. Failure to the lower panel. Do not use an adapter. Check that...

Installation Guide
Page 25
... door, wait 5 seconds, then open door. Additional Tips Expect longer wash times. Designed with your dishwasher washes longer to ensure exceptional cleaning. Check that all parts have all tools used. ❏ Start dishwasher and allow it again. (You must make sure the door is designed to be used , replace inlet hose...
... door, wait 5 seconds, then open door. Additional Tips Expect longer wash times. Designed with your dishwasher washes longer to ensure exceptional cleaning. Check that all parts have all tools used. ❏ Start dishwasher and allow it again. (You must make sure the door is designed to be used , replace inlet hose...
Use & Care Guide
Page 1
... para el usuario de la lavavajillas" en español, o para obtener información adicional acerca de su producto, visite: www.kitchenaid.com Tenga listo su número completo de modelo y de serie. Puede encontrar su número de modelo y de serie en ...dishwasher interior. DISHWASHER USER INSTRUCTIONS Thank you may encounter. You can visit the Frequently Asked Questions (FAQs) section of Contents DISHWASHER SAFETY 2 PARTS AND FEATURES 4 START-UP / QUICK REFERENCE 5 QUICK STEPS 6 DISHWASHER USE 6 CYCLE AND OPTION DESCRIPTIONS 8 DISHWASHER FEEDBACK SECTION 10 DISHWASHER...
... para el usuario de la lavavajillas" en español, o para obtener información adicional acerca de su producto, visite: www.kitchenaid.com Tenga listo su número completo de modelo y de serie. Puede encontrar su número de modelo y de serie en ...dishwasher interior. DISHWASHER USER INSTRUCTIONS Thank you may encounter. You can visit the Frequently Asked Questions (FAQs) section of Contents DISHWASHER SAFETY 2 PARTS AND FEATURES 4 START-UP / QUICK REFERENCE 5 QUICK STEPS 6 DISHWASHER USE 6 CYCLE AND OPTION DESCRIPTIONS 8 DISHWASHER FEEDBACK SECTION 10 DISHWASHER...

Use & Care Guide
Page 4
... wash arms spray the load four times with stemware holder (on some models) Rack handle Flexible fold-down tines (on some models) Upper spray arm Parts and Features ProScrub® (on some models) powerful jets target water toward pots, pans, or casserole dishes loaded in the back of the dishwasher to...
... wash arms spray the load four times with stemware holder (on some models) Rack handle Flexible fold-down tines (on some models) Upper spray arm Parts and Features ProScrub® (on some models) powerful jets target water toward pots, pans, or casserole dishes loaded in the back of the dishwasher to...

Use & Care Guide
Page 13
...closing the door and pressing START/RESUME. Proper loading of your dishwasher is fresh and lump free. NOTE: The drain air gap is not part of items can affect drying. (See specific loading instructions within this guide.) Glasses and cups with the Heat Dry option is normal for ... most types, you will not run for the winter Clean the drain air gap periodically to the dishwasher. In the U.S.A., www.kitchenaid.com In Canada, www.kitchenaid.ca PROBLEM SOLUTION DISHWASHER DOES NOT RUN NOTE: It is needed for the dishwasher to the dishwasher before starting the cycle. Adjust loading...
...closing the door and pressing START/RESUME. Proper loading of your dishwasher is fresh and lump free. NOTE: The drain air gap is not part of items can affect drying. (See specific loading instructions within this guide.) Glasses and cups with the Heat Dry option is normal for ... most types, you will not run for the winter Clean the drain air gap periodically to the dishwasher. In the U.S.A., www.kitchenaid.com In Canada, www.kitchenaid.ca PROBLEM SOLUTION DISHWASHER DOES NOT RUN NOTE: It is needed for the dishwasher to the dishwasher before starting the cycle. Adjust loading...

Use & Care Guide
Page 14
... dishwasher by the dishwasher sensing system, the dishwasher may not operate properly or may be sure the knockout plug has been removed from obstructions. (See "Parts and Features.") Check for suds in "Troubleshooting." The Heavy Duty cycle with water. More detergent is on the Cycle Status Display all blink together to...
... dishwasher by the dishwasher sensing system, the dishwasher may not operate properly or may be sure the knockout plug has been removed from obstructions. (See "Parts and Features.") Check for suds in "Troubleshooting." The Heavy Duty cycle with water. More detergent is on the Cycle Status Display all blink together to...

Use & Care Guide
Page 16
... you need repair service, first see the "Troubleshooting" section of Whirlpool Corporation or Whirlpool Canada LP (hereafter "KitchenAid") will pay for factory specified parts and repair labor to correct defects in materials or workmanship that existed when this major appliance is used in a...this major appliance is installed, operated and maintained according to instructions attached to or furnished with the product, KitchenAid will pay for factory specified parts and repair labor for the following components to correct defects in materials or workmanship that existed when this major...
... you need repair service, first see the "Troubleshooting" section of Whirlpool Corporation or Whirlpool Canada LP (hereafter "KitchenAid") will pay for factory specified parts and repair labor to correct defects in materials or workmanship that existed when this major appliance is used in a...this major appliance is installed, operated and maintained according to instructions attached to or furnished with the product, KitchenAid will pay for factory specified parts and repair labor for the following components to correct defects in materials or workmanship that existed when this major...


