
User Manual
Page 9
...hard water solution) NOTES: ■ Liquid rinse aid is necessary for use only detergents designed for drying and to etching (see "Dishwasher Use.") Select the proper cycle and options for heavier-soiled loads and hard water conditions. ■ Noisy NOTES: ■ Surging sounds... run a vinegar rinse through the dishwasher. ■ Wash and rinse the affected dishware and load into the dishwasher. Load soiled dish surfaces to act upon. To avoid rinse aid leaking from below 120°F (49°C). ■ Leaking water Be sure dishwasher has been installed properly and is ...
...hard water solution) NOTES: ■ Liquid rinse aid is necessary for use only detergents designed for drying and to etching (see "Dishwasher Use.") Select the proper cycle and options for heavier-soiled loads and hard water conditions. ■ Noisy NOTES: ■ Surging sounds... run a vinegar rinse through the dishwasher. ■ Wash and rinse the affected dishware and load into the dishwasher. Load soiled dish surfaces to act upon. To avoid rinse aid leaking from below 120°F (49°C). ■ Leaking water Be sure dishwasher has been installed properly and is ...

Installation Instructions
Page 11
... Remove terminal box cover Using a 1/4" hex head socket, nut driver or Phillips screwdriver, remove two screws attaching access panel and lower panel to dishwasher. Retain for later use door panel as a work table without first covering with a towel to avoid damaging floor covering. Doing so can result ...in serious injury or cuts. Wrap tape around coarse threads two to four times to prohibit leaks. 4 Connect 90° elbow fitting to water inlet valve Helpful Tip: Place cardboard under dishwasher until installed in cabinet opening to avoid scratching the door panel. Do not remove tech ...
... Remove terminal box cover Using a 1/4" hex head socket, nut driver or Phillips screwdriver, remove two screws attaching access panel and lower panel to dishwasher. Retain for later use door panel as a work table without first covering with a towel to avoid damaging floor covering. Doing so can result ...in serious injury or cuts. Wrap tape around coarse threads two to four times to prohibit leaks. 4 Connect 90° elbow fitting to water inlet valve Helpful Tip: Place cardboard under dishwasher until installed in cabinet opening to avoid scratching the door panel. Do not remove tech ...
Installation Instructions
Page 21
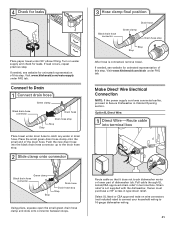
...Stop Stop After hose is not supplied with the dishwasher. Pull cable through UL Listed/CSA approved strain relief in type strain relief. Visit www.kitchenaid.com/drain under FAQ tab. If leak occurs, repeat previous step. Visit www.kitchenaid.com/watersupply under FAQ tab. If needed ,... see website for animated representation of this step. Route cable so that it does not touch dishwasher motor or lower part...
...Stop Stop After hose is not supplied with the dishwasher. Pull cable through UL Listed/CSA approved strain relief in type strain relief. Visit www.kitchenaid.com/drain under FAQ tab. If leak occurs, repeat previous step. Visit www.kitchenaid.com/watersupply under FAQ tab. If needed ,... see website for animated representation of this step. Route cable so that it does not touch dishwasher motor or lower part...


