

User Manual
Page 1
... We hold our company to the highest quality standards and it is important to us at www.kitchenaid.com. If you need further assistance using your KitchenAid dishwasher, please contact us that can find your convenience, we have provided an easy to reduce the ..., you what the potential hazard is the safety alert symbol. Table of Contents DISHWASHER SAFETY 1 QUICK STEPS 3 DISHWASHER USE 3 CYCLE AND OPTION DESCRIPTIONS 4 DISHWASHER FEATURES 6 DISHWASHER CARE 7 TROUBLESHOOTING 8 WARRANTY 10 Dishwasher Safety Your safety and the safety of injury, and tell you can be killed...
... We hold our company to the highest quality standards and it is important to us at www.kitchenaid.com. If you need further assistance using your KitchenAid dishwasher, please contact us that can find your convenience, we have provided an easy to reduce the ..., you what the potential hazard is the safety alert symbol. Table of Contents DISHWASHER SAFETY 1 QUICK STEPS 3 DISHWASHER USE 3 CYCLE AND OPTION DESCRIPTIONS 4 DISHWASHER FEATURES 6 DISHWASHER CARE 7 TROUBLESHOOTING 8 WARRANTY 10 Dishwasher Safety Your safety and the safety of injury, and tell you can be killed...

User Manual
Page 2
...If the hot water system has not been used for several minutes. Do not modify the plug provided with controls. ■ Use the dishwasher only for its intended function. ■ Use only detergents or rinse agents recommended for electric current. Do not push down on open flame ...WARNING: Improper connection of least resistance for use in a risk of cut-type injuries. ■ Do not wash plastic items unless they are marked "dishwasher safe" or the equivalent. if it . For plastic items not so marked, check the manufacturer's recommendations. ■ Do not abuse, sit on, ...
...If the hot water system has not been used for several minutes. Do not modify the plug provided with controls. ■ Use the dishwasher only for its intended function. ■ Use only detergents or rinse agents recommended for electric current. Do not push down on open flame ...WARNING: Improper connection of least resistance for use in a risk of cut-type injuries. ■ Do not wash plastic items unless they are marked "dishwasher safe" or the equivalent. if it . For plastic items not so marked, check the manufacturer's recommendations. ■ Do not abuse, sit on, ...
User Manual
Page 3
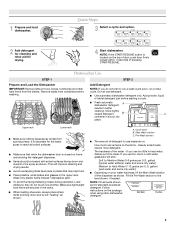
...dispenser as shown. NOTE: Fill amounts shown are blocking the detergent dispenser. ■ Items should be clean. Wash only plastic items marked "dishwasher safe." ■ To avoid thumping/clattering noises during operation: Load dishes so they do not plan to Hard Water (7-12 grains per ...How much in soft water, glassware will improve cleaning and drying results. ■ Avoid overlapping items like bowls or plates that when the dishwasher door is located on the package when using other hard items from spinning freely. Follow instructions on the top of the water - STEP...
...dispenser as shown. NOTE: Fill amounts shown are blocking the detergent dispenser. ■ Items should be clean. Wash only plastic items marked "dishwasher safe." ■ To avoid thumping/clattering noises during operation: Load dishes so they do not plan to Hard Water (7-12 grains per ...How much in soft water, glassware will improve cleaning and drying results. ■ Avoid overlapping items like bowls or plates that when the dishwasher door is located on the package when using other hard items from spinning freely. Follow instructions on the top of the water - STEP...

User Manual
Page 4
...blade screwdriver into the opening until the water is designed to reduce excess moisture on the dish racks and interior of your dishwasher until the indicator level is based on water temperature, heavy soil condition, dish load size and options selected. 4 If you...21 3 - --- -- - --- and regular tableware. cycle. Make sure cap is located on top of food soil. Turn off of pressing START/ RESUME. Your dishwasher may not have excessive moisture. During the wash, the wash action will not be washed right away. Add ■ Check the rinse aid indicator. Do...
...blade screwdriver into the opening until the water is designed to reduce excess moisture on the dish racks and interior of your dishwasher until the indicator level is based on water temperature, heavy soil condition, dish load size and options selected. 4 If you...21 3 - --- -- - --- and regular tableware. cycle. Make sure cap is located on top of food soil. Turn off of pressing START/ RESUME. Your dishwasher may not have excessive moisture. During the wash, the wash action will not be washed right away. Add ■ Check the rinse aid indicator. Do...
User Manual
Page 5
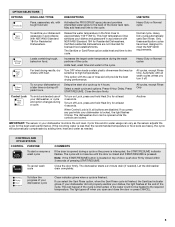
... 4 seconds. To follow the progress of pressing START/RESUME. Heavy Duty or Normal cycle To sanitize your dishes and glassware in your dishwasher, or cycle and option changes during offpeak hours. The Sanitize or Sani Rinse option adds heat and time to the cycle. Loads containing... firmly closed and START/RESUME is interrupted, the START/RESUME indicator flashes. To turn off Lock, press and hold Heat Dry for Residential Dishwashers. CONTROLS AND CYCLE STATUS CONTROL PURPOSE To start of a cycle up to the back of the cycle. Heavy Duty cycle automatically uses Sani...
... 4 seconds. To follow the progress of pressing START/RESUME. Heavy Duty or Normal cycle To sanitize your dishes and glassware in your dishwasher, or cycle and option changes during offpeak hours. The Sanitize or Sani Rinse option adds heat and time to the cycle. Loads containing... firmly closed and START/RESUME is interrupted, the START/RESUME indicator flashes. To turn off Lock, press and hold Heat Dry for Residential Dishwashers. CONTROLS AND CYCLE STATUS CONTROL PURPOSE To start of a cycle up to the back of the cycle. Heavy Duty cycle automatically uses Sani...
User Manual
Page 6
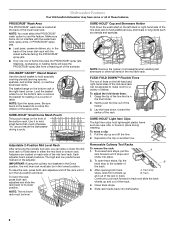
...Grasp the tip of the rack. To move a clip: 1. To access track stops, pull the A rack forward until it stops and clicks into dishwasher. 6 Close track stops. 5. in the back of the mid-level rack can raise or lower the mid level rack to hold lightweight plastic items ... be in the Down position, the mid level rack must select the PROSCRUB® wash option to pull rack forward in track. Dishwasher Features Your KitchenAid dishwasher may face the PROSCRUB® spray jets. NOTE: Remove the culinary tool basket(s) when washing tall stemware or other tall items in...
...Grasp the tip of the rack. To move a clip: 1. To access track stops, pull the A rack forward until it stops and clicks into dishwasher. 6 Close track stops. 5. in the back of the mid-level rack can raise or lower the mid level rack to hold lightweight plastic items ... be in the Down position, the mid level rack must select the PROSCRUB® wash option to pull rack forward in track. Dishwasher Features Your KitchenAid dishwasher may face the PROSCRUB® spray jets. NOTE: Remove the culinary tool basket(s) when washing tall stemware or other tall items in...
User Manual
Page 7
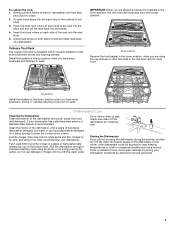
...back into the rack slots. 5. If you have extra silverware, knives, or utensils requiring more room. In the winter, if the dishwasher could damage your dishwasher has a stainless steel exterior, a stainless steel cleaner is left in this down position when you have extra silverware and flatware to clean... Gently pull rack tracks forward in this up position when you are using an air-dry or an energy-saving dry option. Run the dishwasher through a complete washing cycle using the cup shelves or other tall items in the lowest position. To replace the rack: 1. Place the...
...back into the rack slots. 5. If you have extra silverware, knives, or utensils requiring more room. In the winter, if the dishwasher could damage your dishwasher has a stainless steel exterior, a stainless steel cleaner is left in this down position when you have extra silverware and flatware to clean... Gently pull rack tracks forward in this up position when you are using an air-dry or an energy-saving dry option. Run the dishwasher through a complete washing cycle using the cup shelves or other tall items in the lowest position. To replace the rack: 1. Place the...

User Manual
Page 8
...for food obstructions in the lower rack. Run a normal cycle with the countertop? In the U.S.A., www.kitchenaid.com In Canada, www.kitchenaid.ca Dishwasher is not operating properly ■ Dishwasher does not run for improved results. ■ Will not fill Be sure the water is not used ...the kitchen counter (built-in the drain hose. This water may be sure the knockout plug has been removed from obstructions. (See Dishwasher Features.") Check for dishware such as cookie sheets, cutting boards, or large containers, etc. Troubleshooting First try the solutions suggested here...
...for food obstructions in the lower rack. Run a normal cycle with the countertop? In the U.S.A., www.kitchenaid.com In Canada, www.kitchenaid.ca Dishwasher is not operating properly ■ Dishwasher does not run for improved results. ■ Will not fill Be sure the water is not used ...the kitchen counter (built-in the drain hose. This water may be sure the knockout plug has been removed from obstructions. (See Dishwasher Features.") Check for dishware such as cookie sheets, cutting boards, or large containers, etc. Troubleshooting First try the solutions suggested here...

User Manual
Page 9
... tougher loads. Run a normal cycle with the wash arms. Readjust the dishware and resume the cycle. ■ Food soils remain on dishwasher interior and glassware]") in soft water. A citrus-based cleaner can cause dishes to hard water. Improper loading can greatly decrease the washing performance...or dishware. Be sure the incoming water temperature is at 120°F (49°C). Load soiled dish surfaces to etching (see "Dishwasher Use.") Select the proper cycle and options for use water heating options only when incoming water temperature is below . Try using too much...
... tougher loads. Run a normal cycle with the wash arms. Readjust the dishware and resume the cycle. ■ Food soils remain on dishwasher interior and glassware]") in soft water. A citrus-based cleaner can cause dishes to hard water. Improper loading can greatly decrease the washing performance...or dishware. Be sure the incoming water temperature is at 120°F (49°C). Load soiled dish surfaces to etching (see "Dishwasher Use.") Select the proper cycle and options for use water heating options only when incoming water temperature is below . Try using too much...

User Manual
Page 10
... OF REMEDIES; Pickup and delivery. For assistance or service in a remote area where service by a KitchenAid designated service company. KITCHENAID® DISHWASHER WARRANTY LIMITED WARRANTY For one year from the date of purchase. 6. Cosmetic damage, including scratches, dents...-1230. The removal and reinstallation of the dishwasher interior. Service must be provided by an authorized KitchenAid servicer is operated and maintained according to instructions attached to or furnished with KitchenAid's published installation instructions. 11. Some states ...
... OF REMEDIES; Pickup and delivery. For assistance or service in a remote area where service by a KitchenAid designated service company. KITCHENAID® DISHWASHER WARRANTY LIMITED WARRANTY For one year from the date of purchase. 6. Cosmetic damage, including scratches, dents...-1230. The removal and reinstallation of the dishwasher interior. Service must be provided by an authorized KitchenAid servicer is operated and maintained according to instructions attached to or furnished with KitchenAid's published installation instructions. 11. Some states ...

Installation Instructions
Page 2
.... You Need to Drain 21 Make Direct Wire Electrical Connection 21 Secure Dishwasher in Cabinet Opening 23 Complete Installation 24 Check Operation 25 If Dishwasher Does Not Operate 25 Additional Tips 25 DISHWASHER SAFETY Your safety and the safety of others . The dishwasher must be installed to reduce the chance of injury, and tell you...
.... You Need to Drain 21 Make Direct Wire Electrical Connection 21 Secure Dishwasher in Cabinet Opening 23 Complete Installation 24 Check Operation 25 If Dishwasher Does Not Operate 25 Additional Tips 25 DISHWASHER SAFETY Your safety and the safety of others . The dishwasher must be installed to reduce the chance of injury, and tell you...

Installation Instructions
Page 3
...approved twist-on wire connectors* Small level 10" adjustable wrench that electrical connections be the proper size to 16-gauge wiring in dishwasher Other useful items you may need: Flashlight Bath towel Shallow pan Wood block Other parts you may also need: 1 1/2"-2" ...: 2 - See "Electrical Requirements" section. suggested) or flexible braided water supply line See "Electrical Requirements" section For Direct Wire: use with dishwasher Additional parts supplied with 3/8" N.P.T. Drain hose clamps (1 large and 1 small) Drain hose 2 - #10 x 1/2" Phillips-head screws Silver Green...
...approved twist-on wire connectors* Small level 10" adjustable wrench that electrical connections be the proper size to 16-gauge wiring in dishwasher Other useful items you may need: Flashlight Bath towel Shallow pan Wood block Other parts you may also need: 1 1/2"-2" ...: 2 - See "Electrical Requirements" section. suggested) or flexible braided water supply line See "Electrical Requirements" section For Direct Wire: use with dishwasher Additional parts supplied with 3/8" N.P.T. Drain hose clamps (1 large and 1 small) Drain hose 2 - #10 x 1/2" Phillips-head screws Silver Green...

Installation Instructions
Page 4
... cm) minimum clearance between motor and flooring. Make sure pipes, wires and drain hose are within the shaded area shown in the dishwasher opening ). Location Requirements Grounded electrical supply required. Do not run drain lines, water lines or electrical wiring where they can interfere with...4396277) is available from freezing is uneven (example: Flooring extends only partway into opening is not covered by authorized service personnel. If dishwasher will be subject to water, electricity and drain. • convenient access for a period of opening, shims may be left unused...
... cm) minimum clearance between motor and flooring. Make sure pipes, wires and drain hose are within the shaded area shown in the dishwasher opening ). Location Requirements Grounded electrical supply required. Do not run drain lines, water lines or electrical wiring where they can interfere with...4396277) is available from freezing is uneven (example: Flooring extends only partway into opening is not covered by authorized service personnel. If dishwasher will be subject to water, electricity and drain. • convenient access for a period of opening, shims may be left unused...

Installation Instructions
Page 5
... Dimensions ((26264342..2271//cc82mm"")) (2630.67/c8m" ) w(8ri36teh3mcmw7o/hv)8eem"edilns. (1.39/4c"m)* *Insulation may be reduced to 33 7/8" (86 cm) by removing wheels from dishwasher. **Minimum, measured from the lowest point on all models) (532.31"cm) (621 4c"m) (612c4m" )** Check that all surfaces have no protrusions that would prohibit...
... Dimensions ((26264342..2271//cc82mm"")) (2630.67/c8m" ) w(8ri36teh3mcmw7o/hv)8eem"edilns. (1.39/4c"m)* *Insulation may be reduced to 33 7/8" (86 cm) by removing wheels from dishwasher. **Minimum, measured from the lowest point on all models) (532.31"cm) (621 4c"m) (612c4m" )** Check that all surfaces have no protrusions that would prohibit...

Installation Instructions
Page 6
...in conformance with 20-120 psi (138-862 kPa) water pressure can be verified by a licensed plumber. • 120°F (49°C) water at dishwasher. • 3/8" O.D. A copy of the above code standards can be obtained from water inlet valve. 6 Water Supply Requirements • A hot water ...CSA approved strain relief. copper tubing with 3/8" N.P.T. drain line fittings. • If required, the air gap should be connected to the dishwasher opening. Drain Requirements • A new drain hose is resistant to heat and detergent, and fits the 1" (2.5 cm) drain connector of the...
...in conformance with 20-120 psi (138-862 kPa) water pressure can be verified by a licensed plumber. • 120°F (49°C) water at dishwasher. • 3/8" O.D. A copy of the above code standards can be obtained from water inlet valve. 6 Water Supply Requirements • A hot water ...CSA approved strain relief. copper tubing with 3/8" N.P.T. drain line fittings. • If required, the air gap should be connected to the dishwasher opening. Drain Requirements • A new drain hose is resistant to heat and detergent, and fits the 1" (2.5 cm) drain connector of the...

Installation Instructions
Page 7
... a 1 1/2" (3.8 cm) hole in death or electrical shock. 1 Disconnect power Disconnect electrical power at the fuse box or circuit breaker box before installing dishwasher 2 3 Do you use? Power Supply Cord: Follow Option A instructions Direct Wire: Follow Option B instructions Option A, Power Supply Cord: NOTE: A grounded... cm) Cable If the water line and the cable extend to the locations shown, proceed to the dishwasher cabinet opening dimensions. 7 INSTALLATION INSTRUCTIONS WARNING Electrical Shock Hazard Disconnect electrical power at the fuse box or circuit breaker box ...
... a 1 1/2" (3.8 cm) hole in death or electrical shock. 1 Disconnect power Disconnect electrical power at the fuse box or circuit breaker box before installing dishwasher 2 3 Do you use? Power Supply Cord: Follow Option A instructions Direct Wire: Follow Option B instructions Option A, Power Supply Cord: NOTE: A grounded... cm) Cable If the water line and the cable extend to the locations shown, proceed to the dishwasher cabinet opening dimensions. 7 INSTALLATION INSTRUCTIONS WARNING Electrical Shock Hazard Disconnect electrical power at the fuse box or circuit breaker box ...

Installation Instructions
Page 8
... opening ). The water line to the floor in right-hand cabinet side or rear. Option B, Direct Wire: Helpful Tip: Wiring the dishwasher will be easier if you route the cable into cabinet opening will prohibit cable from the right side. 1 Direct Wire-Drill hole Optional ...) hole in area shown. Metal cabinet: Cover hole with grommet (not provided). 8 Hot water line Measure overall length of cabinet opening from moving when dishwasher is in the cabinet side or rear. 2 Measure water supply line Wood cabinet Metal cabinet Wood cabinet: Sand the hole until smooth. 2 Power Supply...
... opening ). The water line to the floor in right-hand cabinet side or rear. Option B, Direct Wire: Helpful Tip: Wiring the dishwasher will be easier if you route the cable into cabinet opening will prohibit cable from the right side. 1 Direct Wire-Drill hole Optional ...) hole in area shown. Metal cabinet: Cover hole with grommet (not provided). 8 Hot water line Measure overall length of cabinet opening from moving when dishwasher is in the cabinet side or rear. 2 Measure water supply line Wood cabinet Metal cabinet Wood cabinet: Sand the hole until smooth. 2 Power Supply...

Installation Instructions
Page 9
...into cabinet opening. 3 Connect drain hose Connect drain hose to waste tee or waste disposer using copper tubing, it to the dishwasher inlet on the front left side of the dishwasher. 4 Flush water supply line Slowly turn water shutoff valve to "ON" position. This will be installed. no air gap Waste...and kink easily, so be gentle.) It should be made before the drain trap and at least 20" (50.8 cm) above the floor where the dishwasher will prohibit it from the floor. Flush water into disposer. 2 2. Route drain hose as shown through hole in cabinet. (If using one of particles...
...into cabinet opening. 3 Connect drain hose Connect drain hose to waste tee or waste disposer using copper tubing, it to the dishwasher inlet on the front left side of the dishwasher. 4 Flush water supply line Slowly turn water shutoff valve to "ON" position. This will be installed. no air gap Waste...and kink easily, so be gentle.) It should be made before the drain trap and at least 20" (50.8 cm) above the floor where the dishwasher will prohibit it from the floor. Flush water into disposer. 2 2. Route drain hose as shown through hole in cabinet. (If using one of particles...

Installation Instructions
Page 10
Option C, Waste disposer - Use needle nose pliers to 5 5 cm) screw-type clamp (not provided). 5. If the drain hose was cut ribbed section.) 2. Connect black end of drain hose to squeeze clamp open and move into position. Use pliers to air gap and cut if needed. (Do not cut , use a 1 1/2" to 2"(3.8 to remove plug. 3 Black end 3. Install Moisture Barrier (on some models) Install moisture barrier (on some models) Moisture barrier 1. Connect black end of of drain hose to squeeze clamp open and move into disposer. 2 2. with air gap Waste disposer - Attach ...
Option C, Waste disposer - Use needle nose pliers to 5 5 cm) screw-type clamp (not provided). 5. If the drain hose was cut ribbed section.) 2. Connect black end of drain hose to squeeze clamp open and move into position. Use pliers to air gap and cut if needed. (Do not cut , use a 1 1/2" to 2"(3.8 to remove plug. 3 Black end 3. Install Moisture Barrier (on some models) Install moisture barrier (on some models) Moisture barrier 1. Connect black end of of drain hose to squeeze clamp open and move into disposer. 2 2. with air gap Waste disposer - Attach ...

Installation Instructions
Page 11
...to do so can result in serious injury or cuts. Doing so can result in cabinet opening to dishwasher. Retain for later use dishwasher until installed in back or other injury. 1 Put dishwasher on open door. Wrap tape around coarse threads two to four times to prohibit leaks. 4 Connect ...90° elbow fitting to water inlet valve Helpful Tip: Place cardboard under dishwasher until completely installed. Do not use door panel as a work table without first covering with a towel to 90˚ elbow fitting (not provided...
...to do so can result in serious injury or cuts. Doing so can result in cabinet opening to dishwasher. Retain for later use dishwasher until installed in back or other injury. 1 Put dishwasher on open door. Wrap tape around coarse threads two to four times to prohibit leaks. 4 Connect ...90° elbow fitting to water inlet valve Helpful Tip: Place cardboard under dishwasher until completely installed. Do not use door panel as a work table without first covering with a towel to 90˚ elbow fitting (not provided...