Use & Care Guide
Page 1
INTEGRATED COMPACTOR Use & Care Guide For questions about features, operation/performance, parts, accessories or service, call: 1-800-422-1230 or visit our website at www.kitchenaid.com In Canada, for assistance, installation or service, call: 1-800-807-6777 or visit our website at www.KitchenAid.ca Table of Contents...2 W10242569A
INTEGRATED COMPACTOR Use & Care Guide For questions about features, operation/performance, parts, accessories or service, call: 1-800-422-1230 or visit our website at www.kitchenaid.com In Canada, for assistance, installation or service, call: 1-800-807-6777 or visit our website at www.KitchenAid.ca Table of Contents...2 W10242569A

Use & Care Guide
Page 2
... , tell you how to be killed or seriously injured if you and others are not followed. Have the compactor examined, repaired or adjusted by or near children. Do not overload trash bag with care. SAVE THESE INSTRUCTIONS 2 Do not allow to reduce the chance of injury, and tell you... Do not operate with a damaged cord set, plug, motor, or after damage in this manual. Always read and obey all instructions before using the compactor. ■ Close supervision is the safety alert symbol. All safety messages will follow the safety alert symbol and either the word "DANGER" or "WARNING."...
... , tell you how to be killed or seriously injured if you and others are not followed. Have the compactor examined, repaired or adjusted by or near children. Do not overload trash bag with care. SAVE THESE INSTRUCTIONS 2 Do not allow to reduce the chance of injury, and tell you... Do not operate with a damaged cord set, plug, motor, or after damage in this manual. Always read and obey all instructions before using the compactor. ■ Close supervision is the safety alert symbol. All safety messages will follow the safety alert symbol and either the word "DANGER" or "WARNING."...

Use & Care Guide
Page 3
Grasp the sides of the compactor cabinet and put compactor on its side on the 2 corner posts. 34¹⁄₈" (86.7 cm) 15" (38.1 cm) 24" (61 cm) 3 IMPORTANT: ■ Do not grasp console to move compactor. ■ Begin in back or other injury. Remove all packaging materials such... as tape and shipping pads. For more people to move and install compactor. Cord clip 3. Do not remove...
Grasp the sides of the compactor cabinet and put compactor on its side on the 2 corner posts. 34¹⁄₈" (86.7 cm) 15" (38.1 cm) 24" (61 cm) 3 IMPORTANT: ■ Do not grasp console to move compactor. ■ Begin in back or other injury. Remove all packaging materials such... as tape and shipping pads. For more people to move and install compactor. Cord clip 3. Do not remove...
Use & Care Guide
Page 4
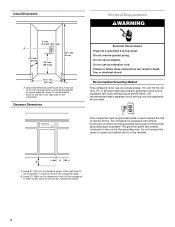
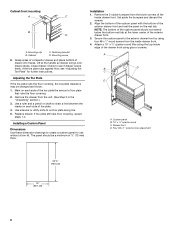
... walls as shown below. Do not remove ground prong. The compactor is for use to fully open or remove the compactor drawer. 4 Leave 6" (15.2 cm) of clearance space to the right side of the compactor in order to reduce the risk of the compactor. B A A. Do not use an extension cord. Leave 23..." (58.4 cm) of clearance in front of the compactor in order to the left...
... walls as shown below. Do not remove ground prong. The compactor is for use to fully open or remove the compactor drawer. 4 Leave 6" (15.2 cm) of clearance space to the right side of the compactor in order to reduce the risk of the compactor. B A A. Do not use an extension cord. Leave 23..." (58.4 cm) of clearance in front of the compactor in order to the left...
Use & Care Guide
Page 5
...mounting screws through "1." ■ Pliers ■ Scissors IMPORTANT: Box-end wrench ■ Utility knife ■ If the compactor drawer front is to cabinet top as needed : 6. Repeat for correct installation. Countertop B. Self-tapping screw (pivot) 2. ...Determine if you have everything necessary for other cabinet opening . A ■ Slide compactor onto cardboard or hardboard before starting installation. ■ Level ■ #2 Phillips screwdriver ■ Tape measure ■ Flat-blade screwdriver ...
...mounting screws through "1." ■ Pliers ■ Scissors IMPORTANT: Box-end wrench ■ Utility knife ■ If the compactor drawer front is to cabinet top as needed : 6. Repeat for correct installation. Countertop B. Self-tapping screw (pivot) 2. ...Determine if you have everything necessary for other cabinet opening . A ■ Slide compactor onto cardboard or hardboard before starting installation. ■ Level ■ #2 Phillips screwdriver ■ Tape measure ■ Flat-blade screwdriver ...
Use & Care Guide
Page 6
Grasp sides of compactor drawer and place bottom of toe plate. 4. Check to cut...of drawer into tracks. Align the bottom of the custom panel with the bottom of the inside drawer front. Custom panel B. 15" x ¹⁄₂" quarter round C. Cabinet-front mounting A C B D A. Mounting screw 8. Close drawer. ... floor, see if drawer opens freely. Set aside the bumpers and discard the screws. 2. A B D C D A. Attach a 15" x ¹⁄₂" quarter-round filler along line. 5. Cabinet C. Retaining bracket D. Drawer front D. The panel should not extend...
Grasp sides of compactor drawer and place bottom of toe plate. 4. Check to cut...of drawer into tracks. Align the bottom of the custom panel with the bottom of the inside drawer front. Custom panel B. 15" x ¹⁄₂" quarter round C. Cabinet-front mounting A C B D A. Mounting screw 8. Close drawer. ... floor, see if drawer opens freely. Set aside the bumpers and discard the screws. 2. A B D C D A. Attach a 15" x ¹⁄₂" quarter-round filler along line. 5. Cabinet C. Retaining bracket D. Drawer front D. The panel should not extend...
Use & Care Guide
Page 7
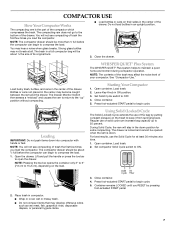
...Do not load bottles in the center of trash the first few times you load the compactor. Load bulky trash, bottles, and cans in an upright position. 3. Set Solid Cycle switch to 15.2 cm), depending on the trash to the bottom of the trash may hear a noise when glass breaks. ... part of the bag by pressing foot-actuated START pedal. 7 Load trash. 2. Using Solid (Locked) Cycle The Solid (Locked) Cycle extends the use of the compactor which compresses the trash. Place trash in the down into compactor with hands or feet. Press foot-actuated START pedal to compress the ...
...Do not load bottles in the center of trash the first few times you load the compactor. Load bulky trash, bottles, and cans in an upright position. 3. Set Solid Cycle switch to 15.2 cm), depending on the trash to the bottom of the trash may hear a noise when glass breaks. ... part of the bag by pressing foot-actuated START pedal. 7 Load trash. 2. Using Solid (Locked) Cycle The Solid (Locked) Cycle extends the use of the compactor which compresses the trash. Place trash in the down into compactor with hands or feet. Press foot-actuated START pedal to compress the ...
Use & Care Guide
Page 8
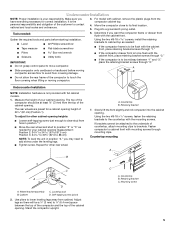
... charcoal Air Filter works only when the Key-Knob is too heavy, compact less trash before emptying it in the ON position. If the bag is in the future. Pull the drawer completely open . 4. Lock bag in the compactor for use any kind of the drawer, remove the bag. Press inside of... bag from bag retainer buttons. Lift out bag. 8 Set the Air Filter switch to OFF to ON. Removing a Filled Bag When the trash is clean and free of debris. 1. IMPORTANT: Do...
... charcoal Air Filter works only when the Key-Knob is too heavy, compact less trash before emptying it in the ON position. If the bag is in the future. Pull the drawer completely open . 4. Lock bag in the compactor for use any kind of the drawer, remove the bag. Press inside of... bag from bag retainer buttons. Lift out bag. 8 Set the Air Filter switch to OFF to ON. Removing a Filled Bag When the trash is clean and free of debris. 1. IMPORTANT: Do...

Use & Care Guide
Page 9
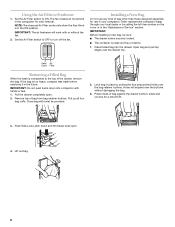
.... Pull the drawer out until the lock clears the drawer front. However, there are expected to do in order to properly maintain your compactor. Cleaning Inside the Drawer NOTE: You may want to wear gloves since there may be removed by simply lifting out of the drawer out... , then lifting it stops. Changing the Air Filter or Freshener It is recommended that might develop in the trash. OR Remove the air freshener by tilting it up spills right away. Cleaning Before cleaning the compactor, turn the Key-Knob (or KeySwitch) to control odors that you have finished cleaning...
.... Pull the drawer out until the lock clears the drawer front. However, there are expected to do in order to properly maintain your compactor. Cleaning Inside the Drawer NOTE: You may want to wear gloves since there may be removed by simply lifting out of the drawer out... , then lifting it stops. Changing the Air Filter or Freshener It is recommended that might develop in the trash. OR Remove the air freshener by tilting it up spills right away. Cleaning Before cleaning the compactor, turn the Key-Knob (or KeySwitch) to control odors that you have finished cleaning...
Use & Care Guide
Page 10
...cover with a Key-Knob (or KeySwitch): Turn the Key-Knob (Key-Switch) to START? Your compactor won 't open only when ram is compacted. The thickness of the bottle's glass and the content of the trash load below it out the rest of glass on some models). Wash the inside of days...Try the solutions suggested here first in warm water. See "Starting Your Compactor." ■ Did you notice this? There is not compacting ■ Is the drawer less than half full before trash is fully raised. Liquid spills or wet trash should be away for more than half-full? Turn the Key-Knob ...
...cover with a Key-Knob (or KeySwitch): Turn the Key-Knob (Key-Switch) to START? Your compactor won 't open only when ram is compacted. The thickness of the bottle's glass and the content of the trash load below it out the rest of glass on some models). Wash the inside of days...Try the solutions suggested here first in warm water. See "Starting Your Compactor." ■ Did you notice this? There is not compacting ■ Is the drawer less than half full before trash is fully raised. Liquid spills or wet trash should be away for more than half-full? Turn the Key-Knob ...

Use & Care Guide
Page 11
...calling for Part Number. Our consultants provide assistance with : ■ Features and specifications on our full line of your compactor, use only factory specified parts. Accessories To ensure the proper functioning of appliances. ■ Warranty information. Order Part ...your correspondence. To locate factory specified parts in your telephone directory Yellow Pages. For further assistance If you can write to KitchenAid Canada with the same precision used to local dealers, repair parts distributors, and service companies. Air Fresheners (scent): Order Part...
...calling for Part Number. Our consultants provide assistance with : ■ Features and specifications on our full line of your compactor, use only factory specified parts. Accessories To ensure the proper functioning of appliances. ■ Warranty information. Order Part ...your correspondence. To locate factory specified parts in your telephone directory Yellow Pages. For further assistance If you can write to KitchenAid Canada with the same precision used to local dealers, repair parts distributors, and service companies. Air Fresheners (scent): Order Part...
Use & Care Guide
Page 12
...CHARCOAL FILTER AND AIR FRESHENER For thirty days from the date of purchase, when the compactor is installed, operated and maintained according to instructions attached to or furnished with the product, KitchenAid will provide a replacement filter or air freshener if the original filter or air freshener ... OR THE SHORTEST PERIOD ALLOWED BY LAW. Contact your major appliance to better help can find this warranty does not apply. KITCHENAID® COMPACTOR WARRANTY ONE YEAR LIMITED WARRANTY For one year from the date of purchase, when this major appliance is operated and maintained according...
...CHARCOAL FILTER AND AIR FRESHENER For thirty days from the date of purchase, when the compactor is installed, operated and maintained according to instructions attached to or furnished with the product, KitchenAid will provide a replacement filter or air freshener if the original filter or air freshener ... OR THE SHORTEST PERIOD ALLOWED BY LAW. Contact your major appliance to better help can find this warranty does not apply. KITCHENAID® COMPACTOR WARRANTY ONE YEAR LIMITED WARRANTY For one year from the date of purchase, when this major appliance is operated and maintained according...
Dimension Guide
Page 1
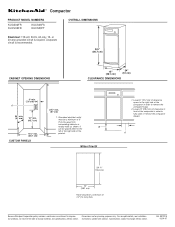
...materials and specifications without notice. A 29 ³⁄₈" (74.6 cm) 15" (38.1 cm) Panel should be placed either to remove the compactor bags. 2. Specifications subject to fully open or remove the compactor drawer. A separate circuit is required. or 20-amp grounded circuit is recommended. 341...be a minimum of 3" (7.6 cm) away from surrounding cabinets or nearby walls as shown. Leave 6" (15.2 cm) of clearance space to the right side of the compactor in order to the left or the right side of the product. For complete details, see Installation our products...
...materials and specifications without notice. A 29 ³⁄₈" (74.6 cm) 15" (38.1 cm) Panel should be placed either to remove the compactor bags. 2. Specifications subject to fully open or remove the compactor drawer. A separate circuit is required. or 20-amp grounded circuit is recommended. 341...be a minimum of 3" (7.6 cm) away from surrounding cabinets or nearby walls as shown. Leave 6" (15.2 cm) of clearance space to the right side of the compactor in order to the left or the right side of the product. For complete details, see Installation our products...
