Use & Care Guide
Page 1
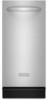
INTEGRATED COMPACTOR Use & Care Guide For questions about features, operation/performance, parts, accessories or service, call: 1-800-422-1230 or visit our website at www.kitchenaid.com In Canada, for assistance, installation or service, call: 1-800-807-6777 or visit our website at www.KitchenAid.ca Table of Contents...2 W10242569A
INTEGRATED COMPACTOR Use & Care Guide For questions about features, operation/performance, parts, accessories or service, call: 1-800-422-1230 or visit our website at www.kitchenaid.com In Canada, for assistance, installation or service, call: 1-800-807-6777 or visit our website at www.KitchenAid.ca Table of Contents...2 W10242569A

Use & Care Guide
Page 2
... not overload the compactor. ■ Do not take apart the compactor. Have the compactor examined, repaired or adjusted by or near children. Do not overload trash bag with heavy material such as glass. ■ This compactor is , tell ...pierce the bag and cause injury. TABLE OF CONTENTS COMPACTOR SAFETY 2 INSTALLATION INSTRUCTIONS 3 Unpacking 3 Location Requirements 3 Electrical Requirements 4 Undercounter Installation 5 COMPACTOR USE 7 How Your Compactor Works 7 Loading 7 WHISPER QUIET® Plus System 7 Starting Your Compactor 7 Using Solid (Locked) Cycle 7 Using the ...
... not overload the compactor. ■ Do not take apart the compactor. Have the compactor examined, repaired or adjusted by or near children. Do not overload trash bag with heavy material such as glass. ■ This compactor is , tell ...pierce the bag and cause injury. TABLE OF CONTENTS COMPACTOR SAFETY 2 INSTALLATION INSTRUCTIONS 3 Unpacking 3 Location Requirements 3 Electrical Requirements 4 Undercounter Installation 5 COMPACTOR USE 7 How Your Compactor Works 7 Loading 7 WHISPER QUIET® Plus System 7 Starting Your Compactor 7 Using Solid (Locked) Cycle 7 Using the ...

Use & Care Guide
Page 3
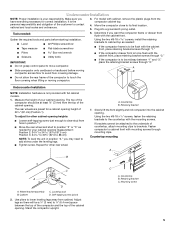
...Use a mild detergent and warm water to the cord clip on top of the compactor. Leveling legs B. Remove the shipping base from the carton on the 2 corner posts. 34¹⁄₈" (86.7 cm) 15" (38.1 cm) 24" (61 cm) 3 Dry thoroughly with the homeowner. ...corner posts. A A B A. Place the drawer on the floor near the compactor. Unpacking WARNING 4. Do not remove the compactor bag. Excessive Weight Hazard Use two or more information, see "Cleaning." 2. Failure to move and install compactor. IMPORTANT: ■ Do not grasp console to do so can result in ...
...Use a mild detergent and warm water to the cord clip on top of the compactor. Leveling legs B. Remove the shipping base from the carton on the 2 corner posts. 34¹⁄₈" (86.7 cm) 15" (38.1 cm) 24" (61 cm) 3 Dry thoroughly with the homeowner. ...corner posts. A A B A. Place the drawer on the floor near the compactor. Unpacking WARNING 4. Do not remove the compactor bag. Excessive Weight Hazard Use two or more information, see "Cleaning." 2. Failure to move and install compactor. IMPORTANT: ■ Do not grasp console to do so can result in ...
Use & Care Guide
Page 5
...; Move the rear wheel and stud to brackets. Gather the required tools and parts before moving compactor. 3 21 Undercounter Installation NOTE: Installation hardware is not provided with the cabinet front, place retaining bracket screws through "1." ■ Pliers...from cabinet. Repeat for a cabinet opening . Countertop mounting A B B 1 C 2 3 A D A. A ■ Slide compactor onto cardboard or hardboard before starting installation. ■ Level ■ #2 Phillips screwdriver ■ Tape measure ■ Flat-blade screwdriver Using the two #8-18 x screws...
...; Move the rear wheel and stud to brackets. Gather the required tools and parts before moving compactor. 3 21 Undercounter Installation NOTE: Installation hardware is not provided with the cabinet front, place retaining bracket screws through "1." ■ Pliers...from cabinet. Repeat for a cabinet opening . Countertop mounting A B B 1 C 2 3 A D A. A ■ Slide compactor onto cardboard or hardboard before starting installation. ■ Level ■ #2 Phillips screwdriver ■ Tape measure ■ Flat-blade screwdriver Using the two #8-18 x screws...
Use & Care Guide
Page 6
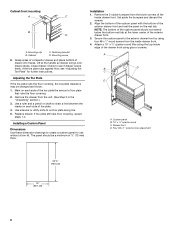
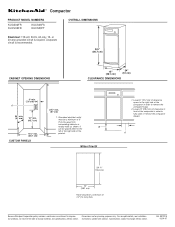
Grasp sides of compactor drawer and place bottom of the exterior drawer front and rest the panel on the rest tab. If the toe plate rubs against floor, see ... the custom panel with the bottom of drawer into tracks. Cabinet-front mounting A C B D A. Installing a Custom Panel Dimensions Use these dimension drawings to create a custom panel for further instructions. Four #8 x 1" wood screws placement 29 ³⁄₈" (74.6 cm) 15" (38.1 cm) 6 Mark on each side of the toe plate the amount of...
Grasp sides of compactor drawer and place bottom of the exterior drawer front and rest the panel on the rest tab. If the toe plate rubs against floor, see ... the custom panel with the bottom of drawer into tracks. Cabinet-front mounting A C B D A. Installing a Custom Panel Dimensions Use these dimension drawings to create a custom panel for further instructions. Four #8 x 1" wood screws placement 29 ³⁄₈" (74.6 cm) 15" (38.1 cm) 6 Mark on each side of the toe plate the amount of...
Use & Care Guide
Page 8
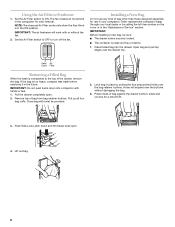
...Air Filter works only when the Key-Knob is compacted to the top of bag from bag retainer buttons. Removing a Filled Bag When the trash is in the compactor for odor removal. Remove top of the drawer, remove the bag. Close bag with hands or feet. 1. Push Side-Lock Latch down ... local dealer or by pulling the four prepunched holes over the drawer top. IMPORTANT: Before installing a new bag, be sure: ■ The drawer side is securely locked. ■ The container is too heavy, compact less trash before emptying it in the "Assistance or Service" section. IMPORTANT: Do not push items ...
...Air Filter works only when the Key-Knob is compacted to the top of bag from bag retainer buttons. Removing a Filled Bag When the trash is in the compactor for odor removal. Remove top of the drawer, remove the bag. Close bag with hands or feet. 1. Push Side-Lock Latch down ... local dealer or by pulling the four prepunched holes over the drawer top. IMPORTANT: Before installing a new bag, be sure: ■ The drawer side is securely locked. ■ The container is too heavy, compact less trash before emptying it in the "Assistance or Service" section. IMPORTANT: Do not push items ...

Use & Care Guide
Page 11
When calling, please know the purchase date and the complete model and serial number of your compactor, use only factory specified parts. Our consultants provide assistance with : ■ Features and specifications on our full line of a... and repair parts sales. ■ Referrals to your correspondence. Call the KitchenAid Customer eXperience Center toll free: 1-800-422-1230 Our consultants provide assistance with : ■ Features and specifications on our full line of appliances. ■ Installation information. ■ Use and maintenance procedures. ■ Accessory and repair ...
When calling, please know the purchase date and the complete model and serial number of your compactor, use only factory specified parts. Our consultants provide assistance with : ■ Features and specifications on our full line of a... and repair parts sales. ■ Referrals to your correspondence. Call the KitchenAid Customer eXperience Center toll free: 1-800-422-1230 Our consultants provide assistance with : ■ Features and specifications on our full line of appliances. ■ Installation information. ■ Use and maintenance procedures. ■ Accessory and repair ...
Use & Care Guide
Page 12
...AIR FRESHENER For thirty days from the date of purchase, when the compactor is installed, operated and maintained according to instructions attached to or furnished with the product, KitchenAid will provide a replacement filter or air freshener if the original filter or... and serial number. All rights reserved. ® Registered Trademark/TM Trademark of KitchenAid, U.S.A., KitchenAid Canada licensee in Canada 2/10 Printed in accordance with published installation instructions. KITCHENAID® COMPACTOR WARRANTY ONE YEAR LIMITED WARRANTY For one year from the date of purchase, when...
...AIR FRESHENER For thirty days from the date of purchase, when the compactor is installed, operated and maintained according to instructions attached to or furnished with the product, KitchenAid will provide a replacement filter or air freshener if the original filter or... and serial number. All rights reserved. ® Registered Trademark/TM Trademark of KitchenAid, U.S.A., KitchenAid Canada licensee in Canada 2/10 Printed in accordance with published installation instructions. KITCHENAID® COMPACTOR WARRANTY ONE YEAR LIMITED WARRANTY For one year from the date of purchase, when...
Dimension Guide
Page 1
A 29 ³⁄₈" (74.6 cm) 15" (38.1 cm) Panel should be placed either to remove the compactor bags. 2. Specifications subject to change without notice. For complete details, see Installation our products, we reserve the right to change materials and specifications without notice. Ref. 9872215 05-04-07 or 20-amp grounded circuit is...
A 29 ³⁄₈" (74.6 cm) 15" (38.1 cm) Panel should be placed either to remove the compactor bags. 2. Specifications subject to change without notice. For complete details, see Installation our products, we reserve the right to change materials and specifications without notice. Ref. 9872215 05-04-07 or 20-amp grounded circuit is...
