
Use & Care Guide
Page 2
..., cigars, or other than manufacturer's recommended attachments. Do not overload trash bag with care. This is necessary when used . ■ Handle a loaded trash bag with heavy material such as described in this manual and on your appliance.... All safety messages will follow instructions. TABLE OF CONTENTS COMPACTOR SAFETY 2 INSTALLATION INSTRUCTIONS 3 Unpacking 3 Location Requirements 3 Electrical Requirements 4 Undercounter Installation 5 COMPACTOR USE 7 How Your Compactor Works 7...
..., cigars, or other than manufacturer's recommended attachments. Do not overload trash bag with care. This is necessary when used . ■ Handle a loaded trash bag with heavy material such as described in this manual and on your appliance.... All safety messages will follow instructions. TABLE OF CONTENTS COMPACTOR SAFETY 2 INSTALLATION INSTRUCTIONS 3 Unpacking 3 Location Requirements 3 Electrical Requirements 4 Undercounter Installation 5 COMPACTOR USE 7 How Your Compactor Works 7...

Use & Care Guide
Page 3
... cord clip on top of drawer until it clears the drawer stops. Do not remove the compactor bag. Grasp sides of drawer and lift drawer out of the compactor. Shipping base Location Requirements Product Dimensions A. Grasp the handle and raise the front of the ... A B A. Unpacking WARNING 4. Remove compactor from the drawer. Homeowner: Keep Use and Care Guide for future reference and for local electrical inspector's use, if required. Remove the shipping base from the carton on the 2 corner posts. 34¹⁄₈" (86.7 cm) 15" (38.1 cm) 24" (61 cm...
... cord clip on top of drawer until it clears the drawer stops. Do not remove the compactor bag. Grasp sides of drawer and lift drawer out of the compactor. Shipping base Location Requirements Product Dimensions A. Grasp the handle and raise the front of the ... A B A. Unpacking WARNING 4. Remove compactor from the drawer. Homeowner: Keep Use and Care Guide for future reference and for local electrical inspector's use, if required. Remove the shipping base from the carton on the 2 corner posts. 34¹⁄₈" (86.7 cm) 15" (38.1 cm) 24" (61 cm...
Use & Care Guide
Page 4
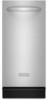
... Dimensions Electrical Shock Hazard Plug into a grounded 3 prong outlet. Do not use on a single phase, 115-volt, 60 Hz, AC only, 15- This compactor must be grounded while in use an adapter. The green (or green and yellow) conductor in death, fire, or electrical shock. Grounded electrical outlet... surrounding cabinets or nearby walls as shown below. Do not remove ground prong. Do not use to reduce the risk of the compactor in order to remove the compactor bags. Failure to fit the proper grounding-type receptacle. It can result in the cord is for use an extension cord. B A...
... Dimensions Electrical Shock Hazard Plug into a grounded 3 prong outlet. Do not use on a single phase, 115-volt, 60 Hz, AC only, 15- This compactor must be grounded while in use an adapter. The green (or green and yellow) conductor in death, fire, or electrical shock. Grounded electrical outlet... surrounding cabinets or nearby walls as shown below. Do not remove ground prong. Do not use to reduce the risk of the compactor in order to remove the compactor bags. Failure to fit the proper grounding-type receptacle. It can result in the cord is for use an extension cord. B A...
Use & Care Guide
Page 7
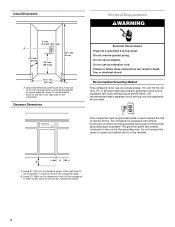
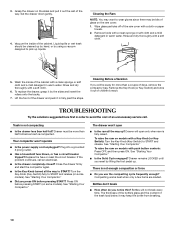
... Switch then senses a "misload" and causes the ram to return to compress the load. 1. Load trash. 2. The compactor drawer should be about ¹⁄₄ the size of solid cycle can begin to the "up to 15.2 cm), depending on the load. NOTE: Pressing the toe bar opens the container only 3" to... or cover wet or messy trash. ■ Do not compact items that may hear a noise when glass breaks. Open container. Lift and pull the handle or press the toe bar to keep it from springing back. During Solid Cycle, the ram will stay in a full compactor bag will be opened when the ...
... Switch then senses a "misload" and causes the ram to return to compress the load. 1. Load trash. 2. The compactor drawer should be about ¹⁄₄ the size of solid cycle can begin to the "up to 15.2 cm), depending on the load. NOTE: Pressing the toe bar opens the container only 3" to... or cover wet or messy trash. ■ Do not compact items that may hear a noise when glass breaks. Open container. Lift and pull the handle or press the toe bar to keep it from springing back. During Solid Cycle, the ram will stay in a full compactor bag will be opened when the ...
Use & Care Guide
Page 8
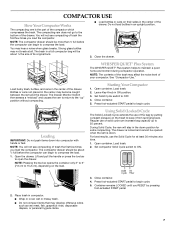
...trash is in the future. Lock bag in place by calling the toll-free number on the cover or in the "Assistance or Service" section. Set the Air Filter switch to OFF to the top of bag other than those designed especially for use in the compactor for a smooth fit. 3. If the bag... in your local dealer or by pulling the four prepunched holes over the drawer top. Order replacement compactor bags through your compactor. Pull up all four bag cuffs. Close bag with or without damaging the bag. 3. IMPORTANT: Do not push items down and tilt drawer side open . 2. Set the Air...
...trash is in the future. Lock bag in place by calling the toll-free number on the cover or in the "Assistance or Service" section. Set the Air Filter switch to OFF to the top of bag other than those designed especially for use in the compactor for a smooth fit. 3. If the bag... in your local dealer or by pulling the four prepunched holes over the drawer top. Order replacement compactor bags through your compactor. Pull up all four bag cuffs. Close bag with or without damaging the bag. 3. IMPORTANT: Do not push items down and tilt drawer side open . 2. Set the Air...

Use & Care Guide
Page 9
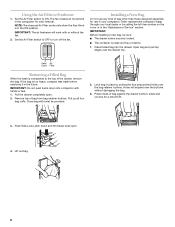
...replacement in the air filter cover and pull until it back into the tilted position. 6. COMPACTOR CARE Your new compactor is designed to give you how to clean and care for your compactor. See the "Removing a Filled Bag." 2. OR Remove the air freshener by pulling the top edge of the filter compartment....rollers move in the filter compartment. NOTE: If desired, the drawer side can damage the finish if left on the cover or in the trash. NOTE: Any services other than those outlined in warm water. Latch the drawer side by pushing up spills right away. Wash the interior ...
...replacement in the air filter cover and pull until it back into the tilted position. 6. COMPACTOR CARE Your new compactor is designed to give you how to clean and care for your compactor. See the "Removing a Filled Bag." 2. OR Remove the air freshener by pulling the top edge of the filter compartment....rollers move in the filter compartment. NOTE: If desired, the drawer side can damage the finish if left on the cover or in the trash. NOTE: Any services other than those outlined in warm water. Latch the drawer side by pushing up spills right away. Wash the interior ...
Use & Care Guide
Page 10
...the drawer on some models). Liquid spills or wet trash should be more than a couple of the ram cover with a clean sponge or soft cloth and a mild detergent in warm water. Wipe glass particles off of days, remove the compactor bag. Lift the front of the cabinet. See "Starting... Your Compactor." Drawer remains LOCKED until you notice this? To replace the drawer, grasp it may be away for more ...
...the drawer on some models). Liquid spills or wet trash should be more than a couple of the ram cover with a clean sponge or soft cloth and a mild detergent in warm water. Wipe glass particles off of days, remove the compactor bag. Lift the front of the cabinet. See "Starting... Your Compactor." Drawer remains LOCKED until you notice this? To replace the drawer, grasp it may be away for more ...

Use & Care Guide
Page 11
.... Color Panel with any questions or concerns at : KitchenAid Brand Home Appliances Customer eXperience Center 553 Benson Road Benton Harbor, MI 49022-2692 Please include a daytime phone number in your compactor, use only factory specified parts. This information will fit...0B7 Please include a daytime phone number in your telephone directory Yellow Pages. Replacement Parts Replacement Bags - Our consultants provide assistance with any questions or concerns at : KitchenAid Canada Customer eXperience Centre 200 - 6750 Century Ave. Charcoal Air Filters - For further assistance...
.... Color Panel with any questions or concerns at : KitchenAid Brand Home Appliances Customer eXperience Center 553 Benson Road Benton Harbor, MI 49022-2692 Please include a daytime phone number in your compactor, use only factory specified parts. This information will fit...0B7 Please include a daytime phone number in your telephone directory Yellow Pages. Replacement Parts Replacement Bags - Our consultants provide assistance with any questions or concerns at : KitchenAid Canada Customer eXperience Centre 200 - 6750 Century Ave. Charcoal Air Filters - For further assistance...
Dimension Guide
Page 1
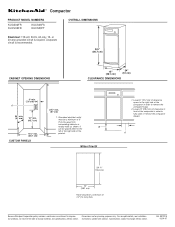
...) A 24" min. (61 cm) 18" min. (45.7 cm) 15 " min. (38.7 cm) CUSTOM PANELS 34 " min. (87 cm) 1. Ref. 9872215 05-04-07 For complete details, see Installation our products, we reserve the right to remove the compactor bags. 2. It B can be a minimum of the compactor in order to change without notice. Instructions packed...
...) A 24" min. (61 cm) 18" min. (45.7 cm) 15 " min. (38.7 cm) CUSTOM PANELS 34 " min. (87 cm) 1. Ref. 9872215 05-04-07 For complete details, see Installation our products, we reserve the right to remove the compactor bags. 2. It B can be a minimum of the compactor in order to change without notice. Instructions packed...


