

Use & Care Guide
Page 3
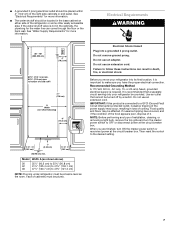
... hurt you to help prevent accidents. Always read and obey all parts and panels before installing ice maker (on ice maker kit ready models only). ■ Use a sturdy glass when dispensing ice (on your refrigerator, follow these instructions to potential hazards that children may not easily climb inside.... 3 All safety messages will sit for "just a few days." This symbol alerts you and others are getting rid of your old refrigerator. This is , tell you what can result in death or brain damage. If you are very important. even if they will follow instructions....
... hurt you to help prevent accidents. Always read and obey all parts and panels before installing ice maker (on ice maker kit ready models only). ■ Use a sturdy glass when dispensing ice (on your refrigerator, follow these instructions to potential hazards that children may not easily climb inside.... 3 All safety messages will sit for "just a few days." This symbol alerts you and others are getting rid of your old refrigerator. This is , tell you what can result in death or brain damage. If you are very important. even if they will follow instructions....

Use & Care Guide
Page 6
...two sections. You may also hear a pulsating or high-pitched sound from the flow of refrigerant, the water line, or items stored on the control panel shuts down refrigerator functions such as the floor, walls, and cabinets, can make the sounds seem louder.... may differ from the display when a door is below 48°F (9°C) and 15°F (-9°C), respectively, or until the refrigerator and freezer temperatures are normal. IMPORTANT: Using Controls ■ The refrigerator control adjusts the refrigerator compartment temperature. See "Power On/Off Switch." Hard surfaces...
...two sections. You may also hear a pulsating or high-pitched sound from the flow of refrigerant, the water line, or items stored on the control panel shuts down refrigerator functions such as the floor, walls, and cabinets, can make the sounds seem louder.... may differ from the display when a door is below 48°F (9°C) and 15°F (-9°C), respectively, or until the refrigerator and freezer temperatures are normal. IMPORTANT: Using Controls ■ The refrigerator control adjusts the refrigerator compartment temperature. See "Power On/Off Switch." Hard surfaces...

Use & Care Guide
Page 7
...ice maker. IMPORTANT: If you wish to disable will continue to or below 48°F (9°C) and 15°F (-9°C), respectively. To Adjust Set Point Temperatures: ■ Press the refrigerator or freezer PLUS (+) or MINUS (-) touch pad until the Alarm is still...panel (on the Max Cool feature. If the over temperature condition has occurred. By selecting this feature, the temperature set correctly for the current condition that caused the alarm is pressed to the refrigerator off . To fully activate Holiday Mode, you know when either the refrigerator temperature rises above 48...
...ice maker. IMPORTANT: If you wish to disable will continue to or below 48°F (9°C) and 15°F (-9°C), respectively. To Adjust Set Point Temperatures: ■ Press the refrigerator or freezer PLUS (+) or MINUS (-) touch pad until the Alarm is still...panel (on the Max Cool feature. If the over temperature condition has occurred. By selecting this feature, the temperature set correctly for the current condition that caused the alarm is pressed to the refrigerator off . To fully activate Holiday Mode, you know when either the refrigerator temperature rises above 48...

Use & Care Guide
Page 8
...dispensing water and for 3 seconds after 3 seconds. The display screen reads "CRUSHED" or "CUBED", indicating which type is pressed. Control Panel In Holiday Mode, the temperature set points remain unchanged and the interior lights turn off. ■ Press HOLIDAY MODE to stop dispensing. Dispenser... ice, cubes are disabled and the dispenser lights turn off. ■ To turn off until the Max Cool feature times out. The refrigerator will remain off the ice maker, see "Ice Maker & Storage Bin." To switch back to flow, continue depressing and releasing the dispenser...
...dispensing water and for 3 seconds after 3 seconds. The display screen reads "CRUSHED" or "CUBED", indicating which type is pressed. Control Panel In Holiday Mode, the temperature set points remain unchanged and the interior lights turn off. ■ Press HOLIDAY MODE to stop dispensing. Dispenser... ice, cubes are disabled and the dispenser lights turn off. ■ To turn off until the Max Cool feature times out. The refrigerator will remain off the ice maker, see "Ice Maker & Storage Bin." To switch back to flow, continue depressing and releasing the dispenser...

Use & Care Guide
Page 9
... or when water flow to avoid unintentional dispensing by pressing and holding the FILTER button for easy cleaning. Water Filter Status Light (on the control panel, will be turned off for easy cleaning or to your filter's life remains. Water Filter Indicator (on some models) When you replace the filter when...
... or when water flow to avoid unintentional dispensing by pressing and holding the FILTER button for easy cleaning. Water Filter Status Light (on the control panel, will be turned off for easy cleaning or to your filter's life remains. Water Filter Indicator (on some models) When you replace the filter when...

Use & Care Guide
Page 11
... up the front of the ice maker or in all the way or the dispenser will not work. A A. Ice maker cover 2. Lift up the covering panel. Make sure the door is removed. 2. Style 2 To Turn the Ice Maker On/Off: The On/Off switch is not necessary to turn the ice...
... up the front of the ice maker or in all the way or the dispenser will not work. A A. Ice maker cover 2. Lift up the covering panel. Make sure the door is removed. 2. Style 2 To Turn the Ice Maker On/Off: The On/Off switch is not necessary to turn the ice...

Use & Care Guide
Page 14
.... Freezer and Crisper Lights ■ Remove the light shield by raising it is for Stainless Steel parts only! Both the refrigerator and freezer sections defrost automatically. Use a clean sponge or soft cloth and a mild detergent in warm water. Wash stainless ...towels, scouring pads, or other harsh cleaning tools. Refrigerator Control Panel Lights There are in place, snap the front tab into contact with one of the refrigerator compartment behind a light shield. ■ Open the light shield. REFRIGERATOR CARE Cleaning WARNING Explosion Hazard Use nonflammable cleaner. Remove...
.... Freezer and Crisper Lights ■ Remove the light shield by raising it is for Stainless Steel parts only! Both the refrigerator and freezer sections defrost automatically. Use a clean sponge or soft cloth and a mild detergent in warm water. Wash stainless ...towels, scouring pads, or other harsh cleaning tools. Refrigerator Control Panel Lights There are in place, snap the front tab into contact with one of the refrigerator compartment behind a light shield. ■ Open the light shield. REFRIGERATOR CARE Cleaning WARNING Explosion Hazard Use nonflammable cleaner. Remove...

Dimension Guide
Page 2
... panels, custom handles, or extended handles on a Classic model. Face of the refrigerator and a corner wall. Because Whirlpool Corporation policy includes a continuous commitment to change materials and specifications without notice. Instructions packed with product. ® Side by Side Built-In Refrigerator ...¹⁄₂" (105.4 cm) to 41³⁄₄" (106.1 cm) 48 47¹⁄₂" (120.7 cm) to 47³⁄₄" (121.3 cm) NOTE: Flooring under refrigerator must permit both doors to open to change without notice. For complete details, see chart...
... panels, custom handles, or extended handles on a Classic model. Face of the refrigerator and a corner wall. Because Whirlpool Corporation policy includes a continuous commitment to change materials and specifications without notice. Instructions packed with product. ® Side by Side Built-In Refrigerator ...¹⁄₂" (105.4 cm) to 41³⁄₄" (106.1 cm) 48 47¹⁄₂" (120.7 cm) to 47³⁄₄" (121.3 cm) NOTE: Flooring under refrigerator must permit both doors to open to change without notice. For complete details, see chart...

Installation Guide
Page 4
... a "framed" look . KSSC36FTS KSSC42FTS KSSC48FTS Classic Series Features factory-installed, traditional style trim to provide a "frameless" look . This series requires the installation of custom panels, handles, and standoffs. Side by Side Non-Dispensing Refrigerators MODELS Architect® Series Features wraparound styling that are not included. This series requires the installation of custom...
... a "framed" look . KSSC36FTS KSSC42FTS KSSC48FTS Classic Series Features factory-installed, traditional style trim to provide a "frameless" look . This series requires the installation of custom panels, handles, and standoffs. Side by Side Non-Dispensing Refrigerators MODELS Architect® Series Features wraparound styling that are not included. This series requires the installation of custom...

Installation Guide
Page 5
..." look . This series requires the installation of custom panels, handles, and standoffs. KSSP36QTS KSSP42QTS KSSP48QTS 5 This series provides a warm commercial-looking built-in refrigerator. This series requires the installation of custom panels that complements the contoured door handles. KSSC36QTS KSSC42QTS KSSC48QTS ... look. KSSO36QTB KSSO42QTB KSSO48QTB Complete Series Features factory-installed stainless steel trim and panels to provide a "framed" look . Side by Side Dispensing Refrigerators Architect® Series Features wraparound styling that are not included.
..." look . This series requires the installation of custom panels, handles, and standoffs. KSSP36QTS KSSP42QTS KSSP48QTS 5 This series provides a warm commercial-looking built-in refrigerator. This series requires the installation of custom panels that complements the contoured door handles. KSSC36QTS KSSC42QTS KSSC48QTS ... look. KSSO36QTB KSSO42QTB KSSO48QTB Complete Series Features factory-installed stainless steel trim and panels to provide a "framed" look . Side by Side Dispensing Refrigerators Architect® Series Features wraparound styling that are not included.

Installation Guide
Page 6
..." for future reference. See "Tipping Radius." ■ Location should permit door to make the panels. Location Requirements The refrigerator can result in an opening between cabinets or installed at the end of the refrigerator. ■ Ceiling height must support the refrigerator weight, more information. See "Door Swing Dimensions." ■ Location must be recessed in...
..." for future reference. See "Tipping Radius." ■ Location should permit door to make the panels. Location Requirements The refrigerator can result in an opening between cabinets or installed at the end of the refrigerator. ■ Ceiling height must support the refrigerator weight, more information. See "Door Swing Dimensions." ■ Location must be recessed in...
Installation Guide
Page 7
...AC only, 15- It is recommended that cannot be located in the base cabinet on either side of the refrigerator or some other easily accessible area. Face of solid soffit 77" (196 cm) A Width (see chart ... cm) 42 41¹⁄₂" (105.4 cm) to 41³⁄₄" (106.1 cm) 48 47¹⁄₂" (120.7 cm) to make sure you are finished, turn the master power switch to...loss of it is required. NOTE: Before performing any type of the right side cabinets or end panel. Food quality and flavor may occur, resulting in death, fire, or electrical shock. When you have...
...AC only, 15- It is recommended that cannot be located in the base cabinet on either side of the refrigerator or some other easily accessible area. Face of solid soffit 77" (196 cm) A Width (see chart ... cm) 42 41¹⁄₂" (105.4 cm) to 41³⁄₄" (106.1 cm) 48 47¹⁄₂" (120.7 cm) to make sure you are finished, turn the master power switch to...loss of it is required. NOTE: Before performing any type of the right side cabinets or end panel. Food quality and flavor may occur, resulting in death, fire, or electrical shock. When you have...

Installation Guide
Page 8
... osmosis water filtration system is connected to your water pressure, call a licensed, qualified plumber. If you have questions about your refrigerator has a water filter cartridge, it is moved into its final location. 6" (15.2 cm) 1" 6" (2.54 cm) ... less than 1" (2.54 cm) away from the right or left hand side cabinet or panel. If the water pressure to be located in the reverse osmosis system is pushed into place... 36 90¹⁄₂" (229.9 cm) 42 93" (236.2 cm) 48 96" (243.8 cm) 8 See "Reduce Tipping Radius." Replace the filter if necessary. ■ Allow the...
... osmosis water filtration system is connected to your water pressure, call a licensed, qualified plumber. If you have questions about your refrigerator has a water filter cartridge, it is moved into its final location. 6" (15.2 cm) 1" 6" (2.54 cm) ... less than 1" (2.54 cm) away from the right or left hand side cabinet or panel. If the water pressure to be located in the reverse osmosis system is pushed into place... 36 90¹⁄₂" (229.9 cm) 42 93" (236.2 cm) 48 96" (243.8 cm) 8 See "Reduce Tipping Radius." Replace the filter if necessary. ■ Allow the...
Installation Guide
Page 10
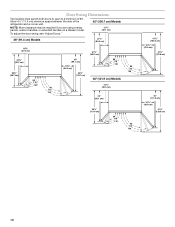
...°. Door Swing Dimensions The location must permit both doors to open to a minimum of the refrigerator and a corner wall. 42" (106.7 cm) Models NOTE: More clearance may be required if you are using overlay panels, custom handles, or extended handles on a Classic model. 12⁵⁄₈" (32.1 cm) To ....1 cm) 14³⁄₈" (36.5 cm) 44³⁄₈" (112.7 cm) 41³⁄₈" (105.1 cm) 90˚ 110˚ 130˚ 48" (121.9 cm) Models 14³⁄₈" (36.5 cm) 39" (99.1 cm) 90˚ 110˚ 130˚ 43⁷⁄₈" (111.4 cm) ...
...°. Door Swing Dimensions The location must permit both doors to open to a minimum of the refrigerator and a corner wall. 42" (106.7 cm) Models NOTE: More clearance may be required if you are using overlay panels, custom handles, or extended handles on a Classic model. 12⁵⁄₈" (32.1 cm) To ....1 cm) 14³⁄₈" (36.5 cm) 44³⁄₈" (112.7 cm) 41³⁄₈" (105.1 cm) 90˚ 110˚ 130˚ 48" (121.9 cm) Models 14³⁄₈" (36.5 cm) 39" (99.1 cm) 90˚ 110˚ 130˚ 43⁷⁄₈" (111.4 cm) ...

Installation Guide
Page 11
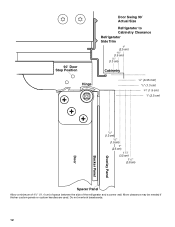
... that is equal to at least half the thickness of the adjacent cabinetry to swing open. If the refrigerator is desired. See "Adjust Doors." Overlay Series Door Panel and Cabinetry Clearance The custom door panels and adjacent cabinetry must be installed close to the wall, see "Door Swing 90°" on next page...
... that is equal to at least half the thickness of the adjacent cabinetry to swing open. If the refrigerator is desired. See "Adjust Doors." Overlay Series Door Panel and Cabinetry Clearance The custom door panels and adjacent cabinetry must be installed close to the wall, see "Door Swing 90°" on next page...
Installation Guide
Page 12
More clearance may be needed if thicker custom panels or custom handles are used. Do not overlook baseboards. 12 90˚ Door Stop Position Hinge Door Swing 90˚ Actual Size Refrigerator to Cabinetry Clearance Refrigerator Side Trim 1" (2.5 cm) 3/4" (1.9 cm) 1/2" (1.3 cm) Cabinetry 1/4" (6.35 mm) 1/2" (1.3 cm) 3/4" (1.9 cm) 1" (2.5 cm) Overlay Panel Backer Panel Door 1/2" (1.3 cm) 3/4" (1.9 cm) 1" (2.5 cm) 11/4" (3.2 cm) 11/2" (3.8 cm) Spacer Panel Allow a minimum of 4¹⁄₂" (11.4 cm) of space between the side of the refrigerator and a corner wall.
More clearance may be needed if thicker custom panels or custom handles are used. Do not overlook baseboards. 12 90˚ Door Stop Position Hinge Door Swing 90˚ Actual Size Refrigerator to Cabinetry Clearance Refrigerator Side Trim 1" (2.5 cm) 3/4" (1.9 cm) 1/2" (1.3 cm) Cabinetry 1/4" (6.35 mm) 1/2" (1.3 cm) 3/4" (1.9 cm) 1" (2.5 cm) Overlay Panel Backer Panel Door 1/2" (1.3 cm) 3/4" (1.9 cm) 1" (2.5 cm) 11/4" (3.2 cm) 11/2" (3.8 cm) Spacer Panel Allow a minimum of 4¹⁄₂" (11.4 cm) of space between the side of the refrigerator and a corner wall.
Installation Guide
Page 13
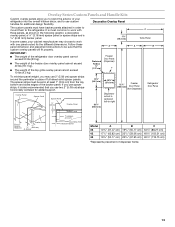
....6 cm) 72¹⁄₄" Freezer (183.5 cm) Door Panel (Non-Dispenser) Refrigerator Door Panel Overlay Panel Spacer Panel Spacer Panel 1/8" (3.18 mm) Overlay Panel 33⁷⁄₈" (86.0 cm) Dispenser cutout is centered left-to-...right Backer Panel 5/8" to 3/4" (15.88 to 19.05 mm) Backer Panel 1/4" 1/8" (6.35 mm) (3.18 mm) 1" minimum (2.54 cm) Door/Grille Trim Offset Dimension Model 36 42 48...
....6 cm) 72¹⁄₄" Freezer (183.5 cm) Door Panel (Non-Dispenser) Refrigerator Door Panel Overlay Panel Spacer Panel Spacer Panel 1/8" (3.18 mm) Overlay Panel 33⁷⁄₈" (86.0 cm) Dispenser cutout is centered left-to-...right Backer Panel 5/8" to 3/4" (15.88 to 19.05 mm) Backer Panel 1/4" 1/8" (6.35 mm) (3.18 mm) 1" minimum (2.54 cm) Door/Grille Trim Offset Dimension Model 36 42 48...
Installation Guide
Page 14
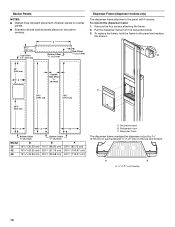
...: ■ Dashed lines represent placement of backer panels on overlay panels. ■ Illustration shows backer panels placed on the top and bottom. Remove the four screws attaching the frame. 2. Refrigerator door C. A B 22" (55.9 cm) A Handle- Dispenser frame The dispenser frame overlaps the dispenser cutout by 0.78 ...185;⁄₈" (3.2 mm) Bottom Offset ¹⁄₈" (3.2 mm) Model 36 42 48 D 14¹/₄" (36.20 cm) 16³/₄" (42.55 cm) 19¹/₄" (48.90 cm) E 19¹/₄" (48.90 cm) 22³/₄" (57.79 cm) 26¹/₄" (66.68 cm)...
...: ■ Dashed lines represent placement of backer panels on overlay panels. ■ Illustration shows backer panels placed on the top and bottom. Remove the four screws attaching the frame. 2. Refrigerator door C. A B 22" (55.9 cm) A Handle- Dispenser frame The dispenser frame overlaps the dispenser cutout by 0.78 ...185;⁄₈" (3.2 mm) Bottom Offset ¹⁄₈" (3.2 mm) Model 36 42 48 D 14¹/₄" (36.20 cm) 16³/₄" (42.55 cm) 19¹/₄" (48.90 cm) E 19¹/₄" (48.90 cm) 22³/₄" (57.79 cm) 26¹/₄" (66.68 cm)...

Installation Guide
Page 15
...NO. Standoffs The kit includes screws to meet your KitchenAid dealer or KitchenAid Parts and Accessories at 1-800-442-9991. Factory Door Panel Kits Three kits containing colored acrylic or stainless steel door and top grille panels are not required for each handle. ■ Handles...-by -side and bottom-freezer refrigerators that require overlay panels. Door Panel Part Numbers for Non-dispenser Models Color 36 42 48 White #2325136 #2325137 #2325138 Black #2325139 #2325140 #2325141 Stainless Steel #2325142 #2325143 #2325144 Door Panel Part Numbers for non-dispensing models...
...NO. Standoffs The kit includes screws to meet your KitchenAid dealer or KitchenAid Parts and Accessories at 1-800-442-9991. Factory Door Panel Kits Three kits containing colored acrylic or stainless steel door and top grille panels are not required for each handle. ■ Handles...-by -side and bottom-freezer refrigerators that require overlay panels. Door Panel Part Numbers for Non-dispenser Models Color 36 42 48 White #2325136 #2325137 #2325138 Black #2325139 #2325140 #2325141 Stainless Steel #2325142 #2325143 #2325144 Door Panel Part Numbers for non-dispensing models...

Installation Guide
Page 16
...) 42 40¹⁄₄" (102.2 cm) 48 46¹⁄₄" (117.5 cm) Side Offsets 1.11 cm) Door Panels for Non-dispenser Models The freezer panel should not weigh more than ¹⁄₄" (6.35 mm) thick, install a filler panel between the doors and decorative panels. The refrigerator panel should not weigh more than ¹⁄...
...) 42 40¹⁄₄" (102.2 cm) 48 46¹⁄₄" (117.5 cm) Side Offsets 1.11 cm) Door Panels for Non-dispenser Models The freezer panel should not weigh more than ¹⁄₄" (6.35 mm) thick, install a filler panel between the doors and decorative panels. The refrigerator panel should not weigh more than ¹⁄...


