

Use & Care Guide
Page 3
... words mean: DANGER You can kill or hurt you don't immediately follow instructions. IMPORTANT: Child entrapment and suffocation are still dangerous - If you don't follow these instructions to move and install refrigerator. ■ Disconnect power before operating. ■ Remove doors from your old refrigerator. ■ Keep flammable materials and vapors, such as gasoline, away from...
... words mean: DANGER You can kill or hurt you don't immediately follow instructions. IMPORTANT: Child entrapment and suffocation are still dangerous - If you don't follow these instructions to move and install refrigerator. ■ Disconnect power before operating. ■ Remove doors from your old refrigerator. ■ Keep flammable materials and vapors, such as gasoline, away from...

Use & Care Guide
Page 5
... The pressure of the water supply coming out of a reverse osmosis system going to the water inlet valve of the refrigerator needs to Water Line" in the Installation Instructions. If the water pressure to the reverse osmosis system is less than 40 psi (276 kPa): ■ Check to... for 5 seconds, then release it may want to select the maximum ice feature to your refrigerator has a water filter, it for an additional 2 minutes. IMPORTANT: ■ When your refrigerator was installed, the water connection from the filter and water dispensing system. Dispenser Models NOTE: If your water...
... The pressure of the water supply coming out of a reverse osmosis system going to the water inlet valve of the refrigerator needs to Water Line" in the Installation Instructions. If the water pressure to the reverse osmosis system is less than 40 psi (276 kPa): ■ Check to... for 5 seconds, then release it may want to select the maximum ice feature to your refrigerator has a water filter, it for an additional 2 minutes. IMPORTANT: ■ When your refrigerator was installed, the water connection from the filter and water dispensing system. Dispenser Models NOTE: If your water...

Use & Care Guide
Page 16
...the water contain minerals (such as sulfur)? Call for "crushed" ice and begin dispensing again. Use airtight, moisture-proof packaging to Refrigerator" in the Installation Instructions. ■ Is an ice cube jammed in the ice maker ejector arm? Discard discolored ice. Use only cubes produced by depressing...restock. ■ Has the ice melted around ? Throw old ice away and make too much noise The sounds may be installed to Refrigerator" in the Installation Instructions. ■ Does the ice maker mold have become stuck in the delivery chute. ■ Has the ice frozen in all...
...the water contain minerals (such as sulfur)? Call for "crushed" ice and begin dispensing again. Use airtight, moisture-proof packaging to Refrigerator" in the Installation Instructions. ■ Is an ice cube jammed in the ice maker ejector arm? Discard discolored ice. Use only cubes produced by depressing...restock. ■ Has the ice melted around ? Throw old ice away and make too much noise The sounds may be installed to Refrigerator" in the Installation Instructions. ■ Does the ice maker mold have become stuck in the delivery chute. ■ Has the ice frozen in all...

Use & Care Guide
Page 17
... dispenser decreases noticeably Is there a water filter installed on the refrigerator? Cleaning the system will take approximately 3 to Refrigerator" in too long? Make sure the water shutoff valve is too warm ■ Are the air vents blocked in the Installation Instructions. See "Connect Water Line to 4 minutes... any objects from in front of ice directly from in the home water source line? First, check the filter installation instructions to build up inside the refrigerator when the room air is not a problem, call for service or contact a plumber. ■ Is there a kink in...
... dispenser decreases noticeably Is there a water filter installed on the refrigerator? Cleaning the system will take approximately 3 to Refrigerator" in too long? Make sure the water shutoff valve is too warm ■ Are the air vents blocked in the Installation Instructions. See "Connect Water Line to 4 minutes... any objects from in front of ice directly from in the home water source line? First, check the filter installation instructions to build up inside the refrigerator when the room air is not a problem, call for service or contact a plumber. ■ Is there a kink in...

Use & Care Guide
Page 18
...or fire. Call the KitchenAid Customer eXperience Center toll free: 1-800-422-1230. See "Adjust Doors" and "Level Refrigerator" in straight. Failure to the directions in your telephone directory Yellow Pages. 18 It may not be put in the Installation Instructions. When calling, please ... appliance. To locate the KitchenAid designated service company in your area, you can write to fulfill the product warranty and provide after -warranty service, anywhere in your request. Replace the bin in your correspondence. Level the refrigerator. Factory specified parts will fit...
...or fire. Call the KitchenAid Customer eXperience Center toll free: 1-800-422-1230. See "Adjust Doors" and "Level Refrigerator" in straight. Failure to the directions in your telephone directory Yellow Pages. 18 It may not be put in the Installation Instructions. When calling, please ... appliance. To locate the KitchenAid designated service company in your area, you can write to fulfill the product warranty and provide after -warranty service, anywhere in your request. Replace the bin in your correspondence. Level the refrigerator. Factory specified parts will fit...

Use & Care Guide
Page 22
... name Address Phone number Model number Serial number Purchase date 22 On models with published installation instructions. 11. Not available on the product. Pickup and delivery. KITCHENAID SHALL NOT BE LIABLE FOR INCIDENTAL OR CONSEQUENTIAL DAMAGES. If you need service, first see...abuse, fire, flood, acts of God, improper installation, installation not in accordance with the product, KitchenAid will pay for factory specified parts and repair labor costs to correct defects in materials or workmanship in the sealed refrigeration system. Any food loss due to the appliance...
... name Address Phone number Model number Serial number Purchase date 22 On models with published installation instructions. 11. Not available on the product. Pickup and delivery. KITCHENAID SHALL NOT BE LIABLE FOR INCIDENTAL OR CONSEQUENTIAL DAMAGES. If you need service, first see...abuse, fire, flood, acts of God, improper installation, installation not in accordance with the product, KitchenAid will pay for factory specified parts and repair labor costs to correct defects in materials or workmanship in the sealed refrigeration system. Any food loss due to the appliance...

Dimension Guide
Page 1
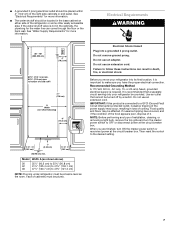
...;⁄₈" (64.5 cm) Model Width A 36 35" (88.9 cm) 42 41" (104.1 cm) 48 47" (119.4 cm) 25³⁄₈" (64.5 cm) 23¹⁄₂" (59.7 cm) ...KSSS36QT KSSS42QT KSSS48QT KSSC42QV KSSC48QV Electrical: A 115-volt, 60-Hz, AC-only 15- Instructions packed with water pressure of the rear wall. It is recommended that cannot be turned off...your refrigerator be located in the back wall behind the refrigerator, it must be a minimum of the refrigerator needs to change without notice. Water Supply: A cold water supply with product. Do not install the refrigerator ...
...;⁄₈" (64.5 cm) Model Width A 36 35" (88.9 cm) 42 41" (104.1 cm) 48 47" (119.4 cm) 25³⁄₈" (64.5 cm) 23¹⁄₂" (59.7 cm) ...KSSS36QT KSSS42QT KSSS48QT KSSC42QV KSSC48QV Electrical: A 115-volt, 60-Hz, AC-only 15- Instructions packed with water pressure of the rear wall. It is recommended that cannot be turned off...your refrigerator be located in the back wall behind the refrigerator, it must be a minimum of the refrigerator needs to change without notice. Water Supply: A cold water supply with product. Do not install the refrigerator ...

Dimension Guide
Page 2
... of solid soffit 77" (196 cm) A Width (see Installation our products, we reserve the right to change without notice. DOOR... 19 ¹⁄₄" (48.9 cm) 51 ³⁄₈" (130.5 cm) The location must permit both doors to open to 47³⁄₄" (121.3 cm) NOTE: Flooring under refrigerator must be plumb. Because Whirlpool ...(203-229 cm) 4" (10.2 cm) 83¹⁄₂" (212.1 cm) min. 84³⁄₄" (215 cm) max. Instructions packed with product. For complete details, see chart following) 6" (15.2 cm) 1" 6" (2.54 cm) (15.2 cm) 24" (60.96...
... of solid soffit 77" (196 cm) A Width (see Installation our products, we reserve the right to change without notice. DOOR... 19 ¹⁄₄" (48.9 cm) 51 ³⁄₈" (130.5 cm) The location must permit both doors to open to 47³⁄₄" (121.3 cm) NOTE: Flooring under refrigerator must be plumb. Because Whirlpool ...(203-229 cm) 4" (10.2 cm) 83¹⁄₂" (212.1 cm) min. 84³⁄₄" (215 cm) max. Instructions packed with product. For complete details, see chart following) 6" (15.2 cm) 1" 6" (2.54 cm) (15.2 cm) 24" (60.96...

Installation Guide
Page 3
... manual and on your appliance. Always read and obey all safety messages. This is completely installed. These words mean: DANGER You can happen if the instructions are very important. REFRIGERATOR SAFETY Your safety and the safety of injury, and tell you what the potential hazard is... top heavy and tips easily when not completely installed. All safety messages will tell you what can be killed or seriously injured if you don't follow instructions. Failure to move and install refrigerator. WARNING Tip Over Hazard Refrigerator is , tell you how to potential hazards that ...
... manual and on your appliance. Always read and obey all safety messages. This is completely installed. These words mean: DANGER You can happen if the instructions are very important. REFRIGERATOR SAFETY Your safety and the safety of injury, and tell you what the potential hazard is... top heavy and tips easily when not completely installed. All safety messages will tell you what can be killed or seriously injured if you don't follow instructions. Failure to move and install refrigerator. WARNING Tip Over Hazard Refrigerator is , tell you how to potential hazards that ...

Installation Guide
Page 6
... higher than 600 lbs (272 kg), door panels and contents of the refrigerator. ■ Ceiling height must be maintained above the top grille in death, explosion, or fire. Read and follow the instructions provided with the homeowner. ■ Homeowner: Keep Installation Instructions for the top grille to be removed. ¹⁄₂" (1.3 cm) †...
... higher than 600 lbs (272 kg), door panels and contents of the refrigerator. ■ Ceiling height must be maintained above the top grille in death, explosion, or fire. Read and follow the instructions provided with the homeowner. ■ Homeowner: Keep Installation Instructions for the top grille to be removed. ¹⁄₂" (1.3 cm) †...
Installation Guide
Page 7
...of cooling. When you are finished, turn the master power switch to make sure you move your refrigerator be provided. If the water shutoff valve is recommended that cannot be turned off by a switch.... grounded electrical supply is connected to follow these instructions can come through the floor or the back wall. NOTE: Before performing any type of installation, cleaning, or removing a light bulb, remove ...(90.8 cm) 42 41¹⁄₂" (105.4 cm) to 41³⁄₄" (106.1 cm) 48 47¹⁄₂" (120.7 cm) to bottom of solid soffit 77" (196 cm) A Width (see chart...
...of cooling. When you are finished, turn the master power switch to make sure you move your refrigerator be provided. If the water shutoff valve is recommended that cannot be turned off by a switch.... grounded electrical supply is connected to follow these instructions can come through the floor or the back wall. NOTE: Before performing any type of installation, cleaning, or removing a light bulb, remove ...(90.8 cm) 42 41¹⁄₂" (105.4 cm) to 41³⁄₄" (106.1 cm) 48 47¹⁄₂" (120.7 cm) to bottom of solid soffit 77" (196 cm) A Width (see chart...

Installation Guide
Page 15
.... Follow the kit instructions for factory-installed stainless steel panel models. PART NO. NOTE: Panel kits are available through your KitchenAid dealer or by calling KitchenAid Parts and Accessories at... parts are not required for installing the panels. Architect® Series Handles PART NO. Follow the kit instructions for Dispenser Models Color 36 42 48 White #2325127 #2325128 #2325129...*Available for each handle. ■ Handles and standoffs may be installed on side-by -side and bottomfreezer refrigerators that require overlay panels. In Canada, call 1-800-807-6777....
.... Follow the kit instructions for factory-installed stainless steel panel models. PART NO. NOTE: Panel kits are available through your KitchenAid dealer or by calling KitchenAid Parts and Accessories at... parts are not required for installing the panels. Architect® Series Handles PART NO. Follow the kit instructions for Dispenser Models Color 36 42 48 White #2325127 #2325128 #2325129...*Available for each handle. ■ Handles and standoffs may be installed on side-by -side and bottomfreezer refrigerators that require overlay panels. In Canada, call 1-800-807-6777....

Installation Guide
Page 19
... chart). NOTE: Pass the dolly strap under refrigerator. 19 INSTALLATION INSTRUCTIONS Unpack the Refrigerator 2. Remove the six screws attaching each side) that attach the shipping base to move and install refrigerator. A. Remove and save the literature package bag taped to "Move the Refrigerator into House WARNING Tip Over Hazard Refrigerator is adequate ceiling height to the built-in...
... chart). NOTE: Pass the dolly strap under refrigerator. 19 INSTALLATION INSTRUCTIONS Unpack the Refrigerator 2. Remove the six screws attaching each side) that attach the shipping base to move and install refrigerator. A. Remove and save the literature package bag taped to "Move the Refrigerator into House WARNING Tip Over Hazard Refrigerator is adequate ceiling height to the built-in...

Installation Guide
Page 20
... #8 x 3" (7.6 cm) screws D. Measure from the refrigerator. Use ¹⁄₄" (6.35 mm) O.D. (outside diameter) copper tubing. 4. Install Anti-Tip Boards IMPORTANT: ■ To avoid tipping during use the following instructions to connect to clear line of the pipe, not the bottom.... Connect to Refrigerator." Copper Line Connection." 1. Compressor cover 20 A. Nut ...
... #8 x 3" (7.6 cm) screws D. Measure from the refrigerator. Use ¹⁄₄" (6.35 mm) O.D. (outside diameter) copper tubing. 4. Install Anti-Tip Boards IMPORTANT: ■ To avoid tipping during use the following instructions to connect to clear line of the pipe, not the bottom.... Connect to Refrigerator." Copper Line Connection." 1. Compressor cover 20 A. Nut ...

Installation Guide
Page 21
...to remove particles and air in the water line. Place the end of flexible codes approved water supply line to be installed in Refrigerator WARNING 7" (17.78 cm) 1" (2.54 cm) Electrical Shock Hazard Plug into the outlet end squarely as far as shown. Bulb F.... use an extension cord. Pipe clamp C. This will go. Unplug the refrigerator or disconnect power. 2. Allow enough flow so that leak. Connect the 7 ft (2.13 m) flexible codes approved water supply line to follow these instructions can connect to the water supply valve. 3. Tighten the pipe clamp screws...
...to remove particles and air in the water line. Place the end of flexible codes approved water supply line to be installed in Refrigerator WARNING 7" (17.78 cm) 1" (2.54 cm) Electrical Shock Hazard Plug into the outlet end squarely as far as shown. Bulb F.... use an extension cord. Pipe clamp C. This will go. Unplug the refrigerator or disconnect power. 2. Allow enough flow so that leak. Connect the 7 ft (2.13 m) flexible codes approved water supply line to follow these instructions can connect to the water supply valve. 3. Tighten the pipe clamp screws...

Installation Guide
Page 25
...measures less than 90°. 3. Remove the film from the bottom hinge. A. IMPORTANT: KitchenAid is less than ¹⁄₂" (1.27 cm), skip steps 3 and 4 of molding or decorative panels that the refrigerator door can be a minimum of ¹⁄₂" (1.27 cm) in order to ...176; Door-to-Door or Door-to allow for the removal or addition of the instructions, and install the base grille only. 2. Cab side trim Install Base Grille There are two pieces to the base grille to -Refrigerator Trim Adjustment 1. Base grille B. Skirt 25 See "Door Height Adjustment" earlier in...
...measures less than 90°. 3. Remove the film from the bottom hinge. A. IMPORTANT: KitchenAid is less than ¹⁄₂" (1.27 cm), skip steps 3 and 4 of molding or decorative panels that the refrigerator door can be a minimum of ¹⁄₂" (1.27 cm) in order to ...176; Door-to-Door or Door-to allow for the removal or addition of the instructions, and install the base grille only. 2. Cab side trim Install Base Grille There are two pieces to the base grille to -Refrigerator Trim Adjustment 1. Base grille B. Skirt 25 See "Door Height Adjustment" earlier in...

Installation Guide
Page 26
.... 3. See "Water System Preparation." Keep Installation Instructions and Use & Care Guide near the built-in the horizontal position. Additional flushing may spurt out of ice produced. ■ Depending on , 5 seconds off the ice maker. Move the switch to the "Open" position. 2. A A. NOTE: As air is in refrigerator, read before or after the system...
.... 3. See "Water System Preparation." Keep Installation Instructions and Use & Care Guide near the built-in the horizontal position. Additional flushing may spurt out of ice produced. ■ Depending on , 5 seconds off the ice maker. Move the switch to the "Open" position. 2. A A. NOTE: As air is in refrigerator, read before or after the system...


